There are two kinds of people in autumn: the ones who carefully plan a cozy seasonal dessert table, and the ones who buy candy corn at 9:47 p.m. and call it “a theme.” Good news: DIY Fall Tree Cupcakes work beautifully for both. They look impressive, taste like sweater weather, and require no pastry school diploma, no edible gold leaf, and absolutely no emotional support rolling pin.
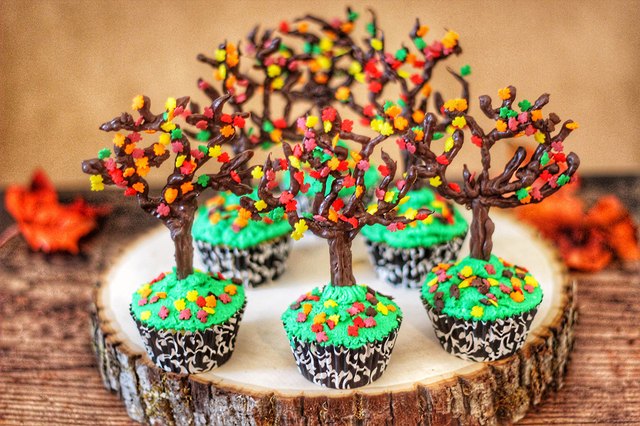
These fall tree cupcakes are soft cupcakes topped with buttercream “forest floors,” pretzel trunks, colorful candy-melt leaves, and tiny autumn details that make guests say, “Wait, you made these?” The best part is that the design is flexible. You can start with vanilla cupcakes, chocolate cupcakes, pumpkin spice cupcakes, apple cinnamon cupcakes, or even boxed cake mix if your oven and your calendar are not currently on speaking terms.
This guide walks you through the recipe, decorating method, make-ahead tips, flavor variations, common mistakes, and party-friendly presentation ideas. Whether you are making Thanksgiving cupcakes, harvest party desserts, classroom treats, or a cozy weekend baking project, these edible fall trees bring a little crunch, color, and cheerful chaos to the table.
What Are DIY Fall Tree Cupcakes?
DIY Fall Tree Cupcakes are autumn-themed cupcakes decorated to look like miniature trees. The cupcake becomes the ground, the frosting becomes grass, leaves, or soil, and a pretzel stick or chocolate-covered pretzel becomes the tree trunk. The branches and foliage can be made with melted candy wafers, buttercream leaves, fondant cutouts, sprinkles, crushed cookies, or small candies in fall colors.
The design is inspired by classic cupcake decorating techniques: piping, candy melting, layering textures, and using small edible decorations for visual storytelling. Instead of a plain swirl of frosting, each cupcake becomes a tiny fall landscape. Imagine a cupcake orchard, but one you can eat before anyone asks you to rake it.
Why These Cupcakes Are Perfect for Fall
Fall baking is all about warm flavors, cozy colors, and desserts that look like they belong next to a mug of cider. These cupcakes check every box. They are easy to customize, simple enough for beginners, and charming enough for Thanksgiving dessert tables, bake sales, Halloween parties, Friendsgiving, harvest festivals, and weekend baking with kids.
The visual appeal comes from classic autumn colors: burnt orange, golden yellow, deep red, chocolate brown, caramel, moss green, and cream. The flavor can lean sweet and simple with vanilla buttercream or go full autumn parade with pumpkin spice, maple frosting, cinnamon sugar, caramel drizzle, and toasted pecans.
Another reason they work so well is portion control. A full decorated cake can be dramatic, but it also requires slicing, plates, forks, and at least one person who claims they only want “a sliver” and then somehow receives one-third of the cake. Cupcakes are self-contained, easy to serve, and ideal for parties.
Ingredients for DIY Fall Tree Cupcakes
For the Cupcakes
- 1 1/2 cups all-purpose flour or cake flour
- 1 1/2 teaspoons baking powder
- 1/4 teaspoon baking soda
- 1/2 teaspoon salt
- 1 teaspoon ground cinnamon
- 1/4 teaspoon nutmeg
- 1/2 cup unsalted butter, softened
- 3/4 cup granulated sugar
- 2 large eggs, room temperature
- 1/2 cup milk or buttermilk, room temperature
- 1 teaspoon vanilla extract
- Optional: 1/3 cup pumpkin puree or applesauce for a seasonal twist
For the Buttercream Frosting
- 1 cup unsalted butter, softened
- 3 to 4 cups powdered sugar
- 2 tablespoons milk or heavy cream
- 1 teaspoon vanilla extract
- Pinch of salt
- Gel food coloring in green, orange, yellow, red, and brown
For the Fall Tree Decorations
- Pretzel sticks or pretzel rods for tree trunks
- Brown, orange, yellow, red, and green candy melts
- Leaf sprinkles or fall-colored sanding sugar
- Mini chocolate chips or crushed chocolate cookies for “soil”
- Optional: caramel drizzle, chopped pecans, edible glitter, or fondant leaves
Tools You Will Need
You do not need a professional bakery setup. A muffin pan, cupcake liners, mixing bowls, a hand mixer or stand mixer, piping bags, parchment paper, and a few piping tips will do the job. A small offset spatula is helpful for spreading frosting, but a butter knife can also step in heroically.
For the tree decorations, use a microwave-safe bowl for melting candy wafers and a zip-top bag or piping bag for drawing branches. If you do not own piping tips, do not panic. Snipping a tiny corner from a plastic bag can create thin lines for branches and leaf shapes. It may not make you feel like a television pastry chef, but it works.
Step-by-Step Recipe: How to Make DIY Fall Tree Cupcakes
Step 1: Bake the Cupcakes
Preheat the oven to 350°F. Line a standard 12-cup muffin pan with cupcake liners. In a bowl, whisk together the flour, baking powder, baking soda, salt, cinnamon, and nutmeg. In a separate bowl, beat softened butter and sugar until light and fluffy. This step matters because creaming butter and sugar adds air, which helps create a tender cupcake instead of a tiny seasonal doorstop.
Add the eggs one at a time, mixing just until combined. Stir in the vanilla. Add the dry ingredients in batches, alternating with the milk or buttermilk. Mix gently and stop when the batter is smooth. Overmixing can make cupcakes dense, so resist the urge to keep beating the batter while contemplating your life choices.
Fill each cupcake liner about two-thirds full. This gives the cupcakes room to rise without overflowing into mushroom-shaped drama. Bake for 15 to 20 minutes, or until a toothpick inserted into the center comes out clean. Let the cupcakes cool completely before frosting. Warm cupcakes melt frosting, and melted frosting leads to what professionals call “a delicious landslide.”
Step 2: Make the Buttercream
Beat softened butter until creamy. Add powdered sugar gradually, mixing on low speed at first so your kitchen does not become a powdered sugar snow globe. Add vanilla, salt, and milk or cream. Beat until fluffy and spreadable. If the frosting is too thick, add a small splash of milk. If it is too thin, add more powdered sugar.
Divide the frosting into small bowls and tint each portion with gel food coloring. Use green for grass, brown for tree bark or soil, orange and yellow for leaves, and red for dramatic autumn flair. Gel coloring is ideal because it adds bold color without thinning the frosting too much.
Step 3: Make Candy-Melt Tree Tops
Line a baking sheet with parchment paper. Arrange pretzel sticks on the parchment, leaving space between each one. Melt candy wafers according to package directions, stirring until smooth. Spoon the melted candy into a piping bag or zip-top bag and snip a small corner.
Pipe branches over the top half of each pretzel stick. Then pipe small dots, zigzags, or leafy clusters in orange, red, yellow, and green. The shape does not have to be perfect. Real trees are not symmetrical either, and nobody accuses them of poor piping technique.
While the candy is still wet, add leaf sprinkles or sanding sugar for texture. Let the trees harden completely at room temperature or chill them briefly in the refrigerator. Once set, gently peel them from the parchment.
Step 4: Frost the Cupcakes
Spread or pipe a layer of green or brown frosting onto each cooled cupcake. Green creates a grassy look, while brown frosting topped with crushed cookies gives the effect of autumn soil. For a more dramatic design, swirl green and brown together so the cupcake looks like a woodland floor after a windy afternoon.
You can also pipe small buttercream leaves around the edge using a leaf tip. No leaf tip? Use a small round tip or snipped bag and make little dots or teardrops. The cupcakes will still look festive, and your guests will be too busy eating to audit your nozzle collection.
Step 5: Add the Fall Trees
Insert one candy-melt pretzel tree into the center or back of each cupcake. Press gently so the trunk stands upright. If the tree feels wobbly, add a little mound of frosting at the base for support. Scatter extra leaf sprinkles, crushed cookies, mini chocolate chips, or chopped nuts around the tree to create a fallen-leaf effect.
For a Thanksgiving dessert table, place the cupcakes on a wooden board or cake stand and surround them with cinnamon sticks, mini pumpkins, or faux leaves. Just make sure decorative items are clearly not edible. There is always one enthusiastic uncle who might test the boundaries.
Flavor Variations for Fall Tree Cupcakes
Pumpkin Spice Fall Tree Cupcakes
Add pumpkin puree, cinnamon, ginger, nutmeg, and cloves to the cupcake batter. Pair with cream cheese frosting or maple buttercream. Pumpkin cupcakes are moist, fragrant, and basically autumn wearing a cupcake liner.
Apple Cinnamon Cupcakes
Fold finely diced apples into the batter and add a touch of cinnamon. Top with caramel buttercream or vanilla frosting. A small caramel drizzle over the finished cupcake makes the tree look like it grew in a very fancy orchard.
Chocolate Woodland Cupcakes
Use chocolate cupcakes, chocolate frosting, pretzel trees, and crushed chocolate cookies. This version has a cozy forest-floor look and a deeper flavor. Add orange and yellow candy leaves for contrast.
Maple Pecan Cupcakes
Add maple extract or real maple syrup to the frosting and sprinkle chopped toasted pecans around the base of each tree. The flavor is rich, nutty, and perfect for Thanksgiving or fall birthday parties.
Decorating Ideas for Different Skill Levels
Beginner Version
Use boxed cake mix, canned frosting, pretzel sticks, and store-bought leaf sprinkles. Frost the cupcakes, add a pretzel trunk, and scatter fall sprinkles around the top. This version is fast, cute, and ideal for school events or last-minute party desserts.
Intermediate Version
Make homemade cupcakes and buttercream, then pipe candy-melt trees on parchment paper. Use two or three colors of candy melts for leaves. Add cookie crumbs for soil and a few buttercream dots for extra texture.
Advanced Version
Create multi-layered tree toppers with shaded candy leaves, hand-piped buttercream grass, fondant pumpkins, and edible gold dust. This version is perfect for dessert tables, photography, and anyone who owns more piping tips than socks.
Common Mistakes and How to Avoid Them
Using Warm Cupcakes
Always cool cupcakes completely before decorating. Even slightly warm cupcakes can soften buttercream and cause candy trees to slide sideways. Unless you are intentionally creating “windstorm cupcakes,” patience is your friend.
Overfilling the Liners
Fill liners about two-thirds full. Too much batter can overflow, creating uneven tops that are harder to decorate. A cookie scoop helps keep portions consistent.
Melting Candy Too Aggressively
Candy melts can become thick or clumpy if overheated. Melt them slowly, stir often, and use short microwave intervals. If needed, add a tiny amount of shortening or candy-melt thinning aid to improve the texture.
Making Trees Too Thin
Thin candy branches are pretty but fragile. Pipe the branches thick enough to hold together after they set. If a few break, call them “fallen branches” and place them artistically on the frosting. Baking is mostly confidence with snacks.
Make-Ahead and Storage Tips
You can bake the cupcakes one day ahead and store them in an airtight container at room temperature if they are unfrosted and do not contain perishable fillings. Candy-melt trees can also be made ahead and stored in a cool, dry place between sheets of parchment paper.
Buttercream can be prepared ahead and refrigerated. Let it soften at room temperature, then re-whip before using. If you use cream cheese frosting, keep the cupcakes refrigerated and avoid leaving them out for long periods, especially in warm rooms. For the freshest texture, add delicate candy trees shortly before serving.
If you need to transport the cupcakes, place them in a cupcake carrier or deep container. Insert the trees after arrival if possible. Pretzel trees are charming, but they are not built for off-road travel, sudden braking, or the emotional intensity of a school parking lot.
Serving Ideas for Parties and Holidays
DIY Fall Tree Cupcakes look beautiful on a rustic dessert board. Arrange them in rows like a mini forest, or place them in a circle around a pumpkin centerpiece. For Thanksgiving, add small labels with flavor names such as “Maple Grove,” “Pumpkin Patch,” or “Chocolate Forest.” For Halloween, use darker colors and add candy eyes near the base of the trees for a spooky woodland vibe.
For kids’ parties, set up a cupcake decorating station. Provide plain frosted cupcakes, pretzel trunks, leaf sprinkles, candy melts, crushed cookies, and mini candies. Children love building their own edible trees, and adults love any activity that keeps little hands busy for more than seven seconds.
Experience Notes: What I Learned Making DIY Fall Tree Cupcakes
The first thing you learn when making DIY Fall Tree Cupcakes is that autumn colors are very forgiving. Orange, red, yellow, brown, and green naturally look good together because nature already did the design work. Even when a candy-melt branch comes out crooked, it still looks like a real tree. In fact, the slightly messy trees often look more charming than the perfect ones. A forest with identical trees would be suspicious anyway.
One of the best experiences with this project is how relaxed it feels compared with decorating a large cake. Cupcakes are small, low-pressure canvases. If one looks odd, you can fix it with more frosting, add sprinkles, or quietly eat the evidence. This makes the project especially good for families, beginner bakers, and anyone who wants a festive dessert without turning the kitchen into a competitive baking arena.
The candy-melt trees are the most fun part, but they also teach patience. If the candy is too hot, it may run too thin. If it is too cool, it may clog the bag. The sweet spot is smooth, pipeable, and thick enough to hold a branch shape. Working with parchment paper helps because you can pipe several trees at once and choose the strongest ones later. Making a few extras is smart because at least one tree will break, and another may mysteriously disappear into someone’s mouth.
Flavor pairing also matters. Vanilla cupcakes are easy and crowd-friendly, but pumpkin spice or apple cinnamon makes the whole dessert feel more seasonal. Chocolate cupcakes create a beautiful contrast with bright fall leaves, while maple buttercream adds a cozy, almost pancake-breakfast sweetness. A pinch of salt in the frosting keeps the cupcakes from tasting overly sweet, which is important when candy melts and sprinkles join the party.
Another useful lesson is to decorate in stages. Bake the cupcakes first. Make the candy trees while they cool. Prepare the frosting after the trees have set. Then assemble everything close to serving time. This workflow keeps the decorations crisp and prevents the pretzels from softening too quickly. It also makes the project feel manageable instead of like a dessert marathon with frosting on your elbows.
For presentation, simple is usually best. A white platter, wooden board, or neutral cake stand lets the fall colors shine. Too many decorations around the cupcakes can make the table look cluttered. A few mini pumpkins, cinnamon sticks, or paper leaves are enough. The cupcakes already have personality; they do not need a full Broadway set.
Most importantly, DIY Fall Tree Cupcakes are memorable because they invite people to smile before they even take a bite. They are playful, seasonal, and a little whimsical. They remind guests that homemade desserts do not have to be flawless to be delightful. Sometimes the best treat is a cupcake with a leaning pretzel tree, a frosting leaf stuck to the side, and a baker proudly saying, “Yes, that one survived a storm.”
Conclusion
DIY Fall Tree Cupcakes are the kind of dessert that makes autumn feel instantly more festive. They combine soft cupcakes, creamy frosting, crunchy pretzels, colorful candy leaves, and enough seasonal charm to make a dessert table look planned even if the rest of dinner is still negotiating with the oven.
The recipe is easy to adapt for beginners or experienced decorators. You can keep it simple with boxed cake mix and sprinkles, or go all out with homemade pumpkin spice cupcakes, maple buttercream, and detailed candy-melt trees. Either way, the result is fun, edible, and perfect for fall gatherings, Thanksgiving parties, school events, bake sales, or cozy weekends at home.
Best of all, these cupcakes prove that seasonal baking does not need to be complicated. With a few smart techniques and a playful attitude, you can turn ordinary cupcakes into a tiny autumn forest. And unlike real fall leaves, these are much more enjoyable to clean up.