Note: This article is original, publish-ready content synthesized from current U.S. home improvement, paint, and small-bath design guidance. No source links or citation placeholders are embedded in the article body.
A half bath is the tiny room in the house that quietly dreams of being dramatic. It does not need a shower, a soaking tub, or a floor plan large enough to host a yoga class. It just needs a sink, a toilet, decent lighting, and one clever design idea that makes guests say, “Wait, this bathroom is adorable.” That is where a cute striped wall update for a half bath comes in.
Striped walls are one of the easiest ways to give a powder room personality without committing to a full renovation. Paint can change the room faster than a contractor can say “change order,” and stripes bring pattern, rhythm, and charm to a small space. Whether you love soft cottage stripes, bold black-and-white lines, cheerful coastal colors, or barely-there tone-on-tone bands, a striped wall can turn a plain half bath into a polished little jewel box.
The best part? This project is affordable, beginner-friendly, and surprisingly forgiving once you understand the right prep, paint finish, stripe width, color balance, and layout. A half bath may be small, but with the right striped wall design, it can carry more style than rooms three times its size.
Why Stripes Work So Well in a Half Bath
A half bath is the perfect place to try a design idea that might feel too bold in a living room or bedroom. Since people use the room briefly, a playful wall treatment feels exciting instead of overwhelming. Stripes are especially useful because they can visually reshape a compact space.
Vertical stripes can make the ceiling feel taller, which is helpful in older homes or small powder rooms that feel a little boxed in. Horizontal stripes can make a narrow wall feel wider, especially when the colors are soft and the lines are evenly spaced. Thin stripes create a tailored look, while wide stripes feel modern and relaxed. In other words, stripes are not just decoration. They are tiny optical illusions wearing cute shoes.
Unlike wallpaper, painted stripes are easy to customize. You choose the exact colors, width, direction, and mood. If you already have a white vanity, brass mirror, vintage tile, dark floor, or patterned hand towel you love, your stripe colors can be chosen to tie those pieces together. That is what makes a striped wall update feel intentional rather than random.
Choosing the Best Wall for Stripes
Before grabbing painter’s tape like a weekend warrior with caffeine, decide where the stripes should go. In a half bath, the best wall is usually the one guests see first when they open the door. This could be the wall behind the vanity, the wall behind the toilet, or a blank side wall that needs a little attention.
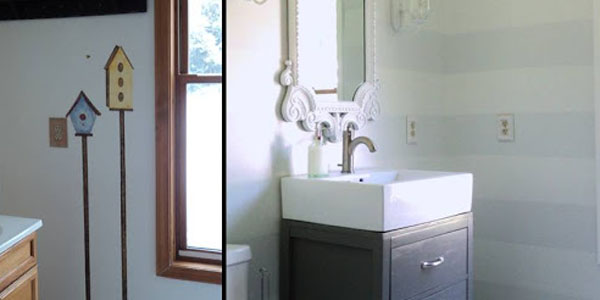
The vanity wall is often the most effective choice because the mirror, faucet, sconces, and sink naturally frame the stripes. This creates a finished focal point without adding clutter. If the toilet wall is the main sightline, stripes can still work beautifully, especially with framed art or a small shelf layered on top.
For very small powder rooms, avoid striping every wall unless the colors are extremely soft. A full-room stripe treatment can be charming, but high-contrast stripes on all four walls may feel dizzying. Nobody wants guests leaving the bathroom looking like they just stepped off a carnival ride.
Picking a Cute Stripe Style
Soft Cottage Stripes
For a cozy, welcoming half bath, try cream and warm beige, pale blue and white, soft sage and ivory, or blush and off-white. These combinations feel sweet without looking childish. They work especially well with beadboard, vintage mirrors, woven baskets, oil-rubbed bronze hardware, or antique-style lighting.
Classic Black-and-White Stripes
Black-and-white stripes are crisp, confident, and timeless. They pair well with chrome, brass, marble-look counters, white pedestal sinks, and graphic floor tile. To keep the look cute rather than severe, soften the space with a rounded mirror, a small plant, warm wood accents, or art with a little humor.
Coastal Blue Stripes
Blue stripes are a natural fit for bathrooms because blue suggests freshness, water, sky, and calm. Navy and white feel nautical, powder blue and cream feel airy, and blue-gray with white feels polished. Add a rope-framed mirror or woven shade if you want coastal charm, but stop before the room starts auditioning to become a seafood restaurant.
Tone-on-Tone Stripes
If you want texture without drama, choose two shades from the same color family. For example, use warm white with ivory, pale gray with soft greige, or sage with a slightly lighter green. Tone-on-tone stripes are great for small bathrooms because they add movement while keeping the space calm.
Playful Color Stripes
A half bath is one of the safest rooms for a little color mischief. Coral and white, mustard and cream, mint and ivory, or lavender and pale gray can all work when balanced with simple fixtures. The trick is to let one color be the star and keep everything else quieter. In design, as in group projects, too many stars can cause chaos.
How Wide Should Bathroom Stripes Be?
Stripe width matters more than people think. Narrow stripes can look elegant, but too many thin lines in a small room may feel busy. Very wide stripes feel bold and modern, but if the wall is short, you may only get a few bands, which can look accidental. For most half baths, stripes between four and twelve inches wide tend to work well.
A balanced approach is to measure the wall and divide it into equal sections. If your wall is 96 inches tall and you want vertical stripes, eight-inch stripes create a clean repeat. If the math gets awkward, adjust slightly so the first and last stripe look intentional. A stripe plan should feel designed, not like the wall lost a bet with a measuring tape.
For horizontal stripes, consider where the sink, mirror, towel ring, and light fixtures land. You do not want a dark stripe awkwardly slicing through the middle of the mirror or making the towel ring look like it is wearing a belt. Sketch the wall first, even if your drawing skills peaked in third grade. A rough plan prevents weird surprises.
Best Paint Finish for a Half Bath
Bathrooms need paint that can handle moisture, splashes, fingerprints, and occasional mystery smudges. Even though a half bath does not have shower steam, it still benefits from durable paint. Satin and semi-gloss finishes are common choices because they are easier to wipe clean. Some modern bathroom-specific matte paints are also designed to resist moisture and mildew while giving a softer, more elegant finish.
For stripes, using the same sheen for both colors usually creates the most even look. If you use different sheens, the stripes may show more contrast because light reflects differently. That can be a cool effect if planned, but it can also look like one stripe is showing off while the other forgot to moisturize.
Trim, doors, and baseboards typically look best in a more durable finish, such as semi-gloss. Wall stripes can be satin, eggshell, or bathroom-rated matte depending on your preferred look and the room’s ventilation.
Tools You Need for a Clean Striped Wall
A cute striped wall update does not require fancy equipment, but it does require patience. Gather painter’s tape, a level, measuring tape, pencil, drop cloth, angled brush, small roller, paint tray, wall cleaner, spackle, sanding sponge, and a plastic card or putty knife for sealing tape edges.
Painter’s tape is the star of this project. Use a quality tape designed for clean lines, especially if your wall has texture. Cheap tape may save a few dollars, but it can cost you several emotional years when paint bleeds underneath. Press the tape firmly along the edge, and seal it with a plastic card before painting.
Step-by-Step: How to Paint Stripes in a Half Bath
Step 1: Clean and Prep the Wall
Half baths collect dust, hand soap residue, and general life evidence. Wipe the wall with a mild cleaner and let it dry completely. Patch nail holes, sand rough spots, and remove switch plates or outlet covers. If the wall is glossy or uneven, a primer may help the paint adhere better.
Step 2: Paint the Base Color
Paint the entire wall with the lighter stripe color first. Let it dry fully before taping. This is important because tape can pull up paint that has not cured enough. Waiting is boring, yes, but so is repainting the same wall because impatience got bossy.
Step 3: Measure and Mark the Stripes
Start measuring from the least noticeable corner or edge. Use a level to mark straight lines. For vertical stripes, check each line from top to bottom. For horizontal stripes, measure from the ceiling or baseboard consistently. Old homes often have walls that are not perfectly square, so trust the level more than your eyeballs.
Step 4: Tape Outside the Paint Lines
Place tape just outside the stripe area you plan to paint. Mark the sections that will stay the base color with small pieces of tape so you do not accidentally paint the wrong stripe. This sounds silly until you are standing in a tiny bathroom holding a roller and questioning every decision you have ever made.
Step 5: Seal the Tape
Press the tape edge firmly with a plastic card or putty knife. For extra-crisp lines, lightly paint the tape edge with the base color first. This helps seal tiny gaps. Once that dries, paint the second stripe color. This little trick can make DIY stripes look much more professional.
Step 6: Paint the Stripes
Use a brush near corners and trim, then roll the center of each stripe. Apply thin coats rather than one heavy coat. Thick paint can seep under tape and create raised edges. Two light coats usually look smoother and cleaner.
Step 7: Remove Tape Carefully
Remove the tape while the paint is still slightly wet, pulling it back at an angle. This helps prevent peeling. If you spot a tiny flaw, wait until the paint dries and touch it up with a small artist brush. Do not panic over one imperfect spot. Most guests are not entering your half bath with a magnifying glass and a clipboard.
Decorating Around a Striped Half Bath Wall
Once the striped wall is finished, the rest of the room should support it. If the stripes are bold, keep accessories simple. Try a plain hand towel, clean-lined mirror, and one small piece of art. If the stripes are subtle, you can add more texture with a woven basket, patterned rug, or decorative soap dispenser.
Lighting matters too. Stripes can look different under warm bulbs, cool bulbs, and natural light. Warm lighting makes creams, beiges, pinks, and greens feel cozy. Cooler lighting can sharpen blues, grays, and whites. Before choosing final colors, test swatches in the room at different times of day.
Hardware is another easy upgrade. Brass adds warmth, matte black adds contrast, chrome feels classic, and brushed nickel keeps things soft and neutral. A new faucet, towel ring, mirror, or light fixture can make painted stripes look like part of a full design plan instead of a weekend impulse.
Small Half Bath Mistakes to Avoid
The first mistake is choosing colors with too much contrast in a room that already has busy flooring, patterned tile, or strong countertops. Stripes should complement the existing finishes, not argue with them in public.
The second mistake is skipping prep. Uneven walls, dust, and loose paint can ruin crisp lines. A small wall does not mean a shortcut wall. In fact, because half baths are compact, mistakes are often easier to notice.
The third mistake is forgetting scale. Tiny stripes in a tiny room can feel frantic. Oversized stripes can look stylish, but they need enough wall space to repeat. Always measure before choosing the final width.
The fourth mistake is adding too much decor afterward. Stripes already bring visual interest. A striped wall plus patterned towels plus a busy rug plus novelty signs can quickly become a tiny design traffic jam. Let the wall breathe.
Budget-Friendly Ideas to Make the Update Feel Bigger
A striped wall is affordable, but a few extra details can make the half bath feel newly renovated. Swap an outdated mirror for a round or arched one. Replace a builder-basic light fixture with a sconce or vanity light that matches your hardware. Add a small framed print, a ceramic tray, or a vase with faux greenery. Change the hand towel to a color that repeats one of the stripe tones.
If the floor feels tired, add a washable rug with a simple texture. If the vanity is dated but still functional, paint it in a color pulled from the stripes. A navy vanity with blue-and-white stripes feels tailored. A sage vanity with cream-and-green stripes feels fresh and organic. A warm wood vanity with beige stripes feels calm and expensive, even if the budget was more “leftover pizza” than “luxury showroom.”
Real-Life Experience: What a Striped Half Bath Update Feels Like
The best thing about updating a half bath with stripes is how quickly the room starts to feel different. In many home projects, there is a long, awkward middle stage where everything looks worse before it looks better. With stripes, the transformation begins the moment the tape goes up. Suddenly, that forgotten little room has a plan.
One common experience is realizing that the bathroom lighting changes everything. A paint color that looked soft and creamy on a sample card may turn yellow under warm bulbs. A pale blue may look fresh in daylight but slightly gray at night. Testing paint directly on the wall is worth the extra step because half baths often have limited natural light. The room may be small, but it has opinions.
Another lesson is that measuring takes longer than painting. Most people imagine the roller as the main event, but the real work is in the layout. Marking each stripe, checking the level, taping the correct side of the line, and pressing down the tape edges all require focus. It is not difficult, but it does reward patience. Put on music, move slowly, and treat the measuring stage like the project’s foundation.
Many DIYers also discover that perfection is not necessary for a beautiful result. A tiny wobble near the baseboard or a small touch-up behind the toilet will not ruin the room. Once the mirror, towel, art, and accessories are back in place, the overall effect matters more than microscopic details. The finished wall feels cheerful, custom, and far more expensive than the cost of paint and tape.
Striped walls also have a fun emotional effect. A plain half bath is easy to ignore, but a striped half bath feels like a little design surprise. Guests notice it. Kids notice it. Even the person who painted it may keep opening the door just to admire the result. This is completely normal behavior and should only be mildly judged.
The update can also build confidence for future projects. Painting stripes teaches useful DIY skills: surface prep, measuring, taping, cutting in, rolling thin coats, and choosing finishes. After finishing one small striped wall, bigger projects feel less intimidating. The half bath becomes a practice room with a very cute final exam.
For homeowners who are nervous about bold design, a half bath is the ideal testing ground. If you love the stripes, you have created a memorable space. If your taste changes later, repainting one small wall is manageable. That flexibility makes this update low-risk and high-reward.
In the end, the striped wall is not just about paint. It is about giving attention to a room that often gets overlooked. A half bath may be small, but it can still feel thoughtful, charming, and personal. With the right colors, clean lines, and a few finishing touches, it becomes proof that even the tiniest room in the house deserves a little style party.
Conclusion
A cute striped wall update for a half bath is one of the smartest ways to add personality without remodeling. It is budget-friendly, customizable, and perfectly suited to small spaces. The key is choosing the right wall, balancing stripe width with room size, using bathroom-friendly paint, and taking the time to prep and tape carefully.
Whether your style is classic, coastal, cottage, modern, or playfully colorful, stripes can make a half bath feel finished and memorable. They create structure, charm, and visual movement while giving the room a custom look. Best of all, this project proves that a small bathroom does not need to be boring. It just needs a good idea, a steady level, and painter’s tape that understands the assignment.