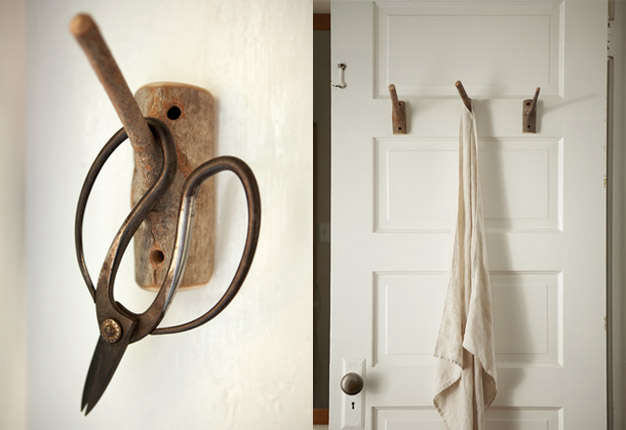
There are two kinds of people in this world: people who buy hooks at the store, and people who look at a fallen branch and think, “You, my woodland friend, are about to become entryway storage.” This article is for the second group.
Rustic hooks from tree branches are one of those rare DIY projects that manage to be practical, affordable, and weirdly charming all at once. They bring texture to a mudroom, warmth to an entryway, and just enough “I might own flannel on purpose” energy to make a space feel more personal. Better yet, they are often made from materials you already have in your yard, a pruning pile, or a stash of branches rescued before they became mulch.
But there is a difference between a gorgeous natural wood hook and a random stick screwed to the wall in a moment of overconfidence. The best rustic tree branch hooks are thoughtfully selected, dried, cleaned, shaped, mounted, and finished so they look intentional and work hard. In other words, you want “handcrafted cabin chic,” not “storm debris with ambition.”
Why Rustic Tree Branch Hooks Work So Well
Great design often comes down to contrast, and branch hooks do that beautifully. Walls are flat. Branches are not. Furniture tends to be clean-lined. Tree limbs have knots, bends, texture, and character built right in. That contrast makes them visually interesting before they even hold a single scarf, tote bag, or dog leash.
They are also versatile. A sturdy branch mounted to a wood backer can become a coat rack in the foyer, a towel holder in the bathroom, a necklace display in the bedroom, or a kitchen organizer for aprons and market bags. If you choose the right branch shape, the natural offshoots can act like ready-made pegs. Nature occasionally shows off like that.
From an SEO and styling perspective, rustic hooks from tree branches also appeal to several popular design themes at once: rustic decor, farmhouse storage, natural wood accents, woodland DIY, cottage style, and sustainable home decorating. That means the project feels timeless rather than trendy-for-five-minutes.
How to Choose the Right Branch
Look for strength first, charm second
A beautiful curve means nothing if the wood is soft, cracked, or crumbly. Start by looking for a branch that feels solid and dry. If you press a fingernail into it and the surface feels punky, spongy, or flaky, keep walking. The best candidates are sound branches with good structure, visible grain, and no obvious rot.
Dense hardwood branches usually perform better than fragile, lightweight branches when you want a hook that will actually hold things. You do not need to become a forest botanist overnight, but you do want wood that feels sturdy in the hand and not suspiciously lightweight for its size.
Fresh-cut green wood is tempting, but patience wins
Fresh wood looks lively and may still have beautiful bark, but green wood contains moisture. As it dries, it can shrink, crack, twist, or loosen around screws. For a decorative branch in a vase, that is charming. For a hook meant to hold a backpack, it is less charming.
If possible, use branches that are already naturally dry or let freshly cut material dry thoroughly before building. Thicker pieces take longer. Smaller branches may dry faster, but they still need time to stabilize.
Smart sources for branches
The best places to find material are your own yard, seasonal pruning leftovers, or branches that came down naturally and are still sound. That approach is practical, inexpensive, and usually gives you wood that already suits your climate. It also keeps the project rooted in real life instead of turning into an expensive quest for the world’s most dramatic twig.
If you are gathering from outside your property, be sure you have permission. Also avoid branches from roadsides that may have been exposed to chemicals or grime, and skip wood that shows obvious insect activity. If you plan to keep bark on the piece, inspect it extra carefully.
Prepping Tree Branches for Hooks
1. Clean the wood
Brush off dirt, loose bark, moss, and anything else that looks like it came with its own ecosystem. A dry scrub brush usually handles the basics. If the branch is grimy, wipe it down lightly and let it dry fully before moving on. You are making home decor, not adopting a habitat.
2. Decide whether to keep the bark
This is where the project’s personality shows up. Bark creates a more rugged, natural look. Stripped wood looks cleaner, lighter, and more refined. Both can be beautiful.
If the bark is loose, flaky, or shedding, remove it. If it is tight, clean, and stable, you can keep it for visual texture. Just remember that bark is usually less predictable than smooth wood, especially in a high-traffic space where coats and bags will rub against it regularly.
3. Let it dry thoroughly
Drying matters more than most beginners expect. If you use a branch before it is ready, you are basically inviting future cracks to the party. For thinner branches, a few weeks in a dry, ventilated indoor space may be enough. Larger pieces can take much longer. A moisture meter is helpful if you want a more confident read before building.
Set branches where air can circulate around them, away from damp areas. If the ends seem prone to splitting, sealing them can help slow moisture loss and reduce dramatic cracking.
4. Sand strategically
You do not need to sand the branch until it looks like a luxury salad bowl. You just want it smooth enough to touch, stable enough for finishing, and free from splinters. Sand with the grain. Start with a medium grit if the wood is rough, then move to a finer grit for a pleasant finish.
If you are keeping the bark, sand only the cut ends and any exposed wood where hands or fabric will make contact. If you stripped the bark, sand the whole piece and pay special attention to high spots, knots, and areas that may snag clothing.
Best Ways to Turn a Branch into a Hook Rack
Option 1: Single branch pegs
Cut several short branch sections with an angled or naturally tapered end. Mount each one individually onto a board or directly onto a wall-mounted backer. This creates a clean, Scandinavian-meets-cabin look and works well in small spaces.
Option 2: One branch, multiple natural hooks
This is the classic approach. Use a branch that has smaller offshoots extending upward or outward. When mounted horizontally, each offshoot becomes a natural hook. It looks organic, sculptural, and just a little smug about how clever it is.
Option 3: Branch on a backer board
If you want the easiest and strongest setup, attach the branch to a wood backer first. Reclaimed wood, a stained board, or a simple painted plank all work. Then mount the entire unit to the wall. This gives the project more structure and makes installation far more secure.
How to Build Rustic Hooks from Tree Branches
Supplies
- Dried branch or several branch sections
- Wood backer board
- Screws long enough for solid attachment
- Drill and drill bits
- Sandpaper in medium and fine grit
- Saw or pruners, depending on branch size
- Wood finish, if desired
- Stud finder and level
Step 1: Plan the layout
Set the branch on the backer board and rotate it until the natural hooks feel balanced. Make sure the offshoots angle upward enough to hold items instead of letting them slide dramatically to the floor like a soap opera exit.
Step 2: Trim and refine
Cut the branch to length and trim off awkward nubs or extra growth that do not help the design. Leave enough character to keep the rustic look, but not so much that the piece starts resembling antlers in a hallway.
Step 3: Drill pilot holes
Branches can split if you drive screws into them without preparation. Pilot holes reduce that risk and make placement more precise. If you are attaching through the back of the board into the branch, mark carefully so the screws hit the strongest parts of the wood.
Step 4: Attach the branch to the board
Secure the branch tightly. Wiggle it a bit before moving on. If it shifts now, it will definitely shift later when someone hangs a tote bag full of mystery items on it.
Step 5: Finish the wood
Apply your chosen finish once the piece is assembled or finish the parts first if that suits your workflow. Let everything cure fully before use, especially if the hooks will touch coats, towels, or fabrics.
Step 6: Mount it properly
This is the step that separates “functional hook rack” from “future drywall repair.” If the hooks will hold coats, bags, or anything with real weight, mount the rack into wall studs or use a French cleat system. Decorative hooks can get away with lighter-duty mounting, but anything hardworking deserves real support.
The Best Finishes for a Natural Look
The right finish depends on the vibe you want. A matte clear sealer keeps the color close to natural while adding protection. An oil finish can deepen the tone and bring out grain beautifully. Wax gives a softer, lower-sheen result but is best for lighter-duty use.
If the hooks will live in a bathroom, laundry room, or busy entryway, choose a more durable protective finish. If they are mainly decorative, you can keep the treatment minimal. Either way, avoid anything overly glossy unless you are specifically going for “forest branch in a tuxedo.”
Styling Ideas for Rustic Branch Hooks
- Entryway: Hang jackets, dog leashes, umbrellas, and woven bags.
- Bathroom: Use smaller branch hooks for hand towels or robes.
- Bedroom: Display hats, scarves, necklaces, or tomorrow’s outfit.
- Kitchen: Hang aprons, oven mitts, or market totes.
- Cabin or porch: Pair with vintage baskets, boots, and weathered wood furniture.
Rustic hooks also play nicely with other natural materials like linen, leather, jute, black metal, stone, and aged brass. If your room already feels a little too polished, a branch hook can add the exact rough-edged balance it needs.
Common Mistakes to Avoid
- Using green wood that is still drying and unstable
- Keeping loose bark that will shed on clothes and floors
- Skipping sanding and ending up with splinters
- Driving screws without pilot holes
- Mounting a heavy-use rack with weak wall anchors
- Using branches that are rotten, buggy, or too thin for the job
The biggest mistake, though, is treating the project like it is too rustic for craftsmanship. Rustic does not mean careless. The most beautiful branch hook racks look easy only because somebody took the time to make them solid.
Are Rustic Hooks from Tree Branches Worth Making?
Absolutely, especially if you want a DIY project that feels both useful and personal. These hooks are inexpensive, customizable, and full of natural character. No two pieces are ever exactly the same, which is part of the appeal. You are not just adding storage. You are adding a small story to the room.
And that is really the magic of this project. A branch that might have been chipped, burned, or forgotten becomes something functional and beautiful. It holds coats after school, towels after showers, or hats on the way out the door. It earns its spot on the wall. Not bad for a piece of wood that started out minding its own business in a backyard.
Extra Field Notes: What the Experience of Making Rustic Branch Hooks Is Really Like
The experience of making rustic hooks from tree branches is different from building with store-bought lumber, and that is exactly why so many people love it. Straight boards from the home center are predictable. A branch is not. A branch has opinions. It twists when you think it should sit flat. It reveals a gorgeous grain pattern where you expected something plain. It makes you stop, rotate it, tilt your head, and suddenly realize the “wrong” side is actually the best side. Working with natural wood like this feels less like forcing a material into submission and more like collaborating with it, which sounds very poetic for a coat hook, but it is true.
There is also a real satisfaction in sourcing the material yourself. Maybe it came from spring pruning in your yard. Maybe it was a fallen limb after a storm. Maybe a neighbor was trimming a tree and you spotted a branch with perfect little offshoots and had the thrillingly specific thought, “That would make an excellent hook rack.” Those moments are part of the project. They make the finished piece feel personal in a way that flat-pack decor rarely does.
The hands-on process is memorable too. You brush away dirt and loose bark. You cut the branch and instantly smell fresh wood. You sand one section and watch it go from rough and forgotten to silky and warm-toned. Even the imperfections become part of the fun. A knot becomes the feature that catches everyone’s eye. A gentle curve turns into the detail that makes the whole piece feel sculptural. Unlike mass-produced hooks, branch hooks look better when they keep a little irregularity. Perfection is not the goal. Personality is.
Of course, the process is not all dreamy forest-cottage magic. Sometimes it is you in the garage covered in sawdust, trying to figure out why a branch that looked perfect outside suddenly seems crooked under indoor lighting. Sometimes a screw placement has to be redone. Sometimes you learn that a branch with gorgeous bark also sheds like an overenthusiastic golden retriever. But even those hiccups become part of the learning curve, and they make the final result feel earned.
Once the rack is mounted, the payoff is immediate. People notice it. Guests ask where you bought it, which is one of the great joys of DIY because you get to casually say, “Oh, I made it from a branch.” It adds warmth that standard hardware rarely can. It also changes how you look at natural materials. After making one, you start noticing shape, grain, and texture everywhere. A trimming pile becomes potential decor. A fallen limb becomes future storage. Your yard begins to look suspiciously like a craft supply aisle.
Most of all, making rustic hooks from tree branches feels grounding. It is a small, useful project with a tactile, natural quality that slows you down in a good way. You are making something functional, but you are also preserving a piece of the outdoors and giving it a second life inside your home. That combination of usefulness, character, and story is what makes the experience stick with people long after the drill is put away and the sawdust is swept up.
Conclusion
Rustic hooks from tree branches are proof that practical storage does not have to be boring. With the right branch, careful prep, proper mounting, and a finish that lets the wood shine, you can create a DIY hook rack that looks custom, feels warm, and works hard. It is affordable, sustainable, and full of character. In a world overflowing with identical decor, that is a pretty good reason to give a humble branch a promotion.

