Painting baseboards with carpet in the room can feel like trying to eat spaghetti while wearing a white shirt: technically possible, but one wrong move and everyone knows what happened. The good news? You do not need to rip out your carpet, hire a magician, or accept fuzzy paint stripes as part of your home’s “character.” With the right prep, a steady brush, and a little patience, you can paint baseboards with carpet neatly and confidently.
This easy guide walks you through the tools, prep work, painting technique, drying time, cleanup, and real-life tricks that help protect carpet while giving your trim a crisp, fresh finish. Whether your baseboards are scuffed, yellowing, dusty, or just begging for a style upgrade, this project is one of the most affordable ways to make a room look cleaner and more finished.
Why Painting Baseboards with Carpet Requires Extra Care
Baseboards sit in the danger zone between walls and flooring. When the floor is carpeted, that danger zone becomes fluffier, thirstier, and much less forgiving. Carpet fibers can trap drips, collect dust, and spring back into wet paint if they are not properly protected. That is why the best method is not simply “paint slowly and hope.” Hope is not a carpet protection strategy.
The goal is to create a clean gap between the baseboard and carpet using tape, a putty knife, and sometimes a paint shield or plastic sheet. Once the carpet is tucked out of the way, you can paint the trim in smooth horizontal strokes without turning your flooring into modern art.
Tools and Supplies You Will Need
Before you open the paint can, gather everything you need. Baseboard painting goes much faster when you are not crawling around the room looking for a missing putty knife with wet paint on your hand.
Basic Supplies
- 2-inch painter’s tape or masking tape
- Plastic drop cloth, canvas drop cloth, or rosin paper
- Flat putty knife or taping knife
- Angled sash brush, usually 1.5 to 2 inches wide
- Fine-grit sanding sponge or 180- to 220-grit sandpaper
- Vacuum with brush attachment
- Microfiber cloth or damp rag
- Wood filler or spackling compound for dents and nail holes
- Paintable caulk for gaps along the top of the baseboard
- Primer, if needed
- Interior trim paint in satin, semi-gloss, or gloss finish
Best Paint Finish for Baseboards
For baseboards, satin and semi-gloss are the most popular choices. Satin gives a softer look and hides minor flaws better, while semi-gloss is more durable and easier to wipe clean. If you have kids, pets, shoes, vacuum bumps, or a mysterious household creature that leaves scuff marks, semi-gloss is usually the safer bet.
Choose a high-quality interior trim paint because baseboards take more abuse than walls. They get kicked, brushed by furniture, attacked by vacuum cleaners, and occasionally judged by houseguests who pretend they are “just looking around.”
Step-by-Step Guide: How to Paint Baseboards with Carpet
Step 1: Clear the Room and Protect the Carpet
Move furniture away from the walls so you have enough space to work. Vacuum the carpet edge near the baseboards to remove dust, pet hair, crumbs, and whatever tiny archaeological discoveries have been living there since 2019.
Lay a drop cloth or plastic sheet over the main carpet area. This protects against accidental spills and gives you a cleaner place to set tools. Leave the edge near the baseboard accessible so you can apply tape properly.
Step 2: Clean the Baseboards
Baseboards collect dust, grime, and oils, especially in hallways and bedrooms. Paint does not stick well to dirty trim, so wipe the baseboards with a damp microfiber cloth. For greasy or heavily soiled areas, use a mild soap-and-water solution, then wipe again with clean water.
Let the trim dry completely before sanding or painting. Painting over damp trim can cause poor adhesion, uneven coverage, and regret. Regret is not sold by the quart, but it spreads fast.
Step 3: Repair Dents, Nail Holes, and Gaps
Inspect the baseboards closely. Fill nail holes, small dents, or chips with wood filler or lightweight spackling compound. Let the filler dry according to the product label, then sand it smooth.
If there is a gap between the top of the baseboard and the wall, apply a thin bead of paintable caulk. Smooth it with a damp finger or caulk tool. Do not caulk the bottom edge where the baseboard meets carpet unless the situation specifically calls for it, because carpet needs room to sit naturally against the trim.
Step 4: Sand for a Smooth Finish
Lightly sand the baseboards with a fine-grit sanding sponge. This step is especially important if the existing trim has a glossy finish. Sanding helps the new paint grip the surface and reduces brush marks.
You do not need to sand down to bare wood. The goal is to dull the surface, smooth rough patches, and make the trim ready for paint. After sanding, vacuum the dust and wipe the baseboards with a tack cloth or slightly damp rag.
Step 5: Tape the Carpet Like a Pro
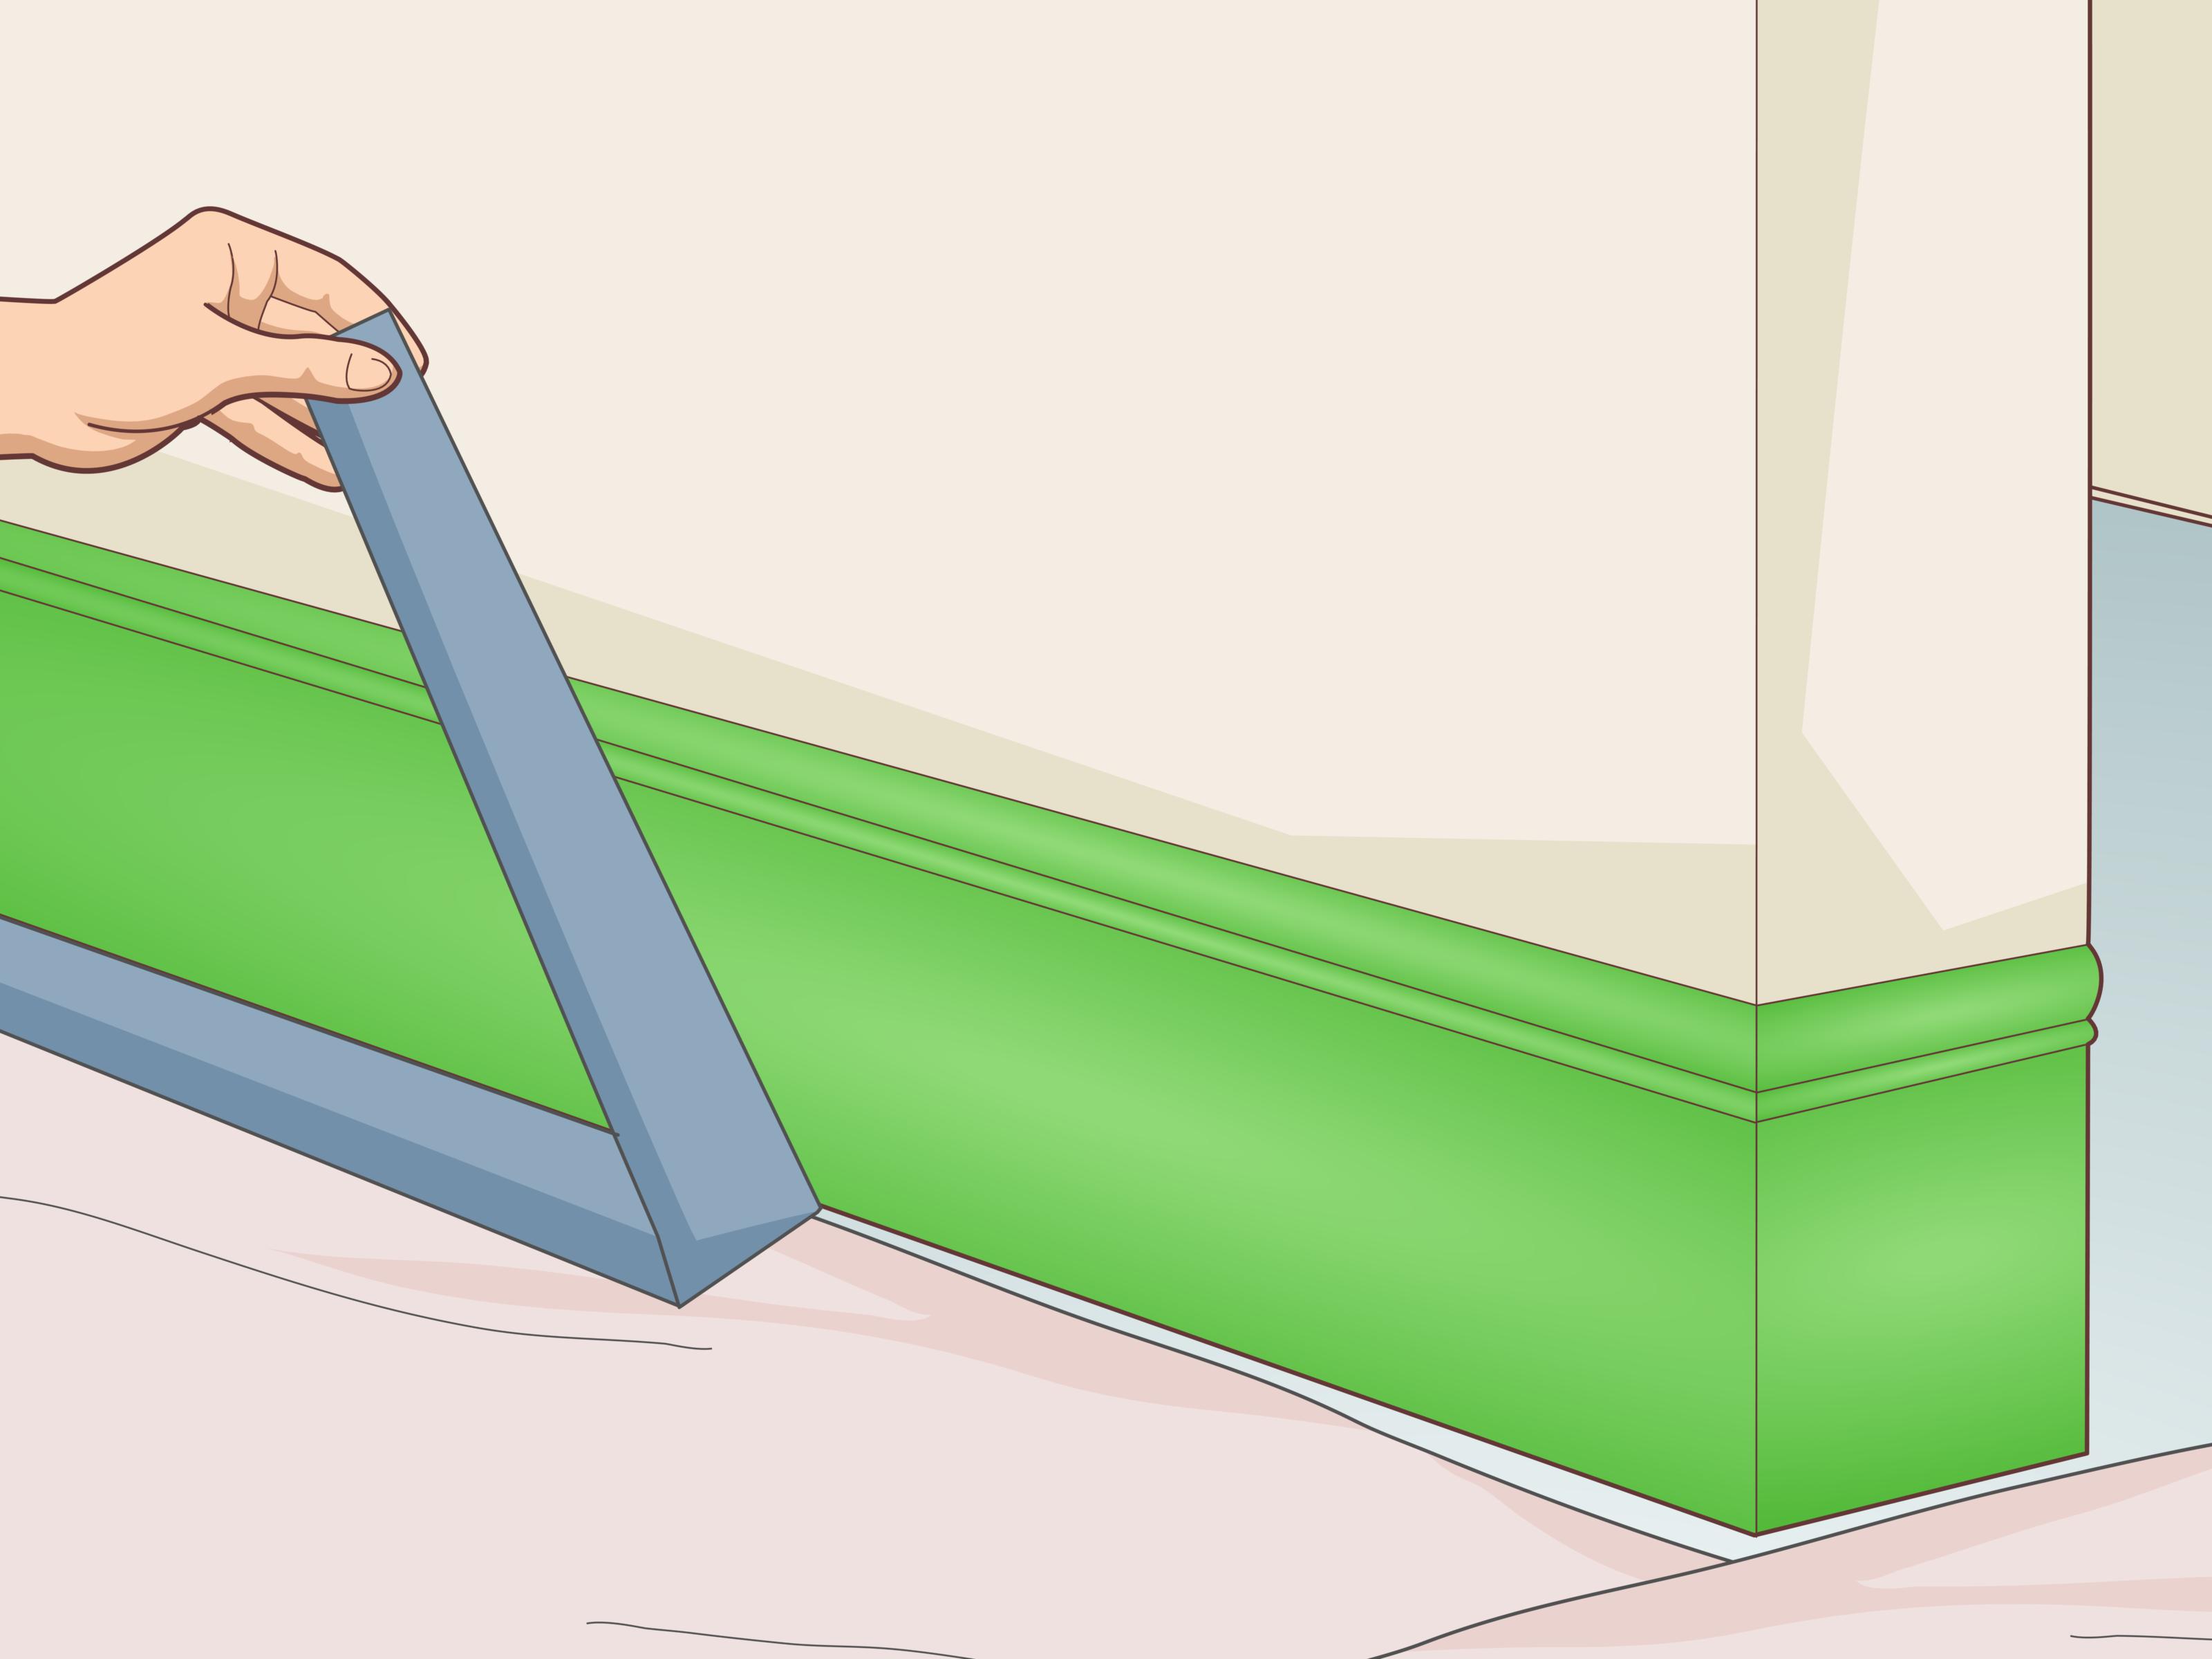
This is the most important step when painting baseboards with carpet. Run a strip of 2-inch tape along the carpet edge, letting about half an inch of tape climb slightly up the baseboard. Then use a flat putty knife to gently push that tape edge down between the carpet and the baseboard.
The tape should tuck the carpet fibers away from the trim, creating a narrow, protected channel. Work slowly around the room. Overlap tape strips slightly so there are no open gaps. For extra protection, add a second strip of tape or plastic sheeting over the carpet next to the first line.
Press the tape firmly, but do not crush the carpet aggressively. You want to hide the fibers, not start a wrestling match with the flooring.
Step 6: Tape the Wall If Needed
If you have a steady hand, you may not need to tape the wall above the baseboard. However, if you are new to trim painting or the wall color contrasts strongly with the trim color, apply painter’s tape along the wall just above the baseboard.
Press the tape edge down with a clean putty knife to reduce paint bleed. For textured walls, tape may not create a perfect seal, so use a light touch with your brush near the top edge.
Step 7: Prime the Baseboards If Necessary
You may need primer if the baseboards are bare wood, stained wood, patched heavily, dark-colored, glossy, or previously painted with an unknown finish. Primer helps block stains, improves adhesion, and creates a consistent surface for the final paint.
Use a quality interior primer and apply a thin coat with an angled brush. Let it dry fully. If the primer feels rough after drying, lightly sand and wipe away dust before painting.
Step 8: Load the Brush Correctly
Dip only the lower third of the brush bristles into the paint. Tap the brush gently against the inside of the can or tray to remove excess. Avoid wiping off too much paint on the rim, because that can leave the brush too dry and streaky.
A brush overloaded with paint is the fastest route to drips. A brush with too little paint creates drag marks. The sweet spot is enough paint to flow smoothly, but not so much that it tries to escape onto your carpet.
Step 9: Paint in Small Sections
Start in a corner and paint along the length of the baseboard in small sections, about one to two feet at a time. Use short strokes to apply the paint, then finish each section with one long, smooth horizontal stroke.
Do not brush up and down. Baseboards look best when brush strokes follow the trim horizontally. Pay attention to grooves, curves, and decorative edges where paint can pool. If you see a drip forming, smooth it right away before it dries into a tiny monument to impatience.
Step 10: Apply a Second Coat
Most baseboards need two coats for a durable, even finish. Let the first coat dry according to the paint manufacturer’s instructions. Lightly sand between coats if the surface feels rough or if dust landed in the paint.
Apply the second coat using the same technique: small sections, controlled brush loading, and long finishing strokes. The second coat is where the trim starts to look polished and intentional instead of “I had a free Saturday and a dream.”
Step 11: Remove the Tape Carefully
Remove the tape when the paint is dry to the touch but not rock-hard, unless the paint label recommends otherwise. Pull the tape back slowly at a 45-degree angle. If paint has bridged over the tape edge, lightly score the edge with a utility knife before pulling.
Do not yank the tape upward like you are starting a lawn mower. Slow, steady removal helps prevent peeling and keeps the carpet edge clean.
Common Mistakes to Avoid
Using Too Much Paint
Too much paint causes drips, brush marks, and carpet disasters. Thin coats are easier to control and usually look better after the second coat.
Skipping the Cleaning Step
Paint over dust and you get dusty paint. Clean trim makes a big difference in adhesion and final appearance.
Forgetting to Tuck the Tape
Simply laying tape on top of carpet is not enough. Carpet fibers can still touch the wet baseboard. Tucking the tape under the trim is the trick that keeps the edge crisp.
Removing Tape Too Late
If the paint fully cures over the tape, removal becomes harder and may pull off bits of the fresh finish. Check the paint label and remove tape with care.
Painting in Poor Lighting
Baseboards are low, shadows are sneaky, and missed spots love dim rooms. Use a work light so you can see drips, thin coverage, and uneven edges before they dry.
How to Fix Paint on Carpet
If wet latex paint gets on carpet, act quickly. Blot the spot gently with a clean damp cloth. Do not rub, because rubbing pushes paint deeper into the fibers. Use mild soap and water if needed, then blot again with clean water.
If the paint dries, removal becomes harder. Carefully trim a tiny amount from the carpet fiber only as a last resort, and only if it will not create a visible bald spot. For larger spills, a carpet cleaning professional may be the best option. This is why the tape-and-drop-cloth step matters so much. Future you deserves nice things.
Should You Remove Baseboards Before Painting?
In most cases, you do not need to remove baseboards to paint them. Removing trim can damage walls, crack old caulk, or create extra work. If the baseboards are already loose, badly damaged, or being replaced, painting them before installation can be easier. But for a normal refresh in a carpeted room, taping and tucking the carpet is usually the simplest method.
If your carpet is being replaced soon, paint the baseboards after the old carpet is removed and before the new carpet is installed. That timing gives you the easiest access and the lowest risk of staining new flooring.
Best Colors for Baseboards with Carpet
White and off-white remain classic baseboard colors because they brighten a room and create a crisp border between wall and floor. Warm whites work well with beige, tan, cream, and brown carpet. Cooler whites pair nicely with gray, blue, or charcoal carpet.
For a modern look, consider painting baseboards the same color as the walls but in a higher sheen. This creates a softer, seamless effect. For bold interiors, dark trim can look dramatic against light carpet, but it requires careful painting because mistakes are more visible.
Maintenance Tips After Painting
Once the paint has cured, clean baseboards regularly with a microfiber cloth or vacuum brush attachment. Avoid harsh scrubbing for the first couple of weeks, because many paints take time to fully cure even after they feel dry.
Touch up scuffs with a small artist brush or trim brush. Keep leftover paint labeled with the room name, color, sheen, and date. A future touch-up will be much easier when you are not standing in the garage holding three mystery cans of “probably white.”
Real-Life Experience: What Painting Baseboards with Carpet Actually Teaches You
The first thing you learn when painting baseboards with carpet is that prep work is not optional. It is the project. The painting itself may take only a fraction of the time, but the final result depends almost entirely on how well you clean, tape, tuck, and protect the carpet. Many beginners want to rush straight to the satisfying part where the brush glides across the trim. That is understandable. Fresh paint is fun. Taping carpet is less glamorous. But the tape is what separates a sharp, professional-looking finish from a fuzzy white border that looks like the carpet got frightened and aged overnight.
One practical experience worth remembering is to test your tape method on a small section before doing the entire room. Carpet thickness varies. Some carpet tucks easily under the baseboard, while thicker plush carpet may resist more. In rooms with very tight carpet installation, a flexible putty knife works better than a stiff metal blade because it can push tape down without scraping the trim or snagging fibers. If the carpet is especially high-pile, using plastic sheeting along with tape adds a second layer of protection and gives you more confidence while brushing.
Another lesson is that lighting changes everything. A baseboard can look perfectly painted from standing height, then reveal streaks, missed grooves, and little paint ridges when viewed from the floor. Use a bright portable work light and move it as you go. Shine it along the trim rather than directly at it. Side lighting makes imperfections easier to see. Yes, this means you may spend part of the afternoon crouched on the floor inspecting trim like a detective in a home-improvement mystery. That is normal. The mystery is usually called “Where did that drip come from?”
Brush quality also matters more than people expect. A cheap brush can shed bristles, leave heavy streaks, and make cutting in harder. A good angled brush gives you control near the carpet and wall edges. For most baseboards, a 1.5-inch or 2-inch angled brush feels manageable. Bigger brushes hold more paint but can be clumsy in tight spaces. Smaller brushes offer control but may slow the project down. The best brush is the one that lets you paint smoothly without overloading the trim.
Patience between coats is another real-world difference maker. When the first coat looks uneven, the temptation is to keep brushing over it. Resist. Overworking partially drying paint can create drag marks and texture. Let the coat dry, then apply the second coat. Trim paint often looks dramatically better after coat two. The first coat builds coverage; the second coat brings the confidence.
Finally, expect the project to be physically awkward. Baseboards are low, which means knees, back, and patience all get involved. Use knee pads, a folded towel, or a small foam gardening pad. Work in sections instead of trying to finish the entire room in one heroic crawl. Painting baseboards with carpet is not difficult, but it rewards slow, steady work. When the tape comes off and the carpet is clean, the room suddenly looks sharper, brighter, and better cared for. It is one of those small DIY projects that quietly upgrades the whole space without demanding a huge budget.
Conclusion
Learning how to paint baseboards with carpet is mostly about preparation, protection, and patience. Clean the trim, repair imperfections, sand lightly, tuck tape between the carpet and baseboard, and paint with controlled horizontal strokes. Use thin coats, let each coat dry properly, and remove tape carefully for the cleanest line.
It may not be the flashiest home project, but freshly painted baseboards can make an entire room feel cleaner and more finished. Plus, you get the satisfaction of knowing you protected the carpet like a responsible adult, even if you celebrated afterward by ordering pizza on the floor.