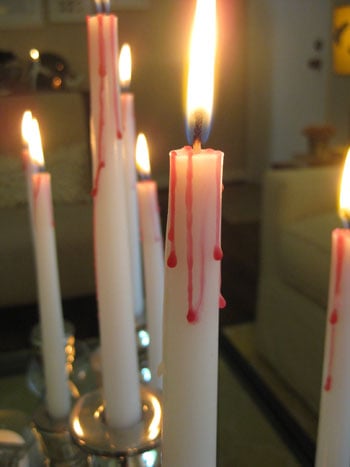
Halloween decorating has two official moods: “cute little pumpkins on the porch” and “why does this dining room look like a vampire hosted a formal dinner?” DIY bloody candles live proudly in the second category. They are dramatic, inexpensive, surprisingly elegant, and just creepy enough to make guests pause before asking, “Is that wax… or should I call someone?”
The good news is that making bloody candles for Halloween decor does not require professional crafting skills, a haunted mansion, or a suspiciously large budget. With plain white candles, red wax, a safe work surface, and a little patience, you can create a spooky centerpiece that looks custom-made. The better news? This project is flexible. You can make it gothic and moody, playful and campy, or polished enough for a Halloween dinner party where the cheese board has tiny skeleton hands on it because, obviously, culture.
In this guide, we will cover how to make DIY bloody candles, what materials work best, styling ideas for different Halloween setups, safety tips, common mistakes, and real-life crafting experiences that can help your candles look intentionally spooky rather than accidentally messy.
What Are DIY Bloody Candles?
DIY bloody candles are Halloween candles decorated with red wax drips to mimic the look of blood running down the sides. Usually, the base candle is white, ivory, or black, while the “blood” is made by melting red candle wax and letting it drip naturally over the top and edges.
The effect works because wax hardens in organic, uneven lines. That means you do not need perfect symmetry. In fact, perfect symmetry would look weird here. Blood-drip candles are one of the rare craft projects where “slightly chaotic” is not a flaw; it is the assignment.
These candles are popular for Halloween tablescapes, haunted house corners, gothic mantels, party buffets, entryway displays, vampire-themed decor, and spooky photo backdrops. They can be made with pillar candles, taper candles, votives, or flameless candles with wax exteriors.
Why Bloody Candles Are Perfect For Halloween Decor
Bloody candles hit the sweet spot between easy DIY and high visual impact. A plain candle is nice. A plain candle with red wax dripping down the side suddenly has a backstory, an attitude, and possibly a dramatic organ soundtrack.
They Look Expensive Without Being Expensive
Store-bought Halloween decor can get pricey fast, especially if you are decorating more than one room. DIY bloody candles let you transform basic candles into custom Halloween pieces using affordable supplies. Dollar-store-style candles, thrifted holders, leftover red tapers, or old pillar candles can all become part of the project.
They Work With Many Halloween Themes
Bloody candles are not limited to one style. For a vampire dinner party, use tall white tapers in antique brass holders. For a haunted laboratory, place short bloody pillars near glass jars and faux specimen labels. For a witchy mantel, pair black candles with dark red wax, dried-looking florals, and old books. For a horror movie snack table, cluster several candles around candy bowls and dramatic black fabric.
They Are Beginner-Friendly
This project is forgiving. If one drip looks too thick, add more around it. If a drip runs too far, call it “extra haunted.” If the first candle looks imperfect, put it in the back of the arrangement and let the better-looking candles take the spotlight. Halloween is kind like that.
Supplies You Will Need
Before starting, gather everything in one place. Once wax begins melting, you do not want to run around looking for parchment paper while holding a red candle like a tiny flaming wand of doom.
Basic Materials
- White, ivory, cream, or black candles
- Red taper candle, red tea light, or red candle wax
- Heat-safe candle holders or a stable work surface
- Parchment paper, foil, or a disposable tray to catch wax drips
- Lighter or long-reach match
- Heat-resistant gloves or tongs, if needed
- Paper towels for cleanup
Optional Styling Supplies
- Black candlesticks or gothic-style holders
- Mirror tray or black serving tray
- Faux cobwebs placed safely away from flames
- Plastic spiders, skulls, bats, or ravens for surrounding decor
- Dark florals, velvet ribbon, or black lace
- LED tea lights for safer displays
Choosing The Right Candles
The candle combination matters. The classic choice is a white pillar candle with red wax drips because the contrast is sharp and theatrical. However, there are several good options depending on the look you want.
White Pillar Candles
White pillar candles create the clearest bloody effect. They offer enough surface area for long wax trails, making them ideal for mantels, entry tables, coffee tables, and Halloween centerpieces. Choose different heights for a more layered display.
White Taper Candles
Taper candles look elegant and eerie, especially when placed in vintage-style holders. They are great for a gothic dinner table or vampire-inspired decor. Because tapers are narrow, use lighter wax drips so the candles do not become bulky or unstable.
Black Candles
Black candles with red wax create a darker, more dramatic look. The red may appear deeper and less bright than it does on white, which can feel more sophisticated. This is a great choice if your Halloween decor leans moody rather than cartoonish.
Flameless Candles
Wax-coated flameless candles can also be decorated with red wax on the exterior. They are especially useful for homes with pets, children, crowded parties, or areas where real flames are not ideal. Just avoid applying hot wax near battery compartments, switches, or plastic areas that could warp.
How To Make DIY Bloody Candles For Halloween Decor
This method is simple, but the details make the difference between “spooky designer candle” and “red wax had a personal crisis.” Work slowly and build the drips in layers.
Step 1: Prepare Your Work Area
Cover your table with parchment paper, foil, or a disposable tray. Place the base candle upright on a stable, heat-safe surface. Make sure the candle will not wobble. A wobbly candle is never charming. It is a tiny warning sign wearing wax.
Keep flammable items, loose fabric, paper decorations, and faux cobwebs away from any open flame. Even if you plan to use the candles only as decor, safety should be part of the setup from the beginning.
Step 2: Light The Red Candle
Light the red taper candle or red tea light and allow a small pool of melted red wax to form. If you are using a taper, hold it at a slight angle over the base candle. If you are using a tea light, you can carefully spoon or pour tiny amounts of melted wax, but only if the container is safe to handle and not too hot.
Step 3: Drip Red Wax Around The Top Edge
Start at the top rim of the base candle. Let the red wax drip over the edge and run naturally down the sides. Rotate the candle slowly so the drips appear around different areas. Vary the drip length. Some should stop near the top; others can travel farther down. Realistic spooky decor loves variety.
Step 4: Build Layers For A Richer Look
One layer of wax can look thin. Let the first layer cool slightly, then add another layer over selected areas. This creates depth and makes the red wax look more dimensional. Focus on the top edge, where “blood” would collect before dripping downward.
Step 5: Add A Final Top Pool
For a dramatic finish, add a small amount of red wax to the top of the candle around the wick area. Do not bury the wick or block the candle from burning properly if you plan to light it later. For display-only candles, you have more freedom, but the top should still look intentional rather than like a wax volcano exploded.
Step 6: Let The Candle Cool Completely
Allow the candle to sit undisturbed until all wax has hardened. Moving it too soon may smear the drips or flatten the texture. Once cooled, peel away any unwanted wax from the bottom or holder area.
Safety Tips For Bloody Halloween Candles
Halloween decorations should be spooky, not genuinely alarming. Candles bring atmosphere, but they also require common sense. Use these safety habits every time you decorate with real flames.
Keep Candles Away From Flammable Decor
Faux cobwebs, paper bats, dried leaves, curtains, costumes, napkins, and table runners should stay far away from candle flames. If your display includes delicate decorations, use LED candles instead.
Use Stable, Heat-Resistant Holders
Always place candles in sturdy holders that will not tip over. Glass, ceramic, and metal holders are common choices, but they should be designed to handle candle heat. Avoid placing candles directly on wood, plastic, paper, or fabric.
Never Leave Burning Candles Unattended
If you leave the room, blow out the candles. If the party gets crowded, switch to flameless options. If your cat is staring at the candle like it has just insulted his ancestors, definitely switch to flameless.
Trim Wicks Before Burning
Trim candle wicks to about one-quarter inch before lighting. A properly trimmed wick helps reduce high flames, soot, and uneven burning.
Consider Flameless Candles For High-Traffic Areas
Entryways, buffet tables, children’s party spaces, bathrooms, and stair displays are great places for flameless candles. You still get the eerie glow without worrying about sleeves, pets, or someone’s dramatic vampire cape drifting into danger.
Design Ideas For Decorating With Bloody Candles
Once your candles are finished, styling them is where the fun begins. Bloody candles are bold, so they work best when the surrounding decor supports the theme without competing too hard.
Gothic Dinner Table
Place tall bloody taper candles in black or antique brass candlesticks. Add black plates, dark napkins, red glassware, and a low centerpiece of faux roses or dark greenery. Keep the arrangement low enough that guests can see each other across the table. Nothing ruins a spooky dinner like shouting through a floral arrangement.
Haunted Mantel Display
Cluster pillar candles of different heights along the mantel. Add old books, framed silhouettes, small skulls, and a mirror behind the candles to reflect the glow. Use flameless candles if the mantel is close to garlands, fabric, or wall decorations.
Vampire Entryway
Place bloody candles on a console table near the front door with a black tray, faux ravens, and a bowl of candy. This creates an instant Halloween moment when guests arrive. It says, “Welcome, please take a chocolate and ignore the suspicious candles.”
Bathroom Or Powder Room Surprise
A single bloody candle next to dark hand towels and a tiny skeleton figurine can make a small bathroom feel intentionally decorated. Use flameless candles here, especially if towels, tissue boxes, or curtains are nearby.
Halloween Party Buffet
Use a few bloody candles around serving dishes, but keep them away from food, napkins, and reaching hands. Flameless versions are usually best for buffet tables because guests may lean over the display while grabbing snacks.
Color Variations For A Better Bloody Effect
Not all red wax looks the same. Bright cherry red creates a classic horror-movie effect. Deep burgundy looks more elegant and gothic. Dark crimson feels moodier and less playful. You can even mix red wax with a tiny amount of black wax to deepen the color, but test it first on a scrap candle or hidden area.
For a more realistic look, avoid neon red unless your theme is campy horror. For a polished table setting, choose wine red or oxblood tones. For a haunted house prop, brighter red may show better in dim light.
Common Mistakes To Avoid
This project is easy, but a few mistakes can make it messier than necessary. Luckily, most are simple to prevent.
Using Red Candles That Are Only Coated
Some red candles are red only on the outside and white inside. When melted, they may produce pale or streaky wax. Look for candles that are colored throughout, or use red candle wax made for crafting.
Adding Too Much Wax At Once
Big pours can create thick blobs instead of elegant drips. Add wax gradually. You can always add more, but removing hardened red wax requires patience and possibly a small emotional support snack.
Forgetting To Protect The Surface
Wax drips are part of the project. They will happen. Protect your table before starting, not after the first red splash lands somewhere important.
Decorating Too Close To The Wick
If you plan to burn the candle, do not cover the wick or overload the top with wax decorations. Keep the burn area clean and follow basic candle safety guidelines.
Placing Finished Candles Near Lightweight Decor
Bloody candles look amazing with cobwebs, fabric, and paper cutouts, but real flames and flammable decorations should not be close neighbors. Use LED candles when styling with delicate materials.
How To Make Bloody Candles Look More Professional
The secret to professional-looking Halloween candles is controlled imperfection. Let the wax drip naturally, but guide where the drips begin. Work in sections, rotate the candle, and use layers rather than one heavy application.
Use candles in odd-numbered groups, such as three or five. Mix heights for visual movement. Place them on trays to make the display feel deliberate. A black tray, mirrored tray, or dark wood board can instantly make the candles look like part of a designed scene instead of a craft project that wandered onto the table.
Lighting also matters. Bloody candles look best in warm, low light. Pair them with dim lamps, string lights, or flameless tea lights. Harsh overhead lighting can make the display look flat, while soft lighting gives the wax shadows and drama.
Can You Use Crayons For Bloody Candle Wax?
Many DIY tutorials mention crayons for coloring wax, but for candles that may be burned, it is better to use actual candle wax or candle dye made for candle projects. Crayons are designed for coloring, not clean candle burning, and they may affect how wax melts or burns. If your bloody candles are purely decorative and will never be lit, crayon-colored wax may be an option for the outside effect, but candle wax is still the cleaner and more reliable choice.
Can You Make Bloody Candles With Hot Glue?
Hot glue can create fake drips on display-only props, especially if you paint the glue red after it dries. However, hot glue should not be used on candles you intend to burn. It is not candle wax, and it does not behave like candle wax near heat. For real candles, stick with wax. For flameless props, hot glue can be useful as long as it is kept away from heat sources.
Budget-Friendly Tips
You do not need a luxury craft haul to make this project work. Check discount stores, thrift shops, clearance sections, and leftover holiday bins for plain candles and holders. White candles are often available year-round, while red candles may be easier to find around Christmas, Valentine’s Day, or Halloween.
Reuse candle holders you already own. A simple glass holder can look spooky when placed on a black tray with a few plastic spiders. Old brass candlesticks are especially good for this project because they already have that “possibly found in a haunted attic” energy.
DIY Bloody Candles For Different Skill Levels
Beginner Version
Use one white pillar candle and one red taper candle. Drip wax around the top edge, let it cool, and display it on a small plate or candle holder. Simple, fast, and effective.
Intermediate Version
Create a group of three candles in different heights. Use layered wax drips, vary the color intensity, and arrange them with a few Halloween accents on a tray.
Advanced Version
Design a full Halloween tablescape with bloody tapers, dark linens, themed place cards, moody florals, and flameless accent lighting. Coordinate the red wax tone with napkins, glassware, or centerpiece details for a more polished look.
Extra Experience Notes: What I Learned Making DIY Bloody Candles
The first time you make DIY bloody candles, you may expect the process to be perfectly controlled. Then the wax chooses its own path, slides down the candle like it has somewhere urgent to be, and suddenly you are negotiating with gravity. That is part of the charm. The best bloody candles usually happen when you guide the wax but do not try to control every drip.
One useful experience is to start with less red wax than you think you need. A small drip can always be extended with another layer, but a giant blob at the top can make the candle look heavy. The most attractive candles often have a mix of thin trails, medium drips, and a few thicker areas near the top. Think of it like decorating a cake, except the cake is haunted and nobody should eat it.
Another lesson is that candle height makes a big difference. Short pillar candles look chunky and creepy, which works well for mantels and shelves. Tall taper candles feel more elegant and dramatic, especially in vintage holders. If you combine both, the display feels fuller and more intentional. A cluster of candles in different heights looks better than a row of identical candles standing there like they are waiting for a school picture.
The color of the red wax also changes the mood. Bright red is bold and theatrical, great for a fun Halloween party or horror-themed setup. Dark red or burgundy feels more grown-up and gothic. If your decor uses black lace, brass holders, velvet, or antique books, deeper red wax usually blends better. If your setup is full of skeletons, candy bowls, and playful signs, brighter red keeps the mood energetic.
Surface protection is not optional. Wax has a special talent for landing exactly where you hoped it would not. A sheet of parchment paper or foil under the project saves time and stress. It also makes cleanup easier because hardened wax can usually be lifted away once cool. Do not work directly over your favorite table, unless your favorite table has personally wronged you.
Testing one candle before making a full set is also smart. Different red candles melt differently. Some drip smoothly, while others produce thicker wax that hardens quickly. Some red candles are not fully red inside, which can create pale streaks. A small test tells you whether your materials will give the look you want before you commit to decorating a dozen candles.
For party use, flameless candles are often the most practical choice. Real candles are beautiful, but Halloween parties involve costumes, excited guests, snack tables, and sometimes pets who believe every new object is an enemy. Wax-coated LED candles decorated with red wax can still look spooky, especially from a few feet away. Add them to lanterns, trays, or shelves, and most guests will notice the atmosphere before they notice the lack of real flame.
Finally, the display matters as much as the candle itself. A single bloody candle can look cool, but a styled group creates a scene. Add a dark tray, a mirror, faux skulls, black candlesticks, or deep red flowers. Keep the surrounding items safe and flame-free if using real candles. With the right styling, DIY bloody candles can become the centerpiece of your Halloween decor rather than just another craft project hiding between the candy corn and the plastic bats.
Conclusion
DIY bloody candles for Halloween decor are simple, affordable, and wonderfully dramatic. They turn basic candles into spooky statement pieces with only a little red wax and a bit of creative patience. Whether you are decorating a haunted mantel, gothic dinner table, vampire party, or cozy Halloween movie corner, these candles deliver instant atmosphere without requiring advanced crafting skills.
The best results come from choosing the right candle base, building wax drips in layers, styling candles in groups, and keeping safety at the center of the setup. Use real candles carefully, choose flameless versions when needed, and keep flammable decorations far from open flames. Halloween should be spooky because of the mood, not because someone placed a candle next to a paper bat.
Note: This article synthesizes common U.S. DIY Halloween candle-decor practices and widely recommended candle safety guidance, rewritten in original language for web publication.