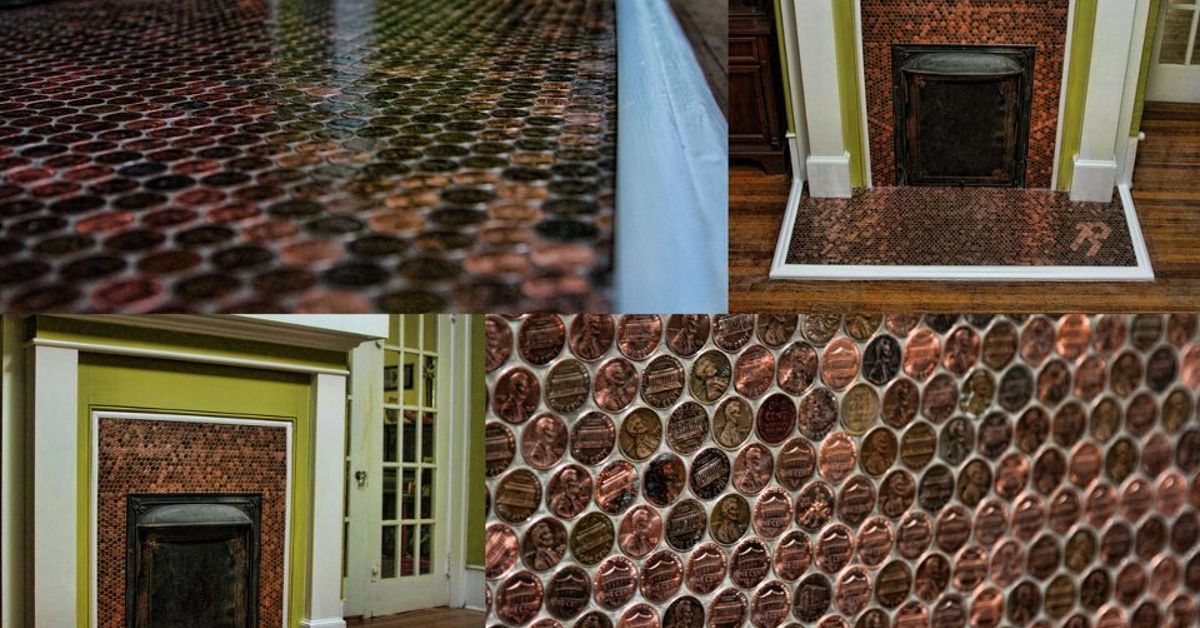
Note: This guide is written for a penny-look fireplace surround or hearth face. If your fireplace is functional, do not install pennies or tile inside the firebox. Always check your fireplace manufacturer’s instructions and local building code before you begin.
A penny fireplace is one of those home projects that sounds slightly ridiculous until you see one finished and suddenly think, “Well, now my plain fireplace is embarrassing.” Tiny round shapes, warm metallic tones, and old-school charm can turn a bland surround into the kind of focal point that makes guests ask questions before they’ve even taken off their shoes.
The good news? You do not need the budget of a renovation show or the patience of a museum conservator to pull this off. The better news? You have options. You can build the look with actual pennies for a quirky, handcrafted finish, or use penny-round mosaic tile sheets for a cleaner, more heat-friendly version. Both can look fantastic. The right choice depends on whether your fireplace works, how polished you want the result to feel, and whether you enjoy counting coins more than the average sane person.
Why a DIY Penny Fireplace Works So Well
Fireplaces already act like visual anchors, so even a small design upgrade has a big payoff. Penny surfaces work especially well because they add texture, movement, and a little shine without demanding a giant footprint. The tiny circles soften the hard edges of brick, stone, or drywall and make even a builder-grade surround feel more custom.
There is also a style advantage here. Penny designs can lean vintage, industrial, modern, eclectic, farmhouse, or glam depending on your grout color, layout, and mantel styling. Black grout makes the pattern feel crisp and graphic. Gray keeps things understated. White grout brightens the area and pushes the look toward classic mosaic tile. A glossy sealer or topcoat makes the finish feel dressier, while a matte treatment keeps it grounded.
In plain English: penny fireplaces are flexible. They can whisper, “I have tasteful design instincts,” or shout, “I once turned pocket change into architecture.” Both are valid.
Choose Your Version First: Real Pennies or Penny Tile?
Option 1: Real Pennies
Using real pennies creates the most literal version of a penny fireplace. It can look warm, original, and wonderfully weird in the best possible way. This route shines on decorative fireplaces, faux fireplaces, or low-heat projects where the pennies function mainly as art.
Real pennies are best if you want a handcrafted statement piece and do not mind a little extra prep. You will need to sort, clean, and arrange them, and installation takes more time because you are working with many small pieces. The finished look can be gorgeous, but it is not the quickest route from “before” to “wow.”
Option 2: Penny-Round Mosaic Tile
Penny-round tile sheets are the practical cousin of the real-penny look. They give you the same small-scale pattern, but the sheets are easier to install, easier to space, and generally better suited to a functional fireplace surround. If your fireplace is used regularly, this is usually the smarter choice.
These sheets also come in ceramic, porcelain, glass, and stone looks, which means you can create a coppery penny vibe without gluing legal tender to your living room. If your goal is “stylish and sensible,” penny-round tile is hard to beat.
What You’ll Need
Your supply list depends on the version you choose, but most DIY penny fireplace projects call for the following:
For Either Version
- Tape measure
- Level
- Pencil or chalk
- Painter’s tape
- Drop cloth
- Tile spacers if needed
- Grout float
- Sponges and clean buckets
- Caulk for edge transitions
- Sealer or protective topcoat, depending on finish
For a Real Penny Fireplace
- Pennies
- Strong tile adhesive or a heat-appropriate thinset over a stable surface
- Optional mesh sheets or template board for faster layout
- Grout or clear epoxy finish, depending on the look you want
For Penny-Round Mosaic Tile
- Penny-round mosaic sheets
- Thinset mortar
- Tile nippers or wet saw for cuts
- Unsanded or recommended grout for narrow joints
Step-by-Step: How to Make a DIY Penny Fireplace
1. Start With the Safety Check
This is the least glamorous part of the project, which is exactly why people skip it and later meet consequences shaped like regret. First, decide whether you are working on a functional fireplace, a nonworking fireplace, or a faux fireplace.
If the fireplace is functional, focus your project on the surround and hearth face only. Do not treat the firebox like a craft board. Confirm that the surface you plan to cover is appropriate for tile, and make sure you are not violating required clearances. If you are altering a hearth extension, measure it carefully before you get carried away with design ambition.
If the fireplace is purely decorative or faux, you have more freedom. That is when real pennies become a much easier yes.
2. Measure Everything Twice
Measure the width and height of the area you want to cover. Then subtract openings, trim areas, or sections you plan to leave exposed. This gives you your square footage and helps you estimate how many penny sheets or actual pennies you need.
At this stage, think about where the pattern will start and end. A centered layout usually looks more intentional than beginning at one corner and hoping for emotional support from the universe. Dry-fitting a few rows on the floor will tell you whether you need cut pieces at the edges and whether your grout lines will look balanced.
3. Prep the Surface Like You Mean It
Penny fireplaces look detailed and expensive only when the surface under them is boringly solid. Remove dust, grease, soot, loose paint, and flaky material. Fill obvious holes or deep dips. If the wall is uneven, fix that now instead of pretending grout is magic.
If you are tiling over old tile, make sure it is firmly attached and thoroughly cleaned. If you are applying over painted drywall on a decorative surround, lightly sanding and cleaning the surface can improve adhesion. If the area near the fireplace includes different materials, such as metal next to drywall, plan your transition carefully so movement does not ruin your hard work later.
4. Dry-Fit Before You Commit
Lay out a small sample before using any adhesive. This matters even more with real pennies because color variation can either look beautifully aged or like your project lost a bar fight. Sort pennies if you want a more uniform finish. Mix them randomly if you prefer a collected-over-time look.
For mosaic sheets, place several sheets side by side and check for visible sheet lines. This is the sneaky issue that can make a DIY job look, well, extremely DIY. Adjust spacing before installation so the pattern reads as one continuous field.
5. Install the Pennies or Penny Tile
For real pennies, spread adhesive in small sections so it does not skin over while you are still fussing with alignment. Press the pennies in place row by row, keeping spacing consistent. You can install them in straight rows, stagger them slightly, or create a subtle pattern. Work slowly. This is not a speed event.
For penny-round tile sheets, apply thinset with the appropriate trowel, then press the sheets into place using even pressure. A beating block or grout float can help flatten the sheet gently without crushing the layout. Pull back a corner once in a while to make sure you are getting proper coverage.
Wipe away excess adhesive as you go. It is much easier to clean a little mess now than to wage a personal war against dried mortar later.
6. Cut the Edge Pieces Carefully
The outer edges are where good projects become great ones or suspicious ones. Real pennies can be trimmed only in limited ways, so many DIYers finish the perimeter with a metal edge trim, painted border, or simple frame detail. Penny-round tile can be cut more neatly, but the tiny circles still require patience.
A clean edge treatment makes the whole fireplace feel intentional. It tells the eye, “Yes, this was a design decision,” instead of, “We ran out of emotional energy near the trim.”
7. Grout for the Final Look
Once the surface has cured, apply grout according to the product directions. Grout color changes everything. Dark grout creates drama and helps individual circles stand out. Light grout brightens the surface and can make the penny pattern feel softer and more vintage.
Work the grout into all the joints, then wipe the surface with a damp sponge in light passes. Do not flood the area with water. Let the grout haze form, then buff it off when appropriate. If you are using real pennies and want more shine, this is the moment when the project starts looking less like loose change and more like design.
8. Seal, Caulk, and Finish
After the grout cures, apply sealer if your grout or finish calls for it. Use caulk where the fireplace meets the wall, mantel, or other change-of-plane areas. This small step helps the project look clean and finished rather than abruptly attached to your house.
If you used real pennies and want a sleek glassy look, a clear topcoat can intensify the shine. If you prefer a more natural finish, leave the texture visible and let the variation do the talking.
Best Design Ideas for a Penny Fireplace
- Copper-on-copper: Use real pennies or copper-look tile with warm wood for a cozy, vintage effect.
- Black grout contrast: Great for modern spaces that need pattern without floral fussiness.
- Soft gray surround: Use muted penny-round tile with pale walls for a subtle upgrade.
- Floor-to-ceiling statement: Extend the penny treatment upward if you want the fireplace to dominate the room in a good way.
- Framed surround: Add trim or metal edging so the penny field looks like a designed panel.
The main rule is balance. Penny surfaces already bring a lot of detail, so let the mantel, art, and décor calm down a bit. Your fireplace should look charming, not like a coin-operated carnival booth.
Common Mistakes to Avoid
- Skipping code and manufacturer checks on a functional fireplace
- Using real pennies in the firebox area
- Ignoring surface prep
- Installing without a dry layout
- Choosing a grout color without testing a sample first
- Forgetting edge trim or transition planning
- Rushing cleanup and leaving haze on the finished surface
How Much Does a DIY Penny Fireplace Cost?
Costs vary wildly depending on scale and materials, but a small surround makeover can stay pretty reasonable. Real pennies may sound cheap, but adhesive, grout, edging, and finishing materials add up. Penny-round tile sheets may cost more upfront, yet they often save time and reduce installation headaches.
If you already own the basic tools, the project can be budget-friendly compared with a full fireplace refacing. The real investment is usually time. And patience. And maybe one muttered speech delivered to a crooked edge row.
Is It Worth Doing Yourself?
Yes, if you enjoy detail work and want a fireplace that looks custom without paying custom-labor prices. A DIY penny fireplace is especially worth it when the existing surround is visually dull but structurally sound. You can get a dramatic transformation without tearing out the entire feature.
Hire a pro if your surround is damaged, if the substrate is uneven, if you need code-sensitive hearth work, or if the fireplace gets hot enough that material selection makes you nervous. There is no shame in protecting your house and your eyebrows.
What the Experience Is Really Like
Making a DIY penny fireplace is one of those projects that begins with confidence and a Pinterest board, then briefly enters a phase best described as “Why am I negotiating with copper circles at 9:40 p.m.?” That is normal. In fact, it is part of the charm.
The first emotional shift usually happens during prep. At the start, the fireplace looks simple. Then you clean the surface, measure the edges, test the layout, and realize the whole project depends on tiny details. This is when the fireplace stops being a casual weekend idea and becomes a real design commitment. Oddly enough, that is also when it gets fun. You start seeing the room differently. The wall color matters more. The mantel suddenly has opinions. Even the rug begins auditioning for a supporting role.
Then comes the layout stage, which is strangely satisfying. Whether you use real pennies or penny-round sheets, there is something deeply calming about repetition. One piece, then another, then another. The project has rhythm. It rewards patience instead of brute force. You are not demolishing anything. You are composing. That makes the work feel creative in a way many home projects do not.
Of course, there will be a moment when you step back, squint, and decide one section is slightly off. This is the ancient DIY ritual known as second-guessing. You may pull off a few pieces and reset them. You may stare at grout samples like they hold the fate of Western civilization. You may text someone a photo and ask, “Charcoal or warm gray?” as if you are choosing a baby name. Again: all normal.
What makes this project memorable is how quickly the character of the room changes once enough of the penny surface is in place. A plain fireplace can disappear into the background for years. But once the penny pattern starts catching light, the whole room feels more intentional. It looks styled. Finished. A little bolder. Even before grout, you can see the personality showing up.
The best part is that a penny fireplace tends to look more expensive than it is. It has the handmade, textural quality people usually associate with boutique renovations or custom tile work. Guests often assume it required a complicated contractor process when in reality it required planning, persistence, and maybe one playlist that got played far too many times.
And after it is done, you keep noticing little things. Morning light hitting the surface. Candlelight bouncing off warm metallic tones. The way holiday décor suddenly looks more polished against the surround. The fireplace starts behaving like the room’s anchor instead of its leftover feature.
That is why so many people love this kind of project. It is not just about covering a wall. It is about changing the mood of the space with texture, pattern, and a little personality. A DIY penny fireplace feels personal because it is personal. No one else will arrange it in exactly the same way. No one else will choose your grout, your trim, your finish, or your version of “perfectly imperfect.”
So yes, the experience includes measuring, cleaning, cutting, spacing, wiping, waiting, and possibly talking to your fireplace like it owes you money. But it also includes the rare satisfaction of making something ordinary look unforgettable. And that, frankly, is worth a few copper-colored headaches.
Final Thoughts
If you want a fireplace makeover that is distinctive, budget-conscious, and packed with personality, a DIY penny fireplace is a strong contender. Choose real pennies for a more artistic, conversation-starting finish on decorative projects. Choose penny-round mosaic tile for a cleaner, more straightforward route on a functional surround. Either way, the magic is in the prep, the layout, and the restraint to keep the final styling balanced.
Take your time, respect the heat and code realities, and let the details do the heavy lifting. When it is finished, your fireplace will not just warm the room. It will finally look like it belongs there.