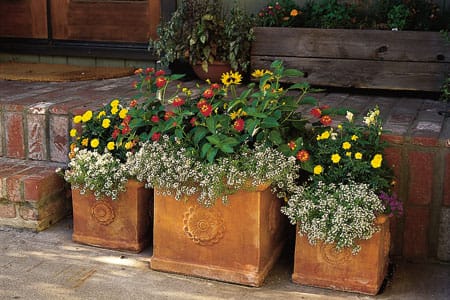
A container garden is proof that you do not need a backyard the size of a national park to grow something beautiful. A sunny porch, apartment balcony, front step, windowsill, or even a suspiciously unused corner near the mailbox can become a thriving mini garden.
Learning how to pot a plant is simple in theory: plant goes in pot, pot gets water, everyone lives happily ever after. In practice, a few details matter. The wrong pot, dense soil, poor drainage, mismatched plants, or an enthusiastic daily watering habit can turn your cheerful planter into a botanical crime scene.
This guide explains how to pot a plant correctly, choose the right container, build a container garden, arrange flowers and edible plants, and keep everything alive long enough to make your neighbors wonder whether you secretly hired a horticulturist.
Why Create a Container Garden?
Container gardening gives you control. You can choose the soil, move plants to catch more sun, protect tender plants from storms, and grow flowers or vegetables where traditional garden beds are impossible. Pots are especially useful for renters, small-space gardeners, beginners, and anyone whose yard soil resembles a brick factory after rain.
A container garden can be decorative, practical, or both. You might grow colorful annual flowers by the front door, herbs outside the kitchen, tomatoes on a sunny deck, lettuce in a window box, or a combination of all four. There are no garden police coming to inspect your choices.
Container gardens also make seasonal decorating easy. Spring bulbs, summer petunias, fall mums, ornamental grasses, kale, pansies, and evergreen branches can rotate through the same containers throughout the year. Think of your pots as tiny stages with plants taking turns in the spotlight.
What You Need To Pot a Plant
Before beginning, gather your supplies. You do not need a professional greenhouse, a gardening apron with seventeen pockets, or a dramatic soundtrack. A few basic items will do the job.
- A container with drainage holes
- High-quality potting mix
- Plants, seedlings, herbs, flowers, or vegetable starts
- A hand trowel or sturdy scoop
- Slow-release fertilizer or a suitable plant food
- A watering can or hose with a gentle spray setting
- Plant labels, especially if you tend to forget what you planted approximately six minutes later
- Gloves, if you enjoy looking responsible while getting dirt under your fingernails anyway
Choose the Right Pot for Your Plant
Start With Drainage Holes
The most important feature of a plant container is drainage. A pot needs holes in the bottom so extra water can escape and roots can receive enough oxygen. When soil stays saturated for too long, roots may rot, leaves can yellow, and a plant may look oddly sad despite being watered constantly.
If you fall in love with a decorative pot that has no drainage hole, use it as a cachepot rather than planting directly into it. Keep the plant in a slightly smaller nursery pot with drainage, place that pot inside the decorative container, and remove it when watering. This lets you have both healthy roots and a pot that does not look like it was borrowed from a dentist’s office.
Match Pot Size to Plant Size
A plant needs enough room for its roots, but enormous pots are not always better. A container that is much too large can hold excess moisture around a small root system. For houseplants, moving up one pot size is usually safer than leaping from a small nursery pot into something large enough to bathe a toddler.
For outdoor containers, bigger generally means more stable moisture and more room for roots. Large plants such as tomatoes, peppers, eggplants, dwarf shrubs, and small trees need larger containers than herbs, lettuce, pansies, or succulents. A small pot may be adorable, but it can dry out so fast that your plant starts sending passive-aggressive signals by lunchtime.
Consider Pot Material
Terracotta is classic, breathable, and excellent for plants that prefer soil to dry somewhat between waterings. However, clay pots can dry quickly, become heavy, and crack in freezing weather. Plastic and resin pots are lightweight and retain moisture longer, making them convenient for balconies, hanging baskets, and gardeners with questionable upper-body strength.
Metal containers can heat up quickly in strong sun, while dark-colored pots absorb more heat than light-colored ones. Wood containers can look wonderful but should be built from materials suitable for garden use. Whatever material you choose, make sure the pot is sturdy, stable, and easy enough to move when necessary.
Use Potting Mix, Not Garden Soil
One of the biggest container gardening mistakes is filling a pot with soil dug directly from the yard. Garden soil can become compacted in a container, restricting air flow and trapping too much water around roots. A quality potting mix is lighter, better aerated, and designed to retain moisture while still draining properly.
Look for a potting mix made for containers. Many mixes include materials such as compost, coconut coir, peat moss, bark, perlite, or vermiculite. These ingredients help create the balance container plants need: enough moisture to avoid drought stress and enough air space to keep roots healthy.
Do not put a layer of rocks, gravel, packing peanuts, or broken pottery in the bottom of the pot to “improve drainage.” It sounds logical, which is probably why the myth has survived so long. In reality, a continuous column of potting mix allows water to move more effectively than a layered container. Rocks also use up valuable root space and make a planter unnecessarily heavy.
How To Pot a Plant Step by Step
1. Pick the Right Location First
Before filling a pot, decide where it will live. A full container can be surprisingly heavy, especially after watering. More importantly, plants need the right amount of light. Read the plant tag and match plants with similar sun, shade, watering, and temperature preferences.
Warm-season vegetables such as tomatoes, peppers, eggplants, and squash generally need strong direct sun. Leafy greens, many herbs, begonias, impatiens, ferns, and caladiums can tolerate or prefer more shade. Southern and western exposures tend to be warmer and sunnier, while northern and eastern exposures are often cooler and shadier.
2. Add Potting Mix
Fill the container about halfway to two-thirds full with slightly moistened potting mix. If the mix is bone dry, it may repel water at first, so dampening it before planting helps. Leave enough room for the root ball and keep about one inch of space below the rim of the pot for watering.
3. Remove the Plant From Its Nursery Pot
Gently squeeze the sides of the nursery pot and slide the plant out. Avoid pulling it by the stem, because plants are not tiny green suitcases. Support the root ball with one hand instead.
Inspect the roots. If they are circling tightly around the root ball, loosen them gently with your fingers. You do not need to perform root surgery with the intensity of a television medical drama. Simply tease apart a few outer roots so they can begin growing into the new potting mix.
4. Set the Plant at the Correct Depth
Place the plant in the container so the top of the root ball sits at approximately the same level it was growing in its original pot. Most plants should not be buried deeper than before, although tomatoes are a notable exception because they can form additional roots along buried stems.
5. Fill Around the Root Ball
Add potting mix around the plant and press it gently to remove large air pockets. Do not pack the soil down tightly. Roots need a little room to breathe, stretch, and conduct their quiet underground negotiations with water and nutrients.
6. Water Thoroughly
Water slowly until moisture runs from the drainage holes. This helps settle the potting mix around the roots and ensures the entire root ball is hydrated. A light sprinkle on the surface is not enough; it often wets only the top layer while deeper roots remain dry.
7. Add a Plant Label
Labeling is optional until it is suddenly very necessary. Plant labels help you remember the variety, care needs, planting date, and whether that tiny green sprout is basil or the weed you have been nurturing with impressive dedication.
How To Design a Container Garden
A container garden can hold one spectacular plant or a full combination of flowers, foliage, herbs, and trailing vines. The easiest design method is the “thriller, filler, spiller” approach.
Thriller: Add Height and Drama
The thriller is the tall focal point. It usually sits near the center of a round container or toward the back of a planter viewed from one side. Examples include ornamental grasses, coleus, angelonia, salvia, tall calibrachoa varieties, dwarf cannas, or tomato plants in edible containers.
Filler: Create Fullness
Fillers are mounded plants that make the container look lush and complete. Petunias, begonias, lantana, geraniums, basil, leafy greens, compact peppers, and many foliage plants work well in this role.
Spiller: Soften the Edges
Spillers trail over the edge of the container and make the arrangement look more natural. Sweet potato vine, dichondra, creeping Jenny, trailing petunias, lobelia, ivy, oregano, and nasturtiums are common choices. The thriller, filler, spiller method creates balance and visual movement without requiring a degree in landscape architecture.
Easy Container Garden Ideas
Sunny Flower Container
Try one upright ornamental grass or angelonia as the thriller, petunias or lantana as fillers, and trailing sweet potato vine or calibrachoa as spillers. Keep all plants suited to full sun and consistent watering.
Shade Container Garden
Use caladium or a fern for height, begonias or impatiens for fullness, and trailing ivy or dichondra over the sides. Shade containers are excellent for porches, covered patios, and bright areas that avoid harsh afternoon sun.
Kitchen Herb Container
Combine basil, parsley, chives, thyme, oregano, and compact rosemary in a sunny container. Keep aggressive spreaders, especially mint, in their own pot unless you enjoy watching one herb stage a small coup.
Salad Garden in a Pot
Grow leaf lettuce, arugula, spinach, radishes, green onions, and edible flowers such as nasturtiums. These crops can work well in wide containers and are ideal for cool weather. Harvest outer leaves regularly, and the plants will continue producing.
Patio Tomato Container
Choose a large pot, a compact or determinate tomato variety, a tomato cage or sturdy support, and a sunny location. Add support at planting time instead of trying to wrestle a mature tomato plant into a cage later. That task has humbled many confident adults.
Watering Container Plants Correctly
Container plants dry out faster than plants growing in the ground because their roots have limited soil and are exposed to wind, heat, and sun from all directions. Check pots regularly, especially during hot weather.
Push a finger one to two inches into the potting mix. If it feels dry, water deeply. If it is still damp, wait. The goal is moist soil, not a permanent swamp. Water close to the soil surface rather than soaking the leaves whenever possible, since wet foliage can contribute to disease problems.
Morning is usually the best time to water because plants can take up moisture before the hottest part of the day. During heat waves, small pots, hanging baskets, and plants in full sun may need watering more than once daily. Larger containers hold moisture longer, which is one reason generous pot size is a gardener’s quiet superpower.
Fertilizing a Container Garden
Potting mix does not provide unlimited nutrition. Every watering gradually carries some nutrients out through drainage holes, especially during the active growing season. Most container plants benefit from regular feeding according to the fertilizer label.
You can mix a slow-release fertilizer into the potting mix at planting time or use a water-soluble fertilizer during the season. Avoid the “more is better” approach. Too much fertilizer can burn roots, create weak growth, and leave crusty salt deposits on the soil surface. Plants want lunch, not an all-you-can-eat buffet with a fireworks display.
Common Container Gardening Mistakes To Avoid
- Using a pot without drainage holes: Decorative does not matter if the roots cannot breathe.
- Using garden soil: It can compact and drain poorly inside pots.
- Adding rocks to the bottom: This does not improve drainage and reduces root space.
- Combining plants with different needs: A sun-loving petunia and shade-loving fern will not become friends just because they share a pot.
- Choosing a pot that is too small: Small containers dry out rapidly and restrict roots.
- Forgetting to fertilize: Container plants depend on you for ongoing nutrition.
- Watering on autopilot: Check the soil instead of following a rigid schedule.
- Ignoring wind: Tall plants and lightweight pots can tip over during storms.
- Skipping maintenance: Remove dead flowers, yellow leaves, damaged stems, and diseased material promptly.
Experience-Based Lessons From Creating Container Gardens
The most useful container gardening lessons usually arrive after a few imperfect planting attempts. A planter may look magazine-ready on the day it is assembled, then turn into a jungle, a drought experiment, or a buffet for aphids within three weeks. That is not failure. It is gardening providing feedback in its usual subtle style: very loudly.
One common experience is underestimating how much water a container garden needs in summer. A plant that looks perfectly healthy at breakfast may become limp by late afternoon, particularly in a small black pot sitting on hot concrete. The solution is not necessarily to water every plant constantly. Instead, gardeners learn to notice the weight of a pot, feel the potting mix, and choose larger containers for thirsty plants. Bigger pots hold more growing medium, which gives roots a more stable supply of moisture.
Another lesson is that location matters more than the prettiest container. It is tempting to place a colorful planter exactly where it looks best, then discover that the chosen flowers require six hours of direct sun and the porch receives approximately six minutes. Successful container gardeners often move pots several times during the first week. They watch where morning light lands, where afternoon sun becomes intense, and where wind dries leaves and soil faster than expected.
Many people also learn that a container garden changes quickly. A small tomato transplant may look lonely in a five-gallon pot in May, but by July it can behave like it has filed a claim on the entire patio. Trailing plants spill farther than expected. Herbs become surprisingly large. A pepper plant that seemed politely compact at the nursery can suddenly demand center stage. Leaving a little space between plants at planting time often creates a healthier and more balanced arrangement later.
Container gardeners frequently discover that mixing plants with similar needs is more important than choosing plants with matching colors. A dramatic arrangement can fail when one plant loves dry soil and another wants constant moisture. The best combinations usually share the same light requirements, watering habits, and seasonal preferences. Once those practical needs match, color and texture become much easier to play with.
There is also a useful emotional lesson: not every plant has to be saved. Sometimes a plant is in the wrong place, in the wrong season, or simply nearing the end of its natural cycle. Replacing tired annuals, trimming back overgrown foliage, or restarting a container for fall is part of the process. A container garden is not a museum exhibit. It is a living arrangement that changes, grows, rests, and occasionally needs a fresh start.
Finally, container gardening teaches the value of small routines. A two-minute morning walk with coffee can reveal dry soil, fading flowers, a chewed leaf, or a basil plant ready for harvest. Those small observations prevent bigger problems later. The reward is not only a prettier porch or a bowl of fresh herbs. It is the satisfying feeling that you turned an ordinary pot of soil into something alive, useful, and unexpectedly cheerful.
Final Thoughts
Learning how to pot a plant and create a container garden is less about perfection and more about understanding a few essentials: drainage, potting mix, sunlight, space, water, and plant compatibility. Start with one pot, choose plants that suit your location, and pay attention to what happens over the season.
Before long, one planter may become three. Three may become a row of herbs, flowers, peppers, and tomatoes. Then you may find yourself explaining to guests why there is a pot of lettuce beside the driveway. Congratulations: you have become a container gardener.