Curled eyelashes are the beauty equivalent of opening the curtains in a dark room. Suddenly, your eyes look brighter, your mascara works harder, and you appear more awakeeven if your coffee is still negotiating with your bloodstream. The good news? You do not need naturally dramatic lashes, professional glam skills, or a tiny fairy with a makeup brush to get a pretty lift.
Learning how to curl your eyelashes is mostly about choosing the right method for your lash type, using gentle pressure, and avoiding the common mistakes that make lashes droop, crimp, or, worst of all, snap. Whether your lashes are straight, short, stubborn, downward-facing, or simply having a “not today” moment, there is a curling technique that can help.
Below are four practical ways to curl your eyelashes, from the classic eyelash curler to heat-assisted methods, mascara tricks, and no-curler alternatives. You will also find safety tips, product-selection advice, and real-world experience notes to help your curl last longer without sacrificing lash health.
Why Curling Your Eyelashes Makes Such a Big Difference
Eyelashes frame the eyes, and when they point upward instead of straight forward or downward, they create the illusion of bigger, more open eyes. Curling also helps mascara coat lashes more visibly because the lashes are lifted into view. Think of it as giving your lashes better posture. Same lashes, better attitude.
A good lash curl can make a natural makeup look feel polished, help hooded or deep-set eyes appear more lifted, and reduce the need for heavy eye makeup. The key is not forcing your lashes into an unnatural bend. The goal is a smooth, lifted curvenot a sharp “L” shape that looks like your lashes got scared halfway through.
Before You Curl: The Golden Rules of Lash Safety
Before trying any eyelash curling method, start with clean, dry lashes. Old mascara, oil, eye cream, or leftover makeup can make lashes sticky and more vulnerable to tugging. Clean lashes also curl more evenly and hold shape better.
Never curl lashes aggressively. Your eyelid is not a craft project, and your lashes are not pipe cleaners. Use gentle pressure, work slowly, and stop immediately if you feel pinching, pulling, burning, or irritation. Avoid sharing eye tools or mascara, and clean your eyelash curler regularly to reduce the risk of transferring bacteria around the eye area.
If you have an eye infection, redness, swelling, recent eye surgery, or unusual irritation, skip lash curling until your eyes are healthy again. Beauty can wait. Your eyeballs are VIP guests.
Way 1: Curl Your Eyelashes With a Classic Eyelash Curler
The traditional eyelash curler is still the most popular and reliable way to curl eyelashes at home. It looks mildly intimidating the first time you hold itlike something from a tiny medieval toolboxbut when used correctly, it can create a beautiful, long-lasting lift in seconds.
Best for:
Most lash types, especially medium to long lashes, straight lashes, and anyone who wants quick results before mascara.
How to do it:
- Start with clean, dry lashes. Remove any old mascara or oil with a gentle makeup remover or micellar water.
- Look slightly downward into a mirror. This helps expose the lash line without forcing your eye wide open.
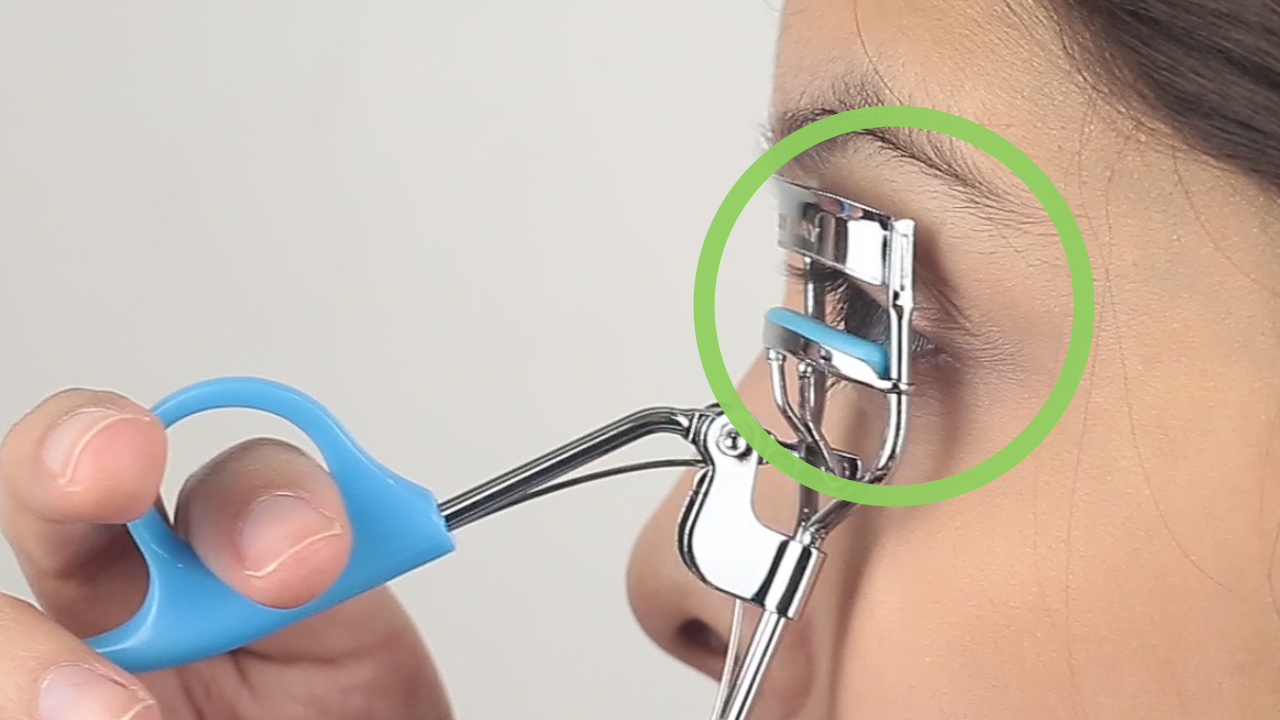
- Place the curler close to the base of your upper lashes, but do not clamp your eyelid skin.
- Gently squeeze and hold for about five to ten seconds.
- Move the curler slightly toward the middle of the lashes and squeeze again.
- For a soft curve, repeat once more near the tips using lighter pressure.
- Apply mascara afterward to lock in the shape.
The biggest mistake is clamping once at the base with too much pressure. That creates a harsh bend instead of a natural curl. A better method is the “walk-up” technique: curl at the root, middle, and tip. This creates a rounded, lifted shape that looks softer and more natural.
Pro tips for better results
Choose an eyelash curler that fits your eye shape. Round eyes, almond eyes, hooded eyes, and deep-set eyes may need slightly different curler curves. If your curler pinches, misses the outer lashes, or feels awkward no matter how carefully you use it, the tool may be the wrong shape for your eyesnot proof that you are bad at beauty.
Replace the rubber pad when it becomes cracked, flat, or worn. A damaged pad can press unevenly and increase the chance of lash breakage. Also, always curl before mascara. Curling after mascara can cause lashes to stick to the curler, which may lead to pulling or breakage. No one wants a dramatic lash moment that ends with fewer lashes than they started with.
Way 2: Curl Your Eyelashes With a Heated Lash Curler
A heated lash curler works like a mini styling tool for your eyelashes. Instead of clamping the lashes between metal and a pad, many heated curlers use a warm comb-like surface to lift and shape the lashes. This can be especially useful for lashes that refuse to hold a curl, even after a pep talk and two coats of mascara.
Best for:
Straight, downward-facing, stubborn, or coarse lashes that lose curl quickly. It is also helpful for people who dislike the pressure of a traditional clamp curler.
How to do it:
- Turn on the heated lash curler and allow it to warm according to the product instructions.
- Test the warmth on your wrist or finger before placing it near your eye.
- Hold the heated comb at the base of clean lashes and gently lift upward.
- Pause for a few seconds, then move slowly through the middle and tips.
- Let the lashes cool in their lifted position.
- Apply mascara if desired, or use the heated curler after mascara has fully dried if the tool instructions allow it.
Heat helps reshape the lash temporarily, similar to how a curling iron works on hair. But the eye area is delicate, so gentle warmth is the goalnot “freshly baked cookie tray.” If the device feels too hot, let it cool before using it.
Heated lash curler safety tips
Do not hold heat against your lashes or eyelid for too long. Avoid using a heated curler if your eyes are watery, irritated, or sensitive that day. Keep the tool clean, and never use a device with exposed wires, damaged comb teeth, or inconsistent heating.
Some people like to warm a traditional metal eyelash curler with a blow dryer. This can work, but it requires caution. If you try it, heat the curler for only a few seconds and test it on your wrist first. If it feels hot on your wrist, it is too hot for your eyelid. Your lashes want a curl, not a sauna membership.
Way 3: Curl Your Eyelashes With Mascara Technique
Mascara does more than darken lashes. The right formula and application method can help lift, shape, and hold a curl. This method is perfect when you want extra staying power after using a curler, or when your lashes need a little structure but you do not want to fuss with heat.
Best for:
People who already use mascara, lashes that curl but fall quickly, and anyone who wants lift plus definition.
How to do it:
- Curl your lashes first with a clean eyelash curler.
- Choose a lightweight curling or waterproof mascara if your lashes tend to droop.
- Place the mascara wand at the base of your lashes.
- Wiggle the wand gently at the roots to add lift and volume.
- Pull the wand upward and outward, following the direction of the curl.
- Use the tip of the wand to separate outer lashes.
- Apply a second thin coat only if needed.
The trick is to focus product near the roots without overloading the tips. Too much mascara on the ends can weigh lashes down and make the curl collapse. If your lashes are fine or short, a heavy formula may act like ankle weights at the gymtechnically impressive, but not helpful for lift.
Choosing the right mascara for curled lashes
For lashes that struggle to hold curl, waterproof mascara often gives stronger hold because it tends to dry firmer than many washable formulas. Tubing mascaras can be useful for length and smudge resistance, though some formulas may offer less curl support than waterproof options. Curling mascaras with curved brushes can help guide lashes upward, especially when used with a careful rolling motion.
Avoid pumping the mascara wand in and out of the tube. This pushes air into the formula, making it dry out faster. Instead, twist the wand gently inside the tube. Also, replace mascara regularly, especially if it smells odd, changes texture, becomes clumpy, or has been used during an eye infection.
The cotton swab lift trick
After applying mascara, take a clean cotton swab and gently press lashes upward from underneath while the mascara is still slightly tacky. Hold for several seconds, then release. This can help set the curl as the mascara dries. Be careful not to poke the eye or press too hard. The goal is a graceful lift, not a duel with a cotton stick.
Way 4: Curl Your Eyelashes Without an Eyelash Curler
No eyelash curler? No problem. You can still create a soft lift using a clean spoon, warm fingers, or a spoolie. These methods are less precise than a traditional curler, but they are useful in a pinchlike when you are traveling, running late, or your curler has mysteriously vanished into the same alternate universe as missing hair ties.
Option A: The spoon method
A spoon can mimic the curved shape of an eyelash curler. Use a clean metal teaspoon with a smooth edge.
- Wash and dry the spoon thoroughly.
- Warm it slightly under warm water, then dry it again.
- Test the temperature on your wrist.
- Place the curved edge near the base of your upper lashes.
- Use your thumb to gently press lashes upward against the spoon’s curve.
- Work in small sections from the inner to outer lashes.
- Finish with mascara to help hold the shape.
This method requires patience. Do not pull lashes outward or scrape the spoon along the lash line. If it feels awkward or unsafe, stop and use a regular curler instead. Beauty hacks should not feel like emergency room origin stories.
Option B: Warm fingers
Warm fingers can help lift lashes gently. Rub clean fingertips together to create mild warmth, then press lashes upward for several seconds. Repeat two or three times, then apply mascara. This method gives a subtle, natural lift rather than a dramatic curl.
Option C: Clean spoolie and lightweight gel
A clean mascara spoolie can brush lashes upward and separate them. Some people use a tiny amount of clear lash gel or aloe-based gel to hold the shape. Use only a very small amount, avoid getting product into the eyes, and skip this method if your eyes are sensitive or watery.
Common Eyelash Curling Mistakes to Avoid
Curling after mascara
This is one of the most common lash mistakes. Mascara can make lashes stiff and sticky. When you clamp curled, mascara-coated lashes, they may stick to the tool and break or pull out. Curl first, mascara second.
Using too much pressure
If your hand is shaking from effort, you are squeezing too hard. Gentle pressure is enough. Multiple soft presses create a better curve than one dramatic clamp.
Skipping tool cleaning
Your eyelash curler touches lashes, skin oils, eye makeup, and sometimes mascara residue. Wipe it down regularly with a gentle cleanser or alcohol wipe, then let it dry completely before use.
Using old mascara
Old mascara can become dry, flaky, and more likely to clump. It may also increase hygiene concerns around the eyes. If your mascara smells strange, looks dry, or irritates your eyes, toss it.
Forgetting your lash type
Short lashes may need a smaller curler or detail curler. Long lashes may need the walk-up technique to avoid bent tips. Straight lashes often benefit from heat or waterproof mascara. Fine lashes usually need lightweight formulas. Your lashes are not being difficult; they simply have preferences.
How to Make Your Eyelash Curl Last Longer
Start with clean lashes, curl in sections, and use mascara strategically. If your lashes fall quickly, try a waterproof mascara at the base only, then use a washable mascara on the tips for easier removal. Another useful trick is to curl one eye, apply mascara, then curl the other eye and apply mascara. This locks each side before the curl relaxes.
Humidity, oily eyelids, heavy eye cream, and thick mascara can all weaken curl. If your lashes droop by lunchtime, check whether skincare products are migrating onto your lashes. Apply eye cream sparingly and give it time to absorb before curling.
Should You Try a Professional Lash Lift?
A professional lash lift is a semi-permanent treatment that curls natural lashes using chemical solutions and a silicone rod. It can be a good option for people who want lifted lashes without daily curling. Results commonly last several weeks, depending on the lash growth cycle and aftercare.
However, lash lifts should be done by a trained professional. The eye area is sensitive, and improper application can cause irritation, dryness, or damaged lashes. If you have allergies, sensitive eyes, or a history of reactions to beauty treatments, ask questions before booking and consider a patch test when recommended.
My Experience-Based Notes: What Actually Helps in Real Life
After trying different eyelash curling methods, the biggest lesson is this: technique matters more than force. Many people assume their lashes are “too straight” or “impossible,” when the real issue is that they are clamping once, rushing, or using a curler that does not fit their eye shape. The first time you use the walk-up methodroot, middle, tipit can feel almost suspiciously simple. But the result is usually softer, prettier, and much less crimped.
For everyday wear, the classic eyelash curler plus a lightweight mascara is the most dependable combination. It is quick, affordable, and easy to control. The best results usually happen when lashes are completely dry. Even a tiny bit of moisturizer or leftover cleanser can make the curl fall faster. If your curl disappears within minutes, try cleansing the lashes first and waiting until the skin around your eyes is fully dry before curling.
Heated lash curlers are helpful, but they are not magic wands. They work best when used patiently. Instead of dragging the tool upward quickly, hold it at the base, pause, then move slowly toward the tips. The lashes need a moment to warm and set. If you expect instant drama in half a second, you may be disappointed. If you give it time, the lift can look very natural and elegant.
The spoon method is useful, but it has a learning curve. It is not the first method I would recommend before an important event unless you have practiced. The spoon needs to be clean, smooth, and only slightly warm. The movement should be gentle and controlled. Done correctly, it can lift lashes nicely. Done while rushing, it can feel like trying to apply eyeliner during turbulence. Not ideal.
Mascara choice makes a huge difference. A heavy volumizing mascara can look beautiful but may pull down a fresh curl, especially on fine or straight lashes. A thinner waterproof formula often holds curl better, but it needs gentle removal at night. Rubbing waterproof mascara off aggressively defeats the whole purpose of careful lash care. Use a proper remover, press it lightly over closed eyes, and let it dissolve the product before wiping.
Another real-life tip: do not chase perfect symmetry. Your two eyes may have different lash patterns, just like eyebrows often look more like sisters than twins. One side may curl easily while the other side needs extra attention at the outer corner. That is normal. Use a detail curler or the tip of a mascara wand to adjust small sections rather than re-clamping the entire lash line repeatedly.
If your lashes are short, focus on lift at the root rather than trying to curl the whole length dramatically. If your lashes are long, avoid loading mascara on the tips. If your lashes point downward, heat and waterproof mascara may be your best team. If your eyes are sensitive, keep everything clean and simple: clean curler, fresh mascara, no glitter fallout, no mystery products from the bottom of a makeup bag that has seen several presidential administrations.
The most important experience-based rule is to stop when something feels wrong. Pinching, pulling, burning, or watering eyes are signs to pause. Eyelash curling should feel easy and painless. When done gently, it can become one of the fastest ways to look awake and polished. When overdone, it becomes a tiny wrestling match with your eyelidsand your eyelids did not sign the waiver.
Conclusion
There are several effective ways to curl your eyelashes, and the best method depends on your lash type, comfort level, and desired look. A classic eyelash curler gives quick, reliable lift. A heated lash curler helps stubborn lashes hold shape. Mascara technique can lock in curl and add definition. No-curler methods, such as a spoon, warm fingers, or a clean spoolie, can work when you need a backup plan.
The secret is gentle technique, clean tools, and realistic expectations. You do not need to punish your lashes into place. With the right method, your lashes can look lifted, soft, and naturally eye-openingno panic clamping required.
Note: Avoid curling irritated eyes, never share eye makeup or lash tools, and stop using any product or device that causes pain, burning, redness, or unusual watering.