A perm can deliver bouncy curls, soft waves, and enough personality to make a quiet ponytail feel underdressed. But hairstyles are relationships, and sometimes the honeymoon ends early. Perhaps your curls came out tighter than expected, you need straight hair for a special event, or you simply miss running a brush through your hair without negotiating with every spiral.
The good news is that you can straighten permed hair. The less-good news is that recently permed hair has already undergone a chemical process, so treating it like untouched hair can lead to dryness, frizz, split ends, or breakage. The safest approach depends on whether you want a temporary style or a genuinely permanent change.
This guide explains three practical ways to straighten permed hair: using a blow-dryer, using a flat iron, and visiting a professional for chemical retexturizing. It also covers preparation, temperature control, aftercare, and the warning signs that mean your hair needs rest rather than another makeover.
Can You Straighten Hair After a Perm?
Yes, but timing and technique matter. A traditional perm changes the arrangement of chemical bonds within the hair shaft. The stylist uses a reducing solution to make the hair moldable, wraps it around rods, and applies a neutralizer to help lock in the new shape. Although the finished curl may look carefree, the strand has just completed a fairly serious chemistry assignment. Research into permanent waving and chemical straightening shows that these processes can reduce hair strength and increase vulnerability to mechanical and thermal damage.
Temporary straightening with a blow-dryer or flat iron does not normally erase the perm. It rearranges weaker, moisture-sensitive bonds, so the curls generally return after shampooing or exposure to enough humidity. A chemical straightening service changes stronger bonds and can permanently straighten the treated portion of the hair.
Do not try to straighten a brand-new perm immediately. Follow the aftercare instructions provided by your stylist, which commonly include keeping the hair dry and relatively undisturbed for at least 48 hours. More importantly, postpone optional heat styling until the hair has been washed, conditioned, and assessed for dryness or breakage. A fresh perm does not need to meet a flat iron on its first weekend.
Check Your Hair Before Choosing a Method
Before plugging in anything that produces heat, inspect several sections of your hair under good lighting. Gently stretch a damp strand and release it. Healthy hair should have some elasticity and return without snapping. Hair that feels gummy, stretches excessively, breaks easily, or appears covered in short flyaway pieces may be overprocessed.
Delay straightening if you notice:
- Unusual shedding or numerous broken strands
- A sore, burned, itchy, or peeling scalp
- Hair that feels mushy when wet
- Severe tangling that remains after conditioning
- White dots, frayed ends, or splitting along the shaft
- Recent bleaching, relaxing, or repeated permanent coloring
Perming, bleaching, coloring, chemical straightening, and high heat can all weaken the hair shaft. Combining several treatments increases the chance of cuticle damage and breakage, particularly where previously processed hair overlaps with a new chemical application. Dermatology guidance therefore emphasizes limiting both chemical processing and excessive heat when hair is already fragile.
Preparation: The Step People Skip and Later Blame on the Flat Iron
Successful straightening begins before the styling tool touches your hair. Start with a gentle shampoo unless your hair is extremely dry, in which case you can use a moisturizing cleanser recommended for chemically treated hair. Apply conditioner from the mid-lengths to the ends, allow it to sit for the directed time, and detangle carefully with your fingers or a wide-tooth comb.
Blot the hair with a microfiber towel or soft cotton T-shirt. Do not twist it into a tight towel turban or rub it as though you are trying to remove a mysterious stain. Wet hair is more flexible and vulnerable to physical damage, especially after chemical processing.
Apply a leave-in conditioner suited to your hair density, followed by a heat-protectant product. A lightweight spray often works well for fine hair, while coarse or very dry hair may respond better to a cream or serum. Leave-in conditioners can reduce friction and may provide additional protection during heat styling, but they do not turn extreme temperatures into a harmless spa treatment.
Method 1: Straighten Permed Hair With a Blow-Dryer
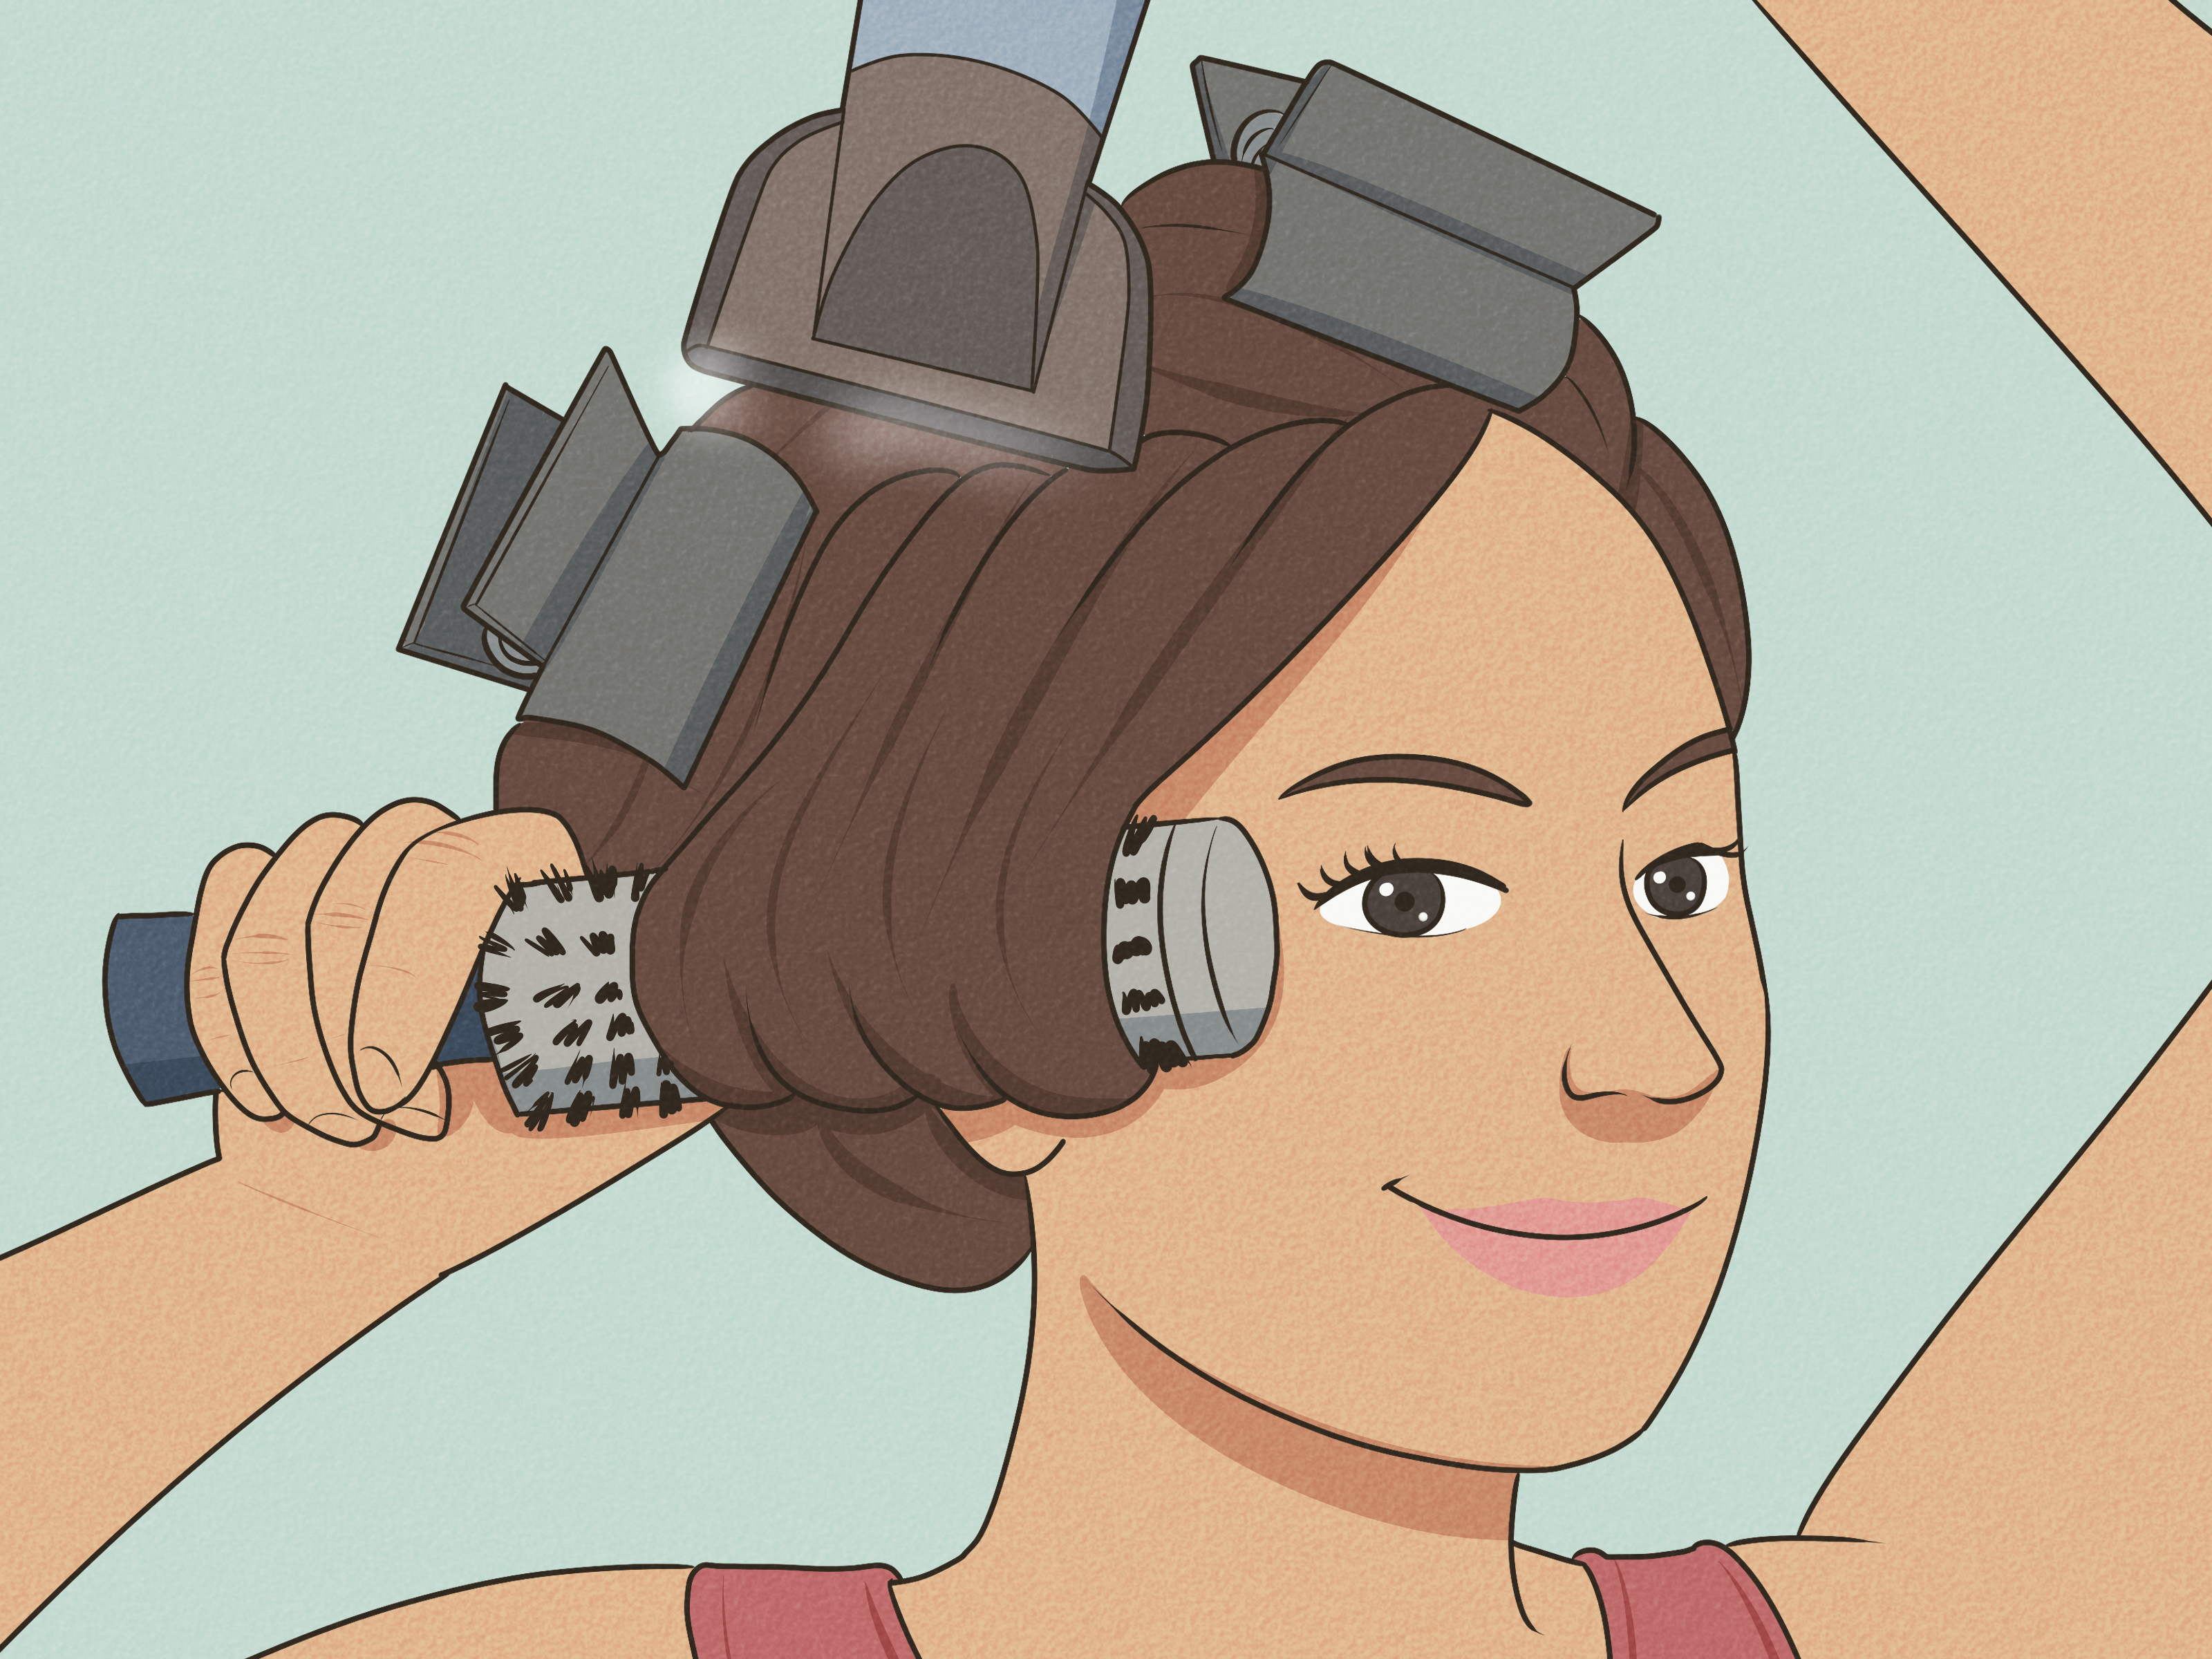
Blow-drying with controlled tension is usually the best first method for permed hair. It can soften curls, stretch the pattern, reduce bulk, and create a smooth finish without pressing each strand between two very hot plates. The result may not be glass-straight, but it is often polished enough for everyday wear.
What you need
- A blow-dryer with a concentrator nozzle
- A paddle brush or round brush
- Sectioning clips
- Leave-in conditioner
- Heat protectant
- A lightweight finishing serum or anti-humidity product
Step 1: Let the hair partially air-dry
Allow your hair to air-dry until it is approximately 60% to 75% dry. Starting with dripping-wet hair dramatically increases drying time and heat exposure. The American Academy of Dermatology recommends partial air-drying and limiting how frequently you use a blow-dryer to reduce damage.
Step 2: Divide the hair into manageable sections
Create four to eight sections depending on your hair’s thickness. Smaller sections give the brush better control and allow air to pass through the strands evenly. Giant sections may save three minutes initially, but they usually create damp roots, puffy ends, and a suspicious amount of frustration.
Step 3: Use low or medium heat
Attach the concentrator nozzle and direct the airflow downward from roots to ends. Keep the dryer moving rather than holding it against one spot. Place the brush beneath a section, pull it gently but firmly, and follow the brush with the dryer.
A paddle brush creates a straighter, less voluminous finish. A round brush provides more polish and lets you curve the ends inward or outward. Avoid aggressive pulling. Chemically treated strands need tension, not an arm-wrestling tournament.
Step 4: Finish with cool air
Once each section is dry, use the cool-shot setting. Cool air will not magically repair damaged hair, but it can help set the style and reduce the need for repeated hot passes. Finish with a small amount of serum on the mid-lengths and ends.
How long will it last?
A blowout may remain smooth for several days, depending on your curl pattern, weather, exercise routine, and nighttime care. Humidity can cause permed hair to expand or curl again because temporary straightening is moisture-sensitive. Wrap the hair loosely at night or sleep on a satin or silk pillowcase to reduce friction.
Method 2: Straighten Permed Hair With a Flat Iron
A flat iron provides the sleekest temporary result, but it also delivers more concentrated heat than a standard blow-dry. Use this method occasionally rather than making it a daily ritual. Dermatologists recommend using flat irons only on completely dry hair, selecting low or medium heat, and limiting frequency because excessive heat can damage every hair type.
Step 1: Make sure the hair is completely dry
Never flat-iron damp permed hair unless you are using a specialized wet-to-dry device exactly as directed by its manufacturer. With a traditional iron, any remaining water can rapidly turn into steam inside or around the hair fiber, increasing dryness and breakage.
Step 2: Apply heat protectant evenly
If you applied protection before blow-drying, check whether the product is designed to protect through both drying and ironing. Otherwise, apply a light thermal spray to dry hair and allow it to dry before using the iron. More product is not automatically better; oversaturating the hair can make it sticky and encourage multiple passes.
Step 3: Choose the lowest effective temperature
Use an adjustable ceramic or similarly even-heating flat iron. Start around 250°F to 300°F for fine, fragile, bleached, or visibly damaged hair. Medium-density hair may need approximately 300°F to 350°F. Even though thicker hair can sometimes tolerate higher settings, recently permed hair should generally be treated as chemically processed hair rather than challenged to survive the maximum number on the dial. Professional styling guidance similarly recommends lower temperatures for fine or damaged strands.
Step 4: Work in thin sections
Separate a section no wider than the plates. Comb through it, place the iron near the roots without touching the scalp, and glide steadily toward the ends. One controlled pass is preferable to five fast passes. If a section does not straighten, reduce its size before increasing the temperature.
Step 5: Protect the finished style
Allow the hair to cool before tying it back. Use a tiny amount of smoothing serum and avoid heavy water-based sprays that may reactivate the curl pattern. During showers, wear a cap and keep the bathroom reasonably ventilated; enough steam can turn your sleek finish into an unauthorized science experiment.
Will flat ironing permanently remove a perm?
No. Properly performed thermal styling is temporary. Your curls should return after washing. However, excessive temperature or repeated passes can cause permanent heat damage, leaving sections unusually straight, limp, rough, or unable to hold their original curl. That is not successful perm removal; it is structural damage wearing a fashionable disguise.
Method 3: Have the Perm Professionally Straightened
If you want the treated hair to remain straight after shampooing, consult an experienced stylist about professional chemical retexturizing. Depending on the original perm chemistry, hair condition, and desired result, the stylist may discuss a thio-based straightening system, smoothing service, Japanese thermal reconditioning, or another compatible technique.
This is not a sensible home experiment. Permanent straightening works by breaking and reforming chemical bonds within the hair. Applying an incompatible product, processing for too long, overlapping chemicals, or using the wrong temperature can cause scalp irritation, burns, severe breakage, or hair loss. Reviews of chemical straighteners have documented changes to the cuticle and cortex as well as scalp inflammation and loss caused by breakage.
What a responsible stylist should evaluate
- The type and approximate date of your original perm
- Previous color, bleach, relaxer, or smoothing treatments
- Elasticity, porosity, density, and visible breakage
- The condition of your scalp
- Compatibility between the old and proposed chemicals
- The results of a strand test
A strand test allows the stylist to observe how a hidden section reacts before processing the entire head. The stylist may refuse the service if the hair is too fragile. That is not poor customer service. It is your hair narrowly avoiding an extremely short haircut.
Be cautious with keratin and smoothing treatments
Keratin-style smoothing treatments are not all chemically identical. Some reduce frizz without making the hair completely straight, while others release formaldehyde or related substances when heated. The FDA advises consumers to read ingredient information, ask the salon about the product being used, and consider whether the facility has appropriate ventilation. OSHA has also found that certain smoothing products may contain or release formaldehyde even when marketing claims create confusion about their contents.
Ask to see the ingredient list or Safety Data Sheet. Names associated with formaldehyde exposure can include formaldehyde, formalin, and methylene glycol. Stop the service and move to fresh air if you experience strong eye irritation, coughing, wheezing, burning in the nose or throat, dizziness, or difficulty breathing.
How to Care for Permed Hair After Straightening It
Stretch the style instead of reheating it
Use a loose wrap, low-tension bun, or satin pillowcase to preserve straightness overnight. Touch up only obvious bends rather than ironing every strand again. The goal is to make one styling session last, not to reapply heat whenever a hair develops an independent opinion.
Condition regularly
Use a rinse-out conditioner after shampooing and add a weekly moisturizing mask if your hair feels dry. Protein or bond-support products may improve the feel and manageability of some damaged hair, but they cannot restore a severely fractured strand to its original condition. Once the ends split extensively, trimming is the reliable solution.
Avoid stacking services
Do not schedule bleaching, permanent coloring, another perm, or chemical straightening without telling the stylist about every previous treatment. Processed hair can look acceptable on the surface while having reduced tensile strength internally. Permed hair is also more likely to become dry because the chemical process alters the structure that helps it behave like healthy, untreated hair.
Know when to consult a dermatologist
See a board-certified dermatologist if you develop persistent scalp pain, sores, inflammation, patchy hair loss, or ongoing breakage near the roots. Stop using the suspected product and do not attempt to “fix” chemical damage with another chemical treatment.
Common Mistakes to Avoid
- Straightening immediately after the perm: Give newly processed hair time to settle and follow your stylist’s aftercare instructions.
- Using an iron on damp hair: Traditional flat irons belong on completely dry strands.
- Turning the temperature to maximum: Higher heat is not a substitute for smaller sections and better technique.
- Skipping heat protectant: It cannot eliminate damage, but it provides a useful protective layer.
- Making repeated passes: One slow, controlled pass is usually safer than repeatedly attacking the same section.
- Applying a home relaxer over unknown perm chemicals: Chemical incompatibility can cause catastrophic breakage.
- Ignoring breakage: Short pieces around the sink are not your hair “adjusting.” They are a warning.
Practical Experiences: What Usually Happens in Real Life
The instructions on a styling tool often make straightening sound beautifully simple: switch it on, glide it through, become shiny. Real permed hair is less cooperative. Its response depends on the original curl size, strand thickness, porosity, chemical history, climate, and how much damage existed before the perm.
Experience 1: The blow-dry looked softer but survived better
Someone with a loose body-wave perm may expect a blow-dryer to create pin-straight hair. Instead, the first attempt often produces smooth roots, gentle bends through the middle, and slightly curved ends. At first, this can feel like an incomplete result. In practice, it is frequently the better trade-off.
The hair retains movement, requires less concentrated heat, and usually feels softer the following morning. Using smaller sections and directing airflow downward makes a much bigger difference than increasing the temperature. A paddle brush creates a relaxed, natural finish, while a round brush gives more shine and control at the ends. For office days, dinners, or photographs, this may be all the straightening that is actually necessary.
Experience 2: The flat iron worked, but impatience caused problems
With tight curls, the most common early mistake is taking sections that are too thick. The surface becomes straight while the hairs inside remain wavy, so the user raises the heat and repeats the pass. The final result may look sleek, but the ends can feel rough and smell faintly overheated.
A better second attempt uses thinner sections, complete drying, a moderate temperature, and one deliberate pass. The styling session may take longer, yet the hair usually looks more even and needs fewer touch-ups. The surprising lesson is that careful preparation saves more time than speed. Ten extra minutes of sectioning can prevent several days of crunchy ends and personal regret.
Experience 3: Humidity revealed that temporary means temporary
A freshly straightened perm can look flawless indoors and begin expanding the moment it encounters summer air. This is normal. Blow-drying and flat ironing temporarily reshape moisture-sensitive bonds, but humidity encourages the hair to move toward its chemically set curl pattern.
Anti-humidity styling products, a thorough blow-dry, and protecting the hair from rain can extend the result. Still, no temporary technique makes permed hair permanently immune to weather. Planning a sleek style for an outdoor wedding in August may require accepting a little movementor carrying an umbrella with the seriousness of a security professional.
Experience 4: Chemical correction was not always the fastest solution
People unhappy with a perm often assume that another chemical service will immediately restore their previous texture. During a professional consultation, however, a stylist may discover overlapping color, fragile ends, or inconsistent porosity. In those cases, the safest plan may involve conditioning, trimming, temporary blowouts, and waiting before reconsidering permanent straightening.
This waiting period can feel inconvenient, but it often preserves far more length. Chemically straightening compromised hair may produce a beautiful result on appointment day and extensive breakage later. A skilled stylist evaluates not only whether the hair can become straight, but whether it can remain attached to the head afterward.
Experience 5: The best result came from changing the goal
Some people begin with the goal of perfectly straight hair and eventually choose “smoother and easier to manage” instead. Stretching curls with a blow-dryer, polishing only the front and ends with a flat iron, or wearing a low bun can create a sleek appearance with much less heat.
This hybrid approach is especially useful while growing out a perm. New growth has the natural texture, while the older lengths retain the chemical curl, creating two patterns that respond differently to heat. Expecting both areas to behave identically can lead to overworking the more fragile ends. Treating each section according to its condition produces a healthier, more convincing style.
The consistent lesson across these experiences is that the lowest effective amount of heat and chemical processing usually gives the best long-term outcome. Straight hair is enjoyable. Straight hair that still feels like hair is even better.
Conclusion
The three main ways to straighten permed hair are tension blow-drying, careful flat ironing, and professional chemical straightening. Blow-drying is generally the gentlest temporary option. A flat iron offers a sleeker finish but requires completely dry hair, heat protection, modest temperatures, and minimal passes. Permanent chemical reversal should be handled by an experienced stylist after a consultation and strand test.
Whatever method you choose, remember that permed hair is chemically processed hair. Condition it, handle it gently, limit repeated heat, and stop when you see unusual breakage or scalp irritation. The goal is not merely to defeat the curl for one afternoon. It is to enjoy a different style without turning your bathroom sink into a crime scene full of broken ends.