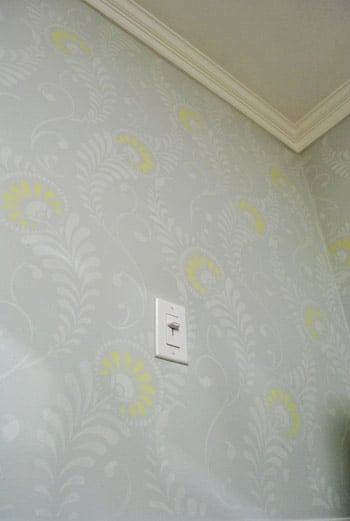
Wall stenciling is the sneaky little design trick that lets you get the charm of wallpaper without the commitment, the seams, the paste, or the emotional spiral that begins when panel three refuses to line up with panel two. With the right stencil, a little paint, and a patient attitude, you can turn a plain wall into a custom accent feature that looks intentional, expensive, and very much not like something you panic-painted at 11:47 p.m.
The beauty of a stenciled wall is flexibility. You can go bold with a large Moroccan pattern in a dining room, subtle with tone-on-tone vines in a bedroom, playful with polka dots in a nursery, or elegant with a geometric border in a hallway. Even better, wall stencils are reusable, budget-friendly, and easy to paint over when your style changes. Try doing that with wallpaper after it has bonded to your drywall like it signed a lifetime lease.
This guide covers practical wall stenciling tips, common mistakes, paint choices, layout ideas, and after-photo inspiration so you can plan your project with confidence. Whether you are a first-time DIY decorator or a weekend warrior with a drawer full of painter’s tape, these steps will help you create crisp lines, balanced patterns, and a finished wall worthy of several dramatic “before and after” photos.
Why Wall Stenciling Is Back in Style
Decorative wall painting has never really disappeared, but stenciling is having a fresh moment because homeowners want character without permanent renovation costs. Modern wall stencils are not the tiny grapevine borders of the 1990s. Today’s designs include oversized florals, Art Deco fans, checkerboards, damask patterns, tile-inspired repeats, botanical murals, scallops, arches, and minimalist linework.
Compared with wallpaper, stenciling offers three big advantages: lower cost, easy customization, and simple repair. If one section smudges, you can touch it up. If you want the pattern lighter, you can use less contrast. If you move furniture and discover a hidden mistake behind the bookcase, congratulationsyour secret is safe.
Stenciling is especially useful for renters or homeowners who like to refresh rooms every few years. A painted stencil pattern can be covered with primer and a new wall color, making it less intimidating than peel-and-stick wallpaper, traditional wallpaper, or expensive wall treatments.
Choose the Right Wall for Stenciling
Before buying a stencil, choose your wall carefully. A smooth, clean, lightly textured wall gives the sharpest result. Heavy orange-peel texture, knockdown texture, or uneven plaster can cause paint to seep under the stencil edges. That does not mean textured walls are impossible, but the pattern will look softer and more handmade.
Best walls for stenciling
Accent walls are the easiest place to begin. Try the wall behind a bed, sofa, console table, fireplace, desk, crib, or dining banquette. These areas naturally draw the eye, so the stencil feels like a design feature instead of a random wall that got dressed up and forgot to invite the others.
Small spaces also work beautifully. Powder rooms, entryways, laundry rooms, mudrooms, reading nooks, and closet interiors can handle bolder patterns because you do not stare at them all day. A dramatic stencil in a tiny bathroom can make the space feel decorated instead of just small with plumbing.
Walls to avoid for a first project
If this is your first attempt, avoid walls with many windows, doors, outlets, sconces, shelves, or awkward corners. Every obstacle means extra measuring, bending, taping, and possibly inventing new words. Start with a clean, open wall so you can focus on technique.
Pick a Stencil Pattern That Fits the Room
The scale of the stencil matters as much as the design itself. Large stencils create a wallpaper-like look and often finish faster because each repeat covers more space. Small stencils can be charming, but they require more repeats, more alignment checks, and more chances for your patience to leave the building.
Large-scale patterns
Large Moroccan, damask, floral, lattice, and geometric stencils work well in living rooms, bedrooms, dining rooms, and offices. They make a strong statement and can visually fill a wall without needing much art. For a sophisticated look, choose low-contrast colors such as warm white over beige, soft gray over charcoal, or satin paint over matte paint in the same color.
Small-scale patterns
Small stars, dots, leaves, diamonds, or repeating motifs are lovely for nurseries, kids’ rooms, closets, and craft rooms. They can look whimsical without overwhelming the space. The key is spacing. A tiny stencil repeated too tightly can start to feel busy, while a wider repeat feels airy and intentional.
Tile-inspired stencils
Tile stencils are popular for walls, backsplashes, stair risers, and floors because they mimic patterned cement tile at a fraction of the cost. On walls, they work especially well below chair rails, around bathroom vanities, or as a kitchen breakfast nook feature. Use durable paint and consider a protective finish in areas exposed to moisture or splashes.
Gather the Right Supplies
Wall stenciling is not complicated, but the right tools make the difference between crisp pattern and “abstract fog with regrets.” Here is what you need before opening the paint can.
Basic wall stenciling supplies
- Reusable wall stencil
- Painter’s tape or low-tack stencil adhesive
- Small foam roller or stencil brush
- Paint tray or paper plate
- Latex or acrylic interior paint
- Level or laser level
- Measuring tape
- Pencil or chalk pencil
- Drop cloth
- Paper towels or lint-free rags
- Baby wipes or damp cloth for quick cleanup
- Small artist brush for touch-ups
A foam roller is best for large, repeating wall patterns because it covers quickly and evenly. A stencil brush is better for delicate details, corners, edges, and multi-color designs. Many DIYers use both: a roller for the main wall and a brush for the tricky spots where the stencil meets trim, ceiling lines, or corners.
Prep the Wall Before You Stencil
Preparation is not glamorous, but neither is a dusty wall with paint blobs. Clean the wall first with a mild soap-and-water solution or a gentle wall cleaner. Kitchens and bathrooms may need extra attention because grease, hairspray, lotion residue, and mystery household film can interfere with paint adhesion.
Patch holes, sand rough areas, and wipe away dust. If your wall has a glossy finish, lightly scuff it so the stencil paint grips better. If the base color is fresh, allow it to dry fully before stenciling. Paint may feel dry to the touch quickly, but it can remain soft underneath for hours or even days depending on paint type, humidity, temperature, and ventilation.
Do a test run first
Before touching the wall, practice on cardboard, poster board, or a leftover painted sample board. This helps you learn how much paint to load, how hard to press, and how the stencil behaves. It also reveals whether your color contrast is too strong, too faint, or just right.
The golden rule is simple: use less paint than you think. Then use even less. A nearly dry roller or brush produces cleaner stencil edges than a wet, juicy one. Paint overload is the main reason patterns bleed under the stencil.
Plan the Layout Before Painting
A professional-looking stenciled wall starts with a smart layout. Do not simply slap the stencil into a corner and hope the pattern behaves. Walls are rarely perfectly square, ceilings are rarely perfectly level, and houses love to keep secrets.
Start in the center or at the focal point
For full-wall patterns, many decorators start at the center of the wall and work outward. This keeps the design balanced, especially behind a bed, sofa, fireplace, or vanity. Use a level to draw a faint vertical guideline. Align the stencil with that line for your first repeat.
If the wall has a strong focal point, such as a mirror or mantel, center the pattern around it. A symmetrical design looks more polished when the main motif lands in the middle rather than wandering slightly off-center like it got distracted.
Use registration marks
Many reusable stencils include registration marks, which help line up the next repeat. Use them. They are not decorative confetti; they are tiny lifesavers. Mark lightly with pencil or use small pieces of painter’s tape to guide placement.
Check level often
Even if your first repeat is perfect, small shifts can build across the wall. Check with a level every few repeats. If the pattern drifts slightly, make tiny corrections gradually. A small adjustment is invisible. A sudden correction may make the design look like it hit a speed bump.
How to Stencil a Wall Step by Step
Step 1: Secure the stencil
Place the stencil on the wall and secure it with painter’s tape. For extra hold, especially with large stencils, use a light coat of repositionable stencil adhesive on the back. Let the adhesive become tacky before placing it on the wall. Avoid heavy adhesive buildup because it can leave residue or pull at fresh paint.
Step 2: Load the roller or brush lightly
Dip the foam roller into paint, then roll off most of it on a tray, paper towel, or scrap cardboard. The roller should look evenly coated but not wet. If it shines with paint, it is too loaded. The same rule applies to stencil brushes: dip, swirl, then blot.
Step 3: Apply paint with light pressure
Roll gently over the stencil using short passes. Do not press hard. Heavy pressure forces paint under the stencil edges. If using a brush, tap or swirl lightly rather than brushing sideways across the openings. Sideways brushing can lift the stencil and smear the pattern.
Step 4: Build coverage slowly
One thin coat is usually enough for a soft look. For bolder color, apply a second light pass after the first layer begins to set. Resist the urge to achieve full coverage in one loaded pass. Wall stenciling rewards patience and punishes enthusiasm with fuzzy edges.
Step 5: Peel carefully
Remove the stencil while the paint is still slightly wet. Pull it straight away from the wall rather than dragging it sideways. Wipe the back of the stencil every few repeats to prevent paint buildup from transferring onto the wall.
Step 6: Repeat the pattern
Align the stencil using registration marks or guide lines. Continue across the wall, completing all full stencil repeats before cutting into corners, edges, outlets, and ceiling lines. Save the awkward sections for last, when the main wall is finished and your confidence is still standing.
How to Avoid Paint Bleeding
Paint bleeding is the most common wall stenciling problem, but it is usually preventable. The main causes are too much paint, too much pressure, poor stencil contact, textured walls, and rushing between repeats.
Use the dry roller method
The dry roller method means loading your roller with paint and then removing most of it before touching the stencil. It feels wrong at first because the roller looks almost too dry. Trust the process. A dry roller creates crisp edges and gives you control.
Hold the stencil flat
Use your free hand to press the stencil flat near the area you are painting. Work in sections. Do not rely only on tape at the corners, especially with flexible plastic stencils that may lift slightly in the middle.
Clean buildup regularly
After several repeats, paint can collect on the back of the stencil. Wipe it gently with a damp cloth or baby wipe, then dry it before continuing. Wet stencil backs can smear paint, so keep everything clean and dry.
Best Paint Finishes for Wall Stenciling
Interior latex and acrylic paints are the most common choices for wall stenciling. For most rooms, eggshell or satin base paint works well because it is washable without being too shiny. For the stencil pattern, you can use the same finish or play with contrast.
Flat and matte finishes
Flat paint hides imperfections and gives a soft, wallpaper-like effect. It is excellent for bedrooms, offices, and low-traffic spaces. However, it may be harder to clean, so avoid flat finishes in splash-prone areas unless you choose a washable matte formula.
Satin and semi-gloss accents
For a subtle tone-on-tone look, try using the same paint color in two sheens: matte on the wall and satin or semi-gloss for the stencil. The pattern appears when light hits it, creating depth without shouting across the room. This is a great option for minimalist interiors where you want texture, not visual noise.
Metallic paint
Metallic stencil paint can look beautiful in dining rooms, powder rooms, and bedrooms, but use it carefully. A little shimmer feels elegant. Too much can make the wall look like it is auditioning for a disco documentary. Gold, champagne, bronze, and pearl finishes work best as accents over muted base colors.
Wall Stenciling Ideas by Room
Bedroom
Stencil the wall behind the bed to create a faux headboard or wallpaper effect. Soft botanical patterns, arches, medallions, and tone-on-tone geometrics make the room feel cozy and finished. Keep colors calm if the bedroom is meant for rest. Your sleep schedule does not need neon chevrons yelling at it.
Living room
A living room stencil can frame a sofa, fireplace, or built-in shelves. Large patterns work well because furniture breaks up the wall visually. Try warm neutrals, muted greens, deep blues, or charcoal accents for a polished look.
Powder room
Powder rooms are perfect for bold wall stencils. Since the space is small, a dramatic pattern feels intentional rather than overwhelming. Try dark walls with light stenciling, metallic details, or a tile-inspired repeat above wainscoting.
Entryway
An entryway stencil sets the tone for the entire home. A simple geometric repeat, leafy pattern, or painted border can make the area feel welcoming. Choose durable paint because entry walls deal with bags, coats, keys, pets, and the occasional shoe that somehow becomes airborne.
Kids’ rooms
Stars, clouds, moons, rainbows, animals, dots, and scallops are charming in children’s rooms. Stenciling lets you create a playful theme without committing to expensive murals. When tastes change, repainting is easier than removing themed wallpaper.
After Photos: What a Successful Stenciled Wall Looks Like
Great after photos show more than a pattern. They show transformation. A plain beige wall becomes a cozy reading nook. A basic powder room becomes boutique-hotel cute. A forgotten hallway becomes a design moment. When taking after photos, style the room lightly so the wall feels integrated into the space.
After photo example 1: Soft bedroom accent wall
Imagine a white bedroom wall transformed with a pale taupe botanical stencil behind a linen upholstered bed. The pattern is visible but gentle, adding movement without clutter. In the after photo, the bed is made with layered neutral bedding, two warm wood nightstands, and soft lamps. The wall looks like designer wallpaper, but the cost is closer to a weekend paint project.
After photo example 2: Bold powder room makeover
A small powder room starts with plain gray walls and no personality. After stenciling, the upper walls feature a deep navy base with a champagne metallic fan pattern. A round mirror, brass faucet, and small vase of greenery finish the look. The after photo feels dramatic, polished, and much more expensive than the actual project.
After photo example 3: Cheerful laundry room refresh
A laundry room wall gets a repeating white star stencil over soft sage green paint. Floating shelves hold baskets, detergent jars, and folded towels. The after photo proves that even a chore zone can look cheerful. Will it make laundry fun? Let’s not get reckless. But it may make folding towels slightly less tragic.
After photo example 4: Faux wallpaper dining nook
A dining nook becomes a focal point with a large-scale lattice stencil in cream over warm beige. The after photo includes a round table, woven chairs, and a simple pendant light. The pattern adds depth and rhythm, making the nook feel designed rather than leftover.
How to Photograph Your Stenciled Wall
After photos are important if you plan to share your project online, document your DIY progress, or simply admire your own bravery. Take photos during daylight when possible. Natural light shows paint color more accurately and reduces harsh shadows.
Stand back far enough to include furniture and decor, not just the wall. A close-up shows detail, but a wider shot shows impact. Take one straight-on photo, one angled photo, and one detail shot near the pattern. If the stencil has a sheen contrast, photograph it from the side so the light catches the finish.
Before taking the final shot, remove paint cans, tape, ladders, cords, and that one snack plate you forgot on the windowsill. The wall deserves its moment. Let it shine without a half-eaten sandwich in the supporting cast.
Common Wall Stenciling Mistakes
Using too much paint
This is the number one mistake. Too much paint causes bleeding, smudging, and thick edges. Load lightly and build slowly.
Skipping the level
Your eye may be good, but walls are sneaky. Use a level or laser guide to keep the pattern straight.
Starting in the wrong place
If the main motif is off-center behind a bed, mirror, or sofa, the whole wall may feel slightly awkward. Plan the focal point first.
Ignoring wall texture
Textured walls soften stencil lines. Use less paint, lighter pressure, and realistic expectations.
Not cleaning the stencil
Paint buildup on the stencil can transfer onto the wall. Wipe it regularly and dry it before continuing.
Touch-Ups and Fixes
Small imperfections are normal. In fact, they are part of the handmade charm. But if a mistake bothers you, fix it with a small artist brush and the base wall color. Clean up fuzzy edges, fill tiny gaps, and correct obvious smudges after the stencil paint dries.
For larger mistakes, let the area dry completely, paint over it with the base color, and stencil again. Do not try to wipe wet paint aggressively from the wall. That usually turns a small smudge into a large modern art installation called “Panic in Latex.”
Budget and Time Expectations
Most wall stenciling projects are affordable compared with wallpaper, tile, or custom murals. Costs vary depending on stencil size, paint quality, tools, and wall size, but many accent walls can be completed with one reusable stencil, a sample-size or quart-size paint, a foam roller, tape, and basic supplies.
Time depends on pattern complexity. A simple accent wall may take a few hours. A detailed full-room stencil may take a full weekend or more. Corners, outlets, ceilings, and trim slow the process. Build in breaks so your hands, eyes, and attitude stay cooperative.
Extra Experience Notes: What Real DIY Wall Stenciling Teaches You
The first thing wall stenciling teaches you is humility. You may begin the project feeling like a calm, capable design genius. Twenty minutes later, you are negotiating with a plastic sheet, a foam roller, and gravity. This is normal. The trick is not to rush through the awkward beginning. Once you complete a few repeats, your rhythm improves and the project becomes surprisingly satisfying.
One useful experience is to treat the first repeat like a test even if it is on the actual wall. Choose a spot that will be partly hidden by furniture if possible. This lets you adjust paint load and pressure before working across the most visible area. Many beginners discover that the best results come from a roller that seems almost too dry. The pattern may look faint at first, but the edges stay crisp, and you can always add another light layer.
Another lesson is that walls are not perfect grids. Even in newer homes, corners can be uneven, baseboards can tilt slightly, and ceilings may not run perfectly level. If you force the stencil to follow every crooked edge, the pattern can look distorted. Instead, keep the pattern level where the eye notices it most, then handle edges with partial repeats or careful touch-ups. Furniture, curtains, and decor hide more than you think.
Cleaning the stencil regularly feels annoying, but it saves the project. Paint slowly builds along the cut edges, especially with detailed patterns. If you ignore it, the buildup can create blurry lines or random marks. Keep damp wipes nearby, clean the back of the stencil every few repeats, and dry it before placing it back on the wall. Wet plastic against fresh paint is not your friend.
Color choice also looks different on a full wall than it does on a tiny sample. High-contrast combinations create drama, but they also make every alignment issue more visible. If you want a forgiving first project, choose colors that are two or three shades apart, or use the same color in different sheens. Tone-on-tone stenciling is elegant, modern, and mercifully kind to minor mistakes.
After photos are another part of the experience. A stenciled wall may look busy in a close-up but balanced in a full-room shot. Style the space before judging the final result. Add lamps, textiles, art, plants, or furniture back into the room. The pattern usually settles down visually once the rest of the room returns. A wall that seems loud while empty can feel perfect once paired with a bed, sofa, mirror, or console table.
Finally, accept that handmade does not mean machine-perfect. A stenciled wall has tiny variations, and that is part of its appeal. The goal is not sterile perfection. The goal is a beautiful, personal wall that adds style, texture, and a little “Yes, I did that myself” energy to your home. And if anyone gets close enough to inspect one tiny imperfect corner, hand them a roller. They are clearly ready to help.
Conclusion
Wall stenciling is one of the most rewarding DIY paint projects because it delivers a big visual change without a major renovation budget. With careful prep, light paint application, steady alignment, and a little patience, you can create a wall that looks like custom wallpaper, painted tile, or designer mural work. The best results come from choosing the right stencil scale, testing your colors first, using a dry roller or stencil brush, and taking your time around corners and edges.
Whether you want a calm bedroom accent wall, a bold powder room makeover, a playful kids’ room, or a photo-worthy entryway, stenciling gives you room to experiment. It is affordable, personal, and easy to update later. Plus, the after photos can be extremely satisfyingthe kind of satisfying that makes you casually invite people over and say, “Oh that wall? Just a little thing I did,” while secretly waiting for applause.
Note: This article synthesizes practical wall stenciling knowledge from reputable U.S. home improvement, paint, and interior design resources, rewritten into original web-ready content.