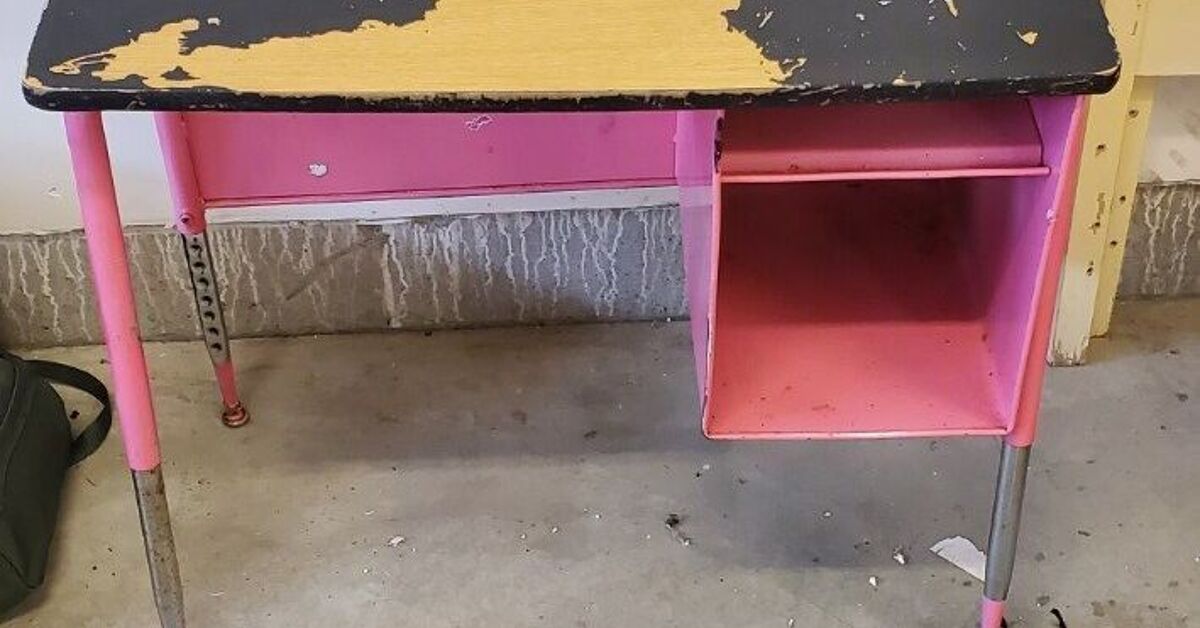
An ugly metal vintage desk has a special kind of confidence. It sits there with chipped paint, rusty corners, sticky drawers, and the emotional energy of a DMV waiting room. But underneath that sad office-gray shell is usually a surprisingly sturdy piece of furniture begging for a second chance. Unlike flimsy modern desks that wobble if you look at them too aggressively, vintage metal desks were often built like tiny tanks. Heavy? Absolutely. Durable? Very. Stylish? Not yetbut that is where the makeover magic begins.
A smart ugly metal vintage desk makeover is more than throwing paint at a problem and hoping the desk forgives you. The best results come from careful cleaning, rust repair, sanding, priming, painting, hardware updates, and a few design choices that make the finished piece feel intentional rather than “I found this behind a warehouse and panicked.” With the right process, an old metal office desk can become a modern home office centerpiece, craft table, writing station, vanity, or dramatic statement piece that makes guests say, “Wait, that was the ugly one?”
This in-depth guide walks through how to transform a rusty, outdated metal desk into something practical, polished, and full of character. We will cover prep, tools, paint choices, style ideas, common mistakes, and real-world experience tips from tackling this type of furniture project.
Why Vintage Metal Desks Are Worth Saving
Before you drag that metal desk to the curb, consider what you are actually holding onto. Vintage steel desks often have strong frames, deep drawers, smooth industrial lines, and a weight that says, “I survived three office managers and a fax machine.” They are excellent candidates for restoration because the structure is usually better than the surface.
Metal furniture also responds beautifully to a makeover when properly prepped. Rust can often be removed or stabilized. Scratches can be sanded smooth. Dull paint can be replaced with a satin black, soft cream, forest green, navy blue, warm beige, or even a bold retro color. New hardware, peel-and-stick drawer liners, a wood desktop overlay, or brass pulls can make the piece feel custom without requiring a custom budget.
Best Uses for a Refinished Metal Desk
A restored metal desk can work in many spaces, including a home office, kids’ study area, garage workspace, sewing room, art studio, entryway command center, or small apartment workstation. Because metal desks tend to be tough, they are especially useful in rooms that need furniture with muscle. You can write on them, craft on them, stack books on them, and occasionally question your life choices while assembling a printer nearby.
Step 1: Inspect the Desk Before You Start
Every vintage desk has a story. Some stories are charming. Some involve mystery stains. Start by inspecting the entire piece before buying supplies. Open every drawer. Check the frame for bends, missing screws, stuck runners, rust holes, sharp edges, and loose handles. Look underneath the desk, along the drawer tracks, around the feet, and anywhere moisture may have sat for years.
If the desk has serious structural damage, deep rust holes, or drawers that cannot be repaired, decide whether it is worth the time. Surface rust is manageable. A desk that looks like it spent a decade at the bottom of a lake may be a more advanced rescue mission.
Check for Old Paint and Safety Concerns
Older painted furniture may contain lead-based paint, especially if the finish is very old, unknown, or already flaking. Do not aggressively dry-sand suspicious old paint without testing it first. Use a lead test kit or consult a professional if you are unsure. If lead is present, follow lead-safe practices or hire a certified professional. A desk makeover should end with a beautiful workspace, not a cloud of hazardous dust and regret.
Step 2: Gather Your Tools and Materials
The right supplies make the project smoother and help the finish last. You do not need a professional workshop, but you do need more than wishful thinking and one half-empty can of paint from 2016.
Basic Supply List
- Drop cloth or plastic sheeting
- Gloves, safety glasses, and a mask or respirator
- Degreasing cleaner or mild dish soap
- Clean rags and tack cloth
- Wire brush or sanding sponge
- Sandpaper in medium and fine grits
- Rust remover, rust converter, or rust-inhibiting primer if needed
- Metal primer
- Spray paint or enamel paint formulated for metal
- Painter’s tape
- Screwdriver or drill for removing hardware
- New knobs, pulls, or drawer liners if desired
If the desk has a laminate, wood, or vinyl writing surface, inspect that separately. The top may need a different primer or repair method than the metal body. When in doubt, match the product to the surface, not to your mood.
Step 3: Clean Like the Desk Has Been Keeping Secrets
Cleaning is not glamorous, but it is the step that separates a long-lasting makeover from a paint job that peels like a sunburn. Vintage desks collect dust, hand oils, tape residue, spilled coffee, old adhesive, drawer grime, and possibly one fossilized paper clip from the Carter administration.
Remove drawers if possible. Take off knobs, pulls, label holders, and any detachable pieces. Wash the metal surfaces with a degreasing cleaner or warm water with a small amount of dish soap. Scrub corners, drawer fronts, drawer pulls, and the underside of the top. Rinse or wipe away cleaner residue and let everything dry completely.
Do Not Paint Over Grease
Paint does not bond well to oily residue. If the desk lived in a garage, school, workshop, or old office, degreasing is especially important. After the first cleaning, wipe the surface again with a clean rag. If the rag still comes away dirty, the desk is not ready for primer. Be patient. Future you, the one admiring the smooth finish, will be grateful.
Step 4: Remove Rust, Loose Paint, and Rough Spots
Rust and peeling paint are the villains of the metal desk makeover story. They must be handled before primer. Use a wire brush, sanding sponge, or sandpaper to remove loose rust and flaking paint. You do not always need to strip the entire desk to bare metal, but you do need a stable, dull, clean surface.
For light rust, sanding and a rust-inhibiting primer may be enough. For heavier rust, consider a rust converter or dedicated rusty metal primer. The goal is to stop rust from bleeding through the new finish. Painting directly over active rust is like putting a fancy hat on a raccoonit may look charming for a minute, but chaos is still underneath.
Sand for Adhesion, Not Destruction
Once loose material is removed, lightly sand glossy painted areas so primer can grip. You are not trying to punish the desk. You are creating a slightly scuffed surface that helps the coating bond. Wipe away all sanding dust with a tack cloth or clean damp rag, then let the metal dry.
Step 5: Repair Dents, Holes, and Drawer Issues
Small dents and scratches add vintage charm, but large gouges may need repair. Use a metal-compatible filler for dents if you want a smoother modern look. Apply the filler according to the product directions, let it cure, then sand it flush. If drawer tracks are sticky, clean them thoroughly and check for bent runners. A small adjustment can make the desk feel less like a haunted filing cabinet.
Also tighten loose screws, replace missing feet, and check drawer alignment before painting. Paint can make a desk prettier, but it will not magically fix a drawer that opens with the grace of a jammed vending machine.
Step 6: Prime the Metal Properly
Primer is not optional for most metal desk makeovers. It helps paint adhere, improves coverage, blocks stains, and adds rust protection. Choose a primer designed for metal surfaces. If rust was present, use a rust-inhibiting primer. If you sanded to bare steel, prime the exposed metal as soon as possible to reduce the chance of new rust forming.
Spray primer works well for metal desks because it reaches corners, drawer edges, and curved surfaces more evenly than a brush. However, brush-on or roll-on primer can also work if you prefer less overspray. Work in a well-ventilated area, protect the surrounding space, and follow the product’s drying and recoat times.
Thin Coats Win
Several light coats are better than one thick coat. Heavy primer can drip, pool near drawer edges, and create rough texture. Move steadily, slightly overlap passes, and keep the can or brush moving. The first coat does not need to look perfect. Its job is to create a strong base, not win a beauty pageant.
Step 7: Choose the Right Paint Finish
The best paint for a metal vintage desk is durable, smooth, and suited for metal. Spray paint formulated for metal is popular because it gives an even finish with fewer brush marks. Enamel paint is another strong choice for furniture that will see daily use. Satin and semi-gloss finishes are practical because they are easier to wipe clean than flat paint while still looking stylish.
For a modern look, try matte black, charcoal, olive green, cream, warm white, or deep navy. For a retro makeover, consider mustard yellow, teal, coral, mint, or red. For an industrial style, use black with brass hardware or a hammered metal finish. For a softer home office, choose sage green or mushroom beige and pair it with wood accents.
Color Ideas That Work Beautifully
- Matte black: sleek, modern, and forgiving on old imperfections.
- Sage green: calm, vintage-friendly, and perfect for a cozy office.
- Navy blue: polished without feeling boring.
- Cream or warm white: bright, clean, and great for small rooms.
- Deep red or teal: bold retro energy with personality.
- Two-tone: painted base with a wood-look top for contrast.
Step 8: Paint the Desk Like You Mean It
Set up your workspace outdoors or in a highly ventilated area. Protect floors, walls, nearby furniture, and anything else that does not need a surprise makeover. Tape off areas you do not want painted, including drawer interiors, original labels, or special trim.
Apply paint in multiple thin coats. With spray paint, use smooth back-and-forth strokes and keep the can moving. Start spraying slightly before the edge of the desk and continue past the other edge to avoid heavy spots. Allow each coat to dry according to the label before adding the next.
Avoid Common Paint Problems
Drips happen when coats are too heavy. Rough texture can happen if you spray too far away or paint in poor weather conditions. Fingerprints happen when impatience defeats wisdom. Let the paint cure properly before reassembling the desk or placing heavy items on top. Dry-to-the-touch does not always mean fully cured.
Step 9: Upgrade the Hardware
Hardware can completely change the personality of a vintage metal desk. Old handles may be charming, but if they are rusted, bent, or painfully plain, swap them for something better. Brass pulls can warm up dark paint. Matte black handles create a modern industrial look. Chrome keeps the retro office vibe alive. Leather pulls add a handmade touch.
If the original hardware is unique, consider cleaning and repainting it instead of replacing it. Remove rust, prime the metal, and spray it in a complementary finish. Tiny details matter. A freshly painted desk with sad old handles is like wearing a tuxedo with muddy sneakers.
Step 10: Add Drawer Liners, a Desktop Surface, and Final Styling
Once the desk is painted and cured, make the inside as good as the outside. Add peel-and-stick drawer liner, wallpaper scraps, cork, or felt to the drawers. This hides old scratches and makes opening the drawers feel satisfying. If the desktop is damaged, add a glass top, wood panel, contact paper, or a custom-cut writing pad.
Style the finished desk with a lamp, small plant, tray, framed art, pencil cup, and comfortable chair. Keep accessories simple so the desk remains the star. Remember, this piece just had a glow-up. Let it have its moment.
Budget-Friendly Makeover Ideas
An ugly metal vintage desk makeover does not need to be expensive. The biggest costs are usually primer, paint, sandpaper, and hardware. If you already have tools, the entire project can often be done on a modest budget. Shop thrift stores, salvage yards, estate sales, online marketplaces, and garage sales for desks with good bones.
Low-Cost Design Tricks
- Use leftover wallpaper as drawer liner.
- Spray old hardware instead of buying new pulls.
- Add a wood-look contact paper top for warmth.
- Use painter’s tape to create stripes or color-blocked drawers.
- Polish original chrome legs for a retro finish.
- Add labels to drawers for a vintage office look.
If you want a high-end result, spend your money on quality primer and paint first. Decorative details are fun, but the finish is what determines whether the desk looks professionally restored or like it lost a fight with a craft aisle.
Common Mistakes to Avoid
The most common mistake is skipping prep. Paint cannot hide dirt, grease, rust, or loose old finish forever. Another mistake is painting too thickly. Thick coats may seem faster, but they can sag, bubble, and chip more easily. Rushing cure time is another classic DIY trap. Give the paint time to harden before reinstalling drawers, placing a computer on top, or sliding the desk against a wall.
Also avoid choosing paint only by color. Make sure it is made for metal or compatible with your primer. If the desk will live in a garage, sunroom, or humid area, rust protection matters even more. Function and beauty should work together, like coffee and deadlines.
Experience Notes: What a Metal Desk Makeover Really Teaches You
After working through an ugly metal vintage desk makeover, the first lesson is that the desk always looks worse before it looks better. Once the drawers are removed, the hardware is off, and sanding dust appears, there is a moment when you may wonder whether you have made a terrible life decision. That is normal. DIY projects have a dramatic middle chapter. Do not quit there.
The second lesson is that cleaning takes longer than expected. Vintage metal desks often hide grime in drawer tracks, under handles, along seams, and around the feet. A desk may look clean from across the room, then reveal decades of dust once you get close. Taking time to degrease thoroughly makes the biggest difference in the final finish. Paint sticks better, primer goes on smoother, and the whole project feels less like covering up a problem and more like truly restoring the piece.
The third lesson is that rust has a personality. Light rust is usually easy to sand away. Stubborn rust around feet or drawer edges may need more patience. A wire brush is helpful, but it can also fling debris, so eye protection is not just decorative. If rust remains active under paint, it can return like an unwanted sequel. Treating it properly with sanding, rust converter, or rust-inhibiting primer is worth the extra step.
The fourth lesson is that spray painting requires rhythm. Beginners often hover too long in one spot, which creates drips. The trick is to move confidently and lightly, building coverage over several coats. The first coat may look thin and disappointing. That is fine. By the third coat, the desk starts to transform. It is a little like watching a makeover montage, except you are wearing old clothes and trying not to inhale paint fumes.
The fifth lesson is that hardware can surprise you. Sometimes the original handles look awful until they are cleaned. Other times, replacing the pulls instantly makes the desk look custom. Before buying new hardware, measure the distance between screw holes. Vintage desks do not always follow modern sizing, and discovering that after shopping is a special kind of DIY comedy.
The sixth lesson is that imperfections are part of the charm. A vintage metal desk does not need to look factory-new. A tiny ding, a softened corner, or an old label holder can make the piece feel authentic. The goal is not to erase its history; the goal is to make it useful, beautiful, and safe for another decade or two.
The final lesson is that a restored desk changes how a room feels. A piece that once looked too ugly to keep can become the anchor of a workspace. It carries character that flat-pack furniture rarely offers. Every scratch you sanded, every coat you sprayed, every drawer you wrestled back into place becomes part of the story. And when someone compliments it, you get the quiet satisfaction of saying, “ThanksI made it over myself,” which is basically the DIY version of a mic drop.
Conclusion
An ugly metal vintage desk makeover is one of the most satisfying furniture projects because the transformation can be dramatic, affordable, and practical. The key is respecting the process: inspect the piece, clean it thoroughly, handle old paint safely, remove rust, sand for adhesion, prime with the right product, and paint in thin, even coats. Add updated hardware, drawer liners, and thoughtful styling, and that once-forgotten metal desk can become a standout piece with real personality.
Whether your style is modern industrial, soft vintage, bold retro, or clean minimalist, an old metal desk gives you a strong foundation to customize. It may start as the ugliest thing in the garage, but with patience and a plan, it can become the most interesting desk in the house.
Note: Always follow product label directions for primer, paint, drying time, ventilation, and protective equipment. If you suspect lead-based paint on an older desk, test before sanding or consult a qualified professional.