Note: Vintage electronics can contain lethal voltages, even after they are unplugged. This article is educational and safety-focused, not a wiring guide. If you are not trained to work around mains power, let a qualified repair technician handle the first power-up.
There is a special kind of optimism that makes a person drag a dusty tube radio, silver-faced receiver, or attic-rescued amplifier onto the bench and say, “Let’s just plug it in and see what happens.” This optimism has a cousin named “smoke.” Sometimes it is followed by a pop, a smell, a tripped breaker, a ruined transformer, or the sudden realization that the 1950s were charming but not always generous with electrical safety.
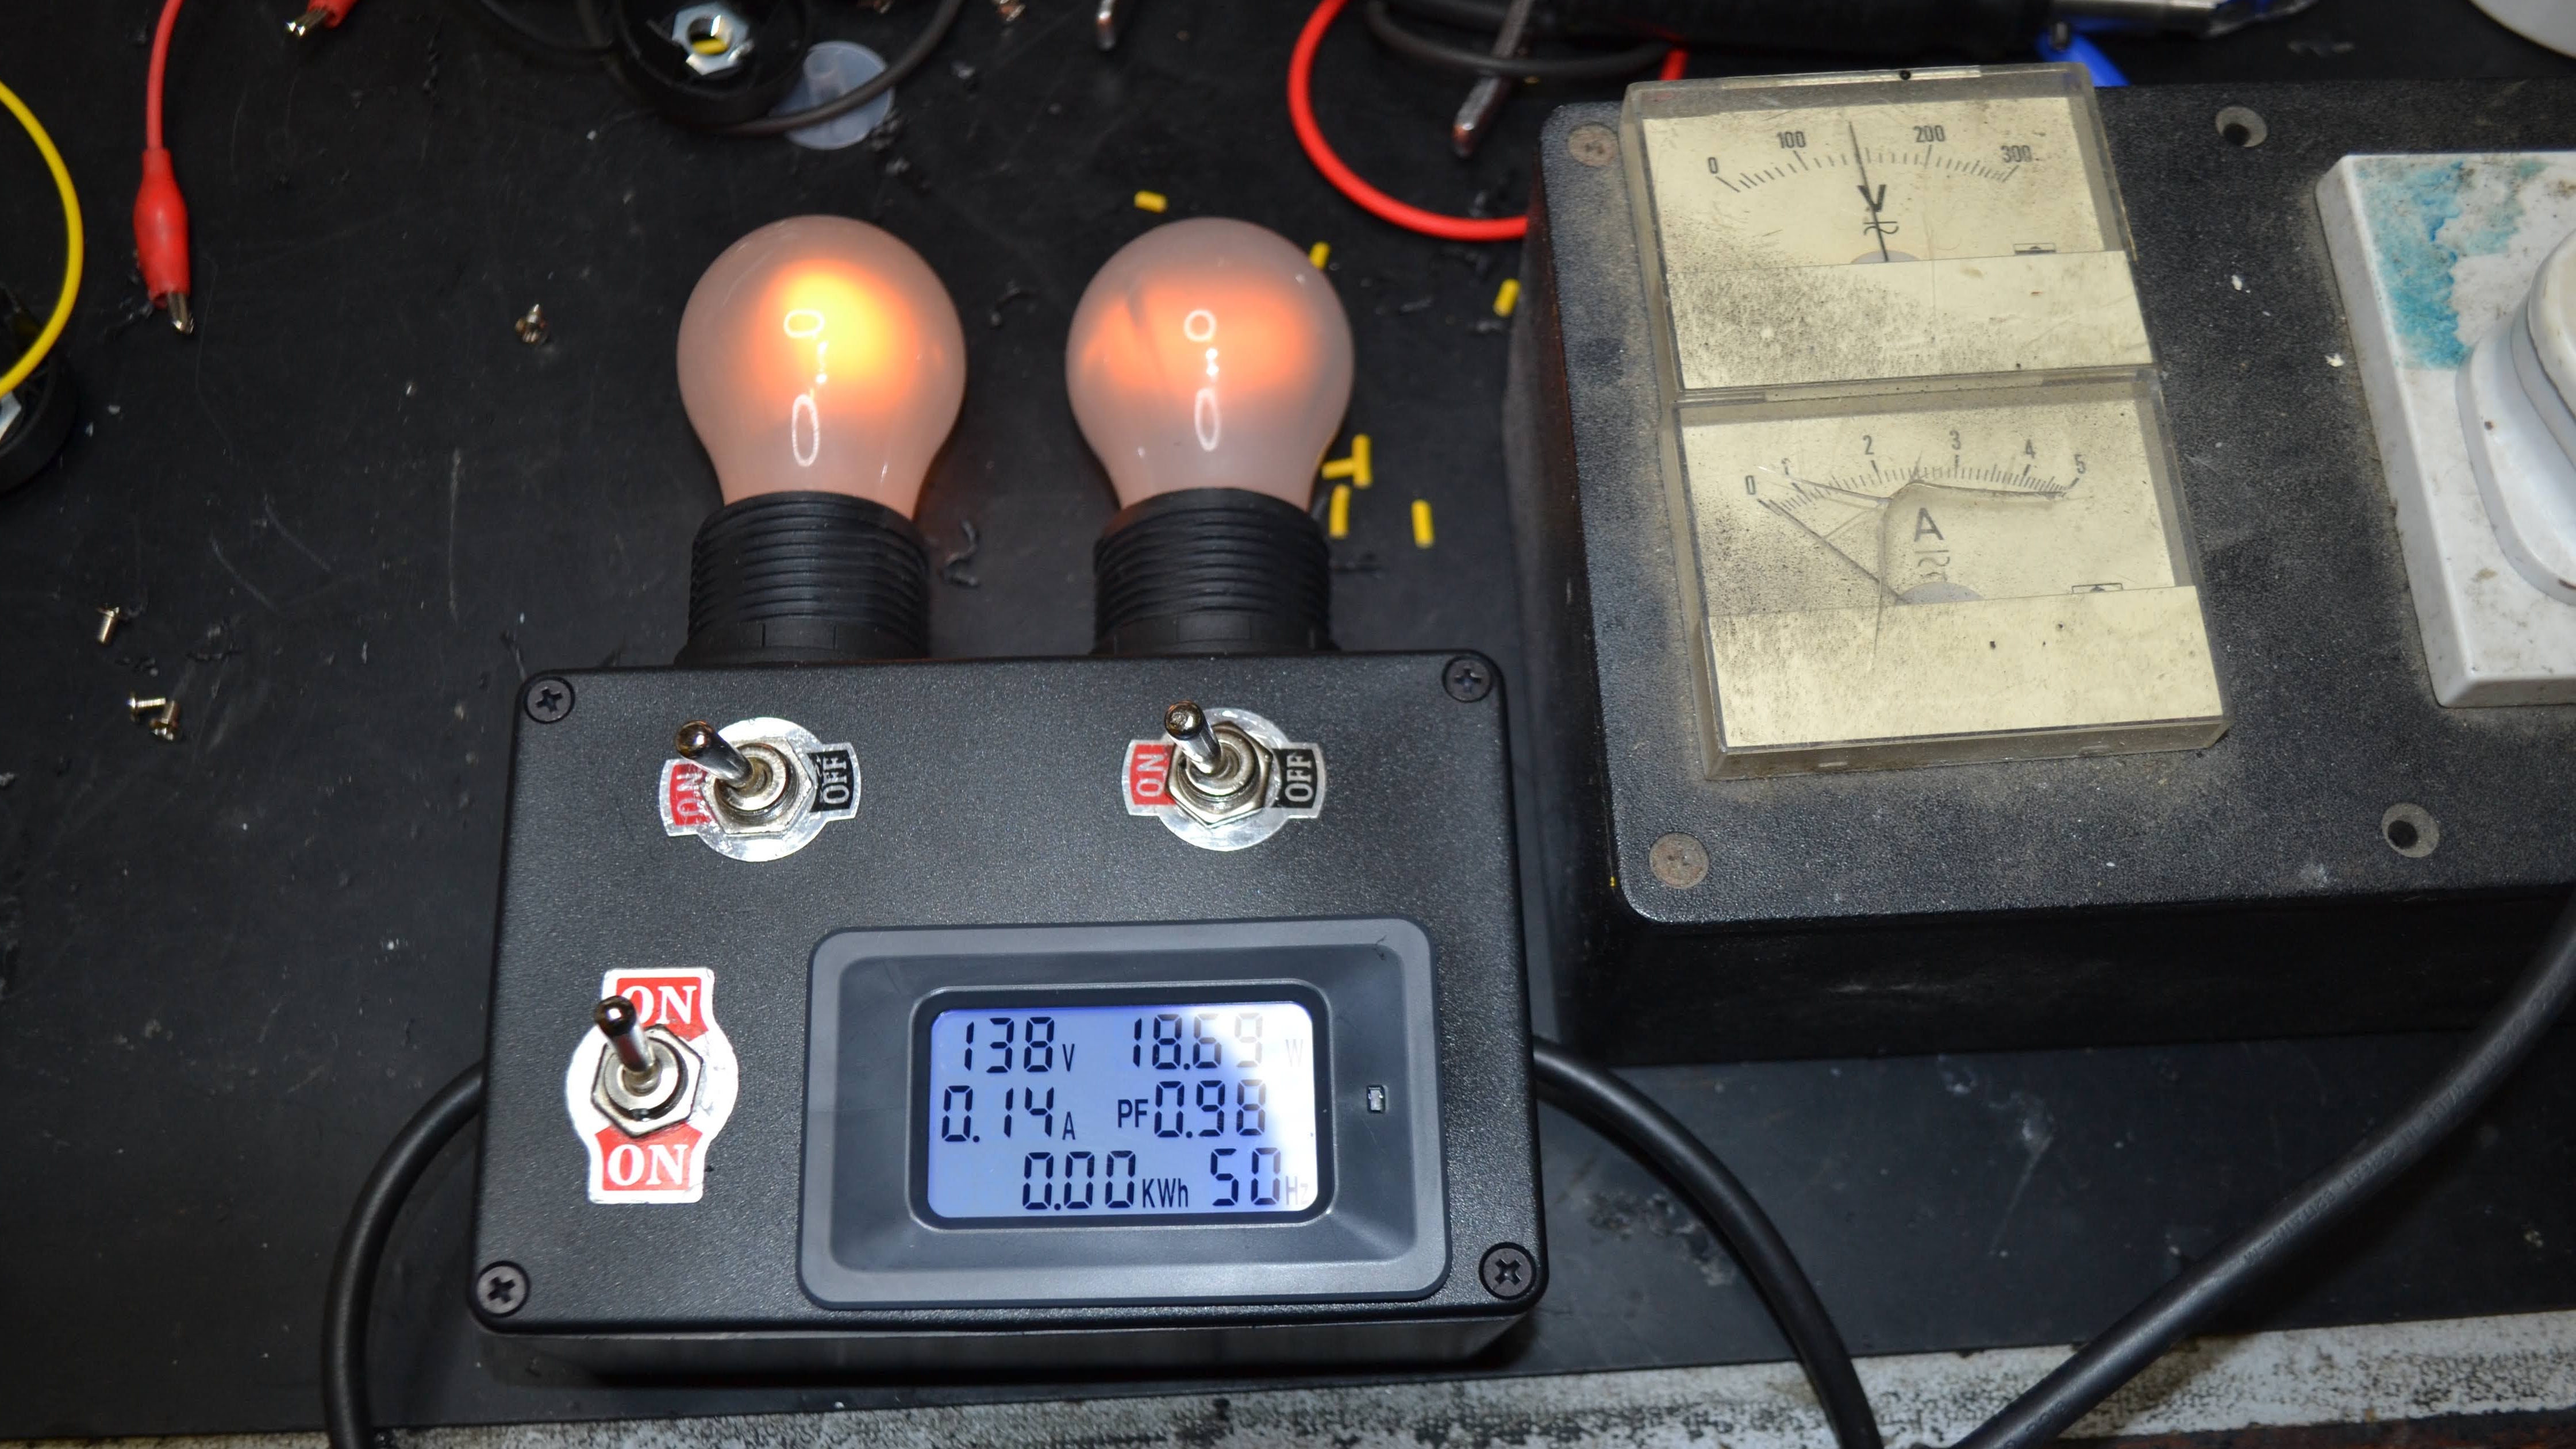
That is where the dim-bulb tester comes in. It is one of the simplest tools in vintage electronics repair, yet it can save old gear from a dramatic second death. Instead of feeding full wall power directly into an unknown device, a dim-bulb tester places an incandescent lamp in series with the equipment. If the old radio or amplifier has a short circuit or serious power-supply fault, the bulb lights brightly and limits current. In plain English: the bulb takes the hit, and your collectible does not instantly become a toaster with knobs.
The key phrase, however, is less unsafely. A dim-bulb tester is not a magic force field. It does not replace inspection, proper fusing, an isolation transformer, careful measurement, or common sense. It is a diagnostic current limitera warning light with manners. Used correctly, it helps make the first power-up of vintage electronics more controlled, more informative, and less likely to end with the ancient ritual known as “releasing the magic smoke.”
What Is a Dim-Bulb Tester?
A dim-bulb tester, often shortened to DBT, is a current-limiting test device used when powering up old electronic equipment for the first time after repair, restoration, storage, or mystery-marketplace purchase. The basic idea is simple: an incandescent light bulb is placed in series with the device under test. Because the current must pass through the bulb, the bulb behaves like a self-adjusting resistor.
When current draw is normal, the bulb may flash briefly at startup and then dim down. When the equipment tries to pull too much current, the bulb glows brightly and drops more voltage across itself. That leaves less voltage available to the vintage radio, tube amplifier, receiver, television, or bench project. The result is not perfect protection, but it often prevents catastrophic damage during the first few seconds of testing.
Think of it as a bouncer at the door of your restoration party. If the equipment behaves, it gets power. If it tries to sprint in while carrying a shorted rectifier and a bad filter capacitor, the bulb steps in and says, “Not tonight, sparky.”
Why Vintage Electronics Need a Gentle First Power-Up
Old electronics age in ways that are not always visible from the outside. A cabinet may look beautiful while the power cord is brittle, the switch contacts are dirty, the electrolytic capacitors are dried out, and the paper capacitors are electrically leaky. Many vintage radios and amplifiers were built with components that were normal for their time but are now well past their expected service life.
Electrolytic capacitors are especially important. They are commonly used in power supplies to smooth rectified voltage. When they deteriorate, they may leak current, lose capacitance, heat up, or fail shorted. Paper capacitors in old radios can also become leaky and cause tubes, transformers, or other components to operate far outside their intended conditions. In a transformer-powered set, a serious short can damage an expensive power transformer. In a transformerless “hot chassis” radio, careless testing can create shock hazards that deserve serious respect.
That is why experienced restorers usually start with inspection and basic service before applying power. They look for obvious damage, cracked insulation, burned resistors, wrong fuses, loose hardware, mouse artwork, corroded terminals, and capacitors that have clearly had a difficult life. A dim-bulb tester belongs after that inspectionnot before it. It is not a substitute for looking inside the device. It is a way to make the next step less reckless.
How a Dim-Bulb Tester Works Without Getting Too Nerdy
An incandescent bulb has a tungsten filament. When the filament is cold, its resistance is relatively low. As more current flows, the filament heats up, glows, and its resistance rises. That changing resistance is what makes the bulb useful as a current limiter. If the equipment under test draws too much current, the bulb becomes bright and resists the flow more strongly.
In normal operation, many devices produce a brief inrush current at startup. A tube amplifier may energize a transformer and charge filter capacitors. A solid-state receiver may pull current for a moment while its power supply wakes up. On a dim-bulb tester, this often appears as a quick bright flash followed by a much dimmer glow. That brief flash is not automatically bad; it may simply be the equipment’s power supply charging up.
The warning sign is a bulb that stays bright. A steady bright bulb usually means the equipment is drawing excessive current. That can point to a shorted rectifier, bad filter capacitor, transformer problem, wiring mistake, failed output transistor, or another fault. Instead of repeatedly blowing fuses while muttering words not approved for family radio, the technician gets a visible clue and a chance to shut things down.
What the Bulb Is Trying to Tell You
Bright Flash, Then Dim
This is often a good sign. It usually means the equipment had startup inrush current, then settled into a lower current draw. The device may still have problems, but it is not obviously shorted at the power input.
Stays Bright
This is the classic “stop and investigate” signal. The equipment is likely drawing too much current. Do not keep it powered just because the bulb looks dramatic. This is not a Christmas decoration; it is a warning.
No Light at All
No bulb glow may mean the device is drawing very little current, the power switch is off, a fuse is open, a power cord is bad, or the circuit is not complete. It can also mean the bulb wattage is too high for the equipment being tested. The answer is not to poke around randomly while everything is live. The answer is to unplug, discharge safely, and troubleshoot methodically.
Dim Glow That Slowly Changes
A changing glow can happen as tubes warm up, capacitors charge, or a fault develops under load. This is where the dim-bulb tester becomes more than a safety accessory. It becomes a diagnostic conversation. The bulb does not speak fluent English, but it does blink in a language restorers learn to appreciate.
Why Incandescent Bulbs Matter
A dim-bulb tester depends on the behavior of an incandescent filament. LED bulbs and compact fluorescent lamps do not behave the same way and should not be used as direct substitutes in the classic tester design. This is one reason old-school repair people have become oddly protective of ordinary incandescent bulbs. Once dismissed as inefficient little heat globes, they are now treasured bench supplies, right next to solder wick and that one screwdriver nobody is allowed to borrow.
Because general-purpose incandescent bulbs have become harder to find in many stores, restorers often save suitable bulbs when they come across them. Some specialty incandescent lamps may still be available, but the important point is that a dim-bulb tester needs a real filament lamp with appropriate voltage and power ratings for the bench setup. The bulb is not there for illumination; it is part of the electrical behavior of the test circuit.
Dim-Bulb Tester vs. Variac vs. Isolation Transformer
People often mention dim-bulb testers, variacs, and isolation transformers in the same breath. They are related bench tools, but they do different jobs.
A Dim-Bulb Tester Limits Current
The DBT helps restrict current if the device under test has a fault. It gives a visible indication of excessive current draw. It is inexpensive, simple, and very useful for first power-up tests.
A Variac Adjusts Voltage
A variac, or variable autotransformer, lets a technician raise AC voltage gradually. This can be useful during troubleshooting, but a variac by itself does not provide isolation from the mains and does not automatically limit current enough to protect equipment from every fault. Turning the knob slowly is not the same as being protected.
An Isolation Transformer Reduces Shock Risk in Certain Tests
An isolation transformer provides galvanic isolation between the wall supply and the device under test. It is especially important when working on transformerless equipment or when attaching grounded test instruments such as oscilloscopes. It does not make high voltage harmless, but it can reduce specific shock and grounding hazards when used correctly.
The best bench setup depends on the equipment and the technician’s skill. Many experienced restorers use more than one tool: inspection first, then an isolation transformer where appropriate, then current limiting, then measurement. The dim-bulb tester is one player on the team, not the entire league.
What Equipment Benefits From a Dim-Bulb Tester?
A dim-bulb tester is especially popular for vintage radios, tube amplifiers, stereo receivers, old televisions, and certain power-supply repairs. It can also help when testing equipment after replacing capacitors, rectifiers, output transistors, power cords, or other components that affect the main power path.
For example, imagine an old tube radio that has just had its filter capacitors replaced. The cabinet is handsome, the dial glass glows like a tiny city at night, and the owner is eager to hear AM static in glorious historical fidelity. A dim-bulb tester gives the restorer a cautious way to apply power and watch for abnormal current draw. If the bulb flashes and dims, the test may proceed. If the bulb glows like a miniature sun, something is wrong and the radio gets unplugged before the power transformer files a complaint.
Or consider a vintage solid-state receiver with a blown fuse history. Replacing the fuse without diagnosing the cause is like putting a new bandage on a dragon bite. A dim-bulb tester can help reveal whether a shorted output transistor or power-supply fault is still present. The bright bulb warns the technician before the new fuse sacrifices itself for no useful reason.
What a Dim-Bulb Tester Cannot Do
A dim-bulb tester is useful, but it has limits. It cannot diagnose every fault. It cannot confirm that a radio is aligned, that an amplifier bias is correct, that a chassis is safe to touch, or that all capacitors have been replaced properly. It cannot make a damaged power cord trustworthy. It cannot turn a beginner into an electrician by sheer glow power.
It also affects the voltage delivered to the equipment. Because the bulb is in series, the device under test may not receive full line voltage during testing. That is part of the point, but it also means some circuits may behave differently on the tester than they do on normal power. Relays may not close, motors may not start, tube heaters may warm slowly, and regulated supplies may complain. Those symptoms must be interpreted with context.
Modern switching power supplies can also be tricky. Some may pulse, refuse to start, or behave unpredictably when fed through a current-limiting bulb. The tester still has value, but the interpretation may not be as straightforward as it is with an old transformer-powered radio or linear amplifier.
Safe Habits Before Any First Power-Up
Before using a dim-bulb tester, slow down. Vintage electronics reward patience and punish dramatic gestures. Start with a visual inspection. Look for burned parts, melted insulation, incorrect repairs, missing covers, metal debris, leaking capacitors, cracked solder joints, and signs that a previous owner believed electrical tape was a personality trait.
Check the fuse rating. A fuse wrapped in foil or replaced with a wildly oversized value is not “upgraded.” It is a little arson intern waiting for a promotion. Inspect the power cord. Old rubber and cloth cords can crack, fray, or expose conductors. If the cord is unsafe, do not energize the equipment.
When working around tube gear, remember that high-voltage capacitors can retain charge. Use proper discharge methods, insulated tools, and verified measurement practices. Keep one hand away from the chassis when appropriate, avoid jewelry, work on a dry bench, and do not troubleshoot mains-powered equipment when tired. Fatigue and high voltage have poor chemistry.
Choosing Bulb Wattage Conceptually
The bulb wattage affects how much current can reach the equipment. Lower-wattage bulbs limit current more aggressively, while higher-wattage bulbs allow more current. Small radios may be tested with lower-wattage bulbs; larger amplifiers or televisions may require higher-wattage bulbs for meaningful operation. The right choice depends on the expected power consumption of the device.
This is where experience matters. A bulb that is too small may glow brightly even when nothing is seriously wrong because the equipment’s normal current draw is enough to heat the filament. A bulb that is too large may not limit current enough for a delicate first test. The goal is not to “make the equipment work” immediately. The goal is to learn whether it is safe enough to continue troubleshooting.
Why the Name Is Funny but the Tool Is Serious
The term “dim-bulb tester” sounds like something used to evaluate cartoon villains, but the tool has earned its place on repair benches for decades. It is cheap, visual, and surprisingly informative. It turns invisible current draw into something you can see from across the bench. When the bulb stays bright, the message is simple: stop feeding power into the problem.
There is also a philosophical lesson here. Vintage electronics restoration is not about forcing an old device awake. It is about listening to it. The dim-bulb tester is part of that listening process. It says, “Let’s ask politely before we shove 120 volts into a machine built when Eisenhower was on television.” That is not fear. That is respect with a filament.
Common Mistakes to Avoid
Using an LED Bulb
An LED bulb is not a proper replacement for the incandescent filament in a classic dim-bulb tester. It may light, flicker, or do something decorative, but it will not provide the same current-limiting behavior.
Skipping the Inspection
Do not use the tester as an excuse to ignore obvious problems. If the power cord is crumbling, the fuse is wrong, or a capacitor has physically failed, fix the known issue before applying power.
Assuming Dim Means Safe
A dim bulb does not prove the equipment is safe. It only suggests that current draw is not excessive under that test condition. Dangerous voltages may still be present.
Leaving Faulty Equipment Powered
If the bulb stays bright, shut down and troubleshoot. Do not let the equipment sit there “for a minute” to see if it improves. Electrical faults rarely heal through encouragement.
Real-World Example: The Old Receiver That Would Not Stop Blowing Fuses
A common repair scenario involves a vintage stereo receiver that blows a fuse immediately. The hopeful owner replaces the fuse. It blows again. Another fuse appears. It blows too. At this point the receiver is not being repaired; it is being fed tiny glass snacks.
With a dim-bulb tester, the next test becomes more informative. If the bulb stays bright, the receiver is still drawing too much current. The technician can then investigate the power supply, rectifier, filter capacitors, and output stage without repeatedly sacrificing fuses. In many solid-state receivers, shorted output transistors can pull heavy current. The DBT does not identify the exact transistor, but it helps confirm that the fault remains before full power is applied.
After the fault is repaired, the same tester may show a different behavior: a brief flash, then dim. That change is useful evidence. It does not mean the job is finished, but it suggests the immediate short is gone and the next round of careful measurements can begin.
Real-World Example: The Antique Radio With Tired Capacitors
Old radios often contain electrolytic and paper capacitors that have aged beyond reliability. A restorer may replace the most failure-prone capacitors, verify wiring, inspect resistors, and then use a dim-bulb tester for first power-up. The bulb becomes a quick health indicator for the power supply.
If the bulb glows brightly and stays there, the restorer stops. Possible causes might include a wiring error, a shorted capacitor, a bad rectifier tube, or a transformer problem. If the bulb flashes and dims, the radio may be ready for further testing: checking B+ voltage, heater voltage, audio response, hum level, and eventual alignment.
The important point is discipline. The tester is not there to rush the process. It is there to slow the disaster down enough that a human can intervene.
Why “Less Unsafely” Is the Honest Phrase
Calling any mains-powered bench procedure completely safe is a bit too confident. Vintage electronics may contain line-connected chassis, high-voltage tube plates, stored capacitor charge, brittle insulation, and unknown modifications. A dim-bulb tester reduces certain risks, especially overcurrent damage, but it does not remove all hazards.
That honesty matters. A good safety mindset does not say, “I bought one tool, therefore I am invincible.” It says, “This tool reduces one category of risk, so what risks remain?” Shock risk remains. Fire risk remains. Measurement error remains. Incorrect assumptions remain. The dim-bulb tester is helpful because it makes one dangerous momentthe first application of powerless chaotic.
Experience Section: What Working With a Dim-Bulb Tester Teaches You
After you have watched enough old electronics wake up through a dim-bulb tester, you start to develop a different relationship with power. You stop thinking of the wall outlet as an on/off switch and start thinking of it as a very enthusiastic energy source that needs adult supervision. The bulb becomes a little translator between the vintage device and your bench. It tells you when the equipment is nervous, when it is hungry, and when it is trying to eat the entire current supply like a raccoon in a bird feeder.
One of the most useful experiences is learning patience. Many beginners want instant proof: does the radio play, does the amplifier sing, does the dial lamp glow? A dim-bulb tester encourages a slower rhythm. You plug in, power on briefly, observe, power down, think, and measure. The process feels less exciting than flipping the switch and hoping for applause, but it is far kinder to rare parts. Power transformers, output transformers, and vintage knobs with impossible-to-match styling deserve that kindness.
Another lesson is that visual clues matter. A bright bulb that refuses to dim can save hours of confusion. It tells you the problem is not imaginary. Something is pulling current, and the equipment is not ready for full line voltage. On the other hand, a quick flash followed by a soft glow can be wonderfully reassuring. It is not a certificate of health, but it is the bench equivalent of hearing a patient cough instead of explode.
Using a dim-bulb tester also teaches humility. Sometimes the bulb glows brightly after you are absolutely certain you repaired the fault. That is when you recheck your work and discover a solder bridge, reversed electrolytic capacitor, misread resistor value, or a wire that looked connected but was actually performing community theater. The bulb does not care about your confidence. It only reports current.
There is also a practical workshop benefit: fewer blown fuses and fewer dramatic failures. Repeatedly replacing fuses can become expensive, annoying, and misleading. Worse, it can tempt people to install a larger fuse, which is a terrible idea wearing a tiny metal hat. A dim-bulb tester gives you a reusable current-limiting clue without encouraging unsafe fuse experiments.
For collectors, the biggest lesson may be respect for age. Vintage electronics are not modern appliances with retro costumes. They were designed for different safety standards, different service expectations, and different component technologies. Some were built beautifully. Some were built economically. Some were repaired by professionals. Some were repaired by Uncle Larry with a soldering gun the size of a canoe paddle. The dim-bulb tester helps you approach each device as an unknown machine, not a guaranteed survivor.
Finally, the tool teaches a healthy kind of skepticism. When an online seller says “untested,” assume it means “tested by the universe and found suspicious.” When a listing says “worked last time I tried it,” ask whether that was last week or during the Carter administration. When a piece of gear has no fuse, a cracked cord, and a cabinet full of dust, do not let nostalgia talk you into bravery. Let the dim-bulb tester, your meter, and your safety habits have a vote.
In the end, powering up vintage electronics less unsafely is not about fear. It is about giving old machines a controlled path back to life. A dim-bulb tester is simple, almost comically simple, but it changes the first power-up from a gamble into an observation. The bulb glows, dims, or warns. You respond. The equipment gets a better chance. And with luck, the only thing smoking at the end of the day is your celebratory cup of coffee.
Conclusion
A dim-bulb tester is one of the most useful tools for vintage electronics repair because it limits current and gives a visible warning during first power-up. It is especially helpful with antique radios, tube amplifiers, stereo receivers, and other old equipment whose power supplies may contain aged capacitors, failed rectifiers, or unknown faults. Still, it should be treated as a diagnostic aid, not a complete safety system.
The smartest approach is layered: inspect first, repair obvious hazards, use proper test equipment, understand when an isolation transformer is needed, and interpret the bulb carefully. A dim-bulb tester will not make dangerous work harmless, but it can make a risky moment more controlled. For anyone restoring vintage electronics, that small glowing bulb may be the difference between a successful comeback and a smoky farewell.