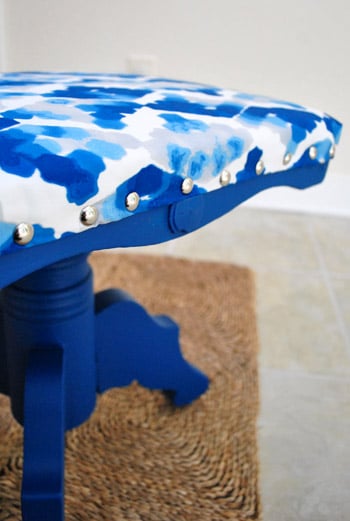
Some furniture projects announce themselves with trumpets. Others sit quietly in a corner, wobbling slightly, wearing a tired cushion that looks like it has survived three moves, two pets, and one regrettable pasta night. A stool is often in that second category. It is small enough to ignore, useful enough to keep, and unattractive enough to make you sigh every time you see it. That is exactly why painting and reupholstering a stool is one of the most satisfying DIY furniture makeovers you can do.
Unlike a full sofa reupholstery project, which can make even brave people suddenly remember they have errands, a stool is manageable. It has fewer parts, less fabric, and a wonderfully low drama level. With basic tools, a little patience, and a willingness to sand when your brain says, “Surely we can skip this,” you can turn an old stool into a custom accent piece for a kitchen, vanity, craft room, entryway, or reading nook.
This guide walks through how to paint and reupholster a stool from start to finish, including preparation, fabric selection, paint choices, common mistakes, and real-world experience tips. The goal is not just to make the stool look pretty for one photo. The goal is to create a durable, comfortable, useful piece that does not peel, wobble, wrinkle, or look like it lost a fight with a staple gun.
Why Painting and Reupholstering a Stool Is Worth the Effort
A stool is one of the best beginner-friendly furniture makeover projects because the scale is forgiving. You can experiment with color, pattern, texture, and finishes without committing to a giant piece of furniture. If you have ever wanted to try a bold floral fabric, a rich green paint, a matte black finish, or a playful stripe, a stool is the perfect place to do it.
There is also a practical reason to refinish instead of replace. Many older stools have strong wooden frames, even when their finish is scratched or their seat fabric is outdated. A sturdy frame can last for years with the right prep and finish. Reupholstering the seat gives you a fresh surface, better padding, and the chance to choose a fabric that fits your real life. That means washable, durable, pet-friendly, kid-friendly, coffee-friendly, or “I occasionally eat snacks like a raccoon” friendly.
Painting and reupholstering also lets you match your existing decor. Store-bought stools often come in limited finishes and fabrics. DIY gives you control over the color, sheen, cushion thickness, pattern direction, and overall style. Whether your home leans farmhouse, modern, coastal, cottage, traditional, boho, or eclectic, the same old stool can be customized to fit.
Tools and Materials You Will Need
Before taking the stool apart, gather your supplies. A smooth project begins with having everything nearby, not discovering halfway through that your staple gun is missing, your sandpaper is somehow from 2009, and your screwdriver has joined the witness protection program.
Basic Supplies
- Screwdriver or drill for removing the seat
- Needle-nose pliers or staple remover
- Sandpaper or sanding block in medium and fine grits
- Tack cloth or lint-free rag
- Wood filler for dents, holes, or deep scratches
- Primer suited to the stool material
- Furniture paint, enamel paint, chalk-style paint, or trim paint
- Paintbrush, small foam roller, or sprayer
- Clear protective topcoat if needed
- Upholstery fabric
- Foam, batting, or both
- Staple gun and staples
- Fabric scissors
- Measuring tape
- Drop cloth
- Safety glasses, gloves, and a mask for sanding
If the stool is old and may have lead-based paint, do not sand it casually. Test first and follow proper safety guidance. For younger DIYers, power tools, staple guns, chemical strippers, and spray products should be handled with adult supervision. A stool makeover should end with a cute seat, not a family meeting in urgent care.
Step 1: Inspect the Stool Before You Start
Before painting anything, check the structure. Sit on the stool carefully and look for wobbly legs, cracked joints, loose screws, damaged stretchers, or a seat base that has warped. Paint and fabric can make a stool prettier, but they cannot magically fix a frame that is trying to retire.
Tighten screws and bolts. Add wood glue to loose joints if appropriate. Clamp the repaired areas until dry. If the legs are uneven, add felt pads or adjust the base after painting. A stool that rocks after a makeover will still rock, only now it will do so while looking stylish and slightly smug.
Step 2: Remove the Seat and Old Upholstery
Turn the stool upside down and look for screws holding the seat to the frame. Remove them and place them in a small container. Do not trust yourself to “remember where they went.” That sentence has ruined many afternoons.
Once the seat is off, remove the old fabric. Use pliers, a flathead screwdriver, or a staple remover to lift staples. Work slowly so you do not damage the seat board. If the old fabric is intact, save it as a pattern for cutting the new fabric. This is one of the easiest ways to get the right size without doing advanced geometry at the kitchen table.
Check the foam and batting. If the padding is flat, crumbly, stained, or smells suspicious, replace it. Fresh foam can make a small stool feel much more comfortable. Batting softens the edges of foam and helps the fabric look smooth instead of boxy.
Step 3: Clean the Frame Thoroughly
Paint sticks best to a clean surface. Wipe down the stool frame with mild soap and water or a suitable cleaner for the material. Remove grease, dust, old polish, and grime. Kitchen stools especially can collect a thin layer of cooking residue, which is basically invisible paint sabotage.
After cleaning, let the stool dry completely. Painting over moisture can cause poor adhesion, uneven texture, and finish problems later. Dry wood, clean surfaces, and patience are the quiet heroes of furniture painting.
Step 4: Sand for Better Paint Adhesion
Sanding is not the most glamorous part of painting a stool, but it is one of the most important. You do not always need to strip the stool down to bare wood. In many cases, the goal is to dull the existing glossy finish so primer has something to grip.
Use medium-grit sandpaper for rough areas or glossy finishes, then follow with fine-grit sandpaper for a smoother surface. Sand in the direction of the wood grain when working with wood. Pay special attention to edges, corners, and places where hands or shoes may touch the stool often.
After sanding, remove every bit of dust. Use a vacuum, tack cloth, or slightly damp lint-free rag. Paint applied over sanding dust will stick to the dust instead of the stool, and that is how peeling begins its villain origin story.
Step 5: Repair Dents, Scratches, and Holes
If the stool has dents, gouges, nail holes, or chipped corners, apply wood filler before priming. Let the filler dry according to the product directions, then sand it smooth. Run your hand over the surface. If you can feel a ridge, it may show after paint.
For a rustic or distressed stool, you may choose to leave some imperfections. That is perfectly fine. The trick is making the choice intentionally. “Charming old character” and “I forgot to fix that crater” are close cousins, but they are not the same person.
Step 6: Choose the Right Primer
Primer helps paint adhere and creates a more even finish. It is especially helpful when painting glossy wood, laminate, dark finishes, raw wood, or surfaces with stains. For a wooden stool, a quality bonding primer or wood primer usually works well. For laminate or slick surfaces, use a primer designed for adhesion. For metal stools, choose a primer suitable for metal and address rust before painting.
Apply primer in a thin, even coat. A small brush works well for legs and detailed areas, while a mini foam roller can help smooth flat sections. Let the primer dry fully. Lightly sand after priming if the surface feels rough, then wipe away dust again.
Step 7: Paint the Stool Frame
Now comes the satisfying part. Apply paint in thin coats rather than one thick coat. Thick paint can drip, stay tacky longer, and leave brush marks. Thin coats dry better and usually produce a more durable finish.
For a stool, choose paint that can handle touch and movement. Interior enamel, cabinet paint, trim paint, acrylic furniture paint, or high-quality latex paint can work depending on the stool’s use. Chalk-style paint can create a soft matte look, but it usually needs a protective wax or topcoat for durability.
Use a brush for spindles, legs, grooves, and tight corners. Use a small roller for flat surfaces if the stool has them. Paint with the grain where possible. Let each coat dry fully before adding the next. Two coats are common, but dark-to-light color changes may require more.
Step 8: Seal the Painted Finish
A stool gets more physical contact than many people realize. Shoes bump the legs. Hands grab the seat edge. Bags get dropped on it. Someone will eventually stand on it even though everyone knows they should not. A protective topcoat can help the finish last.
Use a clear polyurethane, polycrylic, furniture wax, or other sealer compatible with your paint. Water-based topcoats are popular for indoor painted furniture because they dry clear and clean up easily. Oil-based products can be very durable but may amber over light colors. Always test if you are unsure.
Apply the topcoat in thin layers and sand lightly between coats if the product recommends it. Allow the finish to cure before heavy use. Dry to the touch does not always mean fully cured. Treat the stool gently at first so the finish has time to harden.
Step 9: Cut New Foam, Batting, and Fabric
While the painted frame dries, work on the seat. If replacing foam, place the seat board on top of the foam and trace around it. Cut the foam with a sharp utility knife or electric carving knife. The foam can be the same size as the seat board or slightly larger if you want a rounded cushion edge.
Next, cut batting large enough to wrap around the foam and seat board. Batting gives the cushion a smoother shape and reduces sharp edges. Finally, cut your upholstery fabric. Use the old fabric as a template if possible, or add several inches around the seat so you have enough fabric to pull and staple underneath.
If the fabric has a pattern, center it before cutting. Stripes, checks, florals, and geometric prints can look fantastic, but crooked placement is very noticeable on a small stool. Take a few extra minutes to align the design. Future you will be grateful, and future you can be very judgmental.
Step 10: Staple the New Upholstery
Lay the fabric face down, then place batting, foam, and the seat board on top. Start by stapling one side at the center. Pull the fabric snug, not brutally tight, and staple the opposite side. Repeat with the other two sides. This center-first method helps keep the fabric evenly tensioned.
Continue stapling from the center toward the corners, alternating sides as you go. Pull smoothly to avoid wrinkles. For corners, fold the fabric neatly like wrapping a present. Trim excess fabric after stapling, but do not cut too close to the staples.
For round stools, work in small sections and keep rotating the seat. Round seats require more tiny pleats, so do not panic if the underside looks like a fabric accordion. The top is what matters most. The underside only needs to be secure and reasonably tidy, unless your guests routinely inspect furniture from below, in which case you may need new guests.
Best Fabric Choices for a Stool Makeover
Upholstery fabric is usually a better choice than lightweight quilting cotton because it is designed to handle wear. Good options include canvas, denim, performance fabric, faux leather, vinyl, microfiber, jacquard, and tightly woven upholstery fabric. For a kitchen or vanity stool, consider stain-resistant or wipeable fabric.
Think about the stool’s job. A decorative bedroom stool can wear a delicate fabric more successfully than a kitchen stool used every morning. A craft-room stool may need darker fabric or a busy pattern that hides marks. A stool used by children should be durable and easy to clean. A stool used near food should not require a crisis response every time salsa enters the room.
Color and Style Ideas
Painting and reupholstering a stool gives you endless style combinations. For a modern look, try a matte black frame with textured neutral fabric. For a cottage feel, use creamy white paint and a small floral print. For a cheerful kitchen, pair a bright painted base with striped fabric. For a vintage-inspired stool, choose muted green, dusty blue, warm beige, or deep navy with a patterned cushion.
If the stool will sit in a room with many colors, pull one color from the existing rug, curtains, artwork, or pillows. That makes the stool feel intentional instead of random. If the room is mostly neutral, the stool can become a small accent piece with personality. Small furniture is allowed to be a little dramatic. It has fewer responsibilities.
Common Mistakes to Avoid
Skipping Surface Prep
The biggest mistake is painting without cleaning, sanding, or priming. The stool may look fine at first, but paint can chip or peel quickly. Prep is not optional if you want the finish to last.
Using the Wrong Fabric
Thin fabric may stretch, tear, or show wear too soon. Choose upholstery-weight fabric when possible. If you love a lighter fabric, consider backing it or using it only on a low-use decorative stool.
Pulling Fabric Unevenly
Uneven tension causes wrinkles and crooked patterns. Staple from the center outward and alternate sides. Check the top frequently before adding too many staples.
Rushing Dry Time
Paint and topcoat need time. Reattaching the seat too early can dent the finish or cause sticking. Let the painted frame dry and cure properly before regular use.
How Long Does the Project Take?
Actual hands-on time can be just a few hours, but drying and curing time can stretch the project across a weekend. Removing the seat and old fabric may take 20 to 45 minutes. Cleaning, sanding, and priming can take another hour or two. Painting often requires multiple coats with drying time between each. Reupholstering the seat may take 30 to 90 minutes, depending on the shape and fabric.
A simple stool makeover can often be completed over two days: prep and prime on day one, paint and upholstery on day two. If you are using a slower-drying paint or several coats of protective finish, allow more time. Furniture makeovers reward patience. They punish rushing with fingerprints, tacky corners, and words you may not want your neighbors to hear.
Maintenance Tips After the Makeover
After the stool is finished, clean it gently. Use a soft cloth for the painted frame and avoid harsh scrubbers. For fabric, vacuum crumbs and dust regularly. Spot-clean according to the fabric type. If you used vinyl or faux leather, wipe spills quickly with a damp cloth.
Add felt pads to the bottom of the legs to protect floors and reduce scraping. Check screws occasionally, especially if the stool gets daily use. If the painted legs get small chips over time, touch them up with leftover paint. Save a small amount in a labeled jar for future repairs.
Experience Notes: What I Learned From Painting and Reupholstering a Stool
The first thing experience teaches you is that a stool looks simple until you flip it upside down. Suddenly there are mystery screws, old staples bent at strange angles, and fabric that appears to have been attached by someone with unlimited determination. Removing staples is not glamorous, but it sets the tone for the whole project. I learned to take my time, wear eye protection, and keep a small bowl nearby for staples and screws. Otherwise, those tiny metal pieces migrate across the floor like they pay rent.
The second lesson is that sanding is where the final finish begins. Early on, it is tempting to sand just the obvious rough spots and call it good. The problem is that paint reveals laziness. Glossy patches, dust, and uneven filler can show through later. A stool may be small, but its legs and edges get touched constantly, so the paint needs a surface it can grip. A careful scuff-sand, followed by a serious dust wipe, makes the painted finish smoother and more durable.
I also learned that primer is not just a suggestion from people who enjoy adding steps. Primer can be the difference between a finish that lasts and a finish that chips the first time a shoe taps the rung. This is especially true for stools with shiny factory finishes. A bonding primer gives the paint a better foundation, and lightly sanding the primer after it dries can make the topcoat feel much more professional.
Fabric choice matters more than expected. A beautiful fabric that is too thin can wrinkle, stretch, or wear out quickly. Upholstery-weight fabric is easier to pull smoothly because it has body. Patterns are fun, but they require planning. I once centered a pattern perfectly from left to right and completely ignored the front edge. The result looked fine from one angle and mildly seasick from another. Now I mark the front of the seat board and check the pattern before cutting.
Corners are where patience earns its paycheck. Square stool seats need tidy folds. Round stool seats need small, even pleats. The best approach is to staple lightly at first, check the top, and only commit once the fabric looks smooth. If something puckers, remove a staple and adjust it. Upholstery is forgiving right up until you fire thirty staples into the wrong spot and pretend everything is fine.
Finally, the most useful experience tip is to let the stool rest before using it. A freshly painted stool feels finished when it is dry to the touch, but many finishes need longer to cure. Reattaching the cushion too early or placing the stool into heavy use right away can leave marks. Give the paint and topcoat breathing room. After all, the stool waited years for its makeover. It can wait another day before returning to duty as the most stylish seat in the corner.
Conclusion
Painting and reupholstering a stool is a small project with a big payoff. It combines practical repair, creative design, and just enough DIY challenge to feel rewarding without taking over your entire home. By cleaning, sanding, priming, painting in thin coats, choosing durable fabric, and stapling with even tension, you can transform a tired stool into a custom piece that looks fresh, feels comfortable, and fits your space beautifully.
The best part is that every choice is yours. You can go bold or neutral, modern or vintage, playful or polished. A forgotten stool can become a kitchen accent, a vanity seat, a plant stand, or the little piece everyone asks about. And when they do, you get to say, “Oh, I made that,” which is one of the finest sentences in the DIY language.
Note: This HTML body is written as original, publish-ready content based on real DIY painting, furniture refinishing, and upholstery best practices. No source links or content reference placeholders are included inside the article.