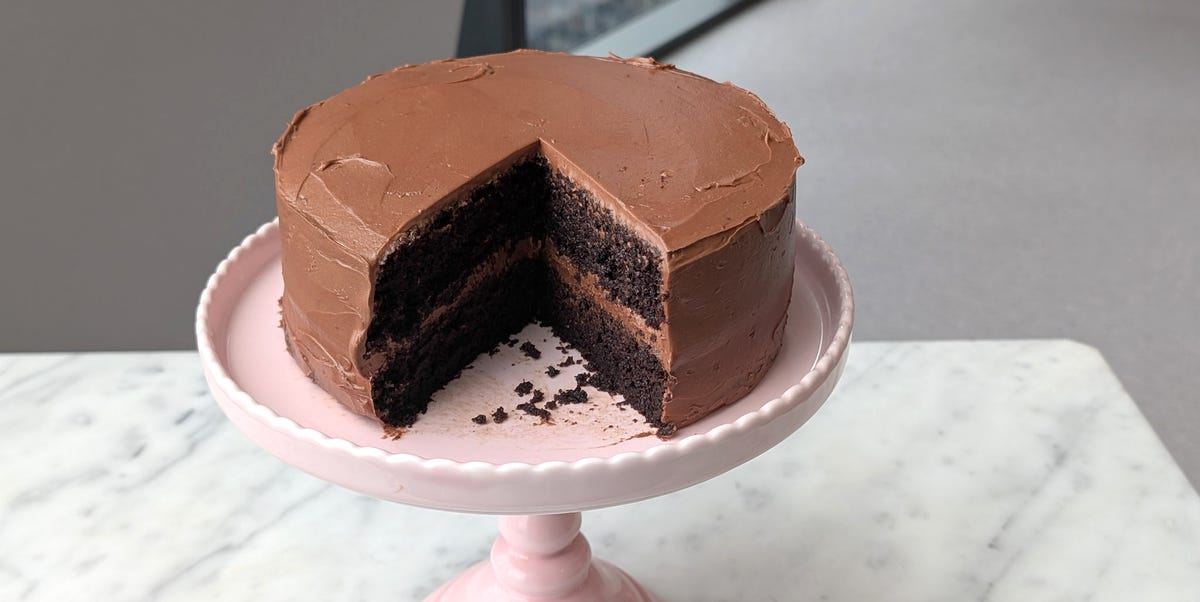
Some chocolate cakes politely suggest dessert. Ina Garten’s chocolate cake kicks open the dining-room door, takes the best seat, and announces that everyone should cancel their afternoon plans. Rich, tender, deeply chocolaty, and covered in glossy buttercream, it is the kind of layer cake that makes a birthday feel like an eventeven when the candles came from the junk drawer.
Officially known as Beatty’s Chocolate Cake, this Barefoot Contessa favorite combines cocoa, buttermilk, vegetable oil, and hot coffee to produce an unusually moist crumb with a bold but balanced flavor. The recipe appeared in Garten’s 2006 cookbook, Barefoot Contessa at Home, and was named for the grandmother of her friend Michael Grimm, who shared the family recipe with her.
The method is approachable enough for a home baker, yet the finished cake looks worthy of a bakery display. Below is a detailed guide to the ingredients, technique, baking science, substitutions, frosting, troubleshooting, and real-world experience behind one of America’s most celebrated chocolate cakes.
Why Ina Garten’s Chocolate Cake Is So Popular
Plenty of chocolate cakes are moist. Plenty are rich. A few are easy. Ina Garten’s version earns its reputation because it manages all three without becoming heavy, gummy, or aggressively sweet.
The cake layers use cocoa powder rather than melted chocolate. That gives the crumb an intense chocolate flavor without loading the batter with extra cocoa butter. Vegetable oil supplies tenderness, while buttermilk adds acidity, flavor, and moisture. Hot coffee loosens the batter and deepens the cocoa’s roasted notes.
The resulting batter looks alarmingly thin. This is normal. Do not panic, add another cup of flour, and accidentally create a chocolate doorstop. The liquid batter bakes into soft layers with a fine, springy crumb.
Recipe testers and longtime home bakers consistently describe the cake as light yet moist, with coffee enhancing the chocolate rather than making the dessert taste like a latte. The original formula serves about eight people or can be converted into approximately 24 cupcakes.
Ina Garten’s Chocolate Cake Ingredients
This recipe uses familiar grocery-store ingredients, but quality matters. The cocoa and chocolate do most of the flavor work, so this is not the moment to rescue the dusty cocoa tin that has been living behind the cinnamon since the previous presidential administration.
For the Chocolate Cake Layers
- 1 3/4 cups all-purpose flour
- 2 cups granulated sugar
- 3/4 cup good-quality cocoa powder
- 2 teaspoons baking soda
- 1 teaspoon baking powder
- 1 teaspoon kosher salt
- 1 cup buttermilk, well shaken
- 1/2 cup neutral vegetable oil
- 2 extra-large eggs, at room temperature
- 1 teaspoon pure vanilla extract
- 1 cup freshly brewed hot coffee
For the Chocolate Buttercream Frosting
- 6 ounces good-quality semisweet chocolate, chopped
- 1 cup unsalted butter, softened to room temperature
- 1 extra-large egg yolk, at room temperature
- 1 teaspoon pure vanilla extract
- 1 1/4 cups confectioners’ sugar, sifted
- 1 tablespoon instant coffee granules
- 2 teaspoons hot water
Garten’s published recipe recommends high-quality semisweet chocolate and specifically discourages using chocolate chips in the frosting because they contain ingredients designed to help the chips maintain their shape. A chopped baking bar generally melts more smoothly.
How to Make Ina Garten’s Chocolate Cake
Step 1: Prepare the Oven and Cake Pans
Preheat the oven to 350°F. Grease two 8-inch round cake pans. Place a parchment-paper circle in the bottom of each pan, grease the parchment, and lightly dust the interiors with flour.
The parchment may seem like an extra chore invented by someone who does not wash your dishes, but it is worthwhile. These layers are extremely moist, and parchment dramatically reduces the risk of leaving half the cake attached to the pan.
Step 2: Combine the Dry Ingredients
Sift the flour, sugar, cocoa powder, baking soda, baking powder, and salt into a large mixing bowl. Use a stand mixer fitted with the paddle attachment, a hand mixer on low speed, or a sturdy whisk to distribute everything evenly.
Sifting breaks up cocoa lumps that can survive mixing with astonishing determination. It also ensures the leaveners and salt are spread throughout the batter instead of gathering in one unlucky slice.
Step 3: Mix the Wet Ingredients
In a separate bowl, whisk together the buttermilk, vegetable oil, eggs, and vanilla. Room-temperature eggs and buttermilk combine more evenly than refrigerator-cold ingredients, helping the batter form a smoother mixture with less unnecessary beating.
Step 4: Build the Batter
With the mixer running on low, gradually pour the wet mixture into the dry ingredients. Mix only until mostly combined.
Slowly add the hot coffee. The batter will become fluid and may splash if the mixer is operating at anything resembling jet-engine speed. Stop the mixer, scrape the bottom and sides of the bowl with a flexible spatula, and stir briefly to remove any dry pockets.
Step 5: Bake the Layers
Divide the batter evenly between the prepared pans. A kitchen scale is useful here, although carefully comparing the pans by eye also works.
Bake for approximately 35 to 40 minutes. The layers are done when a tester inserted near the center comes out without wet batter. A few moist crumbs are fine. The centers may settle slightly as the cakes cool, which the original recipe notes is not a problem.
Step 6: Cool Completely
Let the layers rest in their pans for about 30 minutes. Run a thin knife around the edges if necessary, turn the cakes onto cooling racks, remove the parchment, and allow them to reach room temperature.
Do not frost warm cake unless your decorating theme is “chocolate landslide.” Even slightly warm layers can melt the buttercream and cause the cake to slide.
How to Make the Chocolate Buttercream
Ina Garten’s buttercream is smoother and less sugary than many traditional American chocolate frostings. It gets its body from softened butter, its flavor from real melted chocolate, and its sheen from an egg yolk.
Melt and Cool the Chocolate
Place the chopped semisweet chocolate in a heatproof bowl over a saucepan containing gently simmering water. Keep the bottom of the bowl above the water. Stir until the chocolate has just melted, then remove it from the heat and let it cool to room temperature.
You can also microwave the chocolate in short intervals, stirring thoroughly between each one. Whichever method you choose, avoid adding hot chocolate directly to the butter. Heat can turn fluffy frosting into a glossy puddle with excellent flavor but limited architectural value.
Beat the Butter Base
Beat the softened butter for about three minutes, until pale and fluffy. Add the egg yolk and vanilla, then continue mixing until completely incorporated.
Reduce the mixer speed and gradually add the sifted confectioners’ sugar. Once the sugar is incorporated, beat at medium speed until smooth.
Add the Coffee and Chocolate
Dissolve the instant coffee in two teaspoons of hot water. With the mixer running on low, add the cooled melted chocolate and coffee mixture. Blend only until uniform. Excessive whipping can change the frosting’s intended texture.
The original frosting contains an uncooked egg yolk. The FDA advises using pasteurized eggs in preparations where eggs remain raw or only partially cooked. People who are pregnant, elderly, immunocompromised, or serving young children should use a pasteurized yolk or choose a yolk-free chocolate buttercream.
Assembling the Cake
Place the first layer on a cake plate with its flatter side facing upward. Spread a modest layer of buttercream across the top, extending it nearly to the edge.
Add the second layer, again placing the flat side upward. Apply a thin coating of frosting around the sides and top to trap crumbs. Chill the cake for 15 to 20 minutes if the kitchen is warm, then add the remaining buttercream.
Ina’s cake looks best with relaxed swirls rather than perfectly polished edges. This is good news for anyone whose offset-spatula skills resemble windshield scraping. Make broad curves in the frosting and finish with chocolate curls, fresh raspberries, toasted hazelnuts, or a restrained pinch of flaky salt.
The Baking Science Behind the Recipe
Vegetable Oil Keeps the Cake Moist
Unlike butter, oil remains liquid at room temperature. It coats flour particles efficiently and helps produce a tender cake that stays soft for several days. Baking tests have found that replacing some or all of the butter in appropriate cake formulas with oil can slow drying and create the plush texture many people associate with premium boxed cakes.
Buttermilk Supports Flavor and Rise
Buttermilk contributes acidity, which reacts with baking soda and supports carbon-dioxide production in the batter. It also brings a subtle tang that prevents two cups of sugar from tasting flat or one-dimensional.
Coffee Makes Chocolate Taste More Chocolaty
Coffee and cocoa share roasted, bitter flavor compounds. Used in the right amount, coffee expands the cake’s chocolate profile without producing an obvious coffee flavor. It also supplies the hot liquid needed to hydrate the cocoa and loosen the batter. Both professional recipe developers and independent cake testers have identified coffee as a major reason this cake tastes deeper than many standard chocolate layer cakes.
Cocoa Powder Choice Matters
Natural cocoa is acidic, while Dutch-process cocoa has been treated to reduce acidity. Ina’s batter contains buttermilk plus both baking soda and baking powder, so different cocoas may still produce a workable cake, but they will change its color and flavor. Natural cocoa generally offers a brighter, sharper profile; Dutch-process cocoa tends to produce a darker color and smoother taste. When dependable results matter most, use the cocoa style recommended by the brand or recipe version you are following.
Common Mistakes and How to Avoid Them
Overmixing After Adding the Flour
Mixing develops gluten. Some structure is necessary, but extended beating can make a cake firm or rubbery. Once the wet and dry ingredients meet, use low speed and stop as soon as the mixture is uniform.
Using Cold Ingredients
Cold eggs and buttermilk can resist smooth incorporation. Set them out briefly before baking, but do not leave perishable ingredients at room temperature for an excessive period.
Overbaking the Layers
Chocolate cake can look wet even when it is nearly finished because the crumb is dark. Begin checking at the lower end of the recommended baking time. Remove the pans when a tester shows moist crumbs rather than liquid batter.
Frosting Before the Cake Is Cool
Warm layers soften buttercream immediately. When time is limited, cool the cakes on wire racks in a well-ventilated area. Avoid putting steaming-hot cake directly into the refrigerator, where condensation may make its surface sticky.
Adding Hot Melted Chocolate to the Frosting
Let melted chocolate cool until it is fluid but no longer warm. Hot chocolate melts the butter; chocolate that has cooled until solid creates lumps. The ideal stage is smooth, pourable, and close to room temperature.
Useful Substitutions and Variations
Can You Make the Cake Without Coffee?
Yes. Replace the coffee with hot water, decaffeinated coffee, or hot milk. The cake will still work, although its chocolate flavor may be slightly less complex. Decaf is the easiest substitution when caffeine is the concern.
Can You Replace Buttermilk?
For one cup of homemade buttermilk substitute, place one tablespoon of lemon juice or white vinegar in a measuring cup, then add milk to reach one cup. Let it stand for five to ten minutes before using. Plain yogurt thinned with a little milk can also work, though the final crumb may differ slightly.
Can You Use Large Eggs?
The original recipe specifies extra-large eggs, but experienced home bakers have reported successful results with standard large eggs. The small difference is unlikely to ruin the cake, especially when the remaining ingredients are measured accurately.
Can You Make Cupcakes?
Yes. The official recipe yields approximately 24 cupcakes. Fill lined cups about two-thirds full and begin checking them after 25 minutes. The buttercream quantity listed in the original formula may frost only about 12 generously decorated cupcakes, so consider doubling it for a full batch.
Can You Add a Filling?
A thin layer of raspberry preserves, cherry compote, salted caramel, or whipped ganache can be placed between the cakes. Keep the filling inside a buttercream border so it does not escape when the top layer is added.
Storage and Make-Ahead Tips
Unfrosted cake layers can be baked a day in advance. Once completely cool, wrap each layer tightly and keep it at room temperature in a cool kitchen. For longer storage, freeze the wrapped layers and thaw them before decorating.
Because the traditional buttercream contains an uncooked egg yolk, refrigerate the assembled cake if it will not be served promptly. Cover it well to prevent the cake from absorbing refrigerator odors. Let chilled slices stand at room temperature before serving so the buttercream softens and the chocolate flavor becomes more expressive.
A yolk-free buttercream offers simpler storage, but the cake should still be covered carefully. Exposed edges dry out faster than anyone expects, usually immediately after someone says, “We’ll finish it tomorrow.”
A Home Baker’s Experience With Ina Garten’s Chocolate Cake Recipe
The first surprising moment comes before the cake enters the oven. After the wet ingredients are added, the mixture resembles ordinary chocolate cake batter. Then the hot coffee goes in, and everything becomes dramatically thinner. It looks less like batter and more like something that should be poured into a mug. The instinct to add flour is powerful. Resist it.
Once baked, the layers feel unusually soft. They are sturdy enough to stack, but they should be handled with two hands and the respect normally reserved for sleeping babies and unstable grocery bags. Letting them cool for the full recommended time makes assembly much easier.
The coffee is far less obvious than expected. Served without explanation, most people identify the dessert as “extra chocolaty,” not as mocha cake. The coffee seems to extend the cocoa flavor, giving it a darker finish and preventing the sweetness from lingering too heavily. Even tasters who do not usually drink coffee may enjoy the result.
The crumb is another reason the recipe stands out. Butter-based cakes can become firm after a night in the refrigerator, but this oil-based cake remains tender. On the second day, it may taste even more cohesive because the layers have had time to absorb a little moisture from the frosting. That makes it particularly useful for birthdays and dinner parties, when baking everything on the same day can turn a pleasant celebration into a flour-covered emergency.
The frosting requires more attention than the cake. The butter must be genuinely soft, and the melted chocolate must be cool. When both are at the proper temperature, the frosting becomes satin-smooth and spreads with very little resistance. When the chocolate is too warm, the mixture loosens; when the butter is too cold, the frosting can appear curdled or lumpy. Fortunately, most texture problems can be fixed by adjusting the temperature and mixing gently.
The egg yolk gives the buttercream a luxurious, emulsified consistency, but it also creates a food-safety consideration. Using a pasteurized yolk offers the closest experience to the original. A yolk-free frosting is slightly less glossy but remains delicious, especially when made with high-quality chopped chocolate.
For decorating, rustic swirls suit this cake better than rigid perfection. The dark frosting naturally looks dramatic, and minor imperfections disappear once the cake is sliced. Fresh raspberries provide color and acidity; chocolate shavings make the dessert look formal; a little flaky salt creates a more grown-up finish. A thick blanket of rainbow sprinkles, meanwhile, announces that adults are not supervising dessertand that is sometimes the correct artistic direction.
The finished cake is rich enough that modest slices are sensible, but people routinely request seconds. Eight servings, as stated in the original recipe, produces generous wedges. For a larger gathering, it can comfortably stretch to ten or twelve portions when served after a full meal.
Most importantly, the recipe feels dependable. It does not require separating eggs, whipping meringue, folding batter in stages, or negotiating with gelatin. The cake’s elegance comes from ingredient balance rather than complicated pastry technique. That combinationsimple preparation, forgiving texture, and celebration-worthy flavoris why so many home bakers adopt it as their permanent birthday cake.
Final Verdict
Ina Garten’s chocolate cake recipe deserves its reputation. The hot coffee intensifies the cocoa, buttermilk adds balance, and vegetable oil keeps the layers moist long after an all-butter cake might begin to dry. The real-chocolate buttercream delivers a smooth, sophisticated finish without burying the cake under excessive sugar.
It is not the fastest dessert in the Barefoot Contessa universe because the layers must cool completely and the frosting requires temperature control. Still, none of the individual steps is especially difficult. Prepare the pans carefully, measure accurately, trust the thin batter, cool the chocolate, and use a pasteurized yolk when making the original-style frosting.
The reward is a classic American chocolate layer cake that feels nostalgic and polished at the same time. It works for birthdays, anniversaries, holiday dinners, or an ordinary Saturday that could clearly benefit from two layers of chocolate.