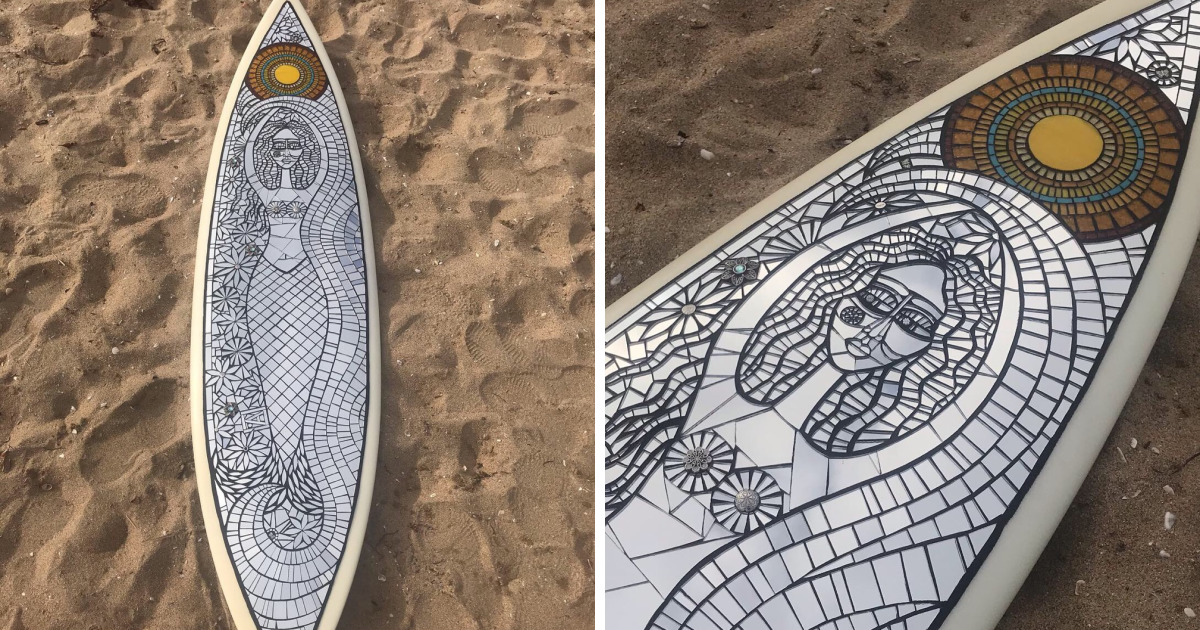
Some people look at an old surfboard and see a tired piece of foam, fiberglass, wax, dings, and sun-faded glory. I look at it and think, “Perfect. This thing is ready for a second career.” That career, in my studio, is mosaic art: colorful glass, ceramic, stone, mirror, shell, and found coastal materials arranged piece by piece across the curved body of a board that once belonged to the waves.
Creating mosaic art on surfboards is part coastal décor, part fine art, part recycling project, and part patience test invented by someone who clearly enjoys tiny pieces of tile more than is reasonable. But that is the beauty of it. A surfboard already has movement built into its shape. Its pointed nose, soft rails, rocker, and long outline feel like motion even when the board is hanging quietly on a wall. Add mosaic tesseraethe small pieces used in mosaic workand suddenly the surface becomes a glittering tide pool, a sunset, a wave, a fish, a story, or sometimes an abstract explosion that looks like the ocean went to art school.
Why Surfboards Make Such Powerful Mosaic Canvases
A surfboard is not a flat rectangle, and that is exactly why it is fun. Traditional mosaic art often appears on walls, tabletops, garden pieces, pools, and architectural surfaces. Those are beautiful, but a surfboard brings something extra: personality. It carries the memory of saltwater, beach days, wipeouts, road trips, board racks, and the suspicious smell of old surf wax. It has a silhouette people instantly recognize, even if they have never managed to stand up on one without performing an accidental yoga pose.
Most modern surfboards are made with a foam core covered in fiberglass cloth and resin. Common constructions include polyurethane foam with polyester resin and expanded polystyrene foam with epoxy resin. For mosaic art, that matters because the surface must be strong, clean, sealed, and stable before any tile is added. A board built for riding is designed to be light. A mosaic board becomes much heavier once glass, grout, and adhesive enter the room like tiny enthusiastic bricks.
That is why most mosaic surfboards are decorative rather than functional. They are created as wall art, gallery pieces, beach house décor, restaurant displays, patio accents, or statement pieces for anyone who wants their living room to say, “Yes, I own art, and yes, it has probably seen a wave.”
The Creative Idea Behind Mosaic Surfboard Art
For me, mosaic surfboard art begins with a simple question: what does this board want to become? Some boards ask for ocean waves. Some want tropical flowers. Some demand a sea turtle, because apparently even old surfboards have opinions. A longboard might call for a flowing reef scene with blues, greens, and sandy neutrals. A shortboard might suit a bold geometric pattern, lightning-like color lines, or a sunrise bursting from the nose.
The best designs usually respect the board’s natural shape. A surfboard already suggests movement, so I use the outline to guide the artwork. I might let a wave curl along the rail, place a sun near the nose, or build a school of fish that swims diagonally across the deck. The goal is not to cover the board randomly. The goal is to make the mosaic feel like it grew there, as if the board washed ashore already wearing a tiny glass tuxedo.
Materials I Use for Surfboard Mosaics
Mosaic art can be made from many materials, but surfboards need a thoughtful mix because they have curves, flex history, and glossy surfaces. I often use stained glass, ceramic tile, porcelain pieces, glass gems, mirror, smalti-style glass, beach glass, shells, and sometimes broken dishware. Each material has its own mood. Glass gives sparkle. Ceramic adds color and strength. Mirror catches light like a small disco ball trying to behave itself. Shells bring texture, but they must be placed carefully because they can be fragile.
Glass and Stained Glass
Glass is one of my favorite materials for mosaic surfboard art because it reflects light beautifully. Blues and aquas can mimic shallow water, while amber and orange pieces make sunsets glow. Stained glass can be cut into curves, waves, fins, petals, and abstract shapes. It also creates depth, especially when different opacities are combined.
Ceramic and Porcelain Tile
Ceramic and porcelain tiles are durable and come in a wide range of colors. They are excellent for bold patterns, borders, lettering, and background areas. Porcelain is especially useful when I want a clean, polished look. The challenge is weight: tile adds up quickly. A surfboard may look large and brave, but once covered in ceramic pieces, it becomes the sort of object that makes wall anchors nervous.
Found Coastal Objects
Found objects can make a surfboard mosaic feel personal. Small shells, smooth stones, sea glass, old jewelry, bottle glass, and reclaimed ceramics can all become part of the story. I avoid using sharp, unstable, or dirty materials without proper cleaning and preparation. Beachcombing is romantic; embedding mystery gunk into art is not.
Preparing the Surfboard Surface
Preparation is where the project succeeds or fails. A surfboard’s resin surface is often slick, waxy, salty, or damaged. Mosaic adhesive does not enjoy clinging to leftover surf wax, sunscreen residue, or dust. The first step is cleaning the board thoroughly. Old wax must be removed, dings should be inspected, and any soft or delaminated areas should be repaired or avoided.
After cleaning, I lightly sand the surface to create tooth. The goal is not to destroy the board or expose fiberglass cloth unnecessarily. The idea is to dull the glossy finish enough so adhesive can grip. I wear eye protection and a mask when sanding because fiberglass and resin dust are not studio confetti. They do not make parties better.
If the board has open cracks or water damage, I seal them before starting the mosaic. A mosaic is not a magic waterproof bandage. It can hide ugly areas, but the base still needs to be structurally sound. A weak board under heavy tile is like building a fancy beach house on pudding.
Designing the Layout Before Gluing
Before adhesive appears, I sketch. Sometimes I draw directly on the board with a pencil or removable marker. Other times I create a paper template, especially for detailed animals, lettering, or wave patterns. Dry fitting is essential. I place pieces on the board without glue to check spacing, color balance, and flow.
This step prevents the classic mosaic disaster: realizing halfway through that the turtle’s face looks like a confused pancake. Dry layout gives me time to adjust shapes, trim pieces, test grout lines, and make sure the design still reads from across the room. A mosaic surfboard is usually viewed vertically, so the design must work both up close and from a distance.
Choosing the Right Adhesive
Adhesive choice depends on the board surface, the mosaic materials, and where the finished piece will live. Indoor decorative boards may use different products than outdoor boards exposed to humidity, heat, or salt air. The adhesive must bond well to fiberglass or prepared resin and hold tile securely over time.
For many surfboard mosaic projects, artists use strong mosaic adhesives, marine-grade epoxy products, or specialty bonding materials suitable for nonporous surfaces. Standard craft glue is usually not enough for a heavy, curved, mixed-media piece. If the board will hang outdoors or in a damp coastal space, the adhesive and grout system must be chosen with weather resistance in mind.
I also test materials before committing to the entire board. A small sample patch can reveal whether the adhesive grips, whether pieces slide on the curved surface, and whether the surface needs more sanding. Testing is less glamorous than gluing, but it prevents future heartbreak, which is what artists call “tiles falling off in front of guests.”
Building the Mosaic Piece by Piece
Once the design is ready, I begin placing tesserae. I usually work in sections so the adhesive stays manageable. On a surfboard, the rails and curved areas require extra patience. Small pieces sit better on curves than large tiles, so I often cut glass or ceramic into smaller shapes along the edges.
Spacing matters. Tight grout lines create a polished look, while wider gaps can feel rustic or playful. I try to keep the spacing consistent enough that the eye flows naturally, but handmade mosaic art should not look machine-perfect. A little irregularity gives the piece life. Too much irregularity makes it look like the board sneezed tile.
Cutting tile and glass is part of the craft. Wheeled nippers, glass cutters, tile nippers, and safety glasses are my studio companions. Some pieces snap exactly as planned. Others shoot across the table like tiny escape artists. That is why I never cut glass near a cup of coffee. I enjoy crunch in cookies, not beverages.
Grouting the Surfboard Mosaic
Grout transforms the artwork. Before grout, a mosaic can look busy and unfinished. After grout, the design suddenly comes together like it finally remembered its job. Grout fills the gaps, supports the pieces visually, and creates contrast. White grout can make colors feel beachy and bright. Gray grout is forgiving and natural. Black grout adds drama and makes jewel tones pop.
Grouting a surfboard requires care because the board is curved and often large. I work the grout into the joints, wipe excess from the surface, and clean gradually with a damp sponge. Over-wiping can pull grout out of the lines; under-wiping leaves a dusty haze. It is a delicate dance, and the sponge is always invited.
After curing, I polish the tile surfaces and inspect the entire board. Any sharp edges, loose pieces, or uneven areas need attention. Decorative surfboard art should be beautiful, but it should also be safe to handle and hang.
Sealing and Finishing
Sealing depends on the materials. Glass itself does not usually need sealing, but grout often benefits from a penetrating grout sealer, especially if the piece may be exposed to moisture or fingerprints. Natural stone, porous ceramic, shells, or unglazed materials may need special care. The final finish should protect the artwork without making it look plastic or cloudy.
Hardware is another important finishing step. A mosaic surfboard is heavier than a regular surfboard, so hanging hardware must be strong. I use secure mounting systems and always consider the final weight. A six-foot mosaic board is not something you want casually leaning above a sofa unless you enjoy living with suspense.
Popular Mosaic Surfboard Design Ideas
Ocean Wave Mosaic
The wave design is the classic choice, and for good reason. Curving lines of blue, teal, turquoise, white, and mirror glass can create motion across the board. I like using lighter pieces for foam and darker blues for depth. A wave mosaic looks especially striking on longboards because the design can travel from tail to nose.
Sea Turtle or Marine Life Mosaic
Sea turtles, fish, manta rays, dolphins, octopuses, and whales all work beautifully on surfboards. Their shapes fit the coastal theme without feeling forced. A sea turtle swimming across a surfboard can feel peaceful, symbolic, and full of movement.
Sunset Surfboard Mosaic
A sunset palette brings warmth: coral, gold, orange, rose, lavender, and deep blue. I often place the sun low on the board and let rays stretch outward. Mirror accents can make the piece glow when sunlight hits it.
Abstract Coastal Mosaic
Not every surfboard needs a literal beach scene. Abstract designs can be even more powerful. Broken lines, color fields, geometric patterns, and textured sections can turn the board into modern coastal art. Abstract mosaic surfboards are great for contemporary homes where seashell overload is not the goal.
Why Recycled Surfboards Make the Art More Meaningful
One of the best parts of this craft is giving old boards a new life. Surfboards are difficult to recycle because they often combine foam, fiberglass, resin, paint, and hardware. Turning a damaged or retired board into mosaic wall art keeps it out of storage, out of the trash, and in the visual world where it still belongs.
This does not mean every broken board should become art. Some boards can be repaired and surfed again, and that is wonderful. But when a board is too damaged, outdated, or sentimental to throw away, mosaic art gives it a second story. A board that once rode waves can become a family memory piece, a coastal statement, or a tribute to a favorite beach.
Where Mosaic Surfboard Art Looks Best
Mosaic surfboard art works beautifully in beach houses, patios, pool areas, surf shops, cafés, seafood restaurants, hotel lobbies, yoga studios, and home entryways. It can be playful or elegant depending on the materials. A bright ceramic board feels casual and sunny. A glass-and-stone board can look refined and gallery-ready.
Lighting matters. Mosaic art loves light. A board placed near a window, under track lighting, or on a shaded patio with indirect sun can sparkle throughout the day. Mirror and glass pieces change as the viewer moves, which makes the artwork feel alive.
Common Mistakes to Avoid
The first mistake is skipping surface preparation. Adhesive needs grip. A glossy, waxy board is not a friendly base. The second mistake is using pieces that are too large for curved rails. Large tiles can lift, crack, or create awkward edges. The third mistake is ignoring weight. Mosaic materials are heavy, and the finished piece needs proper support.
Another mistake is choosing grout color too late. Grout changes the entire look of the piece. I like to test grout colors with sample tiles before committing. The wrong grout can make a delicate ocean scene look muddy or turn a bold design into visual oatmeal.
Finally, do not rush the curing process. Adhesive and grout need time. Mosaic art rewards patience. It is not fast food; it is more like slow-cooked creativity with occasional glass splinters.
My Personal Experience Creating Mosaic Art On Surfboards
The first time I created mosaic art on a surfboard, I underestimated almost everything. I underestimated how long it would take, how many blue glass pieces a single wave could swallow, how much heavier the board would become, and how emotionally attached I would get to a piece of sporting equipment covered in tile. By the end, I was tired, dusty, proud, and convinced the board had developed a personality.
Working on surfboards has taught me to respect curves. A flat panel lets you move quickly, but a surfboard makes you negotiate. The rails slope away. The nose narrows. The tail changes the rhythm. A piece that looks perfect on the table may sit awkwardly on the board. I have learned to cut smaller, test more often, and listen to the shape instead of forcing my original plan. The board usually wins anyway.
I have also learned that color behaves differently on a surfboard. Because the surface is long and narrow, colors need movement. A small patch of red can feel powerful. Too much dark tile near the tail can make the whole board feel bottom-heavy. Light glass near the nose can lift the design. I often step back across the studio and squint at the board like a suspicious art detective. If the design still works from ten feet away, I keep going.
One of my favorite experiences involved transforming an old, sun-yellowed board into a blue-and-green reef scene. The board had pressure dents, old wax shadows, and a few repaired dings. Instead of hiding every imperfection, I let some of the board’s history guide the design. A cracked area became coral. A stained patch disappeared under deep water tones. The final piece looked less like a decorated object and more like a recovered memory from the ocean.
Another lesson: people react strongly to surfboard mosaics. They want to touch them. They ask whether the board can still be used in the water. They tell stories about surfing, vacations, grandparents, beach towns, fish they almost caught, and waves they swear were bigger than physics allows. Mosaic surfboard art invites conversation because it combines two familiar thingssurf culture and handmade craftin a way that feels surprising.
The process can be messy, but it is also meditative. Cutting pieces, arranging colors, filling gaps, and watching the pattern slowly appear feels like building a wave one fragment at a time. There are frustrating days when nothing fits, the adhesive is too slippery, or the cat tries to inspect the grout bucket like a tiny health inspector. But there are also moments when light hits the finished board and every little piece suddenly flashes. That moment is why I keep making them.
Creating mosaic art on surfboards has changed how I see discarded materials. A chipped plate might become sea foam. A broken mirror might become sunlight. A cracked tile might become part of a fish scale. An old board might become the centerpiece of a room. The art is not just about decoration; it is about transformation. It reminds me that beauty often arrives in pieces, and sometimes the best thing you can do is gather those pieces, glue them carefully, grout the gaps, and hang the whole wild story on the wall.
Conclusion
Creating mosaic art on surfboards is a joyful mix of craftsmanship, coastal culture, recycling, and design. It takes patience, planning, safety, and a willingness to spend a surprising amount of time deciding which shade of turquoise feels “more ocean.” But the result is worth it. A mosaic surfboard is more than beach décor. It is a second life for a board, a handmade celebration of water and color, and a reminder that broken pieces can still become something stunning.
Whether the design features rolling waves, sea turtles, abstract geometry, sunset colors, or personal keepsakes, each mosaic surfboard becomes one of a kind. No two boards have the same scars, curves, or stories. That is what makes the art so rewarding. It does not erase the past life of the surfboard; it honors it, then gives it a new job: making people stop, smile, and say, “Waithow did you make that?”
Note: This article is written as original, publication-ready HTML content based on real mosaic craft practices, surfboard construction knowledge, coastal art trends, and decorative surfboard reuse concepts.