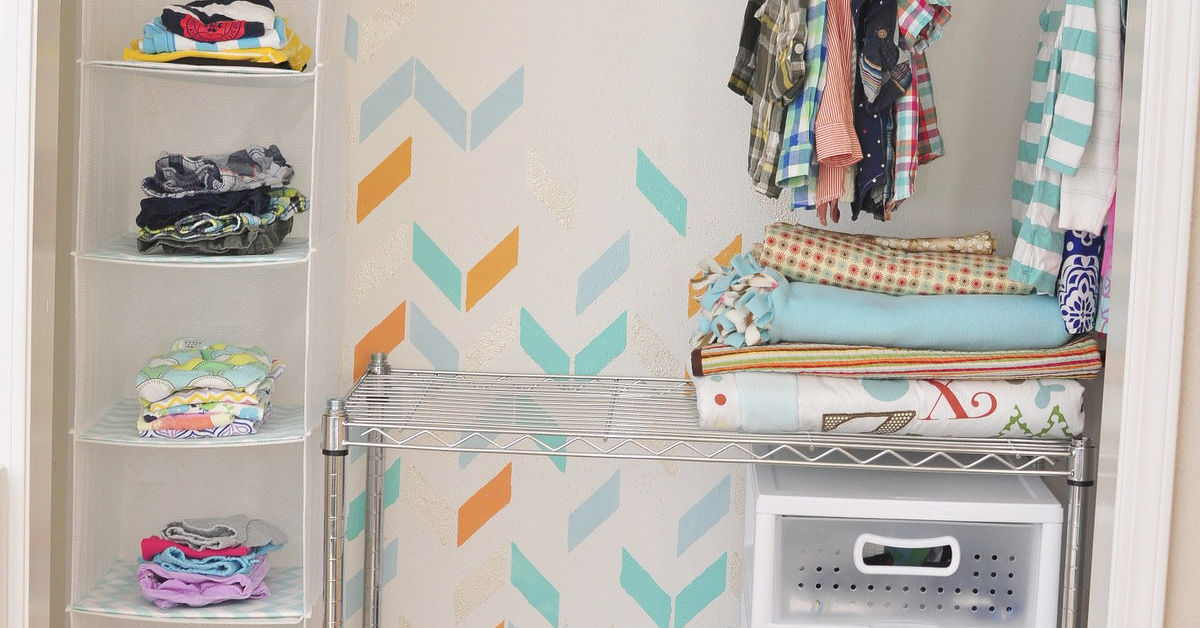
A kid’s closet is rarely just a closet. It is a clothing department, shoe warehouse, toy garage, laundry holding facility, memory box, and mysterious habitat where missing socks go to begin new lives.
That is why a HUGE kid’s closet makeover should do more than produce a pretty “after” photo. The finished space needs to help children find their clothes, put belongings away, and get ready with less help. It must also adjust as tiny T-shirts become sports uniforms, school outfits, and eventually an impressive collection of hoodies.
This guide explains how to plan a complete kids’ closet transformation using accessible storage, flexible shelving, practical labels, smart safety precautions, and realistic maintenance habits. No daily color-coding ceremony required.
Why a Huge Kid’s Closet Makeover Is Worth the Effort
Children grow quickly, but their closets often remain frozen in time. A single high hanging rod that worked for baby clothes may be nearly useless to a six-year-old who wants to choose an outfit independently. Meanwhile, shoes gather on the floor, toys migrate into empty corners, and outgrown clothes quietly occupy premium real estate.
A thoughtful makeover can improve three things immediately:
- Accessibility: Everyday clothing and accessories are placed where the child can reach them.
- Visibility: Categories are easy to recognize, reducing forgotten clothes and duplicate purchases.
- Maintainability: Putting an item away is as simple as getting it out.
Kid-height rods, open cubbies, hooks, and easy-access containers can encourage children to participate in dressing and cleanup. Adjustable systems are especially useful because rods and shelves can be repositioned as clothing sizes and storage needs change.
Step 1: Empty the Closet Completely
Yes, completely. Pull out every shirt, shoe, stuffed animal, backpack, hanger, mystery bag, and lone mitten. A closet cannot be redesigned accurately while half its contents are hiding behind the other half.
Create Five Sorting Categories
- Fits and gets worn
- Next size up
- Outgrown but worth saving
- Donate or sell
- Damaged, stained, or incomplete
Be honest during this stage. If a shirt technically fits but your child reacts to it as though it were woven from angry porcupines, it does not belong in the active wardrobe.
Keep a dedicated donation container inside or near the closet after the makeover. When something becomes too small, place it directly in the container instead of returning it to the rod for another six months of denial. Professional organizers frequently recommend removing clothing that no longer fits before purchasing new storage products.
Step 2: Measure Before Buying Organizers
Storage baskets are charming. Storage baskets that do not fit are decorative regrets.
Measure the closet’s width, height, and depth. Also record the dimensions of doors, trim, baseboards, electrical outlets, vents, and any existing shelf supports. Check whether closet doors fold inward, slide, or swing into the room. These details affect where drawers, hooks, and shelving can be installed.
Take Three Important Vertical Measurements
- The child’s comfortable reaching height
- The length of the child’s longest hanging garment
- The unused space above the existing shelf or rod
Most children’s garments are shorter than adult clothing, which makes double hanging rods especially efficient. The lower rod can hold everyday tops and pants, while the upper rod stores dresses, jackets, dress clothes, or less frequently used pieces.
Step 3: Design the Closet in Practical Zones
A successful kids’ closet organization system should reflect how the child uses the spacenot how a catalog stylist hopes the child uses it.
The Everyday Zone
Place daily clothing between the child’s knee and shoulder height. This area may include:
- A low hanging rod
- Open baskets for socks and underwear
- Hooks for pajamas, jackets, or tomorrow’s outfit
- A small shoe shelf
For younger children, labels can include both words and pictures. A drawing of a sock is surprisingly effective when the intended audience has not yet mastered vowels.
The Parent Zone
Use upper shelves for out-of-season clothing, keepsakes, extra bedding, hand-me-downs, and next-size garments. These items should be clearly labeled but do not need to occupy the easiest-to-reach locations.
The Transition Zone
Include one container for clothes that are almost too small and another for items the child will soon grow into. This prevents several sizes from becoming mixed together and makes seasonal wardrobe changes much faster.
The Activity Zone
If the closet must also store costumes, sports equipment, toys, or craft supplies, assign each activity a defined section. Avoid scattering one category across four unrelated shelves. A child should not need a treasure map to assemble a soccer uniform.
Step 4: Double the Hanging Space
Adding a second rod is one of the highest-impact changes in a large kid’s closet makeover. A rod doubler can be attached without rebuilding the entire closet, while a permanent lower rod provides a more polished solution.
Group hanging clothes by type:
- Short-sleeve shirts
- Long-sleeve shirts
- Pants and skirts
- Dresses or formalwear
- School uniforms
- Jackets and seasonal layers
Matching slim hangers create more usable space and prevent small garments from slipping onto the floor. Closet dividers can separate sizes, seasons, or clothing categories. In a shared closet, different hanger colors can help identify which clothes belong to each child.
Step 5: Add Shelves, Drawers, and Cubbies
Hanging every garment is unnecessary, but tall folded stacks are equally troublesome. Remove one shirt from the bottom and the entire pile may collapse like a discount department-store display during a major sale.
Use Shallow Storage for Folded Clothes
Short shelves, drawers, and cubbies keep folded items in manageable groups. Assign one category to each compartment rather than combining pajamas, swimwear, leggings, and craft aprons into a single textile casserole.
Choose Open or Clear Storage Strategically
Open baskets are excellent for frequently used items because they eliminate the extra step of removing a lid. Clear bins work well for next-size clothing and seasonal items because adults can identify the contents quickly. Solid baskets are better when visual calm matters or when a colorful collection of small objects would make the closet appear busy.
Labels remain useful even with transparent storage. Include the category, size, and season, such as “Size 8 Winter” or “Summer Shoes.” Clear containers, labels, and category-based storage are widely recommended for managing children’s clothing and belongings.
Step 6: Use the Closet Door and Side Walls
The back of a closet door is valuable storage territory. Depending on the door style, it can support:
- A pocket organizer for shoes or accessories
- Hooks for backpacks and hats
- A narrow rack for hair supplies
- A weekly outfit organizer
- A small mirror at the child’s height
Side walls can hold pegboards, short shelves, hook rails, or removable accessory organizers. Keep frequently used items within easy reach and reserve higher positions for lightweight objects handled by adults.
Do not overload doors with heavy equipment. The objective is to gain functional storage, not turn the closet door into a medieval catapult.
Step 7: Create a Real Shoe System
A pile is not a shoe system, even when all the shoes are technically in the same pile.
Choose a low shelf, divided cubby, pull-out basket, or compact rack. Keep everyday footwear in front and special-occasion or off-season shoes farther back. Children who can see each pair are more likely to wear what they already own.
Before storing shoes, remove pairs that are too small, uncomfortable, badly worn, or missing a partner. Save only hand-me-downs that remain in genuinely useful condition.
Step 8: Add a Laundry and Donation Station
Every huge kid’s closet makeover needs an exit strategy for dirty and outgrown clothing.
Place a lightweight hamper where the child can use it independently. A lidless model is usually easier for younger children because tossing in a shirt requires one step rather than an advanced engineering sequence.
Nearby, add a smaller basket labeled “Too Small.” Once it fills, sort the contents for donation, resale, recycling, or hand-me-down storage. This small habit prevents the active wardrobe from slowly becoming a museum of previous sizes.
Step 9: Make the Closet Fun Without Making It Fragile
Organization should lead the design, but the makeover can still feel playful. Consider painting the back wall, applying removable wallpaper, adding colorful shelf liners, or using coordinated labels.
Let the Child Make Limited Design Choices
Offer two or three approved colors, label styles, or basket options. Children are more likely to respect a system they helped create, but unlimited decision-making can turn a Saturday closet project into seventeen days of debate about whether dinosaurs match rainbows.
Improve the Lighting
A dark closet encourages forgotten belongings. Replace an inadequate fixture where appropriate or add a child-safe, motion-activated light. Better visibility helps children distinguish colors, find matching shoes, and return items to the correct locations.
Include a Small Display Area
Reserve one narrow shelf for a favorite framed photo, trophy, artwork, or decorative object. A closet can be functional without looking like an inventory room.
A Sample Layout for a Six-Foot-Wide Closet
For a standard reach-in closet approximately six feet wide, a practical arrangement might include:
- Left side: Two hanging rods for shirts, pants, dresses, and jackets
- Center: A vertical tower with four adjustable shelves and three baskets
- Right side: Hooks, a hamper, a shoe rack, and an outfit-planning area
- Top shelf: Labeled bins for off-season clothes, keepsakes, and the next size
- Door: Lightweight accessories in a pocket organizer
This arrangement combines hanging, folded, concealed, and open storage. More importantly, it can be changed without demolishing the entire installation when the child grows.
Kid’s Closet Makeover Ideas for Different Budgets
Low-Budget Refresh
Keep the existing shelf and rod, then add a hanging rod doubler, matching hangers, repurposed baskets, printed labels, removable hooks, and a compact shoe rack. Paint can provide the visual transformation.
Midrange Makeover
Install adjustable wall-mounted shelving, multiple rods, pull-out baskets, a drawer unit, better lighting, and a coordinated door organizer. This level offers flexibility without requiring fully custom cabinetry.
Built-In Transformation
A custom system may include fitted drawers, adjustable shelves, integrated lighting, a bench, specialized shoe storage, and finished trim. Even with custom construction, prioritize movable components so the closet can transition from toddler clothes to a teenager’s wardrobe.
Buying containers before planning is a common mistake. Inventory the wardrobe first, decide which items should hang or fold, and purchase organizers only after establishing the layout.
Important Safety Details
A beautiful closet is not successful unless it is safe.
- Anchor freestanding dressers, bookcases, drawer towers, and tall shelving to the wall.
- Follow the manufacturer’s installation instructions for rods and shelving.
- Use appropriate anchors for the wall material and expected load.
- Keep heavy containers on lower shelves.
- Store medicine, batteries, cleaning products, tools, and choking hazards out of children’s reach.
- Avoid placing climbable furniture beneath tempting high shelves.
- Check hooks and rails for sharp edges or loose hardware.
The U.S. Consumer Product Safety Commission advises securing furniture with drawers, doors, or shelves to help prevent tip-over injuries. Closet towers and freestanding drawer units should therefore be anchored rather than treated as harmless storage accessories.
How to Keep the New Closet Organized
The best system is not the one with the most containers. It is the one that survives an ordinary Tuesday morning.
Use a Five-Minute Weekly Reset
Once a week, return shoes to their shelf, empty the “Too Small” basket if necessary, straighten hangers, and remove unrelated items. A short reset prevents the need for another dramatic rescue operation.
Review Sizes Every Season
At the beginning of each major season, check shoes, outerwear, uniforms, and frequently worn basics. Move upcoming sizes into the active zone and pack away pieces that no longer fit.
Keep Categories Broad
Children usually maintain simple categories better than highly specific ones. “Shirts” is easier than separate bins for graphic tees, plain tees, athletic tees, school tees, and shirts worn only when visiting Grandma.
Follow the One-Step Rule
Whenever possible, children should be able to put something away in one action. Drop socks into a basket. Hang a backpack on a hook. Place shoes on an open shelf. The more lids, latches, folds, and complicated subcategories involved, the more likely the floor will become the preferred storage method.
What I Learned From a HUGE Kid’s Closet Makeover
The biggest lesson from tackling a major kid’s closet transformation is that the mess is rarely caused by laziness alone. In many cases, the original closet asks a child to use an adult system. The rod is too high, the hangers are difficult to manage, the drawers are heavy, and the correct basket may be hidden behind three other baskets. Then adults wonder why everything lands on the floor.
During one large makeover, the first surprise was how little of the original wardrobe was actually being worn. Once every item was removed, a clear pattern appeared: favorite clothes circulated constantly, while uncomfortable shirts, outgrown pants, and special-occasion outfits consumed most of the space. Decluttering produced more usable capacity than any organizer we could have purchased.
The second lesson was that children think about storage differently. Adults may appreciate identical beige bins, but younger children often need stronger visual clues. Picture labels worked better than text-only labels. Open baskets worked better than lidded boxes. A low hook worked better than a hanger for a jacket worn every morning.
We also learned not to overfill the closet on the first day. Empty space is useful. It provides room for laundry day, new school clothes, birthday gifts, and inevitable changes in size. A closet filled to 100 percent capacity may look impressive for six minutes, but it has no flexibility. Leaving breathing room made the whole system easier to maintain.
The most successful addition was not the decorative wallpaper or matching hangers. It was a simple “Too Small” basket. Whenever a child tried on something that no longer fit, the item went directly into that basket. There was no need to reorganize the entire wardrobe or remember the problem later. Once the basket filled, its contents were sorted for donation and hand-me-down storage.
Another useful change was creating an outfit-planning hook. On school nights, the next day’s clothing could be placed together, including socks and any special accessories. This reduced morning decisions and helped identify missing items before everyone was already late.
The makeover also demonstrated why adjustable storage matters. A fixed system designed perfectly for a five-year-old may become frustrating by age nine. Movable rods, shelf tracks, removable baskets, and repositionable hooks made the closet feel custom without locking it into one stage of childhood.
Finally, the child needed to participate. Not in every construction decision, obviously; nobody handed over a drill and wished everyone luck. However, choosing label colors, deciding where favorite clothes belonged, and practicing the cleanup routine created a sense of ownership. The closet stopped feeling like a system imposed by an adult and became a space the child understood.
Was it perfectly tidy every day afterward? Of course not. Children still generate clutter with the speed and confidence of professional event planners. But cleanup became faster, lost items became less common, and the closet could recover from disorder without requiring a complete weekend overhaul. That is the real sign of a successful makeover.
Conclusion
A HUGE kid’s closet makeover is not about forcing a child’s wardrobe to look like a luxury boutique. It is about building a flexible, safe, easy-to-understand system that supports everyday family life.
Begin by removing what no longer belongs. Measure carefully, divide the closet into zones, bring daily items down to the child’s level, and use adjustable storage wherever possible. Add simple labels, a practical shoe area, a hamper, and an ongoing donation basket. Then leave enough open space for the system to grow.
The final closet may still contain a superhero cape, one unexplained rock, and a sock whose partner disappeared years ago. That is normal. The goal is not perfection. The goal is a closet that children can actually useand adults can restore without needing snacks, negotiations, and a full emotional-support team.