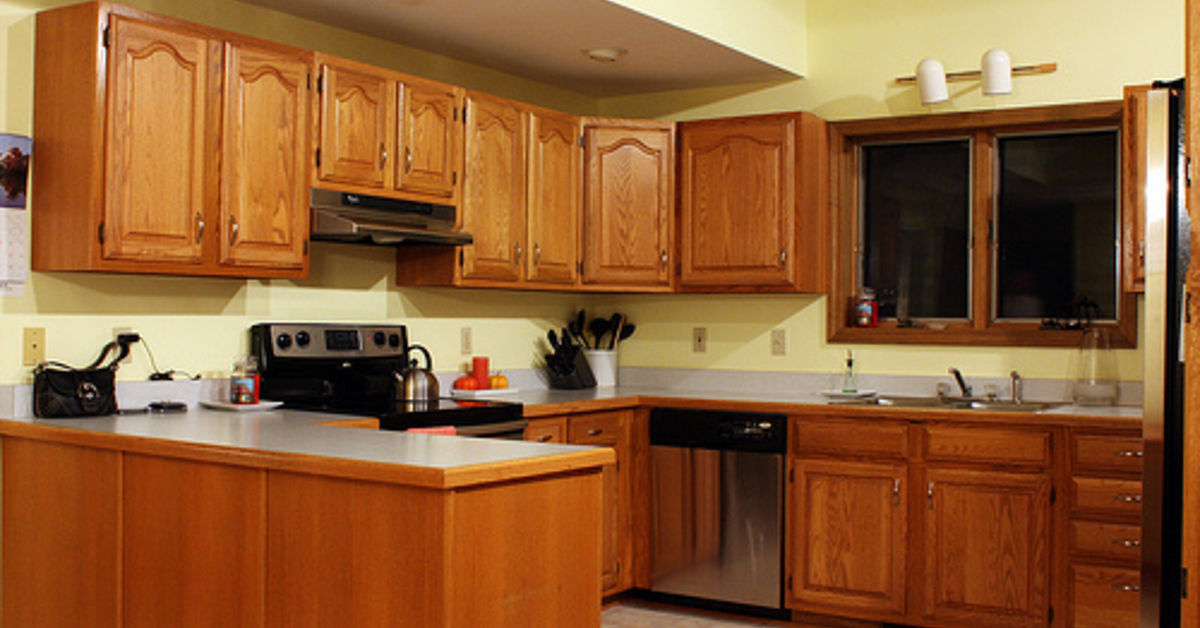
Oak cabinets are not necessarily the problem. The problem is usually everything that was invited to the kitchen party with them: orange-beige walls, busy brown granite, tiny mosaic tile, yellow bulbs, ornate hardware, and perhaps a decorative rooster that has been supervising breakfast since 1997.
The good news is that you can update an oak kitchen without painting the cabinets or committing to a demolition marathon. Oak has visible grain, natural warmth, and enough character to work in traditional, transitional, Scandinavian, organic modern, and even streamlined contemporary kitchens. The trick is to make deliberate choices around it. Instead of disguising the wood, create contrast, improve the lighting, simplify competing finishes, and repeat a few modern details throughout the room.
Start by Identifying What Actually Looks Dated
Before ordering a single brass knob at midnight, photograph the kitchen in daylight and again with the lights on. Then separate the permanent features from the replaceable ones.
- Keep: Solid cabinet boxes, doors in good condition, useful storage, and a layout that functions well.
- Question: Countertops, backsplash, flooring, wall color, lighting, faucet, hardware, window treatments, and decorative trim.
- Remove first: Countertop clutter, faded rugs, fake greenery above the cabinets, dated valances, and accessories that repeat the same orange-brown tone.
Many oak kitchens feel old because every surface is warm and visually busy. Oak grain combined with speckled granite, patterned tile, and tan flooring creates a room with five people talking at once. Your update should quiet two or three of those voices.
1. Clean and Revive the Existing Oak
Cabinets near a range, sink, trash pullout, and frequently handled doors gradually collect grease and grime. Because the change happens slowly, homeowners may assume the finish has permanently darkened when it simply needs careful cleaning.
Follow the cabinet manufacturer’s care instructions when available. Otherwise, begin with a soft microfiber cloth and a mild cleaner intended for finished wood. Test any product in a hidden spot, avoid soaking joints, and dry the surface promptly. Skip abrasive pads and aggressive chemicals that could dull or soften the existing topcoat.
Tighten loose hinges, align crooked doors, replace missing shelf pins, and repair small scratches with a compatible touch-up product. This unglamorous step matters. New hardware on grimy, sagging doors is like putting cuff links on pajamas.
2. Replace Dated Hardware with a Simpler Profile
Hardware is one of the fastest visible changes because it places a modern shape directly on the oak. Look for clean bar pulls, slim arched pulls, understated knobs, or a restrained combination of knobs on doors and pulls on drawers.
Choose a Finish That Works with the Oak
Warm metals such as aged brass, champagne bronze, and soft bronze can complement honey or golden oak without creating harsh contrast. Polished nickel and satin nickel can cool the palette and connect naturally with stainless steel appliances. Dark bronze adds definition while often feeling softer than flat black.
Matte black can work in a graphic modern kitchen, but it should not be an automatic choice. Against heavily grained golden oak, chunky black pulls may emphasize the cabinet doors more than intended. A physical sample is more useful than a hundred saved inspiration photos.
Reuse Existing Holes When Possible
Measure the center-to-center distance between screw holes before shopping. Choosing pulls that fit the current spacing avoids drilling new holes and filling old ones. Check scale as well: oversized handles can make narrow doors look clumsy, while tiny knobs may disappear on large drawers. Buy one sample first, tape it in place, and view it from across the room.
3. Install a Backsplash That Calms the Wood Grain
A backsplash occupies the visual space directly between oak cabinets and countertops, so it has enormous influence. For most kitchens, the safest update is tile with a quiet pattern and limited color variation.
Consider warm white subway tile, creamy handmade-look tile, pale greige ceramic, soft sage, muted blue-green, or a simple stone-look surface. The goal is not necessarily white; it is visual rest. If the cabinets have strong golden undertones, severe blue-white tile may make them appear more orange by comparison.
View samples against the actual cabinets and countertop during morning, afternoon, and evening light. A tile that behaves beautifully in a showroom may develop an unexpected pink, yellow, or gray cast at home.
Run the backsplash from the countertop to the underside of the upper cabinets. A full-height installation looks intentional and protects more wall area than a short four-inch strip. For fewer grout lines, consider larger-format tile or a slab backsplash that continues the countertop material.
Renters and cautious DIYers can test the direction with high-quality removable tile panels, but they should check heat restrictions near ranges and confirm that removal will not damage the wall.
4. Choose Countertops with Restraint, Not More Speckles
If the existing counters are dark, heavily patterned, or strongly orange-brown, replacing them can change the kitchen more than altering the cabinets. Oak already contributes movement through its grain, so the countertop usually works best when it provides a quieter visual field.
Useful options include warm white quartz with subtle veining, creamy solid-surface material, pale quartzite, soapstone for deeper contrast, or a restrained charcoal surface in a room with abundant natural light. Avoid choosing a countertop from a tiny chip alone. Large samples reveal pattern scale, undertones, and how the surface behaves beside the floor.
When full replacement is not realistic, declutter the counter, repair damaged caulk, reseal materials that require it, and consolidate everyday items on one tray. A coffee maker, toaster, blender, knife block, mail pile, vitamin collection, and six decorative cutting boards can make any countertop look as though it has filed a complaint.
5. Paint the Walls, Not the Cabinets
Wall color can either exaggerate oak’s orange notes or make the wood look grounded and intentional. Good companions often include warm white, light mushroom, soft greige, muted olive, dusty blue, gentle sage, and subdued clay tones.
Avoid selecting color by name alone. “Creamy Linen Whisper” can still turn peach under warm bulbs. Paint large sample boards and move them around the room. Compare them with the cabinets, countertops, flooring, and adjacent rooms. In an open floor plan, the kitchen should not look as though it wandered in from a different house.
For a brighter result, choose a white with a soft neutral or slightly warm undertone rather than a stark icy white. For a moodier update, muted green or blue can provide complementary contrast while allowing the oak to remain the room’s warm element.
6. Upgrade the Lighting in Layers
Poor lighting is one of the main reasons oak looks more yellow or orange than it does in daylight. A modern lighting plan should combine general illumination, task lighting, and decorative lighting.
- General light: Replace dated fluorescent boxes or undersized flush mounts with fixtures that distribute light evenly.
- Task light: Add continuous or well-spaced LED lighting beneath upper cabinets to illuminate work surfaces.
- Decorative light: Use pendants or a statement fixture to establish the kitchen’s updated style.
Choose compatible color temperatures throughout the room so one fixture does not look blue while another glows amber. Dimmers add flexibility for cooking, cleaning, entertaining, and late-night refrigerator investigations.
Conceal visible cords and transformers whenever possible. A beautiful backsplash loses some of its magic when crossed by a plastic wire doing parkour.
7. Update the Faucet, Sink, and Visible Appliances
A faucet functions like a sculpture in the middle of the work zone. Replacing a short, ornate, or worn fixture with a clean-lined pull-down model can modernize the sink area immediately. Match it loosely, rather than obsessively, to the cabinet hardware. Mixed metals can look collected when each finish appears more than once.
If the sink is chipped, shallow, or divided in a way that frustrates daily use, a new sink may deliver both visual and practical value. Stainless steel connects easily with appliances, while a light composite or fireclay sink can brighten the counter area. Confirm cabinet dimensions, mounting style, plumbing clearances, and countertop compatibility before purchasing.
Appliances do not all need to be replaced at once. Start with the most visible or least reliable item, then repeat a consistent finish over time. Even small changes, such as replacing a damaged microwave or installing a simpler range hood, can reduce the time-capsule effect.
8. Break Up a Wall of Oak Without Painting It
If the kitchen contains uninterrupted rows of upper cabinets, introduce one controlled change. Replace one or two solid door panels with glass, remove a small cabinet for open shelves, or create a display niche in an area that does not sacrifice essential storage.
Glass fronts work best when the contents are edited. Matching white dishes, clear glassware, or a small collection looks polished. A chaotic assortment of travel mugs looks like airport security opened a gift shop. Reeded or fluted glass adds texture while partially disguising the contents.
Another option is to update only an island, freestanding hutch, pantry door, or range hood in a contrasting finish. The perimeter oak remains untouched, but the room gains a focal point and a layered, custom appearance.
9. Make the Flooring and Decor Support the Cabinets
Oak cabinets paired with similarly colored wood-look flooring can create an overwhelming amount of amber. You do not necessarily need to replace the floor, but you should create separation. A washable runner in a muted pattern can interrupt the wood-on-wood effect and introduce cooler or deeper colors.
If flooring replacement is planned, compare samples carefully with the cabinets. Contrasting stone-look tile, restrained porcelain, or a wood tone that is clearly lighter or darker may look more intentional than a near-match that misses by half a shade.
Finish the room with simple counter stools, tailored window treatments, practical artwork, and a few ceramic or glass accessories. Repeat two or three colors rather than collecting every trend in one space. Oak brings plenty of texture; the supporting cast can afford to use indoor voices.
10. Reduce Countertop and Open-Shelf Clutter
A dated kitchen often looks considerably newer after unnecessary objects are removed. Keep frequently used appliances accessible, but store occasional gadgets behind closed doors. Group oils, salt, and utensils on one tray rather than allowing small items to spread across the entire counter.
Open shelves and glass-front cabinets require even more discipline. Use repeated materials, leave breathing room between objects, and avoid filling every available inch. Negative space is free, matches every wood tone, and never needs dusting separately.
Use a Smart Order of Operations
A coordinated oak kitchen update becomes easier when decisions happen in the right sequence:
- Clean, repair, and photograph the existing kitchen.
- Choose the countertop if it is being replaced.
- Select the backsplash using the countertop and oak as references.
- Test wall colors beside all fixed surfaces.
- Choose hardware, faucet, and lighting as a coordinated family.
- Install the updates, then edit accessories and countertop storage.
This sequence prevents a classic remodeling mistake: falling in love with a backsplash first, then discovering that it argues with the countertop and makes the cabinets look radioactive.
Budget-Friendly Oak Kitchen Update Plans
The One-Weekend Refresh
Deep-clean the cabinets, replace hardware using existing holes, change the wall color, remove dated decor, add a runner, and install plug-in or rechargeable under-cabinet lights. This plan works best when the counters and backsplash are already neutral.
The Midrange Makeover
Add a new backsplash, hardwired under-cabinet lighting, updated pendants, a modern faucet, and a more cohesive wall color. Replace one or two upper doors with glass if the cabinet style permits.
The High-Impact Renovation Without New Cabinets
Keep the cabinet boxes and doors, but replace countertops, backsplash, sink, faucet, lighting, flooring, and selected appliances. Add organizational inserts and repair worn hinges. The room can feel completely new while the oak remains the largest original element.
Common Mistakes to Avoid
- Using stark white everywhere: Extreme contrast can make golden oak appear more orange.
- Adding another busy pattern: Highly figured counters and tiny mosaics compete with oak grain.
- Mixing too many metals: Two coordinated finishes are usually easier to manage than four unrelated ones.
- Ignoring bulb color: Inconsistent lighting can undo careful material choices.
- Buying hardware without measuring: New pulls may leave exposed holes or look out of scale.
- Updating only one isolated item: A modern faucet cannot single-handedly negotiate peace between Tuscan tile, fluorescent lighting, and burgundy walls.
Experience-Based Lessons from Oak Kitchen Refreshes
The first lesson homeowners commonly learn is that oak changes dramatically after the surrounding clutter and warm-toned accessories disappear. A kitchen may seem to need new cabinets when it really needs fewer brown objects. Removing a dark valance, beige canisters, artificial vines, and patterned floor mats often reveals that the cabinets are not nearly as dominant as they appeared. This is why an editing day should come before a shopping day. It costs nothing, creates a clean visual baseline, and prevents you from buying products to solve problems caused by objects you did not even want.
The second lesson is that samples must live in the kitchen for several days. A warm white tile that looks elegant under showroom lighting may turn yellow beside honey oak. A pale gray countertop may reveal a violet cast at sunset. A brass pull may look refined online and strangely green beneath an old fluorescent fixture. Successful refreshes usually involve taping samples vertically against cabinet doors, laying countertop pieces flat, and viewing everything at different times. People are often surprised by the winning combination because it is quieter than the one that first caught their eye.
Third, hardware can be transformative, but it cannot carry the entire remodel. Slim nickel pulls may sharpen the cabinetry, yet the kitchen will still feel dated if the backsplash is a brown mosaic and the ceiling fixture resembles an office supply. Homeowners get the best result when they repeat the new design language at least three times. For example, simple satin nickel pulls, a clean stainless faucet, and streamlined pendants create a consistent message. The pieces do not need to match perfectly; they need to look as though they have met before.
Another recurring lesson is that lighting often provides the best improvement per hour of disruption. Under-cabinet lights remove shadows from the countertop and make a calm backsplash feel more dimensional. Better overhead light makes the cabinet finish look clearer rather than muddy. Dimmers allow warm oak to feel cozy at dinner without making food preparation difficult. Homeowners frequently say the room feels cleaner after a lighting upgrade even when nothing has actually become cleaner. Apparently, crumbs prefer anonymity.
Finally, the most satisfying oak kitchen updates respect the house rather than forcing it into a costume. A 1980s or 1990s home does not need to impersonate a stark urban loft. It can become lighter, simpler, and more functional while retaining wood grain and warmth. The winning approach is usually selective: keep the quality oak, remove the fussy details, improve the surfaces that touch it, and add one memorable focal point. That might be a soft green backsplash, a sculptural pendant, a charcoal counter, or a beautifully organized glass-front cabinet.
When the choices are intentional, oak stops reading as something you failed to replace and starts reading as something you deliberately preserved. That restraint also leaves room for future updates, allowing the kitchen to evolve without another expensive identity crisis five years later.
Conclusion
Learning how to update an oak kitchen without painting cabinets is less about hiding wood and more about creating balance. Clean and repair the oak, simplify the hardware, improve the lighting, and choose quieter surfaces that complement rather than compete with the grain. A restrained backsplash, modern faucet, thoughtful wall color, edited decor, and better organization can move the room forward without sacrificing solid cabinetry.
Most importantly, update the kitchen as a complete composition. When materials, metals, light, and color repeat with purpose, oak feels warm and architectural instead of dated. Your cabinets can keep their natural finish, and the decorative rooster can finally enjoy a well-earned retirement.