Perennials are supposed to be the dependable citizens of the garden. You plant them once, they return every year, and everyone congratulates you for being wonderfully low-maintenance. Then, one spring, your polite little hosta becomes a leafy sofa, the daylilies invade the walkway, and the ornamental grass develops a mysterious bald spot in the middle.
That is when it is time to divide overgrown perennials.
Dividing a perennial means lifting an established plant, separating its roots and crowns into smaller sections, and replanting the healthiest pieces. The process controls aggressive growth, rejuvenates tired plants, improves flowering, and provides free plants for other parts of the yard. It is gardening’s version of decluttering, except the clutter is alive and may require a shovel.
Why Overgrown Perennials Need to Be Divided
Many clump-forming perennials expand outward each year. As the plant becomes larger, its roots, shoots, and crowns begin competing with one another for water, nutrients, sunlight, and growing space. The result may be weaker stems, fewer flowers, smaller blooms, or a dead center surrounded by a ring of healthy growth.
Division reduces that internal competition. It also creates better spacing between plants, which can improve airflow and make dense flower beds less inviting to certain fungal diseases. Rapid spreaders such as bee balm, obedient plant, garden phlox, and some ornamental grasses may need division more frequently than slow-growing perennials.
Division Is Useful for More Than Plant Health
Gardeners also divide perennials to:
- Keep plants from covering pathways or crowding neighboring flowers.
- Rearrange a garden bed without buying additional plants.
- Propagate a favorite named cultivar.
- Fill bare spaces elsewhere in the landscape.
- Create plants to share with friends, neighbors, or community gardens.
- Remove unhealthy or unproductive portions of an old clump.
A single mature hosta or daylily can sometimes produce several strong divisions. That makes perennial division one of the few home improvement projects in which cutting something apart can leave you with more than you had before.
Signs That a Perennial Is Ready for Division
Do not divide plants simply because a gardening calendar says three years have passed. Different species grow at different rates, and soil, moisture, sunlight, climate, and fertility all affect how quickly a plant becomes crowded.
Instead, watch for visible signs that the plant needs attention:
- The center of the clump is dead, sparse, or sunken.
- The plant produces fewer or smaller flowers than it did previously.
- Stems flop even when the plant receives appropriate light.
- The clump has outgrown its assigned space.
- Roots or rhizomes are pushing above the soil.
- Neighboring plants are being smothered.
- The foliage appears crowded even though water and soil conditions are suitable.
- The plant forms a ring or doughnut shape, with strong growth around an empty center.
Some vigorous perennials may need division every two or three years. Others can remain undisturbed for five, eight, or even ten years. Let plant performance guide the decision rather than treating division like an annual tax deadline.
When Is the Best Time to Divide Perennials?
The safest general rule is to divide a perennial when it is not flowering. A plant that is actively blooming is already spending considerable energy on flowers and seed production. Dividing it at the same time adds stress and may shorten the display.
Dividing Perennials in Spring
Early spring is an excellent time to divide many summer- and fall-blooming plants. New shoots are small, temperatures are moderate, and seasonal rain may help keep the roots moist. Spring divisions also have an entire growing season to establish before winter.
Asters, chrysanthemums, hostas, ornamental grasses, sedum, and many late-season bloomers are commonly divided as their new growth emerges. Spring is especially convenient for plants whose crowns become difficult to see later beneath a jungle of foliage.
Dividing Perennials in Fall
Early fall is often suitable for spring- and early-summer-blooming perennials. Cooler air reduces water loss, while warm soil encourages root growth. Complete the work several weeks before the ground freezes so the divisions can develop new roots before winter.
Fall division is commonly used for daylilies, peonies, garden phlox, and many spring bloomers. In hot regions, waiting until temperatures moderate can greatly reduce transplant stress.
Choose the Right Weather
Work on a cloudy, cool day whenever possible. Water dry soil one or two days beforehand so it is moist but not muddy. Avoid dividing plants during extreme heat, drought, or immediately before a stretch of scorching weather. A plant with recently disturbed roots is not interested in proving its toughness during a heat wave.
Regional climate matters, so gardeners should adjust the schedule according to local frost dates, rainfall patterns, and summer temperatures.
Tools and Supplies You Will Need
Most perennial divisions require only basic garden tools:
- A sharp garden spade or transplanting shovel.
- A digging fork for lifting fibrous root systems.
- A sturdy garden knife or pruning saw.
- Hand pruners for trimming stems and damaged roots.
- Two garden forks for separating tightly packed crowns.
- A tarp, wheelbarrow, or sheet of cardboard.
- A bucket of water or damp cloth for protecting exposed roots.
- Compost or suitable soil amendment.
- A watering can or hose.
- Gloves and eye protection when cutting hard crowns.
Clean soil from cutting tools and disinfect the blades before moving between plants, particularly when disease is suspected. Sharp tools create cleaner cuts and require less force, which is good news for both the plant and your lower back.
How to Divide Overgrown Perennials Step by Step
1. Prepare the New Planting Area First
Decide where the divisions will go before lifting the parent plant. Dig the new holes, loosen compacted soil, remove weeds, and mix in compost when appropriate. The new locations should provide the sunlight, drainage, spacing, and soil conditions required by the species.
Preparing first limits the amount of time the roots remain exposed. Perennial roots do not enjoy sunbathing.
2. Water the Parent Plant
If the soil is dry, water the plant deeply one or two days before division. Moist soil is easier to dig, stays around the roots more effectively, and reduces stress. Avoid creating a muddy swamp, since saturated soil is heavy and can smear into dense clumps.
3. Cut Back Excess Foliage
For large plants divided in fall, trimming stems and leaves can make the clump easier to handle and reduce moisture loss. Leave enough growth to identify the crown and support recovery. Daylily foliage, for example, can be shortened before replanting.
Small spring shoots usually need little or no trimming.
4. Dig Around the Root Zone
Insert a spade or garden fork into the soil beyond the outer edge of the crown. Work around the entire plant in a wide circle, loosening the soil as you go. Angle the tool beneath the root mass and lift carefully.
Starting too close to the crown slices away valuable roots. A larger root ball may be heavier, but it gives the plant a better supply of functioning roots for recovery.
5. Lift the Clump
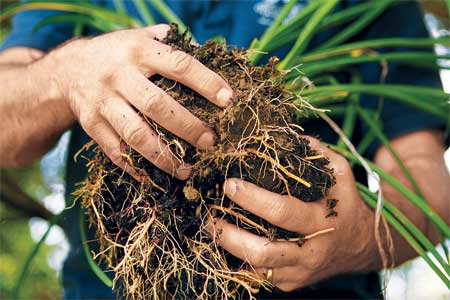
Lever the root mass upward from several sides rather than trying to launch it out of the ground with one heroic shovel movement. Place the clump on a tarp or firm surface. Shake away loose soil or rinse enough soil from the roots to reveal the crowns and natural separation points.
6. Inspect the Roots and Crown
Look for firm roots, healthy buds, and vigorous outer growth. Cut away soft, rotten, hollow, badly damaged, or discolored tissue. In an old doughnut-shaped clump, the exhausted center can usually be discarded while the younger outer sections are saved.
7. Separate the Plant
Choose the method that matches the root system:
- Pull apart by hand: Suitable for loose, fibrous roots and plants with obvious individual crowns.
- Cut with a knife: Useful for fleshy roots, rhizomes, and moderately dense crowns.
- Slice with a spade: Effective for large, tough clumps such as mature daylilies and ornamental grasses.
- Use two garden forks: Insert the forks back-to-back into the center and pull the handles apart to tease dense roots open.
- Use a pruning saw: Reserved for large, woody, stubborn crowns that laugh at ordinary hand tools.
Each new section should contain healthy roots and at least one viable crown or growing point. Larger divisions usually reestablish and flower sooner than tiny fragments. For many common perennials, a section with several healthy shoots and a generous root system provides a sensible balance.
8. Replant at the Correct Depth
Position each division at approximately the same depth at which the parent plant was growing. Spread the roots naturally rather than folding them into a cramped hole. Backfill with soil, press gently to remove large air pockets, and avoid compacting the bed into something resembling concrete.
Planting depth is especially important for certain species. Peony buds should remain close to the soil surface, while bearded iris rhizomes are planted at or just below the surface. Burying these plants too deeply can reduce flowering.
9. Water Thoroughly
Water immediately after planting to settle soil around the roots. Continue checking moisture during the establishment period. The soil should remain evenly moist but not constantly waterlogged.
10. Mulch Carefully
Apply a modest layer of organic mulch to conserve moisture and reduce weeds. Keep mulch away from the crown itself. A thick pile pressed against the crown can trap excessive moisture and encourage rot.
How to Divide Popular Garden Perennials
| Perennial | Preferred Timing | Useful Division Tip |
|---|---|---|
| Hosta | Early spring or early fall | Cut or pull the crown into sections, keeping roots and several shoots together. |
| Daylily | Early spring or after flowering | Separate the clump into groups containing two or three healthy fans with attached roots. |
| Garden phlox | Spring | Retain vigorous outer shoots and discard weak or woody central material. |
| Bearded iris | Several weeks after flowering | Keep firm rhizome pieces with healthy roots and a fan of leaves. |
| Ornamental grass | Spring as growth begins | Use a sharp spade or saw for large crowns and retain healthy outer sections. |
| Peony | Early fall | Include several healthy buds in each division and avoid planting them too deeply. |
| Bee balm | Spring or fall | Remove older central growth and replant vigorous sections from the perimeter. |
Species-specific details matter. Hostas can often be pulled or cut into sections, daylily divisions should retain healthy fans and roots, and garden phlox performs best when each section contains several vigorous shoots. Bearded iris rhizomes should be inspected carefully, and damaged or diseased portions should be discarded.
Perennials That Should Not Be Divided Casually
Not every perennial appreciates frequent disturbance. Plants with deep taproots, fragile crowns, or slow-growing woody bases may recover poorly after unnecessary division. Before splitting an unfamiliar plant, confirm that division is a recommended propagation method for that species.
Peonies can be divided successfully, but established plants generally do not need routine division simply because they are old. They may take time to resume full flowering after being moved. Other long-lived perennials may also be healthier when left undisturbed unless they are declining, overcrowded, or growing in the wrong location.
When a plant cannot be divided safely, seeds, basal shoots, layering, or stem and root cuttings may provide better propagation options.
Aftercare for Newly Divided Perennials
Successful division does not end when the shovel is returned to the shed. Newly replanted sections have reduced root systems and need consistent care while they establish.
- Check soil moisture regularly for the first several weeks.
- Water deeply enough to moisten the root zone instead of sprinkling only the surface.
- Provide temporary shade during unexpectedly hot weather.
- Remove weeds that compete for water and nutrients.
- Avoid heavy fertilization immediately after division.
- Replace divisions that frost heaving has pushed partly out of the soil.
- Label plants before their foliage disappears.
A newly divided perennial may produce fewer flowers during its first season because it is rebuilding roots. That is not failure. It is the botanical equivalent of unpacking boxes before hosting a dinner party.
Common Perennial Division Mistakes
Making Divisions Too Small
A tiny piece with one weak shoot and a few damaged roots may survive, but it will take longer to create an attractive plant. Keep a balanced portion of crown and roots together.
Allowing Roots to Dry Out
Keep divisions shaded and moist until they are planted. Cover them with damp material or temporarily place their roots in moist soil if replanting is delayed.
Dividing During Extreme Heat
High temperatures and dry wind increase water loss at exactly the moment the plant has fewer roots available to replace that moisture.
Replanting the Dead Center
The large center section may look impressive, but it is often the oldest and least vigorous part. Healthy outer growth is generally the better material to keep.
Planting Too Deeply
Covering a crown with excessive soil can delay emergence, reduce flowering, or cause rot. Match the original planting depth unless the species has a specific requirement.
Creating Too Many New Plants
One mature clump can produce more divisions than the garden can reasonably hold. Decide in advance how many you need. Share healthy extras, pot them temporarily, or compost suitable disease-free material rather than squeezing twelve plants into a space designed for four.
Sharing Soil-Borne Pests
Inspect roots and surrounding soil before giving plants away. Do not share divisions containing weeds, suspicious insects, eggs, rot, or disease symptoms. Plant generosity is admirable; distributing a garden pest to the entire neighborhood is less charming.
Practical Experience: Lessons Learned While Dividing Mature Perennials
The most important lesson from working with mature perennial clumps is that the job is rarely as delicate as beginners expect, but it is almost always heavier. A hosta that looks moderately large above ground may have a dense root mass wide enough to occupy a wheelbarrow. Starting with a narrow digging circle usually results in chopped roots, repeated digging, and a gardener wondering why the plant appears to be anchored to the center of the earth.
A wider first cut is usually more efficient. Digging beyond the crown preserves more roots and creates enough working space to angle a shovel beneath the clump. Loosening all sides before lifting also works better than forcing one side upward. When the plant is genuinely enormous, removing it in sections may be more practical than attempting to lift the entire root ball.
Another useful lesson is to prepare the destination before digging. It is surprisingly easy to lift a beautiful clump, divide it into six pieces, and then realize that the new bed still contains weeds, compacted soil, and a buried irrigation line. Meanwhile, the exposed divisions are drying in the sun like vegetables at an unsuccessful farmers market. Having the holes ready turns a rushed transplant into an orderly process.
Root structure determines the best separation method. Loose hosta crowns and young daylilies may pull apart with patient hand pressure. Dense ornamental grasses are a different personality entirely. They may require a sharpened spade, pruning saw, or repeated cuts from opposite sides. Trying to tease a mature grass apart gently can consume an afternoon and several optimistic thoughts.
Experienced gardeners also learn not to save every piece. Healthy outer divisions with strong buds and firm roots generally outperform exhausted central sections. Keeping weak material merely because it is technically alive creates more maintenance and less satisfying growth. Division is partly propagation, but it is also selective renewal.
Watering immediately after replanting matters more than applying fertilizer. Moist soil settles around the roots and eliminates air pockets. Strong fertilizer does not repair damaged roots and may encourage leafy growth before the plant can support it. Compost, suitable soil, steady moisture, and patience are usually more valuable than a dramatic feeding program.
Labeling is another habit learned through experience. A freshly divided bed seems unforgettable in September. By March, six bare patches can look remarkably similar. Labels prevent prized phlox from being mistaken for weeds and stop vigorous volunteers from receiving accidental VIP treatment.
Finally, division changes the appearance of a garden temporarily. Mature fullness disappears, and the replanted sections may look underwhelming for a season. Resist the urge to crowd them together. Proper spacing allows each division to rebuild into a healthy clump. The bed may look sparse today, but perennials are very good at filling empty spaceoccasionally too good, which is how this whole division project began.
Conclusion
Learning how to divide overgrown perennials gives gardeners a practical way to restore declining plants, control aggressive growth, improve flower production, and multiply favorite varieties without buying more. The essential steps are straightforward: choose the correct season, prepare the new planting area, lift a generous root ball, retain healthy roots and crowns, replant at the proper depth, and provide consistent moisture during recovery.
The process can involve mud, stubborn roots, and one clump that refuses to cooperate with any tool invented by modern civilization. Even so, division is among the most rewarding forms of perennial garden maintenance. A crowded, tired plant becomes several vigorous new plants, and an overgrown flower bed gains space, structure, and renewed color.
Note: This original article was synthesized from research-based horticultural guidance published by reputable U.S. university extension programs and prepared for web publication.