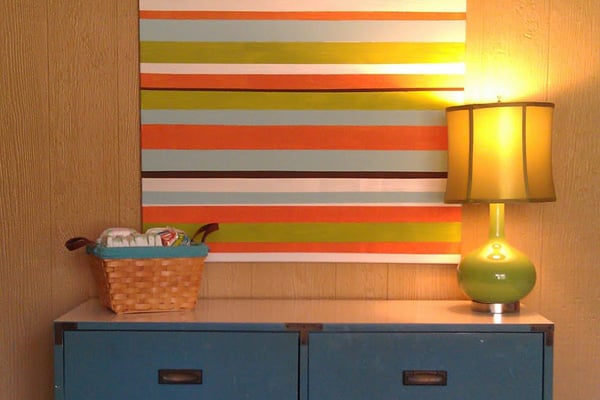
Striped art is one of those wonderfully sneaky projects that looks polished, playful, and a little bit fancy without demanding that you paint like a Renaissance master who survives on espresso and dramatic sighs. A few bold lines, a smart color palette, and some patience with tape can turn an ordinary canvas or sheet of paper into a piece that feels modern, cheerful, and absolutely ready for its close-up on a wall, shelf, or social feed.
This fun striped art tutorial is for beginners, casual crafters, parents making art with kids, and confident DIYers who simply want an easy win. Stripes are approachable because they rely on repetition, rhythm, and color more than realistic drawing skills. In other words, you do not need to paint a perfect face, a moody mountain range, or a suspiciously lopsided bowl of fruit. You just need lines, intention, and a willingness to trust the process when the painter’s tape makes everything look a little chaotic before the big reveal.
In this guide, you will learn how to make striped art from start to finish, choose colors that actually work together, avoid muddy paint disasters, and create a piece that looks lively instead of flat. You will also find ideas for playful variations, display tips, and a deeper reflection on why striped art continues to charm artists, teachers, and home decorators alike. If you have ever wanted to make abstract stripe painting that feels fun instead of fussy, you are in the right place.
Why Striped Art Works So Well
Striped art has serious visual power for such a simple idea. Lines can feel calm, energetic, organized, playful, bold, or even a little rebellious depending on their direction, spacing, thickness, and color. Horizontal stripes often feel relaxed and steady. Vertical stripes can feel taller and more dramatic. Diagonal stripes bring movement, which is art language for, “This painting looks like it had coffee.”
Another reason striped art works is that repetition creates pattern, and pattern gives the eye something satisfying to follow. That is why stripes show up everywhere: textiles, wallpaper, fashion, graphic design, classrooms, museums, and probably on at least one sock that does not match the others in your laundry basket. Repeating lines help build rhythm, while color contrast adds excitement and depth.
Striped art is also flexible. You can make it bright and kid-friendly, muted and minimalist, or rich and layered for a more sophisticated look. You can keep the stripes neat and crisp with masking tape, or paint them freehand for a looser, more expressive feel. That range is exactly what makes a striped art tutorial so useful. It is simple enough to start, but open-ended enough to make your piece feel original.
Supplies for a Fun Striped Art Project
You do not need a giant studio or a suspiciously expensive apron to make beautiful striped art. A basic setup is more than enough.
Basic Materials
- Canvas, canvas board, watercolor paper, or thick mixed-media paper
- Acrylic paint, tempera paint, watercolor, or paint markers
- Painter’s tape or low-tack masking tape
- Ruler
- Pencil
- Flat and round paintbrushes
- Palette or paper plate for mixing
- Water cup and paper towels
Optional Extras
- Metallic paint for accents
- Black or white paint pen for detail lines
- Palette knife for textured stripes
- Masking fluid for tiny reserved areas on paper
- Clear varnish or sealant for finished acrylic work
Acrylic paint is one of the best choices for striped art because it dries quickly, layers well, and gives you crisp color. Watercolor can also be gorgeous if you want a softer, more translucent effect. For younger artists, washable tempera or crayons paired with paint can make the project more forgiving and less likely to turn your dining table into a crime scene.
Before You Start: Choose a Stripe Personality
Yes, stripes have personalities. Some are neat little overachievers. Some are wild. Some look like they run a modern design blog. Before you paint, decide what kind of mood you want.
Option 1: Clean and Modern
Use evenly spaced stripes, a limited palette, and sharp tape lines. Think black and white with one accent color, or soft beige, terracotta, and muted blue.
Option 2: Playful and Colorful
Mix stripe widths, use bright colors, and let a few lines overlap. This is perfect for kids’ rooms, craft spaces, and anyone whose favorite decorating style is “happy chaos, but curated.”
Option 3: Organic and Artistic
Paint stripes freehand so they wiggle slightly, vary in thickness, and feel more handmade. This gives the art movement and charm, especially when paired with layered brushstrokes.
Step-by-Step Fun Striped Art Tutorial
Step 1: Pick Your Surface and Size
Start with a small to medium format if you are new to this. An 8×10 canvas, 9×12 paper, or square canvas panel is perfect. Small surfaces help you focus on color, spacing, and technique without feeling like you accidentally signed up to paint a gymnasium wall.
Step 2: Plan Your Color Palette
Choose three to six colors. That is usually the sweet spot. Too few colors can feel flat, while too many can make the artwork look visually noisy. A good formula is one dominant color, two supporting colors, one neutral, and one accent. For example:
- Navy, sky blue, white, and mustard
- Coral, blush, peach, cream, and gold
- Black, white, sage, and terracotta
- Teal, lime, yellow, and hot pink for a louder, more playful vibe
If you want more contrast, pair warm and cool colors. If you want harmony, stay within one family and vary the tint or shade. This is where your striped wall art starts to feel intentional instead of accidental.
Step 3: Sketch the Layout
Use a ruler and pencil to lightly mark where your stripes will go. Decide whether they will be horizontal, vertical, diagonal, curved, or mixed. You can make all stripes the same width, or alternate thick and thin bands for added rhythm.
Here is a simple beginner-friendly layout:
- Create one-inch-wide stripes across the surface.
- Every third stripe, make it wider for visual variety.
- Leave some areas blank for white space.
White space matters. It gives the eye a place to rest and helps your bold colors stand out. Think of it as the art equivalent of not shouting every sentence.
Step 4: Apply the Tape
Lay painter’s tape along the pencil lines for crisp edges. Press the tape down firmly, especially along the edges, so paint does not sneak underneath like a tiny, colorful burglar. If you want super-clean lines, gently rub the tape with your fingernail or the side of a ruler.
If you are working on paper, test the tape first to make sure it will not tear the surface. You can reduce tack by pressing the tape lightly against your shirt once before applying it. Glamorous? No. Effective? Absolutely.
Step 5: Paint the Background or Base Layer
You can start with a white surface, but a painted base often makes striped art look richer. Try a pale peach background under warm stripes, or a dusty blue background beneath cream and navy bands. Let the base layer dry completely before moving on. Completely means actually dry, not “dry-ish because I am impatient and optimistic.”
Step 6: Paint the Stripes
Fill each taped section with color. Use a flat brush for cleaner coverage. Paint from the tape inward rather than shoving the brush hard into the edge. That helps reduce bleeding. Apply thin to medium layers instead of one thick gloopy coat. Thick paint may look dramatic in the moment, but it can also peel, smear, or dry unevenly.
For more depth, vary the finish and technique:
- Use solid opaque stripes next to dry-brushed textured stripes
- Blend two colors inside one wide stripe
- Add tiny dots, dashes, or zigzags inside a few stripes
- Leave one stripe metallic or glittery for surprise
Step 7: Peel the Tape at the Right Time
This is the dramatic finale. Peel the tape slowly while the paint is still slightly damp or just barely set, depending on the paint thickness. Pull it back at an angle instead of yanking straight up. Yanking is for weeds and bad plot twists, not delicate painted edges.
If a little paint bleeds, do not panic. Small imperfections can be corrected with a detail brush and background color. And sometimes those tiny handmade quirks are what keep abstract stripe painting from looking too stiff.
Step 8: Add Finishing Details
Once dry, step back and see what the piece needs. Maybe it is perfect already. Maybe it needs a few black line accents, a pop of white, or one more energetic stripe crossing the others. This is where your eye matters more than the original plan.
You can also add:
- Mini shapes between stripes
- Thin outlines around selected bands
- A contrasting border around the edge of the canvas
- Gloss varnish for a finished, gallery-inspired look
Best Color Ideas for Striped Art
Color does most of the emotional heavy lifting in striped artwork. A strong palette can make simple lines feel cheerful, elegant, coastal, retro, earthy, or bold.
For a Calm Look
Use soft blues, sandy beige, sage green, warm white, and pale gray. These colors work beautifully for bedrooms, bathrooms, and spaces where you want a relaxed atmosphere.
For a Bright, Fun Look
Try watermelon pink, sunny yellow, turquoise, orange, and white. These combinations feel youthful and energetic, making them ideal for playrooms, creative studios, and cheerful gallery walls.
For a Modern Designer Feel
Lean into charcoal, cream, rust, olive, and muted blush. These shades feel grown-up without being boring, which is a rare and noble achievement in home decor.
For Kids’ Art Time
Choose colors with obvious contrast so the stripe pattern reads clearly: blue and yellow, red and white, purple and green, or rainbow bands with black outlines. Kids usually love seeing clear pattern and rhythm emerge quickly, and striped art delivers that fast.
Common Mistakes to Avoid
Even easy art projects have a few classic traps. The good news is that most of them are simple to dodge.
Using Too Many Colors
More is not always merrier. If everything is shouting, nothing gets heard. Limit the palette so the stripes feel coordinated.
Painting Over Wet Layers
If the base is still wet, tape can lift it and colors can smear. Let layers dry. Art rewards patience, even if patience is annoying.
Forgetting Contrast
If all the colors are similar in value, the stripes can disappear into one another. Include at least one light shade and one dark shade to help the design read clearly.
Ignoring Variety
Perfectly identical stripes can look nice, but they can also feel a little static. Consider mixing widths, textures, or spacing so the piece has more life.
Creative Variations for a Striped Art Tutorial
Once you understand the basic method, striped art opens up fast. Here are some fun ways to remix the idea:
- Rainbow Stripe Canvas: Paint each stripe a different color and add a white border for a fresh, modern finish.
- Monochrome Stripe Study: Use different shades of one color for a subtle, sophisticated piece.
- Curved Stripe Art: Replace straight lines with soft arches or waves for a more organic composition.
- Collage Stripe Art: Cut painted or patterned paper into strips and glue them down instead of painting everything directly.
- Textured Stripe Painting: Use a palette knife, sponge, or thick brush to make each band feel different.
This is also a great project for seasonal or themed decor. Try pastel stripes for spring, warm rust and ocher for fall, or icy blue and silver for winter. One tutorial, many moods, zero need to become emotionally attached to a single palette forever.
How to Display Your Finished Striped Art
A finished striped painting can work almost anywhere. Lean a small canvas on a shelf, group three pieces together for a mini gallery wall, or frame a paper version behind a white mat for a cleaner presentation. If your palette matches the room, the artwork will feel intentional. If it contrasts boldly, it becomes an accent piece. Both are excellent outcomes.
Striped art also makes a great handmade gift. It is personal without being too specific, modern without being cold, and easy to customize for the recipient’s favorite colors. That is the sweet spot of gift giving. Nobody has to pretend they know what your abstract fruit bowl means.
What Painting Stripes Taught Me About Art, Patience, and the Audacity of Tape
The first time I made striped art, I assumed it would be almost laughably easy. How hard could lines be? They are lines. They have one job. I confidently laid down tape, squeezed out paint, and fully expected a masterpiece by lunchtime. What I got instead was a humbling lesson in patience, paint thickness, color balance, and how one crooked strip of tape can throw off your entire emotional state for twenty minutes.
But that is exactly why I ended up loving the process. Striped art teaches you to pay attention in a gentle, low-stakes way. You start noticing whether a color looks warmer next to cream or cooler next to gray. You see how a thick stripe can anchor a composition while a thin one adds energy. You realize that spacing changes everything. A quarter inch here, a wider band there, and suddenly the piece feels calmer, louder, softer, or more sophisticated.
I also learned that striped art is wonderfully honest. It does not hide your decisions. If your palette works, you can feel it immediately. If it does not, the painting tells on you with shocking speed. That honesty is useful. Instead of fighting it, you start adjusting. Maybe the coral needs more white. Maybe the navy is too dominant. Maybe the diagonal stripe is exciting in theory and completely chaotic in practice. Good. That is not failure. That is the actual art-making part.
One of my favorite things about this kind of project is how it changes with mood and environment. On busy days, I want neat vertical stripes, limited colors, and crisp edges. They make me feel organized even when my desk looks like a paper tornado made a personal statement. On more playful days, I lean into uneven lines, brighter colors, and small patterns tucked inside wider bands. The result feels more alive, more personal, and less concerned with perfection.
Striped art is also one of the rare projects that works across ages without feeling watered down for adults or too serious for kids. Children love the repeatable pattern and bold color payoff. Adults love that the finished piece can actually look stylish on a wall. Teachers love that it introduces line, pattern, composition, and color in one manageable activity. Parents love that the project looks impressive enough to justify saving it instead of quietly recycling it three weeks later under a pile of grocery receipts.
And then there is the tape peel. The tape peel deserves its own award category. Few moments in crafting compare to slowly pulling back masking tape and seeing those clean edges appear. It is dramatic, satisfying, and just unpredictable enough to keep you humble. Sometimes you get a flawless reveal. Sometimes you get one tiny bleed that forces you into a corrective detail session. Either way, the reveal feels like a tiny studio victory.
What stays with me most is this: striped art proves that simple ideas are not the same as boring ideas. A line repeated with thought becomes rhythm. Color repeated with intention becomes mood. Space repeated with care becomes design. That is why this fun striped art tutorial is more than a beginner craft. It is a reminder that creativity does not always begin with a grand concept. Sometimes it begins with a ruler, a brush, a handful of colors, and the brave belief that a stripe can do more than you think.
Final Thoughts
A fun striped art tutorial is the kind of project that welcomes experimentation without punishing beginners. It teaches foundational art ideas like line, pattern, composition, and color while still feeling playful and accessible. Whether you make a bold abstract canvas, a soft watercolor stripe study, or a bright collage for a child’s room, the result can be both expressive and beautifully simple.
Start with a limited palette, use variety in width and direction, and let the stripes build their own rhythm. Keep your tape low-tack, your layers dry, and your expectations flexible. The goal is not mechanical perfection. The goal is art with personality. And if the final piece makes you smile every time you walk past it, then congratulations: the stripes did their job.