There is something oddly thrilling about a cheap LED bulb. On the shelf, it looks boring: white dome, screw base, tiny cardboard box, the emotional range of a boiled potato. But crack it opensafely, unplugged, and preferably after it has failedand suddenly you are staring at a tiny lesson in mass manufacturing, cost cutting, thermal management, and electrical compromise. A Dollar Tree LED bulb tear down is not just about what is inside a budget light bulb. It is about how modern lighting became so inexpensive that a device with semiconductors, circuit boards, a power supply, heat control, packaging, shipping, and retail markup can still be sold at a bargain-bin price.
This article looks at the anatomy of a low-cost LED bulb, how the electronics usually work, why the design can be surprisingly clever, and where the compromises hide. We will also cover what shoppers should look for before buying discount LED bulbs, why heat matters more than most people think, and why disassembling mains-powered lighting is not a casual kitchen-table hobby unless your kitchen table has a safety lab attached. Spoiler: the bulb may be cheap, but the voltage is not kidding.
Why a Dollar Tree LED Bulb Tear Down Is So Interesting
A budget LED bulb is a great example of engineering under pressure. The manufacturer has to deliver acceptable brightness, reasonable efficiency, basic safety, decent appearance, and a long enough life to avoid angry customers, all while shaving pennies from every part. In a premium bulb, you may find heavier heat sinks, better driver electronics, stronger plastics, higher color quality, smoother dimming, and more protection components. In a dollar-store-style LED bulb, every component has to defend its right to exist.
That is what makes the tear down fascinating. A simple household LED bulb usually contains a diffuser dome, an LED board, a driver circuit, a base connector, insulation, solder joints, and some thermal path to move heat away from the LEDs. In a low-cost version, those parts may be reduced to their leanest possible form. If the bulb were a sandwich, it would be bread, one polite slice of cheese, and a note promising ham in a future firmware update.
What Is Usually Inside a Cheap LED Bulb?
1. The Diffuser Dome
The white plastic dome is not just decoration. It spreads light from the small LED chips so the bulb behaves more like an old incandescent lamp. Without it, the LED board would create harsh points of light and glare. Budget bulbs often use thin plastic diffusers that snap or glue into place. The plastic must transmit light, hide the LED dots, resist yellowing, and tolerate warmth. That is a lot to ask from a piece of plastic that probably costs less than a sneeze.
2. The LED Board
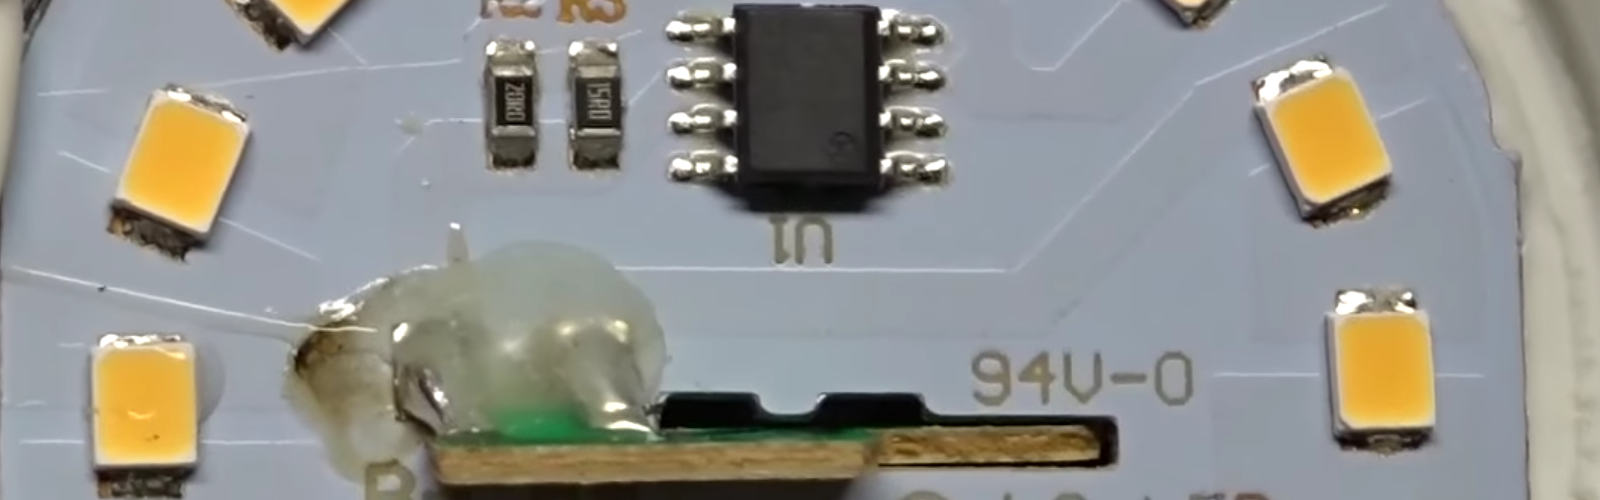
Under the dome sits the LED board. This is often an aluminum-core printed circuit board because LEDs dislike heat. The board holds multiple LED packages wired in series, parallel, or series-parallel arrangements. A common low-cost design may use several LED packages, and each package can contain multiple tiny LED dies. In one widely discussed Dollar Tree bulb tear down, the design used nine LED devices, each containing three LEDs. That kind of arrangement helps the bulb reach the voltage and brightness target while keeping the layout compact.
3. The Driver Circuit
The driver is the tiny power supply that lets LEDs run from household AC power. LEDs require controlled current, not just raw wall voltage. Better bulbs use more sophisticated constant-current driver circuits. Very inexpensive bulbs may use a much simpler circuit, sometimes built around a bridge rectifier, a smoothing capacitor, resistors, and perhaps a small regulator chip. The job is simple in theory: convert AC to DC and keep current through the LEDs within a survivable range. In practice, that little board is doing electrical gymnastics while wearing flip-flops.
4. The Base and Electrical Contacts
The screw base connects the bulb to the lamp socket. In a standard U.S. household bulb, this is usually an E26 base. One contact is the threaded shell, and the other is the small metal button at the bottom. Inside the bulb, wires, metal tabs, or board contacts connect those points to the driver circuit. Good insulation and spacing are important because this part of the bulb is connected to mains voltage.
What the Dollar Tree LED Bulb Tear Down Reveals
The most famous lesson from a Dollar Tree LED bulb tear down is how little hardware can be used to make a working LED lamp. The design discussed in electronics circles showed a 9-watt, 60-watt-equivalent LED bulb with a very minimal internal structure. Instead of a bulky power supply, the bulb used a compact arrangement with two circuit boards that slotted together and were soldered in place. That slot-and-solder method is clever because it reduces wires, connectors, assembly time, and cost.
The LED side used multiple packages to create the light output. The driver side was stripped down to the essentials. A bridge rectifier turns AC into pulsating DC, and a capacitor helps smooth the output. Depending on the exact batch and brand, a small integrated circuit, resistors, or other protection parts may appear. The big takeaway is not that every Dollar Tree bulb is identical. It is that low-cost LED bulbs are designed like tiny economic puzzles. Every screw, wire, blob of glue, and square millimeter of circuit board affects the final shelf price.
That also explains why two bulbs that look almost identical outside can be very different inside. Dollar stores often carry different brands, updated batches, subsidized bulbs, regional utility-program bulbs, and private-label products. One year the bargain bulb might be a basic non-dimmable lamp. Another batch might be dimmable, higher-lumen, filament-style, or marked suitable for enclosed fixtures. The outside says “LED bulb.” The inside says “supply chain adventure.”
How the Driver Circuit Works
LEDs are current-driven devices. Push too little current through them and they glow dimly. Push too much and they overheat, fade, flicker, or fail. Household power in the United States is alternating current, typically 120 volts AC. The LED chips need controlled direct current. That means the bulb must include some kind of AC-to-DC conversion.
The simplest common starting point is a bridge rectifier. A bridge rectifier uses four diodes to flip the negative half of the AC waveform upward, creating pulsating DC. A capacitor may then smooth the ripple. In more refined designs, a driver IC regulates current more carefully, improves efficiency, reduces flicker, and may add dimmer compatibility. In bare-bones designs, the circuit may rely on cheaper current-limiting methods that work but provide less polish.
This is where cheap bulbs can show their personality. Some may flicker more noticeably, especially on camera or in peripheral vision. Some may run hotter because excess electrical energy is not managed efficiently. Some may fail early if the capacitor dries out, the LEDs are driven too hard, or the thermal path is weak. Others may perform just fine for years in an open fixture. Cheap does not automatically mean bad, but it does mean you should read the package like a detective holding a receipt.
Lumens, Watts, and the 60-Watt Equivalent Trick
Old incandescent bulbs trained shoppers to think in watts. A 60-watt bulb meant a familiar level of brightness. LEDs changed the game because wattage now measures energy use, not brightness. Lumens are the better number to watch. A typical 60-watt incandescent replacement is around 800 lumens. A 75-watt replacement is around 1,100 lumens, and a 100-watt replacement is around 1,600 lumens.
So when a budget bulb says “9W, 60W equivalent,” it usually means it consumes about 9 watts while trying to produce light similar to an old 60-watt incandescent. That can be a good deal. If the bulb makes around 800 lumens from 9 watts, it is producing roughly 89 lumens per watt. That is a respectable number for a basic household LED. But brightness is only one part of the experience. Color temperature, color rendering, flicker, beam spread, and heat handling all affect whether the bulb feels pleasant or makes your living room look like a budget dental office.
Color Temperature and Color Quality
Most household LED bulbs are labeled by color temperature. Warm white bulbs around 2700K to 3000K mimic the cozy yellowish glow of incandescent lighting. Bright white or cool white bulbs around 3500K to 4100K feel cleaner and more neutral. Daylight bulbs around 5000K or higher look cooler and bluer. Daylight can be useful in garages, laundry rooms, and workspaces, but in a bedroom it can feel like you are being questioned by airport security.
Color rendering is another important factor. The Color Rendering Index, or CRI, measures how accurately colors appear under the light. Many basic LED bulbs have a CRI around 80, which is acceptable for general use. Better bulbs may offer 90+ CRI, making skin tones, food, paint colors, and fabrics look more natural. Budget bulbs may not advertise CRI prominently, so if color quality matterskitchens, makeup mirrors, art spaces, photography cornerslook for that information before buying.
Heat: The Quiet Enemy Inside Every LED Bulb
LEDs are efficient, but they are not magic. They still produce heat, and that heat must go somewhere. In an incandescent bulb, heat was basically the business model. In an LED bulb, heat is the villain trying to ruin the party. The LED chips, driver capacitor, solder joints, and plastic parts all age faster when temperatures climb.
That is why the LED board often sits on an aluminum substrate or heat-spreading plate. More expensive bulbs may use heavier heat sinks, ceramic materials, better thermal paste, or more open designs. Cheap bulbs may use just enough metal to survive normal use in open fixtures. Put that same bulb into a sealed globe, recessed can, or poorly ventilated fixture, and the temperature can rise enough to shorten its life dramatically.
This is also why “suitable for enclosed fixtures” matters. If the package or bulb does not say it is rated for enclosed fixtures, do not assume it is. Enclosed fixtures trap heat. A bulb that lasts for years in a table lamp might fail quickly in a sealed ceiling globe. Heat does not care that the bulb was only $1.25. Heat is a very strict accountant.
Safety Notes Before You Even Think About Opening One
A Dollar Tree LED bulb tear down should be treated as an educational topic, not an invitation to pry open a live bulb. LED bulbs connect directly to household mains voltage. Even after removal from the socket, capacitors inside may hold charge for a short time. Some cheap driver circuits are non-isolated, meaning parts of the internal board can be electrically connected to dangerous voltage. Touching the wrong area can shock you.
If you are not trained to work with mains electronics, do not disassemble a working bulb. Do not power an opened bulb on a desk. Do not hold it while energized. Do not bypass parts, remove insulation, or “upgrade” the circuit because a comment section said it was easy. The internet also says raccoons are cute roommates. The internet is not always thinking about your homeowner’s insurance.
Why Cheap LED Bulbs Fail
When a low-cost LED bulb fails, the culprit is often not the LED chips themselves. It may be the driver capacitor, a weak solder joint, thermal stress, moisture, a voltage surge, or a design that drives the LEDs too hard. LEDs slowly lose brightness over time, a process called lumen depreciation. But many bulbs die before that graceful fade because another component gives up first.
The electrolytic capacitor is a classic weak point. It lives near heat, handles ripple current, and ages over time. If it dries out, the bulb may flicker, dim, pulse, or stop working. If one LED in a series string fails open, the entire string may go dark. If one LED fails short, the rest may be over-stressed. In ultra-cheap designs, fewer protection components mean less defense against spikes and rough conditions.
What to Look For When Buying Budget LED Bulbs
Discount LED bulbs can be perfectly useful, especially for closets, garages, rentals, utility rooms, backup bulbs, and places where premium color quality is not critical. But check the label. Look for brightness in lumens, not just “watt equivalent.” Check actual watts to estimate efficiency. Choose color temperature based on the room. Look for UL, ETL, or another recognized safety mark. Check whether it is dimmable if you plan to use it with a dimmer. Confirm enclosed-fixture rating if needed. For bathrooms, covered outdoor fixtures, or damp areas, check damp or wet location ratings.
Also consider how many bulbs you are buying. If you need one bulb for a closet, a bargain bulb is low risk. If you are replacing every bulb in a house, the difference between a very cheap LED and a better-quality LED may show up in flicker, color consistency, early failures, and overall comfort. Saving a few dollars is nice. Replacing twelve bulbs from a stepladder while muttering at the ceiling is less nice.
Can You Repair a Cheap LED Bulb?
Technically, yes, some LED bulbs can be repaired by people with electronics knowledge, proper equipment, and safe procedures. Practically, most budget bulbs are not worth repairing for normal household use. The parts are tiny, the boards are connected to mains voltage, and the repaired bulb may no longer meet its original safety design. Once opened, glued, cracked, soldered, or modified, it should not simply go back into household service as if nothing happened.
However, a dead bulb can be useful as a learning object after it is safely discharged and handled properly. It can show how AC power is rectified, how LEDs are mounted, how thermal paths are built, and how ruthless cost engineering looks in real life. For students, hobbyists, and curious makers, the value is not in saving a dollar. The value is in seeing how a common object is designed.
The Bigger Lesson: Modern Lighting Is a Manufacturing Miracle
The most impressive part of a Dollar Tree LED bulb tear down is not that the bulb is simple. It is that it exists at all. A few decades ago, LED lighting was expensive, dim, and specialized. Today, LED bulbs are ordinary household items. They sit in discount bins next to party plates and off-brand batteries like tiny semiconductor miracles pretending to be boring.
That low price comes from global supply chains, huge production volumes, automated assembly, mature LED technology, utility-efficiency programs, competitive retail pricing, and relentless component optimization. The result is a product that can replace an incandescent bulb while using far less electricity. Even if the cheapest version is not the smoothest, prettiest, longest-lasting LED available, it still represents a major shift in everyday energy use.
Practical Experience Notes: Studying a Dollar Tree LED Bulb Tear Down
The most memorable part of studying a Dollar Tree LED bulb tear down is how quickly the “cheap plastic thing” becomes a real piece of engineering. At first glance, the bulb looks disposable. It is light, plain, and inexpensive enough that people toss it into a cart without thinking. But once the construction is examined layer by layer, the design starts to feel less like junk and more like a carefully negotiated truce between cost, brightness, safety, and manufacturing speed.
The diffuser is usually the first surprise. It looks like a simple dome, but it determines whether the bulb creates a soft glow or a constellation of eye-stabbing LED dots. Removing it reveals the LED board, and that is where the bulb suddenly becomes more interesting. The LED packages are arranged with obvious intention. Their spacing affects light distribution. Their board affects heat flow. Their wiring affects the voltage and current requirements of the driver. What looked like a plain household bulb now looks like a tiny city where every building pays rent.
The driver board is even more revealing. In a premium bulb, you might expect a more elaborate power supply. In a budget bulb, the circuit can be shockingly small. A rectifier, capacitor, resistors, and perhaps a small control chip may be all that stands between the wall outlet and the LEDs. That simplicity is both impressive and a little sobering. It shows how much can be done with minimal parts, but it also explains why cheap bulbs may flicker, run warm, or fail earlier in harsh fixtures.
One practical observation from tear down discussions is that build quality varies by batch. Some bargain bulbs are surprisingly tidy inside, with clean solder joints and sensible layout. Others look as if the assembly line was being chased by bees. This does not mean every inexpensive bulb is unsafe, but it does mean the label, safety marks, and intended application matter. A bulb for an open desk lamp has an easier life than one trapped inside a sealed glass ceiling fixture above a hot hallway.
The experience also changes how you shop. After seeing the inside, the package becomes more meaningful. Lumens, watts, color temperature, dimmable rating, enclosed-fixture approval, and safety certification stop being boring fine print. They become clues. A Dollar Tree LED bulb tear down teaches that the cheapest bulb can be a smart buy in the right place, but not every socket deserves the cheapest option. Sometimes the best bargain is the bulb that does not make you climb a ladder again next month.
Conclusion
A Dollar Tree LED bulb tear down turns a humble discount-store product into a lesson in modern electronics. Inside the plastic shell, you can find LEDs, circuit boards, a compact driver, thermal compromises, and clever assembly choices designed to hit a very low price. The best part is not simply discovering how little is inside. It is understanding why those parts are there, what they do, and how they affect brightness, flicker, heat, lifespan, and safety.
For everyday buyers, the lesson is simple: budget LED bulbs can be useful, but read the label. Choose lumens instead of guessing by watts. Match color temperature to the room. Use enclosed-fixture-rated bulbs where heat is trapped. Look for recognized safety marks. And please, do not open or power a mains-voltage bulb unless you know exactly what you are doing. Curiosity is wonderful. Curiosity with insulated tools and common sense is even better.
Note: This article is for educational and consumer-information purposes. Do not disassemble, repair, modify, or energize an opened LED bulb unless you are qualified to work safely with mains-powered electronics.