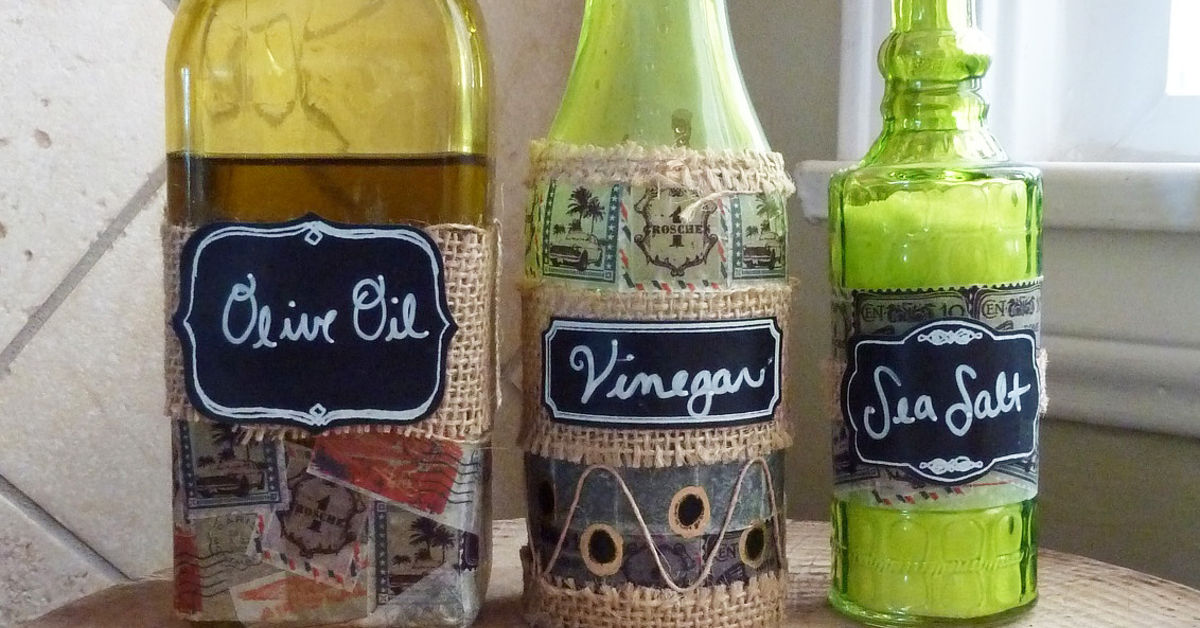
Note: This tutorial is designed for decorative kitchen organization and everyday cooking convenience. For homemade infused oils with garlic, fresh herbs, or vegetables, follow food-safety rules carefully: keep them refrigerated and use them quickly. Pretty bottles are fun; botulism is not invited to the dinner party.
Introduction: Give Your Countertop a Tiny Glow-Up
A good kitchen does not need marble countertops, a copper pot collection, or a refrigerator that can text you when the oat milk is running low. Sometimes, the fastest upgrade is much simpler: a coordinated set of bottles for olive oil, vinegar, and sea salt. This DIY kitchen olive oil, vinegar, and sea salt bottle tutorial turns ordinary pantry staples into a clean, stylish, and practical countertop station that makes cooking feel a little more like starring in your own cozy food show.
Think about it. Olive oil in a greasy plastic bottle, vinegar hiding behind six mystery condiments, and sea salt living in a half-torn bag are not exactly inspiring. But place each one in a labeled glass bottle or jar with a neat pour spout, cork, lid, or scoop, and suddenly your weeknight salad looks intentional. Your pasta gets a restaurant-style drizzle. Your roasted vegetables receive their final pinch of salt with the dignity they deserve.
This project is affordable, beginner-friendly, and endlessly customizable. You can make it farmhouse, modern, coastal, minimalist, rustic, vintage, or “I found this bottle and now I am emotionally attached to it.” Better yet, it improves kitchen workflow. When your most-used ingredients are visible, clean, and easy to grab, you cook faster and waste less.
Why Make a DIY Olive Oil, Vinegar, and Sea Salt Bottle Set?
The best kitchen projects are the ones that look good and solve an annoying problem. A matching olive oil, vinegar, and sea salt set does both. It reduces clutter, keeps daily ingredients close at hand, and makes your cooking zone feel organized without requiring a full pantry makeover.
It Makes Cooking Faster
Olive oil, vinegar, and sea salt are the “little black dress” of home cooking. They work with salads, marinades, roasted vegetables, grilled meat, pasta, bread dipping, soups, and quick sauces. Keeping them together creates a simple flavor station. Instead of opening cabinets with oily fingers, you can season as you go.
It Looks Better Than Store Packaging
Commercial packaging is designed to sell, not necessarily to match your kitchen. A DIY bottle set lets you choose clear, amber, green, ceramic, or frosted containers and create labels that fit your style. Even a small rental kitchen can look more polished with coordinated glass bottles on a tray.
It Helps You Use the Right Amount
A good pour spout gives better control than a wide bottle opening. That means fewer accidental oil puddles and fewer moments where your salad becomes a slip-and-slide. A salt cellar or bottle with a spoon also helps you season with your fingers or scoop instead of shaking blindly.
What You Need for This DIY Kitchen Bottle Project
Before you begin, gather your materials. The goal is not to spend a fortune. You can reuse bottles you already own, buy inexpensive glass bottles, or mix new and thrifted pieces for a collected look.
Materials
- One dark glass bottle or ceramic cruet for olive oil
- One glass bottle for vinegar
- One small glass jar, ceramic cellar, or wide-mouth bottle for sea salt
- Food-safe pour spouts, corks, swing-top lids, or screw caps
- Waterproof or water-resistant labels
- Permanent marker, label maker, vinyl decals, or printable sticker paper
- Small tray, cutting board, shallow dish, or lazy Susan
- Dish soap, warm water, bottle brush, and microfiber towel
- Optional: twine, leather cord, wax seal stickers, chalk labels, or paint pens
Best Bottles to Use
For olive oil, choose a dark glass bottle, stainless steel container, or ceramic cruet. Olive oil dislikes light, heat, and air. Yes, it is dramatic, but it has reasons. Exposure to those elements can speed up oxidation and make oil taste stale or rancid. Clear glass may look beautiful, but if the bottle sits on a bright counter, it is not ideal for long-term olive oil storage.
For vinegar, glass is an excellent choice because vinegar is acidic and can pick up flavors or react poorly with some materials over time. A clear bottle is fine if you enjoy seeing the color of red wine vinegar, apple cider vinegar, or balsamic vinegar. Store it away from strong heat and direct sunlight for best quality.
For sea salt, use a dry container with easy access. A small jar with a lid, a ceramic salt cellar, or a wide-mouth spice bottle works well. Salt absorbs moisture from the air, so the container should protect it from humidity while still being practical during cooking. If you live somewhere humid, keep the lid closed and use a dry spoon.
Step-by-Step DIY Kitchen Olive Oil, Vinegar, and Sea Salt Bottle Tutorial
This project can be finished in an afternoon, and most of that time is spent waiting for bottles to dry. In other words, it is a perfect weekend craft for people who enjoy productivity with snacks nearby.
Step 1: Choose a Style Theme
Start by deciding how you want the finished set to look. This makes every later decision easier. A modern kitchen may look great with square amber bottles and black-and-white labels. A farmhouse kitchen might call for clear swing-top bottles, kraft labels, and twine. A coastal kitchen can use frosted glass, blue lettering, and a pale wooden tray.
Here are a few easy style ideas:
- Minimalist: amber bottles, plain white labels, simple black text.
- Rustic: recycled glass, cork stoppers, handwritten kraft labels.
- Italian trattoria: dark green oil bottle, red wine vinegar bottle, ceramic salt cellar.
- Modern pantry: matching bottles, waterproof vinyl labels, black metal tray.
- Giftable: decorative tags, ribbon, and a small recipe card for vinaigrette.
Step 2: Clean and Remove Old Labels
If you are reusing bottles, remove the old labels first. Soak the bottles in warm, soapy water for at least 20 minutes. Scrape off loose paper with a plastic scraper or the dull side of a butter knife. For stubborn adhesive, rub with a little cooking oil or adhesive remover, then wash thoroughly.
After the labels are gone, clean the inside of each bottle with hot water, dish soap, and a bottle brush. Oil residue can cling to glass like it pays rent, so take your time. Rinse until there are no bubbles and no scent of old contents. Let the bottles air-dry completely upside down on a clean towel. Any trapped water in an oil bottle is bad news for quality and can make the oil cloudy or unpleasant.
Step 3: Match Each Ingredient to the Right Container
Pour olive oil into the dark bottle or ceramic cruet. If you buy oil in a large tin or bottle, only decant a small amount that you will use within a week or two. Keep the rest tightly sealed in a cool, dark cabinet. A countertop dispenser is convenient, but it is not a forever home.
Pour vinegar into the vinegar bottle using a small funnel. If your vinegar has natural sediment or “mother,” that is often harmless, especially in raw apple cider vinegar. If you prefer a cleaner look, strain it through a coffee filter before bottling.
Transfer sea salt into the salt jar or cellar. Flaky sea salt is great for finishing dishes, while fine sea salt works better for everyday seasoning. If the salt clumps in humid weather, add a few grains of dry rice in a tiny food-safe sachet or keep the container in a drier cabinet between uses.
Step 4: Add Pour Spouts, Lids, or Corks
Fit the olive oil and vinegar bottles with food-safe pour spouts or tight caps. A hinged metal pour spout is convenient for frequent cooking, but remember that it may allow more air exposure than a fully sealed cap. If you cook daily, that is usually fine. If you use olive oil slowly, choose a cap that seals tightly.
For vinegar, a pour spout works beautifully for salads, marinades, and pan sauces. For thicker balsamic vinegar, test the spout first. Some narrow spouts turn syrupy balsamic into a slow-motion kitchen drama.
For sea salt, choose a lid that opens easily but closes securely. A salt cellar with a swivel lid is charming and practical. A small jar with a cork lid looks lovely, but make sure the cork stays dry and clean.
Step 5: Create Labels That Actually Survive the Kitchen
Kitchen labels face splashes, steam, oil, vinegar, and the occasional suspicious fingerprint. Paper labels are cute until the first vinaigrette incident. For a longer-lasting project, use waterproof vinyl labels, laminated stickers, paint pens, etched labels, or a label maker tape designed for moisture.
Label each container clearly:
- Extra Virgin Olive Oil
- Red Wine Vinegar, Apple Cider Vinegar, White Balsamic, or Balsamic Vinegar
- Flaky Sea Salt, Fine Sea Salt, or Finishing Salt
If you refill often, add a small “filled on” date to the back or bottom of the bottle. This is especially useful for olive oil, which tastes best when used fresh. You do not need a dramatic spreadsheet. A tiny date sticker is enough.
Step 6: Arrange Everything on a Tray
A tray turns three separate containers into a styled station. It also protects your counter from oil rings and vinegar drips. Use a small marble tray, wooden cutting board, ceramic plate, metal tray, or lazy Susan. Add a folded napkin, tiny spoon, or mini herb pot if you want it to look extra magazine-worthy.
Place the station away from the stove, oven, dishwasher vent, and sunny windows. This matters most for olive oil. A cool, dark cabinet is best for storage, but if you want the bottles on display, choose a shaded spot and use small amounts so you refill often.
Food Safety Tips for Olive Oil, Vinegar, and Sea Salt Bottles
DIY kitchen projects should be pretty, but they should also be safe. A bottle set that looks like it belongs in a boutique hotel is less impressive if it turns into a science experiment.
Do Not Store Fresh Garlic or Herbs in Oil at Room Temperature
Homemade garlic oil and herb-infused oil can be risky if handled incorrectly. Fresh garlic, herbs, and vegetables can carry spores of Clostridium botulinum. In an oxygen-free oil environment, those spores may create a serious food-safety hazard. If you make flavored oils with fresh ingredients, refrigerate them and use them within a few days. For room-temperature storage, follow tested acidification methods from reliable food-preservation sources.
Use Clean, Dry Tools
Always use clean funnels, spoons, and bottle openings. Water left inside a bottle can affect oil quality. Food particles can contaminate vinegar or salt. If you are refilling bottles, wash and fully dry them first. Do not simply pour new olive oil into an old oily bottle forever. Old residue can make fresh oil taste tired before it has had a chance to shine.
Keep Olive Oil Away From Heat
Many people keep olive oil next to the stove because it feels convenient. Unfortunately, that is one of the fastest ways to reduce quality. Heat encourages oxidation and can push oil toward rancidity. Store your main supply in a cool, dark place, then keep only a small amount in your countertop bottle.
Check Vinegar Quality
Vinegar is highly acidic and naturally self-preserving, so it usually lasts a very long time. Still, flavor can fade over time, and specialty vinegars may develop sediment, haze, or color changes. These are often quality changes rather than safety issues. If vinegar smells moldy, tastes unpleasant, or looks truly strange beyond normal sediment, replace it.
Protect Salt From Moisture
Sea salt can clump when exposed to humidity. Keep it away from steam, wet hands, and damp spoons. If your kitchen is humid, choose a lidded container rather than an open cellar. A wide-mouth jar is practical because you can pinch salt while cooking, but close it after use.
Design Ideas for a Beautiful Kitchen Bottle Set
The beauty of this DIY kitchen organization project is that it can match any home. You are not locked into one look. The same tutorial can create a sleek modern oil and vinegar set or a warm, cottage-style countertop display.
Amber Glass and White Labels
Amber glass protects olive oil from light and creates a warm, apothecary-style look. Add white waterproof labels with simple serif lettering. This works especially well in kitchens with wood shelves, brass hardware, or neutral tile.
Clear Bottles With Handwritten Tags
Clear bottles show off the beautiful colors of vinegar, from golden apple cider vinegar to deep balsamic. Use them for vinegar rather than olive oil unless the bottle is stored in a dark cabinet. Tie on handwritten tags with cotton string for a relaxed, homemade feel.
Ceramic Cruet and Salt Cellar
A ceramic olive oil cruet blocks light and looks timeless. Pair it with a ceramic salt cellar and a glass vinegar bottle for a collected but coordinated set. This is perfect if you like a kitchen that feels handmade rather than overly matched.
Black-and-White Modern Set
Choose matte black labels, square glass bottles, and a slim black metal tray. Keep the typography clean. This style looks great in modern apartments, small kitchens, and open shelving setups where clutter needs to look intentional.
Simple Recipe Uses for Your New Bottle Set
Once your DIY bottles are ready, put them to work. A beautiful kitchen tool should earn its countertop real estate.
Everyday Vinaigrette
In a small jar, combine three parts olive oil, one part vinegar, a pinch of sea salt, black pepper, and a spoonful of Dijon mustard. Shake until creamy. This takes less than one minute and tastes better than most bottled dressing.
Fast Bread Dip
Pour olive oil into a shallow dish. Add a splash of balsamic vinegar, flaky sea salt, cracked pepper, and dried oregano. Serve with warm bread. Congratulations, your kitchen now thinks it is a charming little restaurant.
Roasted Vegetable Finish
After roasting carrots, potatoes, asparagus, or Brussels sprouts, finish with a small drizzle of olive oil, a few drops of vinegar, and a pinch of flaky sea salt. That final touch wakes up the whole dish.
Tomato Salad
Slice ripe tomatoes and season them with sea salt first. Let them sit for five minutes, then drizzle with olive oil and vinegar. Add basil if you have it. If not, the tomatoes will forgive you.
Common Mistakes to Avoid
Even simple DIY projects can go sideways. Here are the most common mistakes and how to avoid them.
Using Clear Glass for Olive Oil in a Sunny Spot
Clear glass is pretty, but light damages olive oil quality. If you love the look, keep the clear bottle in a cabinet or use it only for very small amounts that you will finish quickly.
Skipping the Drying Step
Bottles must be completely dry before adding oil or salt. A few hidden drops of water can affect freshness and texture. Let bottles air-dry overnight if needed.
Choosing Labels That Smear
Regular paper labels and washable markers may not survive an active kitchen. Use waterproof labels, permanent paint pens, vinyl decals, or laminated tags.
Overfilling the Bottles
Leave a little headspace at the top so the spout or cap fits cleanly. Overfilled oil bottles become slippery fast. One minute you are cooking; the next you are negotiating with a greased-up glass penguin.
Forgetting to Clean Pour Spouts
Pour spouts collect oil residue and dust. Wash them regularly with hot, soapy water, rinse well, and dry completely before replacing them.
Maintenance: How to Keep Your DIY Bottle Set Fresh
Wipe the outside of the bottles weekly with a damp cloth and mild dish soap if needed. Clean the tray whenever it develops oil marks or salt crystals. Refill small bottles more often instead of using oversized countertop containers. For olive oil, freshness matters more than abundance.
Deep-clean oil bottles between refills. Use warm water, dish soap, and a bottle brush, then rinse thoroughly. If the bottle still smells oily, repeat the wash. Let it dry fully before refilling. For vinegar bottles, rinse and wash when changing vinegar types so flavors do not muddy each other.
Salt containers need less frequent washing, but they should stay dry. If salt hardens into a brick, empty the container, wash and dry it completely, then refill with fresh salt.
of Real-Life Experience: What This DIY Project Teaches You
The first thing you learn from making a DIY kitchen olive oil, vinegar, and sea salt bottle set is that small details change how a kitchen feels. Before the project, oil is just oil. Vinegar is just that bottle you knock over while reaching for soy sauce. Salt is somewhere nearby, probably plotting. After the project, these everyday ingredients become part of your cooking rhythm. You reach for them more naturally, season more confidently, and clean as you go because the station looks too nice to ruin.
One practical lesson is that bottle size matters. A huge olive oil dispenser may look impressive, but it can sit too long, especially if you do not cook with oil every day. A smaller bottle encourages freshness. It is better to refill a petite dispenser weekly than to admire a giant bottle of oil as it slowly loses its sparkle. This is one of those humble kitchen truths that sounds boring until you taste the difference between fresh, peppery olive oil and oil that smells faintly like crayons.
You also learn that labels need to be more durable than you think. In a kitchen, everything gets touched with wet hands, oily fingers, or a spoon that was absolutely clean five seconds ago. A cute paper label may look perfect on day one and tragic by day six. Waterproof vinyl, paint pen lettering, or laminated labels are worth the tiny extra effort. They keep the set looking intentional instead of “craft project survived a salad dressing storm.”
Another experience is discovering your cooking habits. If you constantly refill red wine vinegar, that tells you something about your meals. Maybe you love bright salads, marinades, and quick pan sauces. If flaky salt disappears faster than fine salt, you probably enjoy finishing dishes at the table. This little station becomes a quiet record of how you actually cook, not how you imagine you cook while watching someone calmly chiffonade basil on television.
The tray is more important than it seems. Without a tray, the bottles are just three containers standing around like strangers at a party. With a tray, they become a unit. The tray catches drips, makes cleaning easier, and lets you move everything at once when wiping the counter. A small wooden board gives warmth. A ceramic tray feels clean and bright. A metal tray adds a modern edge. Choose one that fits your kitchen and can handle real use.
Finally, this project teaches restraint. You may be tempted to add chili oil, garlic oil, rosemary oil, lemon vinegar, peppercorn vinegar, smoked salt, pink salt, black salt, and a tiny spoon named Gerald. Resist at first. Start with the big three: olive oil, vinegar, and sea salt. Use the set for a week. Notice what you reach for. Then expand if it makes sense. Good organization is not about displaying every ingredient you own. It is about making daily cooking smoother, prettier, and slightly less chaotic. And if your countertop makes you smile while you cook dinner on a Tuesday, that is not a small thing. That is kitchen magic with a cork stopper.
Conclusion: A Small DIY Upgrade With Big Kitchen Energy
A DIY olive oil, vinegar, and sea salt bottle set is simple, useful, and surprisingly satisfying. It organizes three essential ingredients, improves your cooking flow, and adds a polished touch to your countertop without requiring power tools, remodeling dust, or a dramatic budget conversation.
The key is choosing the right containers for each ingredient. Olive oil needs protection from light, heat, and air. Vinegar does well in clean glass with a secure closure. Sea salt needs a dry, easy-access container that keeps moisture under control. Add durable labels, place everything on a tray, and keep the station away from heat and direct sun.
This tutorial is not just about making bottles look cute, although it absolutely does that. It is about building a kitchen habit that makes everyday meals easier and more enjoyable. When the ingredients you use most are clean, labeled, fresh, and ready to go, cooking feels less like a chore and more like a small creative act. Even toast with olive oil and sea salt gets a little upgrade. And honestly, toast deserves nice things too.