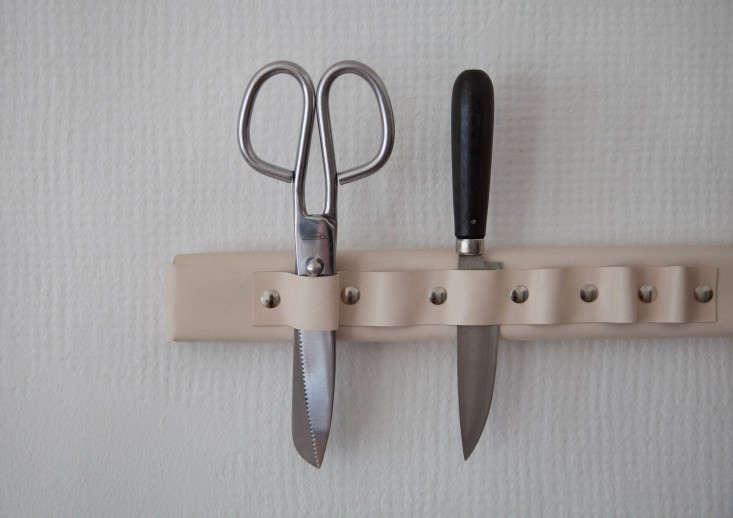
A wall-mounted leather knife rack is what happens when kitchen organization gets dressed for a dinner party. It is practical, handsome, space-saving, and just a little dramaticin the best possible way. Instead of letting your chef’s knife sulk in a crowded drawer or disappear into a bulky countertop block, this DIY project gives your favorite blades a dedicated place on the wall, wrapped in warm leather and supported by a sturdy wood backer.
The idea is simple: create a wall-mounted rack using a wooden board, leather straps or pockets, strong fasteners, and careful spacing. The result looks like something from a boutique kitchen shop, but it can be made at home with basic tools, a little patience, and the willingness to measure twice so your knives do not end up leaning like tired commuters on a Monday morning.
This guide walks through the design, materials, build process, safety considerations, installation tips, and real-world lessons for making a DIY leather knife rack that is beautiful enough to show off and secure enough to trust near your prep station.
Why Make a Wall-Mounted Leather Knife Rack?
Knife storage is not just about looking organized for guests who open the wrong drawer. It affects safety, blade life, counter space, and cooking flow. Loose knives in a drawer can nick, dull, or chip as they bump into other utensils. Traditional knife blocks can take up precious counter space and may not fit the knives you actually use. A wall-mounted knife rack solves several problems at once.
First, it keeps knives visible. You can grab the chef’s knife, paring knife, bread knife, or kitchen shears without conducting a small archaeological dig. Second, it frees up counter space, which is especially helpful in apartment kitchens, galley kitchens, and older homes where “prep zone” means the eight inches between the sink and the toaster. Third, leather adds texture and warmth that stainless steel or plastic holders often lack.
A leather knife rack is also customizable. You can build it for three essential knives or expand it for a fuller collection. You can use natural vegetable-tanned leather for a rustic look, dark brown leather for a classic workshop feel, or black leather for a modern kitchen that says, “Yes, I own flaky salt.”
How This Design Works
This project uses a wood backer board as the structural base and leather loops, sleeves, or straps as the knife holders. The wood carries the weight and gives you something reliable to mount to the wall. The leather acts as a flexible holster that gently holds handles or blades, depending on your chosen layout.
For most home cooks, the safest version is a handle-holding design: the knives hang with their blades pointing downward or resting behind a protective leather layer. Another option is a shallow pocket design, where each knife slides into an individual leather sleeve. The sleeve style looks refined, but it requires extra care so the blade edge does not cut through the leather over time.
If you want extra holding power, you can embed magnets in the back of the board and cover them with leather or wood. This hybrid leather-and-magnetic knife rack offers the security of magnetic storage with the softer appearance of leather. Just remember that magnets should be strong enough to hold knives firmly, but the rack must still be mounted securely. A strong magnet on a weak wall mount is not a design feature; it is a future clatter.
Materials You Will Need
Basic Materials
- One hardwood board, about 18 to 24 inches long, 4 to 6 inches tall, and at least 3/4 inch thick
- Leather strips, preferably 5 to 8 ounce vegetable-tanned leather or sturdy full-grain leather
- Brass, copper, stainless steel, or black oxide rivets
- Wood screws suitable for wall mounting
- Wall anchors or toggle bolts if you cannot hit studs
- Optional rare-earth magnets for a hybrid magnetic leather knife rack
- Wood finish, such as mineral oil, beeswax, food-safe oil, or polyurethane
- Leather conditioner or wax finish
Tools
- Tape measure
- Pencil
- Utility knife or leather knife
- Cutting mat
- Drill and drill bits
- Stud finder
- Level
- Awl or leather punch
- Rivet setter or small hammer
- Sandpaper in medium and fine grits
- Clamps
- Optional Forstner bit if embedding magnets
Choosing the Right Leather
The best leather for a DIY wall-mounted leather knife rack is firm, thick, and predictable. Soft upholstery leather may look lovely, but it can stretch too much. Thin craft leather may sag or curl. For this project, vegetable-tanned leather is a strong choice because it is firm, easy to cut, easy to punch, and develops a beautiful patina over time.
For simple straps, 5 to 6 ounce leather is usually enough. For sleeve-style holders, 6 to 8 ounce leather offers more structure. If you are making pockets that touch the blade, consider doubling the leather or adding a stitched or riveted welt so the cutting edge does not rest directly against a single seam. Your future self will appreciate not discovering a sliced pocket while reaching for a tomato knife.
Color is mostly a design choice. Natural leather pairs well with maple, white oak, and birch. Dark brown leather looks great with walnut or stained wood. Black leather works nicely with modern hardware and matte finishes. Avoid heavily treated or flaky leather that could shed residue near food-prep tools.
Choosing the Wood Backer
A sturdy wood backer makes the rack safer and better looking. Hardwoods such as maple, walnut, oak, cherry, and ash are excellent choices. They resist dents better than soft pine and give the project a more finished appearance. That said, a good piece of sanded pine can work for a budget-friendly version, especially if you stain or paint it.
The board should be wide enough to support the knife layout and tall enough to allow strong mounting points. For a compact rack, an 18-by-5-inch board can hold three or four knives. For a larger setup, a 24-by-6-inch board gives you more breathing room. Leave space between knives so handles do not collide and blades are easy to remove without wrist gymnastics.
Step-by-Step: How to Build a Wall-Mounted Leather Knife Rack
Step 1: Plan the Knife Layout
Place your knives on a table and arrange them in the order you use them most. Many home cooks prefer the chef’s knife in the center, paring knife nearby, serrated knife to one side, and kitchen shears at the end. Trace a rough outline or mark the handle positions with painter’s tape.
Leave at least one inch between handles and more space for wider knives. If you are building leather loops, each loop should grip the handle or upper blade area securely without forcing the knife into place. A rack should feel smooth, not like you are wrestling a tiny leather alligator every time you cook.
Step 2: Cut and Sand the Board
Cut your wood board to size, then sand all surfaces. Start with medium-grit sandpaper to remove rough spots and finish with fine-grit sandpaper for a smooth touch. Ease the edges slightly so the board feels comfortable and does not cut into the leather.
Apply your chosen wood finish before attaching the leather. If the rack will live near a stove or sink, choose a finish that can handle occasional moisture and cleaning. Let the finish cure fully according to the product instructions. Damp finish and leather are not friends; they are two materials quietly plotting stains.
Step 3: Cut the Leather Straps
Cut leather strips according to your design. For handle loops, start with strips about 1 inch wide and 4 to 6 inches long, then adjust for your knife handles. For sleeve pockets, cut pieces that cover the blade width plus a little extra for the riveted edges.
Use a sharp utility knife, metal ruler, and cutting mat. Keep your cuts clean and straight. Ragged leather edges can be sanded lightly and burnished with water, beeswax, or gum tragacanth for a smoother finish. Burnishing is optional, but it gives the project a polished look that says “handmade” instead of “I fought with this in the garage.”
Step 4: Mark Hole Locations
Hold the leather strips against the board and mark where rivets or screws will go. For loops, each strip usually needs two attachment points: one at the top and one at the bottom, or two side-by-side points that create a snug bridge. For pockets, mark holes along the sides where the leather will attach to the board.
Use an awl or leather punch to make clean holes. Then transfer those holes to the wood with a pencil. Pre-drilling the wood helps prevent splitting and makes rivet or screw installation easier.
Step 5: Test the Fit Before Fastening
Before committing to rivets, test the leather with the actual knives. Slide each knife into its planned position and check for tension. The knife should stay put, but it should not require force to remove. If the fit is too loose, shorten the loop or move the holes closer together. If it is too tight, lengthen the loop or use a slightly wider strip.
This is the most important fitting stage. Leather stretches slightly over time, so a fit that is barely snug today may feel relaxed after a month. Aim for firm, controlled contact without bending the leather into a permanent frown.
Step 6: Attach the Leather
Attach the leather using rivets, Chicago screws, or short screws with finishing washers. Rivets give the cleanest handmade look, while Chicago screws allow adjustments later. If using screws, make sure they do not poke through the back of the board or scratch the wall.
Set each fastener carefully and keep the leather flat. If the leather twists, loosen or remove the fastener and try again. A small misalignment can make the whole rack look crooked, even if the board is perfectly level.
Step 7: Add Optional Magnets
If you want a hybrid magnetic leather knife rack, drill shallow recesses in the back of the board with a Forstner bit and glue rare-earth magnets into the holes. Do not drill all the way through. The magnets should sit close enough to the front surface to attract the blade, but not so close that they create an aggressive snap.
Use epoxy rated for metal and wood, and let it cure completely. Test the hold with each knife before mounting. If the magnet is weak, the knife may slide. If it is too strong, it may pull the knife in abruptly. The goal is a controlled hold, not a medieval trapdoor.
How to Mount the Rack Safely
Because this rack holds sharp objects, installation matters as much as craftsmanship. Use a stud finder to locate wall studs whenever possible. Mounting at least one side of the rack into a stud gives the strongest support. If studs are not available in the right position, use high-quality wall anchors or toggle bolts rated for more weight than the loaded rack.
Choose a location near your prep area but away from the reach of children and pets. Avoid mounting directly above a hot stove, where heat and steam can dry out leather and affect the wood finish. A spot beside the prep counter, near a cutting board zone, or under open shelving can work beautifully.
Hold the rack against the wall and use a level to mark the mounting holes. Drill pilot holes, install anchors if needed, then fasten the rack securely. Once mounted, tug gently on the boardnot like you are starting a lawn mower, just enough to confirm it does not wobble. Load one knife at a time and watch for movement.
Knife Safety and Care Tips
A leather knife rack should only hold clean, dry knives. Wash knives by hand, dry them immediately, and store them safely after use. Avoid putting quality kitchen knives in the dishwasher, where heat, detergent, and movement can damage blades and handles.
Do not store wet knives in leather sleeves. Moisture trapped against leather can encourage staining, odors, or corrosion, especially with carbon steel knives. If you own carbon steel blades, make sure they are fully dry before hanging them. A light coat of food-safe mineral oil can help protect certain blades, depending on the knife maker’s care instructions.
Also inspect the leather occasionally. If a loop stretches, a rivet loosens, or a pocket shows signs of cutting, repair it before using the rack again. Good DIY is not just building something once; it is giving it the occasional proud little safety check.
Design Ideas and Custom Variations
Minimalist Leather Loops
Use narrow leather loops to hold knife handles against a slim board. This is the easiest version and works well for small collections. Pair natural leather with maple for a Scandinavian-inspired look.
Leather Blade Sleeves
Create individual pockets for each blade. This version looks elegant and offers more coverage, but it requires precise fitting. Add a welt or double layer to protect seams from sharp edges.
Magnetic Backer With Leather Face
Embed magnets behind a wood or leather face so the knives appear to float against the rack. This style combines modern function with handmade warmth.
Rustic Brass Hardware
Use brass rivets and dark leather on walnut for a moody, vintage look. This variation works especially well in kitchens with open shelving, copper pans, or butcher-block counters.
Compact Apartment Version
Make a short rack for a chef’s knife, paring knife, serrated knife, and shears. In a small kitchen, four well-stored tools are better than twelve knives hiding in a drawer like culinary raccoons.
Common Mistakes to Avoid
The biggest mistake is using leather that is too thin. Thin leather stretches, curls, and may not hold its shape. Another mistake is mounting the rack with weak hardware. A rack holding knives should not depend on tiny picture hooks unless the design is purely decorative and not loaded with actual blades.
Do not place knives too close together. Crowded handles make the rack annoying to use and increase the chance of grabbing the wrong blade. Do not install the rack where steam, grease, or splashing water will hit it daily. Leather likes kitchens, but it does not want to live inside a soup cloud.
Finally, do not skip the test fit. Every knife handle is shaped differently. A loop that holds one chef’s knife perfectly may be too loose for another. Custom storage should be custom, not “close enough and slightly terrifying.”
Maintenance: Keeping Leather, Wood, and Knives Happy
Wipe the wood and leather with a dry or barely damp cloth as needed. Avoid soaking the rack. For leather, use a small amount of leather conditioner occasionally, especially if your kitchen is dry. For wood, refresh the finish if it begins to look dull or worn.
Inspect hardware every few months. Tighten Chicago screws, check rivets, and make sure the wall mount remains firm. If the leather has stretched, you may be able to move the fastener holes slightly or replace the strap. One of the joys of this project is that individual leather pieces can be repaired without rebuilding the entire rack.
Real DIY Experience: What This Project Teaches You
The first thing you learn from building a wall-mounted leather knife rack is that “simple” does not always mean “thoughtless.” This project has only a few main partswood, leather, fasteners, and wall hardwarebut each one affects how the rack feels in daily use. A board that is too short makes knives crowd together. Leather that is too soft feels floppy. Fasteners placed too low make handles tilt. It is a small project with surprisingly honest feedback.
One useful experience is dry-fitting everything before making permanent holes. Lay the knives on the board, then pretend to grab each one as if you are cooking dinner. You may discover that the bread knife handle bumps the shears or that your favorite chef’s knife needs the easiest reach. This “fake cooking” test sounds silly until it saves you from drilling eight holes in the wrong place. The kitchen is already full of irreversible moments, like adding too much salt. Let us not add leather rivets to the list.
Another lesson is that leather behaves like a natural material because it is one. It can stretch, darken, soften, and develop marks. That is part of the charm. A leather knife rack will not remain showroom-perfect forever, but it will gain character. The key is to design with that movement in mind. Slightly snug loops age better than loose ones. Finished edges resist fuzzing. Strong rivets age better than decorative tacks pretending to be hardware.
Mounting the rack also teaches a classic DIY truth: the wall is always part of the project. You can build the most beautiful rack in the world, but if it is attached to drywall with weak fasteners, the project is not finished; it is waiting to become a dramatic sound effect. Finding studs, using anchors correctly, checking level, and testing the hold are not boring steps. They are the difference between a useful kitchen upgrade and a cautionary tale told over takeout.
From a design perspective, this project is satisfying because it gives a kitchen personality without requiring a remodel. The leather adds warmth, the wood adds structure, and the knives become part of the visual rhythm of the room. It is practical décor, which is the best kind. Nobody has to dust a purely decorative ceramic rooster here. The rack works every day.
In actual use, a wall-mounted leather knife rack can change the way you cook. When your best tools are visible and easy to reach, you are more likely to use the right knife for the task. The paring knife handles garlic. The serrated knife handles bread. The chef’s knife stops being asked to do literally everything, which is probably good for morale. Better storage also encourages better habits: wash, dry, hang, repeat.
The project is also beginner-friendly if you are patient. You do not need to be a professional woodworker or leatherworker. Clean cuts, careful measuring, and solid mounting matter more than fancy equipment. If the first leather strip is crooked, cut another. If the board finish looks uneven, sand lightly and try again. DIY projects forgive more than we think, as long as we do not rush the steps that involve sharp things and gravity.
Perhaps the best experience is the small moment after installation when you hang the knives and step back. The rack looks intentional. The counter is clearer. The knives are safer and easier to reach. And you made it yourself, which gives the whole kitchen a quiet little confidence boost. It is not just storage. It is a reminder that good design can be handmade, useful, and handsome enough to make your spatula jealous.
Conclusion
A DIY wall-mounted leather knife rack is a smart project for anyone who wants better knife storage, more counter space, and a warmer kitchen aesthetic. It blends woodworking, leathercraft, and practical organization into one satisfying build. With a sturdy backer board, firm leather, reliable fasteners, and proper wall mounting, you can create a rack that keeps your knives visible, protected, and ready for everyday cooking.
The best version is not necessarily the fanciest. It is the one that fits your knives, your kitchen, and your habits. Start with the tools you use most, give each blade enough space, mount the rack securely, and maintain the leather and wood over time. Done well, this project looks boutique, works hard, and makes your kitchen feel more intentionalwithout asking you to sacrifice a single inch of counter space.