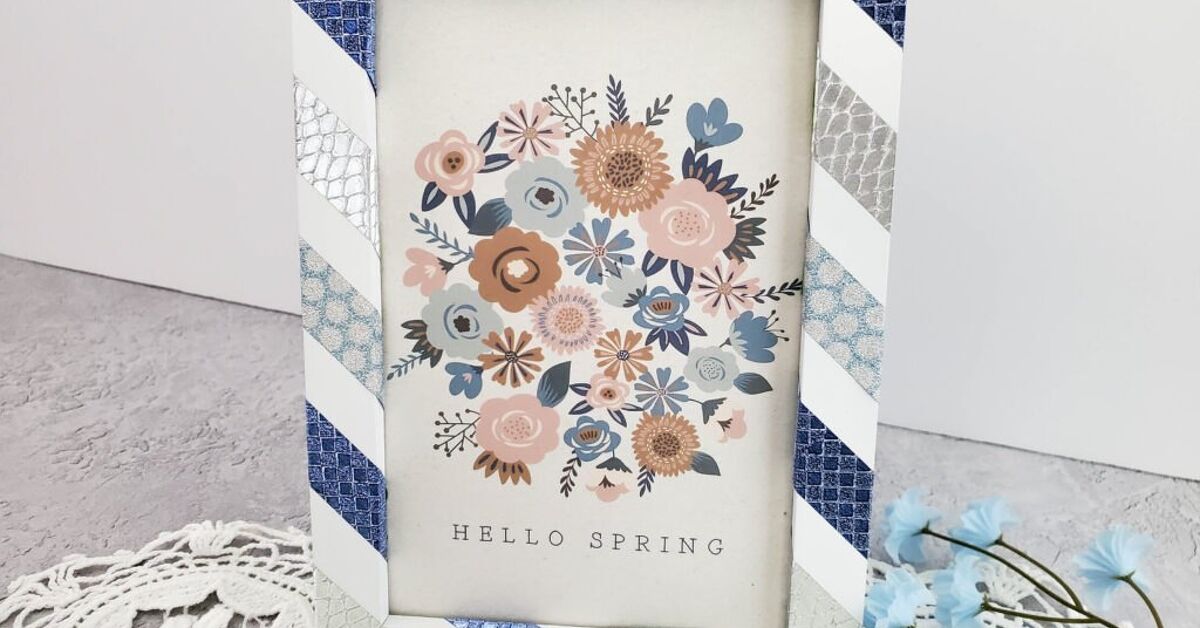
A DIY washi tape picture frame is one of those rare craft projects that looks polished, costs very little, and does not require you to own a garage full of tools. In other words, it is the home decor version of finding five dollars in last winter’s coat pocket.
Why a DIY Washi Tape Picture Frame Is Worth Making
Washi tape is decorative, lightweight, easy to tear by hand, and available in more colors and patterns than any reasonable person can resist. Florals, stripes, metallics, tiny stars, watercolor washes, gingham, neon, vintage postage designsthere is a roll for every mood, every room, and every “I swear I’m only buying one craft supply today” shopping trip.
The beauty of a DIY washi tape picture frame is that it solves several common decorating problems at once. Have an old frame that looks like it retired in 2008? Cover it. Found a plain dollar-store frame that needs personality? Tape it. Want a custom frame for a nursery, dorm room, office shelf, gallery wall, holiday gift, or kid’s art display? Washi tape can make it happen before your coffee gets cold.
Unlike painting, staining, or cutting wood, this project is beginner-friendly. You can finish one frame in about 20 to 40 minutes, depending on how fancy you get with corners and layering. It is also wonderfully forgiving. If a strip looks crooked, lift it gently and try again. If two patterns clash, call it “maximalist.” If the corner looks suspicious, add a tiny decorative square and pretend that was always the plan.
What You Need
Before starting, gather your supplies on a clean table. Washi tape sticks best when the surface is smooth, dry, and free of dust, so a tiny bit of prep goes a long way.
Basic Supplies
- One plain picture frame, wood, plastic, metal, or cardboard
- Two to four rolls of washi tape
- Scissors or a craft knife
- Ruler
- Pencil
- Soft cloth or paper towel
- Optional: Mod Podge or clear craft sealer
- Optional: foam brush
- Optional: fine-grit sandpaper for rough wooden frames
- Optional: cutting mat if using a craft knife
A note for younger crafters: scissors are usually enough for this project. If a craft knife is used, it should be handled carefully on a cutting mat, and younger kids should have adult help. The goal is a cute frame, not a dramatic craft-room incident.
Choosing the Right Frame
The easiest frame for this project is flat-fronted and simple. A wide wooden frame gives you more space to show off patterns. A narrow frame looks sleek with one bold tape design. A black, white, or unfinished wood frame can act as a background that makes bright tape pop.
If your frame has carved details, deep grooves, or rounded molding, you can still use washi tape, but it may wrinkle around curves. For beginners, start with a smooth frame. Once you have conquered straight lines, you can graduate to the Olympic sport of taping around beveled edges.
Old frames are excellent candidates. Remove the glass, backing, and photo before you begin. Wipe the frame with a slightly damp cloth, then let it dry completely. If the frame is unfinished wood and feels rough, lightly sand the surface so the tape can grip evenly.
How to Pick Washi Tape Patterns That Look Good Together
The easiest way to make your washi tape picture frame look intentional is to choose a simple color story. You do not need a design degree. You just need to stop every roll from shouting at the same time.
Try These Pattern Combos
- Modern: black and white stripes, solid gray, metallic gold
- Boho: terracotta, cream, sage green, tiny florals
- Kids’ room: rainbow tape, polka dots, stars, animals
- Holiday: red plaid, green, white, gold accents
- Romantic: blush pink, soft florals, lace-inspired patterns
- Coastal: navy, sky blue, white stripes, sandy beige
If you are nervous about mixing patterns, use one patterned tape and one solid tape. That pairing almost always works. A busy floral next to a calm solid color looks charming; five busy florals together may look like a craft store sneezed. Fun, yes. Peaceful, no.
Step-by-Step: DIY Washi Tape Picture Frame
Step 1: Take the Frame Apart
Remove the backing, glass, mat, and photo. Set them somewhere safe. This prevents fingerprints, tape scraps, or sealer from getting on the glass. It also makes the frame easier to handle while you wrap and trim the tape.
Step 2: Clean the Surface
Use a soft cloth to wipe away dust, oils, sticker residue, and mysterious drawer crumbs. If the frame has sticky spots from an old price tag, clean them gently and let the frame dry. Washi tape is friendly, but it is not a miracle worker. It prefers a clean surface, just like the rest of us.
Step 3: Plan Your Design
Before applying tape, place a few strips loosely on the frame to test your layout. Decide whether you want horizontal stripes, vertical stripes, diagonal bands, a checkerboard, a border, or a patchwork look. Planning first helps you avoid the classic craft moment where the left side is minimalist and the right side has accidentally joined a parade.
Step 4: Apply the First Strip
Start along one side of the frame. Place the tape carefully, press from the center outward, and smooth it with your finger. Avoid stretching the tape as you apply it. Stretching can cause lifting later, especially around corners.
Step 5: Wrap or Trim the Edges
For a clean finish, let the tape extend slightly past the edge, then fold it around the side or back of the frame. If the frame is thick, wrapping gives it a finished look from every angle. If the frame is thin, trimming may look neater. Use scissors for a soft handmade edge or a ruler and craft knife for crisp lines.
Step 6: Handle the Corners
Corners are where good frames become great frames. You have three easy options: overlap the strips, cut a diagonal miter, or add a small square of tape over the corner like a decorative cap. Overlapping is fastest. Mitered corners look more professional. Corner caps are perfect when something went wrong and you would rather not discuss it.
Step 7: Repeat Around the Frame
Continue adding strips until the frame is covered. Keep the tape smooth and press down each edge. If your design uses multiple tapes, alternate patterns evenly. For a striped frame, measure each strip or use the tape width as your guide. For a patchwork frame, vary the lengths for a playful handmade style.
Step 8: Seal the Frame, If Needed
Sealing is optional, but helpful if the frame will be handled often, used in a child’s room, given as a gift, or placed in a busy area. Brush on a thin coat of Mod Podge or clear craft sealer and let it dry fully. Thin coats are better than one thick coat. A heavy coat can wrinkle the tape or leave a cloudy finish, which is not the glamorous ending we want.
Step 9: Reassemble and Display
Once the frame is dry, reinsert the glass, photo, mat, and backing. Add your favorite photo, printable quote, pressed flower art, postcard, recipe card, or tiny masterpiece from a child who believes purple dogs are the future of art.
Design Ideas for Different Styles
Minimalist Washi Tape Frame
Use one matte black, white, beige, or metallic tape around the inner border of the frame. This works well for office decor, modern gallery walls, and black-and-white photography. The result feels intentional without trying too hard.
Colorful Patchwork Frame
Cut short pieces of tape and layer them around the frame in blocks. This is a great way to use leftover tape scraps. Keep the palette limited to three or four colors so the frame looks creative instead of chaotic.
Diagonal Stripe Frame
Place strips diagonally across the frame, trimming each one at the edges. Diagonal stripes add energy and make a plain frame look like it came from a boutique gift shop. This style is especially cute for birthday gifts, graduation photos, and dorm room decor.
Holiday Frame
Choose seasonal tape and update the frame throughout the year. Red and pink hearts for Valentine’s Day, pastels for spring, stars for the Fourth of July, orange and black for Halloween, and plaid for Christmas. One basic frame can have more costume changes than a pop concert.
Photo Mat Makeover
If you do not want to tape the outside frame, decorate the mat instead. Remove the mat, apply washi tape around the window opening, and trim the corners neatly. This gives the photo a custom border while leaving the frame itself simple.
Common Mistakes and How to Avoid Them
Mistake 1: Skipping Surface Prep
Dust, oil, and old sticker residue can stop tape from sticking properly. Always clean and dry the frame before taping.
Mistake 2: Using Too Many Patterns
Washi tape is adorable, which is exactly how it tricks you. Choose a palette before you start. A frame with two or three coordinated patterns usually looks more expensive than one covered in every roll you own.
Mistake 3: Pulling the Tape Too Tight
Stretched tape may shrink or lift at the edges. Apply it gently and press it down without tugging.
Mistake 4: Ignoring the Back
If tape wraps around the frame, press the ends firmly on the back. A messy back may not be visible on the wall, but it can make the tape peel sooner.
Mistake 5: Sealing Too Heavily
If you use sealer, apply thin coats and allow drying time between layers. Thick coats can cause bubbles, wrinkles, or tackiness.
Creative Ways to Use Your Finished Frame
A DIY washi tape picture frame is more versatile than it looks. Use it for family photos, travel snapshots, wedding table numbers, party signs, teacher gifts, nursery prints, desk decor, seasonal shelf styling, or small gallery walls. You can also frame postcards, ticket stubs, pressed leaves, recipe cards, handwritten notes, or printable art.
For a gallery wall, make several frames in related colors but different patterns. For example, use navy stripes on one frame, blue florals on another, and a solid pale blue border on a third. This creates variety while keeping the display cohesive.
If you rent and cannot paint your walls, washi tape frames can bring color into your space without a permanent commitment. You can even use washi tape directly on the wall to create a faux frame around lightweight prints, though a real frame gives the project more structure and longevity.
Budget Tips for This Project
This project is already inexpensive, but you can make it even more budget-friendly. Look for frames at dollar stores, thrift stores, clearance aisles, yard sales, or the forgotten storage bin in your closet. Old frames with scratches are perfect because the tape will cover most flaws.
Buy washi tape in coordinated sets if you want several patterns that already work together. Single rolls are great for statement designs, but multipacks are useful for patchwork frames, party decor, and matching gift sets.
Save scraps. Tiny pieces are perfect for corner details, mini labels, bookmarks, gift tags, and card making. Washi tape scraps have a magical ability to look useless until the exact moment you need a tiny triangle of gold foil.
Experience Notes: What I Learned Making DIY Washi Tape Picture Frames
The first thing you learn when making a DIY washi tape picture frame is that “quick craft” does not always mean “zero decisions.” You may begin with one plain frame and one roll of tape, feeling calm and reasonable. Then suddenly you are comparing three shades of blush pink under a lamp like you are restoring a museum painting. This is normal. Washi tape has that effect on people.
My best experience with this project came from starting with a white wooden frame. The white base made every tape pattern look brighter and cleaner. A navy floral tape looked crisp, a gold stripe looked expensive, and a pale green gingham looked sweet without becoming too childish. On darker frames, some translucent tapes looked dull, so I learned that background color matters. If your tape is slightly see-through, test it on the frame before committing.
I also learned that corners deserve patience. The fastest method is overlapping the tape, and honestly, it works fine for casual projects. But when I took an extra minute to trim diagonal mitered corners, the frame looked much more polished. It had that “small shop handmade” feeling rather than “I did this while standing over the junk drawer.” Both are valid aesthetics, but the mitered look is better for gifts.
Another useful lesson: do not skip smoothing. After each strip, I pressed the tape down with my fingers, especially along the edges and back. On one early frame, I rushed and left small raised spots. They were not obvious at first, but later the tape lifted slightly near the corners. On the next frame, I slowed down, pressed carefully, and the finish looked cleaner.
Sealing was the biggest surprise. For a frame sitting quietly on a shelf, unsealed tape was fine. For a frame that people picked up often, sealing made it feel more finished and durable. A thin coat worked best. When I tried too much sealer, the surface looked uneven and took longer to dry. The lesson was simple: treat sealer like seasoning. Enough is wonderful. Too much and everyone notices.
One of my favorite versions was a memory frame for a vacation photo. I used blue striped tape around the outside, then added tiny pieces of map-style washi tape near the corners. The result felt personal without needing a complicated scrapbook layout. Another successful frame used black-and-white tape around a colorful child’s drawing. The simple pattern made the artwork look surprisingly gallery-worthy, which delighted the tiny artist and slightly inflated their professional confidence.
The project is also excellent for gifts because it feels thoughtful but not overwhelming. A printed photo inside a handmade frame is warmer than a plain store-bought frame, yet it does not require advanced crafting skills. For birthdays, Mother’s Day, teacher appreciation, dorm move-ins, or holiday exchanges, it is a small handmade item that actually gets used.
My biggest practical tip is to make two frames at once. The first frame teaches you the rhythm: clean, plan, tape, smooth, trim. The second frame is usually much better because your hands already know what to do. Also, making two frames gives you an excuse to use more tape, which is important because washi tape collections multiply quietly when left unattended.
In the end, a DIY washi tape picture frame is not just about covering a frame. It is about turning a plain object into something personal. It is affordable, low-stress, and easy to customize. Best of all, if your style changes next month, you can make another one. Your wall decor can evolve right along with you, one cheerful strip of tape at a time.
Conclusion
A DIY washi tape picture frame is proof that home decor does not need to be expensive, complicated, or powered by a mysterious tool you borrowed from someone’s garage. With a plain frame, a few rolls of tape, and a little patience, you can create a custom piece that fits your room, your photo, your season, or your gift idea perfectly.
Whether you choose clean stripes, playful patchwork, soft florals, metallic accents, or a holiday theme, the process is simple and satisfying. Clean the frame, plan your design, apply the tape smoothly, trim the edges, seal if needed, and display your favorite memory. That is it. No sawdust. No paint panic. No complicated math. Just a stylish handmade frame with personality.
Note: This article is written as original web-publishing content and is based on practical DIY craft methods, home decor principles, and real washi tape usage guidance.