Note: This is original, web-ready HTML body content written in standard American English, based on real DIY craft research and rewritten fully for publication without source links or citation placeholders inside the article.
Bright, Juicy Coasters You Can Make Without a Craft Degree
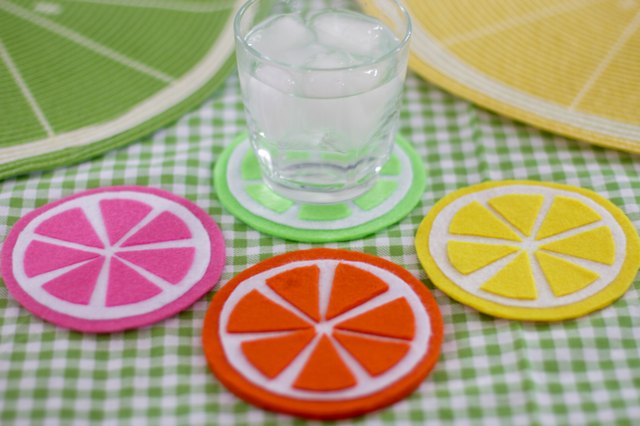
DIY felt fruit-slice coasters are the kind of craft that instantly makes a table look happier. They are colorful, inexpensive, beginner-friendly, and useful enough that nobody can accuse you of “just making cute stuff again.” These little slices of lemon, lime, orange, watermelon, apple, grapefruit, or dragon fruit do more than sit around looking adorable. They protect coffee tables from condensation, add personality to summer drinks, and make handmade gifts that say, “I care about your furniture and your lemonade.”
The beauty of felt is that it behaves nicely. It does not fray like woven fabric, it cuts cleanly, and it is forgiving if your circle looks slightly more “organic farmer’s market orange” than mathematically perfect citrus. Felt fruit coasters can be sewn for a polished handmade finish or glued for a no-sew version that comes together quickly. Either way, the result is a set of cheerful drink coasters that works for picnics, patio parties, kids’ craft afternoons, housewarming gifts, and everyday kitchen decor.
In this guide, you will learn how to make DIY felt fruit-slice coasters from start to finish, including what materials to choose, how to cut clean circles and segments, how to assemble different fruit designs, how to avoid glue disasters, and how to make your finished coasters look neat instead of like a craft drawer exploded politely.
Why Felt Works So Well for Fruit-Slice Coasters
Felt is one of the best materials for this project because it has structure without stiffness. A coaster needs to be soft enough to protect surfaces, thick enough to absorb light condensation, and stable enough to hold a glass without curling into a sad taco. Craft felt checks all those boxes when you choose the right type.
Basic acrylic craft felt is affordable and comes in bright colors, which makes it great for playful fruit designs. Wool-blend felt costs more, but it is usually denser, smoother, and more durable. If you plan to give these coasters as a gift or use them every day, wool-blend felt is worth considering. For a casual party project or a fun afternoon with kids, standard craft felt works just fine.
Best Felt Thickness
For coasters, choose felt that feels sturdy in your hand. Thin, shiny felt can wrinkle, stretch, and show glue marks more easily. A medium-weight felt or stiffened felt gives the coaster a cleaner edge and helps the layers sit flat. If your felt feels floppy, stack two base circles together to create a stronger coaster.
Best Fruit Colors
Fruit-slice coasters are all about contrast. For citrus coasters, you need a bright outer peel color, white or cream for the pith, and a lighter or darker shade for the juicy segments. For watermelon, use green for the rind, white for the inner layer, pink or red for the fruit, and black for seeds. For apple, use red or green as the peel, cream or white for the flesh, brown for the stem, and black or dark brown for seeds.
Supplies You Will Need
You do not need fancy equipment to make DIY felt fruit-slice coasters. Most of the supplies are easy to find at craft stores, fabric stores, or even in a well-loved craft bin that may or may not contain glitter from 2014.
- Craft felt or wool-blend felt in fruit colors
- White or cream felt for citrus pith and fruit flesh
- Black or dark brown felt for seeds
- Sharp fabric scissors
- Paper, cardstock, or printable templates
- Pencil, fabric marker, or chalk pencil
- Fabric glue, felt glue, or hot glue
- Needle and embroidery thread if sewing
- Round cup, bowl, lid, or compass for tracing circles
- Straight pins or tape for holding templates
If you want a very crisp result, use small, sharp embroidery scissors for tiny seeds and citrus segments. For repeated shapes, cardstock templates are helpful because they hold their shape better than regular printer paper. A rotary cutter can also help with clean edges, but it is optional.
Choosing Between Glue and Stitching
There are two popular ways to assemble felt fruit-slice coasters: gluing and stitching. Both work, but they create slightly different results.
No-Sew Felt Fruit Coasters
No-sew coasters are fast, simple, and beginner-friendly. Use felt glue, fabric glue, or a low-temperature hot glue gun. Felt glue is often the neatest option because it is designed to grip fabric without soaking through as much as watery school glue. Hot glue works quickly, but it can create lumps if you use too much. The secret is to apply tiny dots or thin lines, then press the layers flat.
Avoid regular white school glue for this project. It can soak into the felt, leave stiff patches, and make the coaster look blotchy. Nobody wants a lemon coaster with glue freckles unless that is your brand.
Hand-Sewn Felt Fruit Coasters
Stitched coasters take a little longer but look charming and more durable. A running stitch works well around circles, while a backstitch or whip stitch can secure smaller segments. Blanket stitch adds a decorative edge, especially around citrus rounds or apple shapes.
If you are new to sewing, this is a friendly project because felt does not unravel. Your stitches do not have to be perfect. In fact, slightly visible hand stitching adds personality and gives the coaster a cozy handmade look.
How to Make a Basic Citrus Slice Coaster
A citrus coaster is the classic fruit-slice design. You can make it yellow for lemon, green for lime, orange for orange, pink for grapefruit, or a bright coral shade if your fruit has decided to become an influencer.
Step 1: Cut the Base Circle
Trace a circle about 4 inches wide onto your outer peel felt. A mug, small bowl, or jar lid works perfectly. Cut one large circle for the back and another large circle if you want a thicker coaster. If using a single layer, choose sturdy felt.
Step 2: Cut the White Pith Circle
Trace and cut a slightly smaller circle from white or cream felt. This circle should sit inside the outer peel and leave a visible border around the edge. That border is what makes the coaster read as a fruit slice instead of a random cheerful target.
Step 3: Cut the Juicy Segments
Cut six to eight small teardrop or rounded triangle shapes from the same color as your peel or a slightly lighter shade. These pieces should fit inside the white circle with small gaps between them. Round the corners slightly for a softer, more natural citrus look.
Step 4: Arrange Before Attaching
Place all the pieces on the base before adding glue or stitches. Start by positioning pieces opposite each other so the spacing stays even. Once the layout looks balanced, take a quick photo with your phone. This gives you a reference in case one sneaky segment shifts while you are working.
Step 5: Glue or Stitch the Layers
Attach the white circle to the base first. Then attach the fruit segments on top. If using glue, press each piece flat for a few seconds and let the coaster dry completely before stacking it with others. If stitching, use matching thread for a subtle look or contrasting thread for a playful handmade effect.
How to Make a Watermelon Slice Coaster
Watermelon coasters are crowd-pleasers because the colors pop beautifully. They are also very easy to customize. You can make a round watermelon slice or cut the circle in half for a wedge-shaped coaster.
Round Watermelon Design
Cut a large green circle for the rind, a slightly smaller white circle, and a smaller pink or red circle. Stack them in that order: green on the bottom, white in the middle, pink on top. Then cut small black teardrops for seeds and arrange them around the pink circle.
Watermelon Wedge Design
For a wedge, cut a circle and slice it in half, or start with a half-circle template. Layer green, white, and pink felt in curved bands. Add black seed shapes. This version looks especially cute for summer parties, barbecue tables, and kids’ lemonade stands.
One tip: keep watermelon seeds small. Oversized seeds can make the coaster look more like a polka-dot purse than a fruit slice. Still cute, but less “fresh picnic” and more “mysterious craft boutique.”
How to Make Apple, Kiwi, and Dragon Fruit Coasters
Once you understand the basic layering method, you can turn almost any fruit into a coaster. The trick is to simplify the fruit into recognizable shapes and colors.
Apple Slice Coaster
For an apple, cut a rounded apple shape from red or green felt. Cut a smaller cream shape for the inside, then add a brown stem, a green leaf, and two small dark seeds. Apples look great with hand stitching because the outline gives them a storybook style.
Kiwi Slice Coaster
For kiwi, use a brown outer circle, a green inner circle, a small cream center, and tiny black seeds around the center. Kiwi coasters take patience because of the little seeds, but the finished design is worth it. Use tweezers if the seeds are too tiny for your fingers.
Dragon Fruit Coaster
For dragon fruit, use hot pink for the outer circle, white for the flesh, and tiny black dots or stitched seed marks. Add small green felt accents around the edge if you want a more dramatic tropical look. This is the fruit coaster that walks into the party and immediately asks where the mocktails are.
Tips for Cleaner, More Professional-Looking Coasters
Even a beginner project can look polished with a few small tricks. First, use sharp scissors. Dull scissors chew felt edges and make the layers look fuzzy. Second, cut slowly. Felt can shift as you cut, so turning the felt instead of twisting your wrist helps create smoother curves.
Third, do not overload the coaster with glue. Too much glue can seep through, harden the coaster, or create bumps under the layers. A thin, even application is better than a big blob. Fourth, let each coaster dry flat under a book covered with wax paper. The wax paper protects the book from glue, while the weight helps the layers bond smoothly.
Finally, make one test coaster before cutting an entire set. This lets you adjust the size, spacing, and colors. Think of it as the “snack coaster” before the full fruit salad arrives.
Creative Variations for DIY Felt Fruit-Slice Coasters
Once you have mastered the basic designs, the fun really begins. Make a matching set of four citrus slices in different colors: lemon, lime, orange, and grapefruit. Create a tropical set with watermelon, kiwi, pineapple, and dragon fruit. For a fall-inspired version, try apple, pear, fig, and blood orange colors.
You can also personalize coasters with embroidered initials, tiny seed patterns, or contrasting thread around the edges. If making gifts, stack four coasters, tie them with twine or ribbon, and add a small tag that says, “Made by hand. Please admire before placing iced coffee on top.”
How to Care for Felt Fruit Coasters
Felt coasters are easy to use but should be treated gently. Shake off crumbs, spot clean with a damp cloth, and allow them to air dry flat. Avoid soaking them unless your felt and adhesive are washable. If the coaster becomes misshapen, press it flat under a heavy book once it is dry.
Do not put glued felt coasters in the dishwasher or washing machine. That journey will not end with dignity. Hand cleaning is the safer choice, especially if you used hot glue or decorative stitching.
Common Mistakes to Avoid
Using Felt That Is Too Thin
Thin felt can curl, wrinkle, and wear out quickly. Use thicker felt or double the base layer for a coaster that feels substantial.
Skipping the Layout Test
Always arrange all pieces before attaching them. Fruit segments need spacing, and glue does not enjoy second chances.
Cutting Seeds Too Large
Small details make fruit coasters look charming. Large seeds can overwhelm the design, especially on kiwi and watermelon coasters.
Stacking Before Drying
Let glued coasters dry completely before stacking. Otherwise, you may create one thick felt sandwich instead of four separate coasters.
of Real-World Experience: What Making DIY Felt Fruit-Slice Coasters Teaches You
Making DIY felt fruit-slice coasters feels simple at first, but the project quietly teaches you several useful crafting lessons. The first lesson is that templates matter. When you freehand every circle, the coasters may still look cute, but the finished set can feel uneven. A traced lid, printed pattern, or cardstock template keeps the size consistent. That consistency is what makes a handmade set look intentional rather than accidental.
The second lesson is that felt quality changes the whole experience. Budget felt is fine for practice, but slightly thicker felt makes cutting and assembling much easier. It holds its shape, hides glue better, and feels more like a real home accessory. If you have ever made one coaster from flimsy felt and one from wool-blend felt, the difference is obvious. The sturdier one sits flatter, photographs better, and survives repeated use with less fuzzing around the edges.
The third lesson is to slow down when cutting small pieces. Citrus segments, kiwi seeds, and watermelon seeds are tiny, and tiny felt shapes have a talent for escaping. Cutting them over a tray or sheet of paper helps keep everything together. It also makes cleanup easier, especially if kids are helping. Without a tray, you may find black felt seeds in surprising places later. A week from now, one might appear near the toaster like a tiny craft ghost.
Another experience-based tip is to make coasters in batches. Cut all the base circles first, then all the pith circles, then all the segments. Assembly-line crafting helps the set look uniform and saves time. It also reduces the chance that you finish one perfect lemon coaster, then realize you no longer remember how big you made the white circle. Crafting confidence often comes from rhythm, and batch work gives this project a smooth rhythm.
Glue choice also becomes important in practice. Hot glue is fast, but it can create raised spots if applied too heavily. Felt glue or fabric glue usually gives a flatter finish, though it needs more drying time. If you are making coasters for a party the same afternoon, hot glue may be the hero. If you are making a gift and want the neatest result, fabric glue or stitching is often better.
Finally, these coasters are a reminder that useful crafts are often the most satisfying. They are small enough to finish in one sitting, colorful enough to feel exciting, and practical enough to use every day. They also invite creativity without demanding perfection. A slightly lopsided lime still protects a table. A watermelon seed placed too far left still looks cheerful. Handmade crafts have personality, and fruit-slice coasters are at their best when they look fresh, bright, and just a little playful.
Conclusion
DIY felt fruit-slice coasters are an easy, affordable, and wonderfully cheerful craft for beginners and experienced makers alike. With a few sheets of felt, sharp scissors, a simple template, and either glue or thread, you can create a colorful set of handmade drink coasters that protect your surfaces and brighten your table. Start with lemon, lime, orange, or watermelon designs, then branch out into apples, kiwi, grapefruit, and dragon fruit once you get comfortable.
The best part is that this project does not demand perfection. Felt is forgiving, fruit shapes are naturally organic, and small handmade details make each coaster more charming. Whether you are crafting for summer decor, a handmade gift, a party table, or a quiet weekend project, felt fruit-slice coasters bring a fresh splash of color without requiring complicated tools or advanced skills. In other words, they are low-stress, high-cuteness, and fully approved by any drink glass looking for a soft place to land.