Every FDM 3D print tells a story. Unfortunately, that story is often written in tiny horizontal ridges that scream, “I was born one layer at a time.” For functional prototypes, those layer lines are usually acceptable. For display models, cosplay props, miniatures, decorative parts, or anything you plan to photograph from less than twelve feet away, they can be the visual equivalent of wearing socks with sandals: technically allowed, but hard to defend.
That is where UV resin smoothing enters the workshop. Instead of sanding until your hands file for workers’ compensation, the idea is simple: brush a thin layer of UV-curable 3D printing resin over an FDM print, let it settle into the layer lines, then cure it with ultraviolet light or sunlight. The resin hardens into a glossy coating that can reduce print striations, improve paint readiness, and give a rough PLA or PETG part a more finished look.
But does it actually work? Yeswith a few large asterisks, a pair of nitrile gloves, and the patience to test before coating your masterpiece. UV resin can smooth prints beautifully, but it can also pool in details, create drips, stay tacky if under-cured, or turn a crisp skull into something that looks like it spent the weekend in hot cheese. The magic is in application thickness, resin viscosity, curing method, and knowing when to stop.
What Is UV Resin Smoothing?
UV resin smoothing is a post-processing method where liquid photopolymer resin is applied to the outside of a 3D printed part and cured with UV light. Most desktop resin printers use resins designed to harden when exposed to a specific wavelength, commonly around 405 nm. When used as a coating, that same curing behavior can transform a ridged FDM surface into something smoother and glossier.
The technique is especially interesting for PLA prints, because PLA does not respond to acetone vapor smoothing the way ABS does. Traditional finishing usually means sanding, filler primer, more sanding, paint, more sanding, and finally questioning your life choices. UV resin offers a faster route: brush, cure, inspect, repeat if needed.
However, UV resin does not “melt” layer lines away. It fills and covers them. Think of it more like a self-leveling clear coat than a chemical smoothing bath. The resin bridges low areas, softens sharp transitions between layers, and creates a hard shell on top of the original print. That makes it great for visual parts, but less ideal where exact dimensions, tiny embossed text, threaded features, snap fits, or fine mechanical tolerances matter.
The Basic Test: Pure Resin vs. Thinned Resin
A practical smoothing test usually compares three approaches: undiluted UV resin, moderately thinned resin, and heavily thinned resin. The goal is to find the point where the resin flows well enough to spread evenly but remains thick enough to fill layer lines.
1. Straight UV Resin
Pure UV resin has a thick, syrup-like consistency. It clings to surfaces, fills layer gaps aggressively, and produces the most noticeable smoothing effect. On a rough test print with exaggerated layer lines, one coat can make a visible difference. Two coats can make the part look dramatically smoother.
The downside is detail loss. Undiluted resin likes to collect in corners, eye sockets, teeth, grooves, panel lines, and decorative recesses. If the model has tiny features, the coating can bury them faster than a toddler hides vegetables under mashed potatoes. Straight resin is best used for rough prints, large surfaces, props, helmets, display bases, and parts where smoothness matters more than micro-detail.
2. A 50:50 Resin and Isopropyl Alcohol Mixture
Mixing UV resin with isopropyl alcohol reduces viscosity and improves flow. A 50:50 mixture spreads more easily with a brush and tends to settle into layer valleys rather than sitting heavily on every high point. It is easier to control than pure resin and can be useful for general smoothing.
The tradeoff is that it deposits less actual resin after the alcohol evaporates. That means the smoothing effect is milder, and curing may take longer because the coating is thinner, more spread out, and affected by solvent evaporation. This mixture is a good candidate when you want to soften layer lines without completely rounding off details.
3. A 25:75 Resin and Alcohol Mixture
A heavily thinned mixture may look promising when brushed on because it wets the surface quickly. The problem appears after evaporation: most of what you applied was alcohol, not resin. Once the solvent flashes off, very little material remains to fill the print lines.
In practice, a very thin mixture often produces little smoothing on rough FDM prints. It may be useful as a sealing wash or a very light gloss layer, but it should not be expected to hide visible ridges. If your print looks like a relief map of the Rocky Mountains, this mixture is bringing a toothbrush to a bulldozer fight.
Best Results: Thin Coats, Controlled Flow, and Patience
The best UV resin smoothing results usually come from controlled layers rather than one heroic glob. A single thin coat of undiluted resin can noticeably reduce lines, while a second coat may either improve the finish or start destroying detail. For many prints, a slightly thinned mixturesomething closer to three parts resin and one part alcoholcan offer a useful compromise between coverage and control.
Before coating, inspect the part. Remove strings, blobs, support scars, and loose filament bits. Light sanding with 220- to 400-grit sandpaper can knock down the highest ridges and make the resin’s job easier. You do not need to make the part perfect before coating; you just want to remove the worst peaks so the resin fills valleys instead of forming hills.
Use a cheap disposable brush, foam applicator, or silicone-tipped tool. Brush in multiple directions to push resin into layer lines, then remove excess from corners and low areas. The most common beginner mistake is leaving too much resin on the print. If you can see a droplet forming, gravity can see it too, and gravity is extremely committed to ruining your finish.
Curing: UV Lamp, Cure Box, or Sunlight?
UV resin needs the right light exposure to harden. A dedicated curing station provides the most consistent results because it offers controlled UV intensity, rotation, and predictable exposure. A homemade cure box can also work if it uses suitable UV LEDs and protects your eyes from direct exposure.
Direct outdoor sunlight can cure resin as well, and it is wonderfully low-tech. Put the coated part outside, rotate it occasionally, and let the sun do what it has been doing for about 4.6 billion years: blast things with radiation. The catch is consistency. Sunlight varies by season, cloud cover, time of day, latitude, and whether your neighbor’s cat decides your print is now a lawn ornament.
Do not rely on curing through a closed window. Many windows block a significant amount of UV, which can leave resin soft or tacky. Also, do not cure near open containers of resin or resin-soaked brushes. Stray UV light can harden material where you do not want it, turning your brush into a tiny fossil.
Safety First: UV Resin Is Not Fancy Maple Syrup
Liquid UV resin should be treated as a chemical, not as craft glitter with ambition. Wear nitrile gloves, safety glasses, and work in a well-ventilated area. Avoid skin contact, avoid splashes, and keep resin away from children, pets, food surfaces, and anything you plan to touch casually later.
Uncured resin can irritate skin and may cause sensitization after repeated exposure. That means you might get away with sloppy handling once or twice, then suddenly your body decides resin is its sworn enemy. Do not give your immune system a dramatic origin story. Gloves and eye protection are not optional decorations; they are the price of admission.
Ventilation matters, especially when using isopropyl alcohol as a thinner or cleanup solvent. IPA is flammable, evaporates quickly, and can produce strong fumes. Keep it away from sparks, flames, heaters, and electrical chaos. If you use a UV lamp or cure box, follow the equipment instructions and protect your eyes from direct UV exposure.
Dispose of waste properly. Resin-contaminated paper towels, gloves, and failed coating tests should be cured fully before disposal according to local rules. Do not pour liquid resin down the drain. Do not dump alcohol wash full of resin into household plumbing. The sink did nothing to deserve that.
When UV Resin Smoothing Works Best
UV resin smoothing shines on decorative and visual prints. It is especially useful for cosplay armor, masks, helmets, prop weapons, robot shells, display stands, large figurines, architectural models, and parts intended for painting. If a print has broad surfaces with visible layer lines, resin coating can reduce finishing time dramatically.
It also works well when you want a glossy, sealed surface. A resin-coated PLA part can feel more solid and polished. After curing, the surface can usually be sanded, primed, and painted. Primer is still helpful because it reveals imperfections, improves paint adhesion, and creates a more uniform color base.
UV resin smoothing is less ideal for engineering parts. Coating changes dimensions. Holes shrink. Slots tighten. Threads may become unusable. Press-fit parts may no longer press or fit. Any surface that must mate with another component should be masked, sanded back, or left uncoated.
Where It Fails: Detail Loss, Pooling, Tackiness, and Yellowing
The first failure mode is detail loss. Resin fills everything, including details you wanted to keep. Teeth, scales, engraved labels, hair texture, small vents, and mechanical grooves can disappear under an enthusiastic second coat. For miniatures and fine sculptures, apply resin sparingly or use sanding, primer, and paint instead.
The second failure mode is pooling. Resin flows downhill and collects in low spots. This creates glossy blobs and uneven thickness. The fix is simple but annoying: keep brushing away excess until the surface looks evenly wet, not flooded. Rotating the part during early curing can help reduce sagging.
The third issue is tackiness. A coating may remain slightly sticky if it is under-cured, too thick, contaminated with solvent, blocked from UV exposure, or affected by oxygen at the surface. More curing often helps, but extremely thick pools may stay soft underneath. Thin coats cure more reliably than thick ones.
Finally, some resins can yellow with heavy UV exposure or age. Clear resins are most vulnerable visually. If color accuracy matters, test your exact resin and curing method on a scrap print before coating the final model.
UV Resin vs. Epoxy Coating vs. Filler Primer
UV resin is not the only way to smooth 3D prints. Epoxy coatings such as dedicated 3D print finishing products can self-level, fill layer lines, and produce a durable glossy surface. They often provide more working time and predictable coverage, but they require mixing two components and waiting hours for a full cure.
Filler primer is another classic option. Spray, dry, sand, repeat. It is reliable, paint-friendly, and easy to find. It is also dusty, repetitive, and better suited to parts that can survive sanding. For complex models with deep recesses, sanding every surface can become a hobby inside your hobby, which is how weekends disappear.
UV resin sits between these methods. It cures quickly under the right light, requires no two-part mixing, and can use leftover resin from a resin printer. It is excellent for makers who already own resin printing supplies. If you do not already have UV resin, gloves, alcohol, and curing equipment, the cost advantage becomes less obvious.
A Practical Step-by-Step Workflow
Step 1: Choose a Test Print
Do not begin with your final dragon bust, helmet, or gift for someone who already thinks your printer is “that noisy pasta robot.” Start with a failed print, calibration cube, old benchy, or scrap model with similar layer height and detail.
Step 2: Clean and Sand Lightly
Remove loose material. Lightly sand rough spots, support scars, and obvious ridges. Wipe away dust before applying resin.
Step 3: Apply a Thin Coat
Brush on a small amount of resin. Work it into layer lines, then brush off excess. The part should look wet and glossy, not like it was dipped in pancake batter.
Step 4: Cure Evenly
Use a UV cure station, UV lamp, or direct sunlight. Rotate the part so all coated areas receive exposure. Cure until the surface is hard and no longer tacky.
Step 5: Inspect, Sand, and Repeat if Needed
After curing, inspect the surface under bright light or with a light coat of primer. Sand high spots if needed. Apply a second thin coat only where it improves the finish without burying details.
Specific Example: Smoothing a PLA Skull
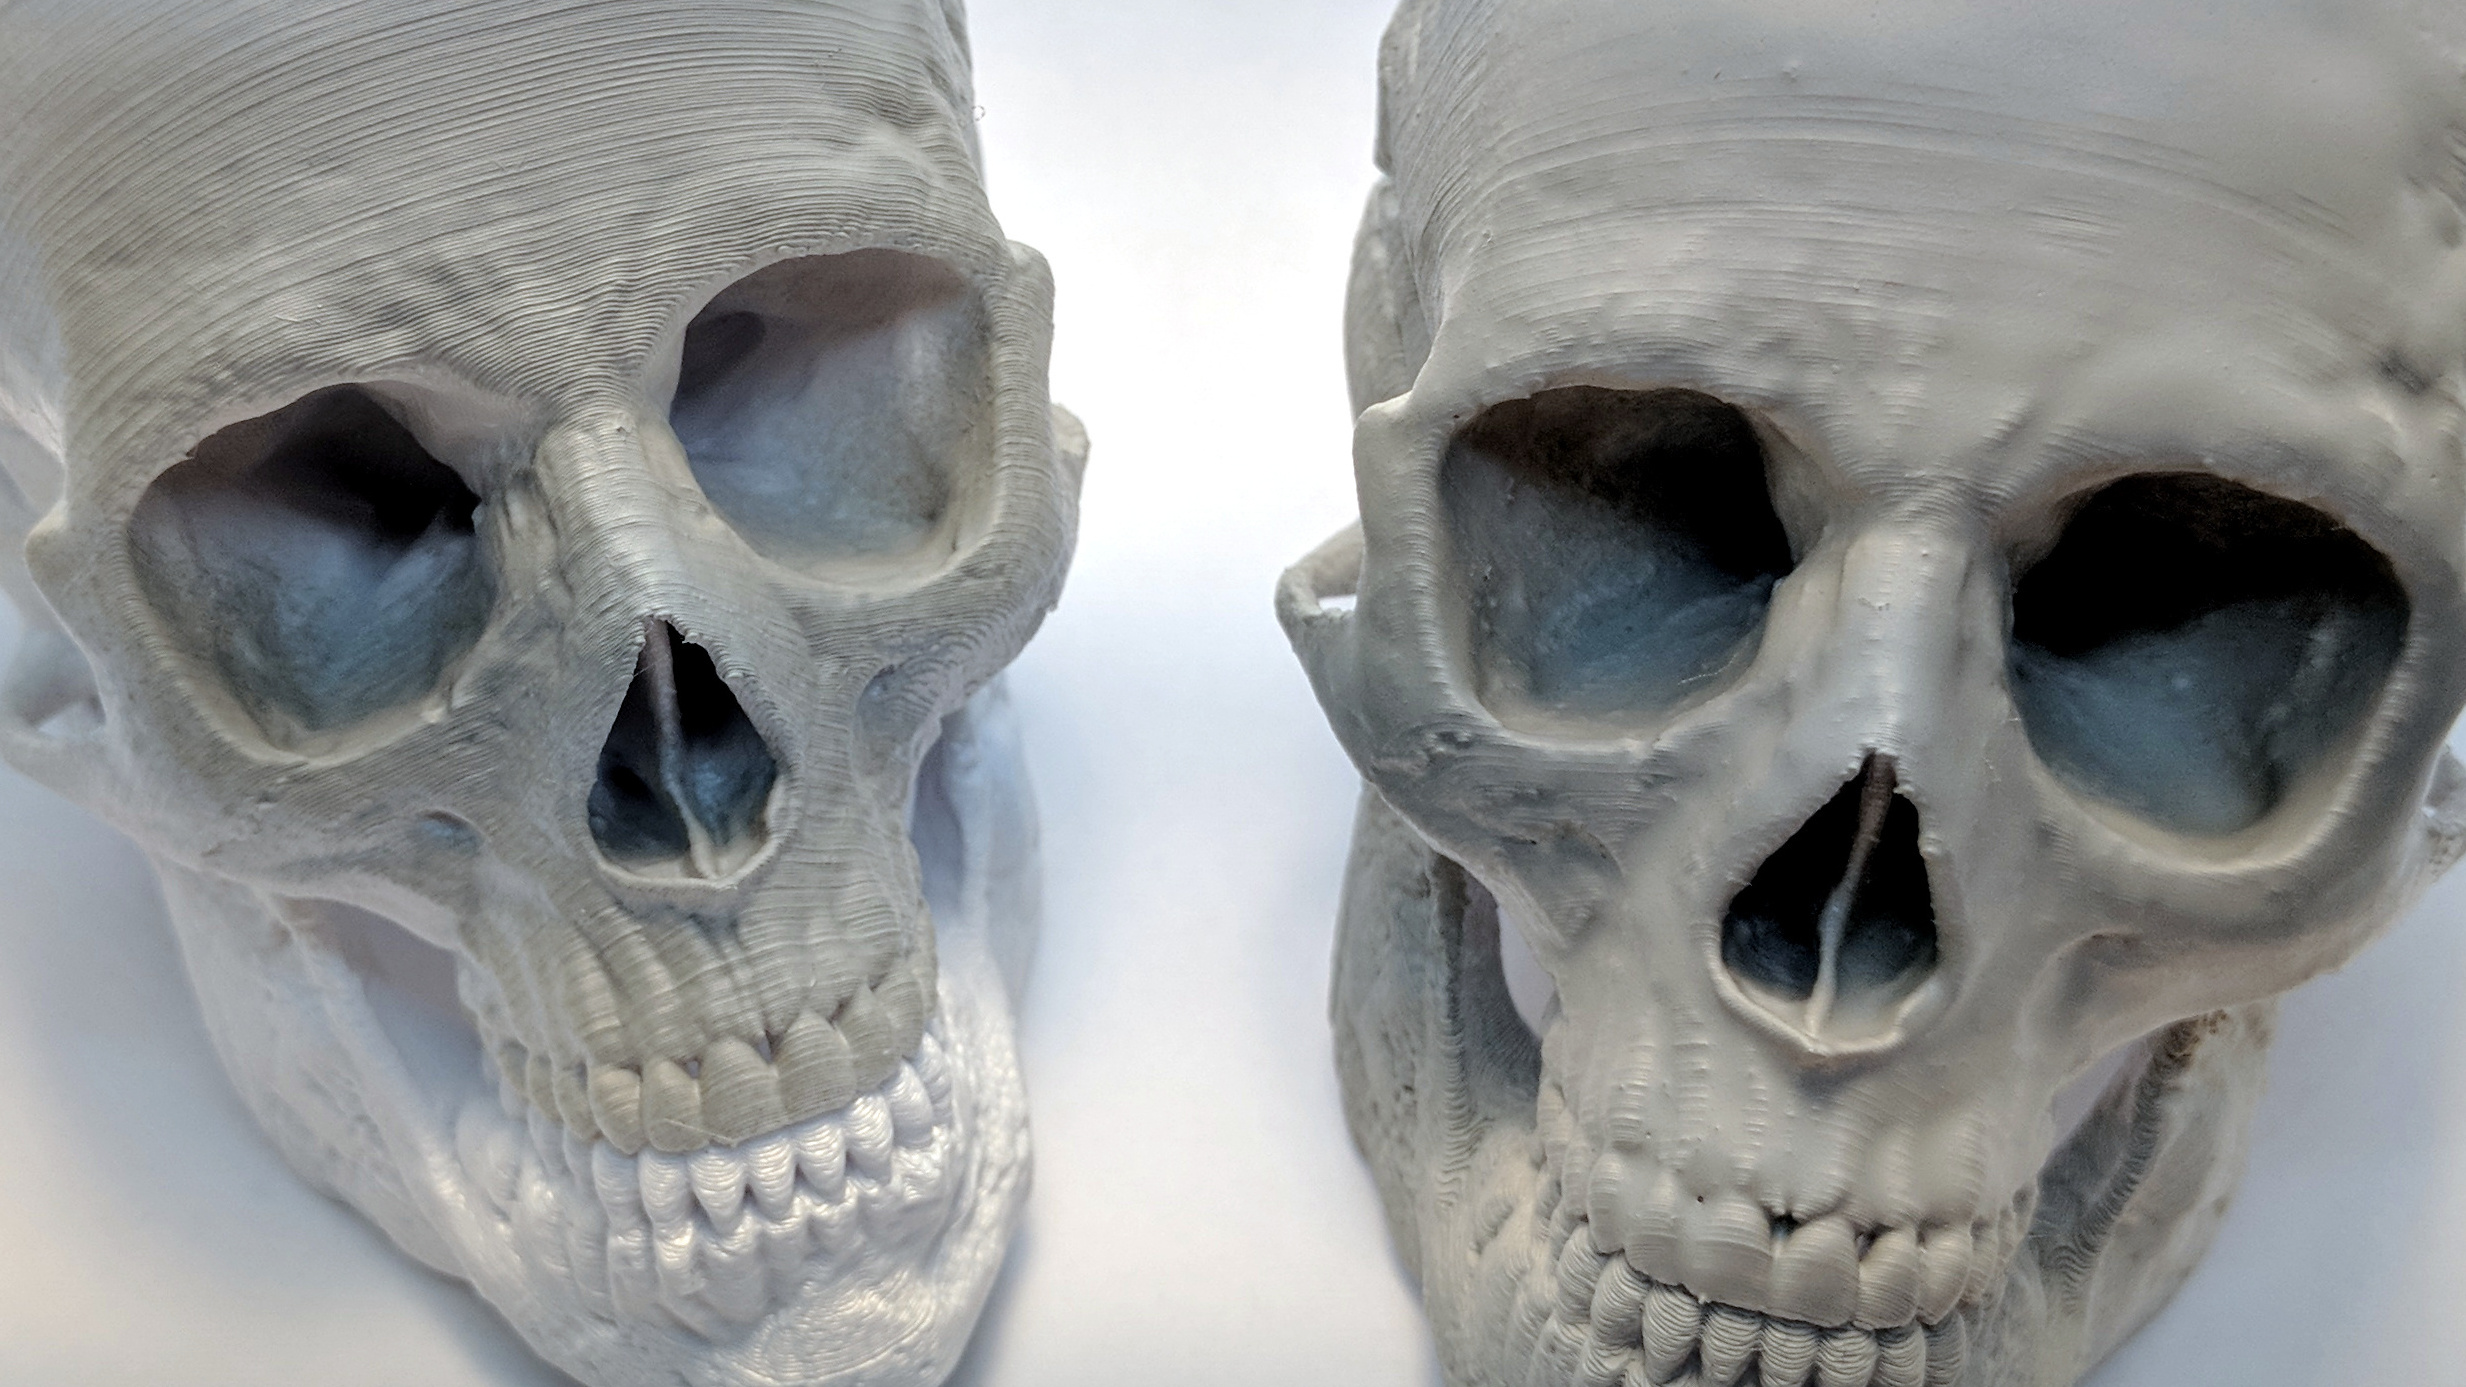
Imagine a PLA skull printed with a 0.4 mm nozzle at 0.1 mm layer height. The shape has smooth cranial curves, recessed eye sockets, sharp teeth, and small cracks. This is a perfect torture test because the forehead wants smoothing, while the teeth beg you not to drown them.
On the forehead and cheekbones, a thin coat of undiluted resin can reduce visible stepping quickly. Around the teeth and nasal cavity, pure resin can be too aggressive. A lightly thinned mixture or careful spot application works better. Use the brush almost dry in detailed areas, then cure before the resin has time to crawl into every tiny feature.
After curing, a grey primer coat reveals what actually happened. Glossy resin can fool your eyes, but primer tells the truth like a brutally honest friend. If layer lines remain on the large curved areas, sand lightly and add another controlled coat. If details look soft, stop. More resin will not bring them back.
Workshop Notes: Real-World Experience With UV Resin Smoothing
The most useful lesson from experimenting with UV resin smoothing is that the process rewards restraint. The first time you see resin fill layer lines, the temptation is to keep adding more. This is where good prints go to become shiny potatoes. The best results usually come from treating resin like a precision coating, not a liquid eraser.
In my experience, the first coat should be almost disappointingly thin. Brush the resin on, then keep brushing as if you are trying to remove half of it. That leftover film is often enough to soften the surface without creating runs. If the part still looks rough after curing, you can add another coat. If the first coat is too thick and cures into a blob, your only options are sanding, muttering, and pretending the model was always supposed to look organic.
Large props are forgiving. Armor panels, helmet sections, wall mounts, and decorative shells can handle a stronger coating because the details are broad. Small models are less forgiving. Miniatures, faces, lettering, scales, and mechanical textures need selective application. A small brush helps, but so does accepting that some prints are better finished with primer and careful sanding.
Another practical discovery is that curing setup matters as much as the resin. A UV lamp placed on one side can cure unevenly, leaving shadowed areas tacky. A rotating turntable is extremely helpful for small parts. For larger parts, curing in stages works better: cure one side, rotate, cure the next, and keep going until every coated surface has received direct exposure.
Sunlight is convenient, but it can be inconsistent. On a bright day, it may cure a thin coating surprisingly well. On a cloudy or winter day, the same part may sit outside for hours and still feel suspicious. A curing box is more predictable, especially if you plan to use this technique regularly.
Surface preparation also makes a major difference. Resin can hide layer lines, but it cannot magically fix blobs, zits, stringing, warped corners, or bad support removal scars. Those defects remain under the coating, sometimes amplified by the gloss. A few minutes of trimming and light sanding before coating saves far more time later.
For painting, resin smoothing can be a great foundation. Once cured and lightly scuffed, the surface takes primer well and looks more professional than raw FDM plastic. The final finish depends on the entire stack: print quality, prep, resin coat, cure, sanding, primer, paint, and clear coat. UV resin is not the whole recipe; it is the ingredient that can reduce the amount of sanding you have to suffer through.
The biggest safety habit is to create a dedicated resin zone. Keep gloves, paper towels, alcohol, a silicone mat, trash container, and curing light in one place. Do not carry wet resin parts across the house like a radioactive sandwich. The workflow becomes cleaner, faster, and less stressful when every messy step happens in a controlled area.
Overall, UV resin smoothing is worth trying if you already work with resin printing or want a faster way to finish FDM display pieces. It is not perfect, and it is not always better than epoxy, filler primer, or sanding. But when used carefully, it can turn a visibly layered print into a smooth, paint-ready part with less effort and a lot less sanding dust. That alone makes it a valuable trick in the maker toolbox.
Conclusion
3D Printering: Print Smoothing Tests With UV Resin proves that a bottle of UV-curable resin can be more than resin-printer fuel. Used as a brush-on coating, it can reduce FDM layer lines, seal rough surfaces, and prepare prints for painting. The best results come from thin coats, careful curing, and realistic expectations.
Pure resin delivers the strongest smoothing effect but can erase fine details. Moderately thinned resin flows better and offers more control, while heavily thinned resin often leaves too little material behind to make a major difference. For large decorative prints, cosplay props, and display models, UV resin smoothing can save time and create a glossy, professional-looking finish. For precision parts or tiny details, use it carefullyor not at all.
The final verdict: UV resin smoothing is not a miracle, but it is a very useful workshop cheat code. Treat the resin with respect, test on scraps, cure thoroughly, and remember that the smoothest finish usually comes from patience, not from dumping on one giant shiny coat and hoping the UV gods are feeling generous.