Radon is the home problem nobody brags about at dinner parties. You cannot see it, smell it, taste it, or blame it on the dog. Yet this naturally occurring radioactive gas can sneak into a house through soil, cracks, drains, crawl spaces, sump pits, and other openings around the foundation. The good news is refreshingly practical: a well-designed radon mitigation system can dramatically lower indoor radon levels and help make your home safer.
This guide explains how radon mitigation systems work, which systems are best for different home types, what homeowners should ask before hiring a contractor, and how to keep the system working after installation. Think of it as a homeowner’s field guide to turning an invisible risk into a manageable maintenance item.
What Is Radon and Why Does It Matter?
Radon forms when uranium naturally breaks down in soil, rock, and water. Outdoors, it usually disperses into the air. Indoors, however, radon can become trapped and concentrated, especially in lower levels of a home. Basements, slab-on-grade rooms, crawl spaces, and any living area in contact with the ground deserve attention.
The biggest health concern is long-term exposure. Radon is linked to lung cancer risk, and the risk is even higher for people who smoke. That combination is like inviting two villains to the same movie and giving them both popcorn. Because radon gives no obvious warning signs, testing is the only reliable way to know whether a home has elevated levels.
When Do You Need a Radon Mitigation System?
In the United States, the common action level used by homeowners and professionals is 4 pCi/L. If your home’s confirmed radon level is 4 pCi/L or higher, mitigation is strongly recommended. Many experts also encourage homeowners to consider action between 2 and 4 pCi/L, because lower is better when it comes to radon exposure.
Radon levels can change with weather, season, ventilation, foundation condition, and home use. A short-term test gives quick information, while a long-term test gives a better picture of the year-round average. If your short-term result is high, confirm it according to test-kit instructions or local guidance, then move toward mitigation rather than simply hoping the basement develops better manners.
How a Radon Mitigation System Works
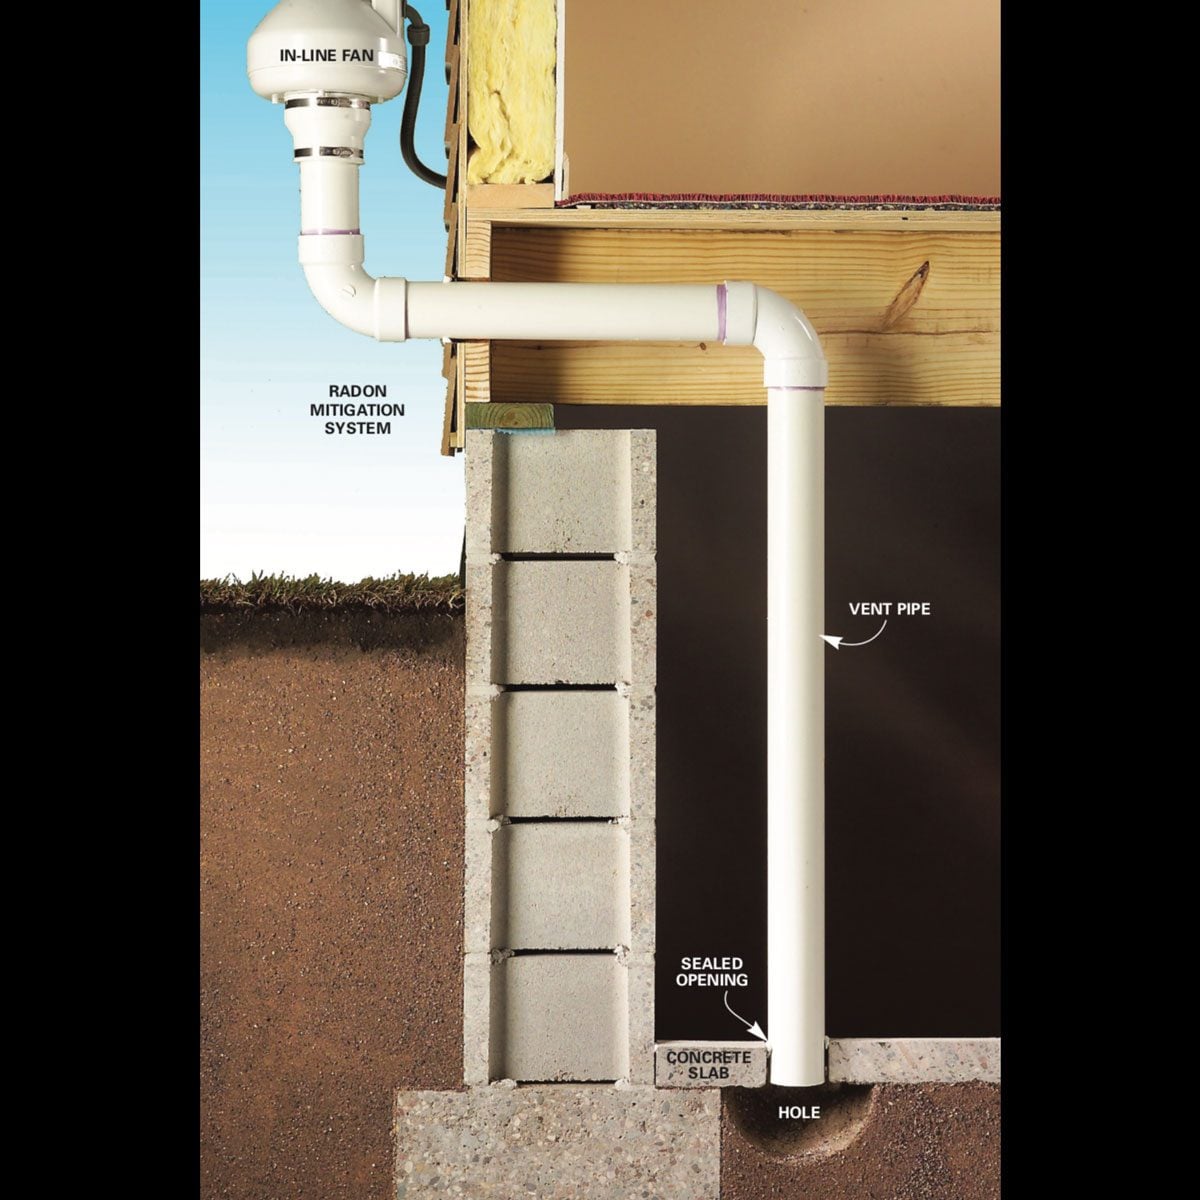
Most residential radon mitigation systems use a simple idea: collect radon before it enters the living space and vent it safely outdoors. The most common systems create lower pressure beneath the slab or membrane than inside the house. This pressure difference pulls soil gas into a pipe instead of letting it drift into your breathing zone.
A typical active radon mitigation system includes a suction point, PVC piping, a continuously running radon fan, sealed foundation openings, a discharge point above the roofline or another approved location, and a visible system monitor such as a manometer. The fan is not decorative. It is the hardworking little engine that keeps the system moving, and it should not be turned off unless a qualified professional is servicing it.
The Best Radon Mitigation Systems by Home Type
There is no universal “best” radon mitigation system for every house. The best system is the one matched to the foundation, soil conditions, radon level, drainage layout, and construction details. A ranch home on a slab, a 1920s basement with stone walls, and a newer home with a sealed sump do not need the exact same solution.
1. Active Sub-Slab Depressurization: Best Overall for Basements and Slab Homes
Active sub-slab depressurization is the workhorse of radon mitigation. For many basement and slab-on-grade homes, it is the most common and reliable choice. A contractor drills one or more suction points through the slab, connects them to piping, installs a radon-rated fan, and vents the collected gas outdoors.
This system works especially well when there is a permeable layer of gravel or aggregate beneath the slab. That layer allows the fan to draw soil gas from a wide area. In less permeable soils, the contractor may need additional suction points, stronger fan selection, or diagnostic testing to confirm the pressure field reaches the right zones.
Best for: finished or unfinished basements, slab-on-grade homes, homes with poured concrete floors, and many real estate situations where reliable reduction is needed quickly.
2. Drain-Tile or Sump-Hole Suction: Best for Homes With Drainage Systems
If your home has interior drain tile, perimeter drainage, or a sump basket, the mitigation contractor may be able to use that system as a radon collection pathway. This can be efficient because drain tile already runs around the foundation, giving the system a ready-made route for pulling soil gas.
The key is sealing. A sump lid must be airtight and serviceable, not a floppy plastic cover that looks like it lost a wrestling match. The system must also prevent outdoor air, sewer gas, or moisture issues from becoming new problems. When done properly, drain-tile suction can be very effective and less invasive than creating multiple slab suction points.
Best for: basements with existing drain tile, sump pits, or perimeter drainage systems.
3. Sub-Membrane Depressurization: Best for Crawl Spaces
Crawl spaces require a different strategy, especially if the floor is exposed soil or gravel. A sub-membrane depressurization system uses a heavy-duty vapor barrier sealed across the crawl space floor and attached carefully to walls, piers, posts, and penetrations. A pipe and fan then pull radon from beneath the membrane and vent it outside.
This is often the best radon mitigation system for crawl spaces because it addresses the main entry area directly. It can also help reduce moisture vapor, which is a welcome bonus if your crawl space currently feels like a swamp with joists.
Best for: dirt-floor crawl spaces, gravel crawl spaces, mixed-foundation homes, and houses with moisture plus radon concerns.
4. Block-Wall Depressurization: Best for Hollow Block Foundations
Concrete block foundation walls can act like hidden radon highways. If the wall cavities contain radon-laden air, a standard sub-slab system may not fully address the problem. Block-wall depressurization connects suction to the hollow wall cavities and pulls gas out before it leaks indoors.
This method is more specialized and may be combined with sub-slab depressurization. It requires careful design because walls, footings, and cavities vary. When a contractor recommends it, ask what diagnostic evidence supports the design.
Best for: homes with hollow concrete block foundations and persistent radon after basic sub-slab mitigation.
5. Passive Radon System With Fan Activation: Best for Newer Radon-Ready Homes
Some newer homes are built with passive radon-resistant features: a gas-permeable layer under the slab, plastic sheeting, sealed openings, and a vent pipe routed upward. A passive system relies on natural airflow, but if post-occupancy testing shows elevated radon, a fan can often be added to convert it into an active system.
This is one reason radon-resistant new construction is smart. It is usually easier to build a system pathway during construction than to retrofit one later, after the finished basement has gained carpet, drywall, furniture, and emotional attachment.
Best for: new homes, radon-ready homes, and properties with existing passive vent piping.
6. Heat Recovery Ventilation: Best as a Supplemental Option
A heat recovery ventilator, or HRV, exchanges indoor and outdoor air while recovering some heating or cooling energy. It may reduce radon levels in certain situations, particularly when used in a basement or tightly sealed home. However, ventilation alone is not usually the first-choice solution for high radon levels from soil gas.
HRVs can improve overall indoor air quality, but they need balancing, filter maintenance, and energy consideration. For many homes, an HRV is better viewed as a supporting actor, not the superhero with the cape.
Best for: tightly built homes, homes with broader indoor air quality goals, and cases where a professional recommends ventilation as part of a larger strategy.
7. Radon in Water Treatment: Best for Private Wells With High Radon
Most indoor radon problems come from soil gas, but private well water can contribute in some homes. Radon in water can be released into indoor air during showering, laundry, dishwashing, and other household use. If you use a private well and have elevated indoor radon, testing the water may be worthwhile.
Two common treatment approaches are aeration and granular activated carbon. Aeration systems mix water with air and vent radon outdoors, making them a strong option for higher concentrations. Granular activated carbon filters can work for moderate levels, but they may accumulate radioactivity and require proper handling and disposal. A qualified water treatment professional should match the system to the test results.
Best for: private well users with confirmed radon-in-water concerns, especially after air testing has been completed.
What Is Not a Complete Radon Mitigation System?
Sealing cracks is useful, but sealing alone is rarely enough for a serious radon problem. Caulk can help a mitigation system perform better by limiting unwanted airflow, yet it does not reliably stop soil pressure from pushing radon toward the house. Opening windows is also not a real mitigation plan. It may temporarily dilute radon, but once the windows close, levels often climb again.
Air purifiers are another common misunderstanding. Standard air cleaners do not remove radon gas effectively. Some devices may capture particles, odors, or dust, but radon is a gas entering from beneath or around the foundation. The solution needs to address the source pathway, not just wave a filter at the living room.
How to Choose the Best Radon Mitigation Contractor
A good contractor does more than install a pipe and call it a day. The best radon mitigation professionals evaluate the foundation, identify entry routes, inspect sump and drainage conditions, consider fan sizing, explain discharge location, and provide post-mitigation testing instructions.
Before hiring, ask whether the contractor is licensed, certified, or registered as required in your state. Many states have their own radon rules, and national certification programs also help identify trained professionals. Ask for proof of credentials, insurance, references, warranty details, and a written proposal. If a contractor says, “Trust me, I watched a video,” politely escort that quote to the recycling bin.
Questions to Ask Before Signing
Ask what type of system they recommend and why. Ask where the fan will be placed, where the pipe will discharge, how noisy the fan may be, how the system monitor works, and what areas will be sealed. Also ask who performs the follow-up test and when it should be done. A reliable contractor should welcome these questions because they show you are paying attention.
Radon Mitigation Cost: What Affects the Price?
Radon mitigation costs vary by home size, foundation type, number of suction points, crawl space condition, fan requirements, routing complexity, local labor rates, and whether electrical work is needed. A simple active sub-slab system is usually less expensive than a crawl space encapsulation with sub-membrane depressurization. Water treatment systems are a separate category and can cost more depending on the technology.
Be cautious with extremely low bids. A radon system is not just PVC pipe with ambition. It needs correct fan selection, sealed penetrations, safe venting, electrical compliance, weather durability, and post-installation verification. The cheapest system is not a bargain if it leaves your radon level high or creates moisture, backdrafting, or noise problems.
What Happens During Installation?
Most standard installations take less than a full day, though complex homes can take longer. The contractor may drill a test hole or suction point, check sub-slab communication, route pipe through a garage, closet, basement, exterior wall, or attic, install the fan in an approved location, seal cracks and sump openings, and add a system monitor.
Good installers think about both performance and appearance. The best route is not always the shortest; it is the route that works, meets standards, avoids damage, minimizes noise, and does not make your home look like it is wearing a plumbing backpack.
Post-Mitigation Testing Is Not Optional
After installation, the home should be retested to confirm the system works. This is the homeowner’s proof, not a decorative receipt. Follow the contractor’s instructions and the testing protocol for timing. In many cases, a short-term test is used after the system has been operating, followed by periodic retesting over the years.
Keep records of your original test, installation details, warranty, fan model, post-mitigation test, and future retests. These documents are useful for maintenance, remodeling, and resale.
Maintenance: How to Keep a Radon System Working
A radon system is low-maintenance, not no-maintenance. Check the system monitor regularly. If the manometer reading changes significantly or drops to zero, the fan may have stopped or the system may need service. Listen for unusual fan noise, inspect visible piping for damage, and make sure the discharge area remains clear.
Retest your home periodically, especially after major remodeling, foundation work, HVAC changes, basement finishing, or additions. A radon system is designed around the house as it exists at installation. Change the house, and you may change the airflow story.
Experience-Based Tips From Real-World Radon Projects
One common homeowner experience is surprise. Many people test only because they are selling a home, buying a home, or finishing a basement. Then the result comes back high, and suddenly radon becomes the main character in a story that was supposed to be about paint colors. The lesson is simple: test before a deadline whenever possible. If you wait until three days before closing, every decision feels louder, faster, and more expensive.
Another experience is that the neatest system is not always the best system. Homeowners often ask for pipes to be hidden completely, and that is understandable. Nobody dreams of a living room with a vertical PVC accent wall. But performance comes first. A skilled contractor can usually find a route that balances effectiveness and appearance. The best conversations happen when homeowners explain their cosmetic concerns while still letting the contractor design for pressure, suction, and code-compliant venting.
Crawl spaces often teach the biggest lesson: preparation matters. If a crawl space is full of stored boxes, loose insulation, debris, or standing water, the project becomes harder. Homeowners who clear access ahead of time often get a smoother installation. Sub-membrane systems require careful sealing around edges, seams, posts, and pipes. That sealing detail is not glamorous, but it is where performance lives. A crawl space membrane should look intentional, not like someone tossed a plastic tablecloth under the house and wished it luck.
Noise is another real-world concern. Most radon fans are not loud, but placement matters. A fan mounted near a bedroom wall or attached in a way that transfers vibration can become annoying. During planning, ask where the fan will go and whether vibration isolation is included. A quiet system is easier to live with, and a system that is easy to live with is less likely to be turned off by a frustrated homeowner.
Homeowners also learn that the system monitor is their friend. A U-tube manometer may look like a tiny science experiment, but it tells you whether the fan is creating suction. Take a photo of the normal reading after installation. Later, if the level changes, you have a reference point. This small habit can prevent months of assuming the system is working when it is not.
Finished basements deserve extra planning. If you are installing a mitigation system before finishing the space, coordinate the pipe route, access panels, sump cover, and future flooring. It is much easier to plan around a radon pipe before drywall than after the basement becomes a home theater with a sectional sofa the size of a fishing boat.
Finally, do not treat radon mitigation as a one-time magic trick. It is a system. It has a fan, seals, piping, airflow, and a measurable result. The best homeowner habit is simple: test, mitigate if needed, verify, monitor, and retest over time. That rhythm keeps the problem controlled without turning you into a full-time radon detective.
Conclusion: The Best System Is the One Designed for Your Home
The best radon mitigation system is not chosen from a shelf like a toaster. It is designed around your home’s foundation, test results, soil conditions, and construction details. For many homes, active sub-slab depressurization is the top choice. For crawl spaces, sub-membrane depressurization is often the strongest solution. For homes with drain tile or sump systems, suction through the drainage network may be efficient. For private wells with high radon in water, aeration or carbon treatment may be needed.
Radon may be invisible, but your response to it should be clear. Test your home, hire a qualified professional when mitigation is needed, verify the results, and maintain the system. Your house will not send you a thank-you card, but your lungs are quietly applauding.