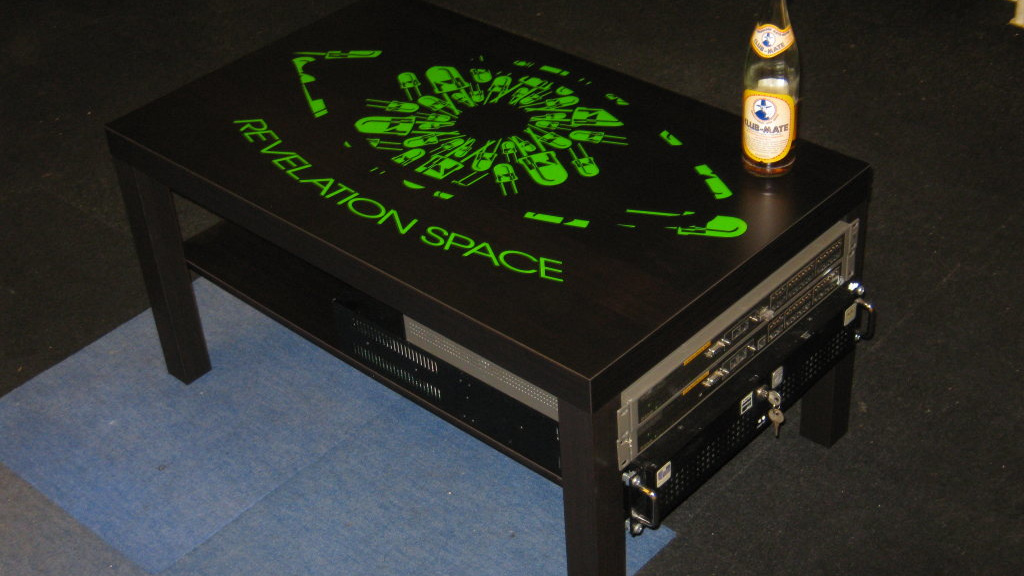
Every home lab eventually reaches the same awkward stage: the gear multiplies, the cables begin nesting like caffeinated spaghetti, and your once-innocent router shelf starts looking like it survived a tiny data-center earthquake. You buy one switch, then a patch panel, then a UPS, then a mini server, and suddenly you are Googling “cheap rackmount solution” at 1:17 a.m. with the emotional intensity of someone shopping for emergency plumbing parts.
That is where the IKEA LACK table enters the chat. Yes, the humble square side tablethe one you may have used for coffee, a lamp, or a suspiciously large pile of remoteshas become a cult favorite among homelab builders, hackerspaces, network tinkerers, AV hobbyists, and people who simply refuse to spend more on a rack than on the hardware inside it. The idea is commonly known as the “LackRack,” and while it sounds like a joke, it can be a surprisingly practical answer to rackmount hardware placement issues.
To be clear, an IKEA LACK is not a certified enterprise rack. It will not impress a data-center auditor. It will not come with a badge, cage nuts, cable waterfalls, seismic bracing, or a smug sales brochure. But for lightweight network equipment, small rack shelves, patch panels, compact lab machines, and budget-friendly organization, the LACK can be the little table that could.
Why Rackmount Hardware Placement Becomes a Problem
Rackmount equipment is designed around order. The 19-inch rack standard gives switches, patch panels, shelves, power distribution units, and servers a shared mounting format. One rack unit, or 1U, equals 1.75 inches of vertical space, which makes planning hardware stacks much easier. In a proper rack, everything has a predictable home.
The problem is that proper racks can be expensive, bulky, loud-looking, and inconvenient for small spaces. A full-height rack is fantastic in a server room, but it may be completely ridiculous in an apartment, dorm room, garage corner, studio, or office closet. Even a smaller wall cabinet can feel like overkill if your “infrastructure” is a modem, firewall, eight-port switch, NAS, and one machine named after a science-fiction character.
Placement issues usually appear in five annoying forms:
- Width problems: rackmount gear wants 19-inch spacing, but ordinary shelves do not.
- Depth problems: full servers can be much deeper than network switches or audio gear.
- Airflow problems: gear stacked directly on top of gear turns into a warm sandwich of regret.
- Cable problems: power cords and Ethernet cables become harder to trace than a mystery novel subplot.
- Access problems: every reboot, cable swap, or drive check requires moving half the room.
A small rack solves these issues, but the price and footprint are not always friendly. That is why the IKEA LACK hack is so popular: it offers a simple, accessible frame that happens to be very close to the spacing needed for rack-style setups.
What Makes the IKEA LACK So Useful?
The standard IKEA LACK side table is compact, inexpensive, lightweight, and easy to find. Its top is roughly 21 5/8 inches square, and the table stands about 17 3/4 inches tall. Most importantly for rackmount fans, the leg spacing is friendly enough that many pieces of 19-inch rack hardware can be placed, mounted, or supported between the legs with minor modification.
The LACK is made from lightweight constructed board materials, commonly using fiberboard, particleboard, and a honeycomb-style paper filling. That structure helps explain why the table is easy to move and surprisingly stiff for ordinary household use. It also explains why you should respect its limits. This is not the place for a giant enterprise storage array that weighs as much as a sleeping Labrador.
The magic of the LACK is not that it is industrial-grade. The magic is that it is “good enough” for the right use case: small, low-cost, visible, easy to modify, and attractive enough to live in a room without making guests ask whether you are operating a secret broadcast station.
The LackRack Concept: Simple, Cheap, and Weirdly Elegant
The classic LackRack idea is beautifully simple. Place rackmountable gear between the legs of the table, use screws, rails, brackets, shelves, or custom mounts as needed, and let the table become a tiny open-frame rack. Some builders stack multiple LACK tables to create more vertical space. Others add caster wheels, braces, side panels, cable hooks, fans, or LED lighting. Because of course someone added LED lighting. This is home lab culture; blinking things are basically a food group.
For many users, the LACK is best treated as a frame or furniture-based organizer rather than a true rack. A network switch can sit on a 1U shelf. A patch panel can be mounted near the front. A small UPS can rest on the bottom shelf area if the weight is reasonable and evenly supported. A mini PC, Raspberry Pi cluster, modem, router, KVM, or audio interface can sit neatly on shelves or trays.
Best Gear for an IKEA LACK Rack
The LACK approach works best with lighter and shallower equipment. Good candidates include:
- Network switches
- Patch panels
- Small firewalls and routers
- Mini PCs and NUC-style systems
- Raspberry Pi clusters
- Lightweight rack shelves
- Small lab power gear
- Audio interfaces and compact studio equipment
- Home automation hubs
- Shallow NAS units, if properly supported
Heavy rack servers are a different story. Many full-depth servers need four-post support because their weight extends far behind the front mounting ears. A LACK can be adapted creatively, but if your server is deep, heavy, and expensive, gravity deserves a vote in the design meeting. Use a real rack, a proper shelf, or a four-post solution when equipment weight and depth demand it.
How to Plan a LACK-Based Rack Setup
Before grabbing a screwdriver and declaring yourself Chief Table Infrastructure Officer, sketch the layout. Rackmount hardware is orderly only when planned. A LACK build can quickly become messy if you treat it like a junk drawer with Ethernet ports.
1. Measure Everything First
Measure the width, depth, height, and weight of each device. A 19-inch front panel does not mean the device body is exactly 19 inches wide. Many rackmount devices have narrower chassis bodies with wider front ears. This is one reason the LACK can work so well: the body of the gear often fits between the legs while the front panel aligns nicely near the outside.
Depth is even more important. Shallow switches and patch panels are friendly. Deep servers may protrude, sag, or require rear support. If a device sticks out the back, that may be acceptable in an open setup, but it needs stable support and safe cable clearance.
2. Put Heavy Items Low
This is not just rack advice; this is furniture survival advice. Place heavier equipment at the bottom to lower the center of gravity. If you add a UPS, put it low and ensure the surface can handle the weight. A top-heavy rack is a bad rack. A top-heavy rack made from a side table is a slapstick routine waiting for a network outage.
3. Leave Space for Airflow
Many network and server devices are designed around front-to-back or side-to-side airflow. Do not block vents with table legs, walls, books, storage bins, or that one mystery cable bundle you keep because “it might be useful someday.” Warm air needs a way out, and cool air needs a way in.
Open-frame LACK builds have one big advantage: they breathe better than cramped cabinets. Still, airflow does not manage itself. Leave room behind the hardware, avoid stacking hot devices directly together, and use blank panels or open gaps thoughtfully if you are creating a more rack-like enclosure. If heat builds up, add quiet fans or improve spacing before blaming the equipment.
4. Organize Cables Like Future You Matters
Future you will absolutely need to troubleshoot something. Future you will not appreciate past you’s “creative cable ecosystem.” Use short patch cables where possible, label both ends of important cables, separate power and data runs when practical, and use Velcro straps instead of permanent zip ties for anything you may change later.
A LACK rack is open, which makes cable management visible. That is either a feature or a public confession. Adhesive cable clips, under-table cable trays, reusable ties, and rear cable loops can keep the build clean. Keep service loops small but useful, and avoid bending cables sharply around edges.
Mounting Options for the IKEA LACK
There are several ways to use a LACK for rackmount hardware, depending on your comfort level and the equipment involved.
Option A: Shelf-Based Setup
This is the easiest method. Use rack shelves, small boards, or sturdy trays to support hardware rather than hanging everything from screws. It is ideal for renters, beginners, and anyone who does not want to turn a side table into Swiss cheese.
Option B: Front-Mounted Gear
Some builders mount lightweight rack gear directly near the front legs. This can work for switches, patch panels, and shallow equipment. Pre-drilling pilot holes helps reduce splitting, and using washers can distribute pressure. However, the LACK’s lightweight construction means you should not expect the legs to behave like steel rack rails.
Option C: Brackets and Reinforcement
Flat braces, angle brackets, corner plates, or added wooden supports can make the build sturdier. This is especially helpful if you stack tables or add wheels. Reinforcement is not glamorous, but neither is watching your firewall slide sideways during a cable change.
Option D: Stacked LACK Tables
Stacking tables creates more vertical rack space. This can look surprisingly clean when done carefully. Use brackets or dowels to prevent shifting, keep heavy gear low, and consider anchoring the structure if it becomes tall. Stacking without securing is fine for pancakes, not for electronics.
Safety Considerations Nobody Should Skip
The LACK rack is clever, but safety still matters. First, check the weight of every device and stay within reasonable load limits. Second, do not overload power strips. Third, avoid daisy-chaining extension cords. Fourth, keep power bricks ventilated. Fifth, keep the rack away from water, pet traffic, curious toddlers, and doors that swing open like medieval siege weapons.
If you install caster wheels, choose wheels rated for the total load and make sure at least two lock. If the rack moves too easily, cables may get strained. If it does not move when you need access, you may end up yanking things anyway. Mobility is useful only when controlled.
Also consider noise. A LACK rack in a living room is charming until a tiny fan begins whining like a mosquito with a certification. Place louder devices in closets, utility rooms, or offices where sound is less annoying. Just remember that closets can trap heat, so ventilation still matters.
Where the IKEA LACK Beats a Traditional Rack
A real rack wins on strength, standards, depth, accessories, security, and professional polish. No argument. But the LACK has its own advantages:
- It is affordable and widely available.
- It blends into home decor better than a metal cabinet.
- It is easy to move, drill, modify, or replace.
- It fits small-space setups.
- It is unintimidating for beginners.
- It encourages experimentation without a huge upfront cost.
For a home lab, the perfect solution is often the one you will actually build. A $500 rack you never buy organizes nothing. A $20-ish table that gets your switch, patch panel, router, and mini server off the floor is already a victory.
When You Should Not Use a LACK Rack
There are times when the IKEA LACK is the wrong answer. If you are mounting heavy full-depth servers, expensive storage arrays, enterprise UPS units, or production equipment that must stay online for business-critical work, use proper rack hardware. If equipment needs rear rails, locking doors, controlled airflow, grounded metal structure, or compliance documentation, a side table is not the hero of this movie.
Likewise, if your environment is dusty, hot, humid, or physically busy, consider an enclosed or purpose-built rack. A LACK setup is open and accessible, which is great for tinkering but less great for protecting gear from accidents.
Practical Example: A Small Home Network LACK Rack
Imagine a simple home setup: cable modem, router/firewall, 16-port switch, patch panel, small UPS, mini PC server, and two smart-home hubs. A LACK rack can organize this nicely.
Place the UPS at the bottom. Mount or shelf the patch panel near the front upper area. Put the switch below the patch panel so short patch cables can connect cleanly. Set the router and modem on a shelf with enough space for airflow. Place the mini PC on a ventilated tray. Attach smart-home hubs to the side or top area with removable mounting strips. Route power down one side and Ethernet down the other. Label the WAN cable, switch uplink, and important room runs.
The result is not a corporate network closet, but it is dramatically better than a pile of blinking boxes on a bookshelf. It is easier to troubleshoot, easier to clean, easier to expand, and less likely to make your home office look like a robot sneezed.
Real-World Experience: What Living With a LACK Rack Teaches You
The best thing about using an IKEA LACK for rackmount hardware is that it forces you to think practically. A commercial rack gives you structure by default. A LACK gives you a blank canvas, four legs, and a polite challenge: “So, how organized are you really?” That challenge can be useful.
In everyday use, the first lesson is that access matters more than perfection. A beautiful cable run is nice, but if you need twenty minutes to unplug one device, the design has failed. Keep the front clean, but leave enough slack at the back to pull gear forward slightly. Short patch cables look tidy, yet overly short cables can make maintenance miserable. The sweet spot is neat, labeled, and flexible.
The second lesson is that heat sneaks up slowly. At first, everything seems fine. The switch is warm, the mini PC is warm, the UPS is warm, and the room is warm because apparently your network stack has decided to cosplay as a space heater. Use your hand, a cheap thermometer, or device temperature readings to check the setup after it has been running for a few hours. If the air behind the rack feels trapped, move it farther from the wall or add quiet airflow.
The third lesson is that weight distribution is not optional. A small switch can hang happily. A deep server cannot be treated like a picture frame. Even if the front screws hold, the rear weight may twist the frame or stress the equipment. Shelves, rear supports, and bottom placement solve many problems before they start. When in doubt, support the device from underneath.
The fourth lesson is that the LACK rack is excellent for iteration. Want to move the router? Drill a pilot hole. Want to add a shelf? Add one. Want to test a different cable path? Undo the Velcro and try again. Unlike a pristine metal rack, a LACK table does not feel sacred. It invites experimentation, which is exactly what a learning-focused home lab needs.
The fifth lesson is aesthetic. A small, tidy LACK rack can live in an office, bedroom, media room, or maker corner without visually shouting “industrial basement.” Choose a color that matches the room, keep cables controlled, avoid overloading the top surface, and the whole setup can look intentional. Add a small label strip, a compact power monitor, or a clean cable tray, and suddenly your budget rack has personality.
Finally, a LACK rack teaches humility. It is a hack, not a miracle. It solves placement issues for lightweight and moderate home-lab gear, but it does not replace engineering judgment. The goal is not to prove that furniture can defeat physics. The goal is to create an affordable, useful, tidy, and safe home for your hardware. When used with common sense, the IKEA LACK is less of a joke and more of a gateway drug to better infrastructure.
Conclusion
Rackmount hardware placement issues do not always require a full server cabinet, a professional installer, or a budget that makes your wallet file a complaint. For small home labs, networking corners, AV setups, and lightweight rack gear, the IKEA LACK can be a clever, affordable, and surprisingly attractive solution.
The key is to use it wisely. Measure your gear, respect weight limits, support deep devices properly, manage cables, maintain airflow, and keep heavy equipment low. Do that, and the LACK becomes more than a side table. It becomes a compact rack-inspired workspace that turns chaos into order without turning your room into a data center.
So, if your switch is dangling, your router is buried, your patch cables are staging a rebellion, and a real rack feels like too much, the answer may be waiting in the furniture aisle. IKEA LACK to the rescuecape not included, Allen key probably included, dignity mostly preserved.