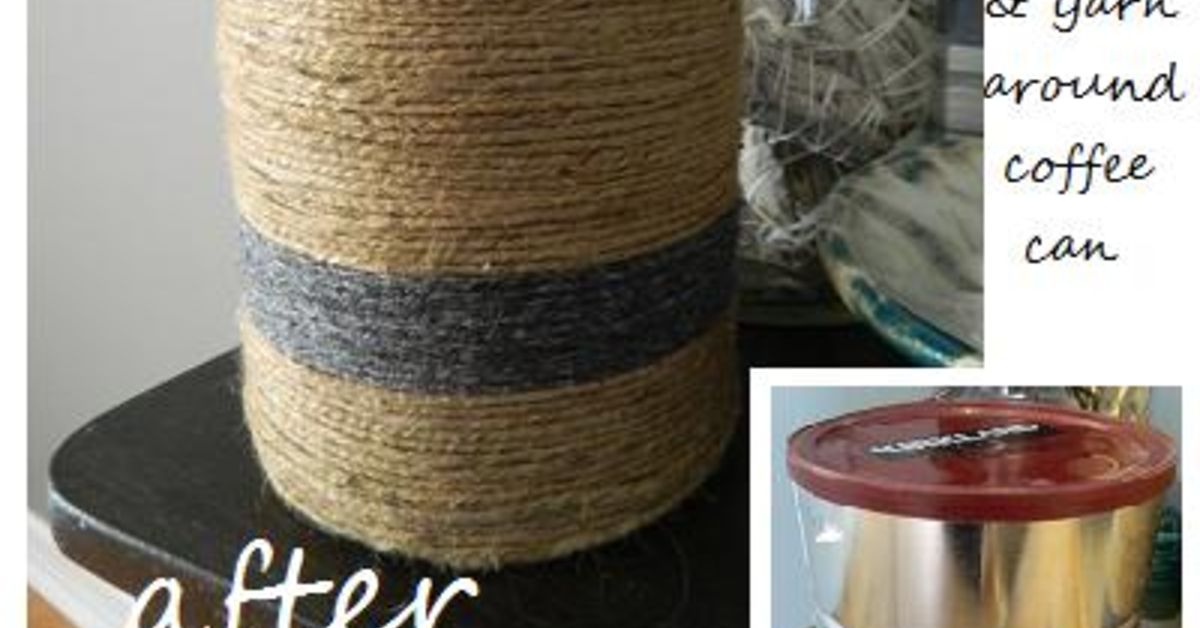
Somewhere in the average kitchen, a coffee can is quietly waiting for its second act. It has already done the noble work of holding your morning survival powder, but tossing it into the bin feels a little too abrupt. After all, it is sturdy, roomy, and often comes with a lid. That is not trash. That is a tiny storage unit wearing a grocery-store disguise.
A quick and easy coffee can makeover turns an empty coffee container into something useful, stylish, and surprisingly fun to make. With a little paint, fabric, twine, scrapbook paper, peel-and-stick wallpaper, or even leftover ribbon, you can create a DIY organizer, planter, utensil holder, craft supply bin, gift container, bathroom caddy, or farmhouse-style decorative piece. Best of all, this project does not require a garage full of power tools or the crafting confidence of someone who owns seven different glue guns. One clean can, a few simple supplies, and a free afternoon are enough.
This guide walks through practical coffee can makeover ideas, design tips, materials, safety notes, and real-life examples so you can turn an everyday container into something that looks intentional, not like you forgot to take out the recycling.
Why Coffee Cans Are Perfect for DIY Makeovers
Coffee cans are excellent candidates for upcycling because they are strong, lightweight, and usually shaped for easy storage. Metal coffee cans offer durability and a classic vintage look, while plastic coffee containers are easy to cut, paint, and carry. Many come with resealable lids, which makes them especially useful for organizing small household items.
Another reason coffee can crafts are so popular is their size. A coffee can is larger than a soup can but smaller than a bulky storage bin, which puts it in the sweet spot for everyday clutter: markers, paintbrushes, seed packets, clothespins, cookie cutters, tea bags, hair accessories, pet treats, garden gloves, batteries, receipts, small toys, or the mysterious cables nobody can identify but everyone is afraid to throw away.
Upcycling also supports the “reuse before recycle” mindset. Recycling is helpful, but reusing a container at home gives it immediate purpose and may reduce the need to buy another organizer. That is a win for your budget, your shelves, and the cabinet that keeps trying to become a junk drawer with doors.
Before You Begin: Clean, Prep, and Plan
A successful coffee can makeover starts with preparation. It is not glamorous, but neither is peeling wet paper off a half-painted can later. Start by removing the label, washing the container with warm soapy water, and drying it completely. If there is a lingering coffee smell, let the can sit open overnight with baking soda inside, then rinse and dry again.
Check the Edges
If you are using a metal coffee can, inspect the rim. Most modern coffee cans have smooth edges, but any sharp spots should be handled before decorating. Cover rough rims with painter’s tape, washi tape, ribbon, adhesive trim, or a fitted plastic lid. For projects involving kids, plastic coffee containers are often the easier and safer choice.
Choose a Purpose First
Decide what the can will become before decorating it. A planter needs drainage or an inner nursery pot. A bathroom holder needs a moisture-resistant finish. A gift container should keep the lid. A desk organizer may need dividers. Function decides the finish, and the finish decides whether your project looks charming or like it lost an argument with a craft drawer.
Basic Supplies for a Quick Coffee Can Makeover
You do not need every item on this list. Choose supplies based on the style you want and what you already have at home.
- Empty coffee can, cleaned and dried
- Acrylic paint, chalk paint, or spray paint suitable for the container material
- Primer for slick plastic or metal surfaces
- Foam brush or small paintbrush
- Scrapbook paper, fabric, wallpaper scraps, or napkins for decoupage
- Craft glue, decoupage medium, or hot glue
- Twine, jute rope, ribbon, lace, leather cord, or decorative trim
- Labels, chalkboard stickers, vinyl letters, or paint pens
- Clear sealer for durability
- Scissors, ruler, pencil, and measuring tape
The easiest version is paint plus label. The coziest version is twine plus fabric. The boldest version is bright paint plus patterned paper. The “I have watched too many home makeover shows and regret nothing” version includes all of the above.
Quick & Easy Coffee Can Makeover: Step-by-Step
Step 1: Remove the Label
Peel off the original coffee label. If glue remains, rub it with a little cooking oil, let it sit for a few minutes, then wash the can again. For stubborn adhesive, a gentle household adhesive remover can help. Make sure the surface is clean and dry before painting or gluing.
Step 2: Lightly Sand Slick Surfaces
For plastic or shiny metal cans, lightly scuff the outside with fine-grit sandpaper. This gives paint and glue a better grip. You are not trying to sand it into a new shape. A gentle once-over is enough.
Step 3: Apply Primer
Primer helps paint stick and reduces peeling. This is especially useful for plastic coffee containers, which can be stubborn little divas when paint is involved. Let the primer dry according to the product instructions.
Step 4: Paint or Wrap the Can
Apply two thin coats of paint instead of one thick coat. Thin coats dry smoother and look more professional. If you prefer a no-paint makeover, wrap the can with fabric, peel-and-stick wallpaper, scrapbook paper, contact paper, burlap, or jute rope. Measure the height and circumference first, cut the material slightly larger, and trim after attaching.
Step 5: Add Texture and Personality
This is where the makeover gets interesting. Add a band of twine around the middle, glue ribbon near the rim, attach a small wooden tag, or use a paint pen to write labels like “Tea,” “Markers,” “Seeds,” “Treats,” or “Emergency Chocolate.” That last one may be the most important household category.
Step 6: Seal the Finish
If the can will be handled often, used in the bathroom, placed near plants, or kept in the kitchen, add a clear sealer. Matte sealer creates a soft modern look, while gloss sealer makes colors pop. For outdoor use, choose an outdoor-safe finish and keep in mind that metal cans can rust over time if exposed to water.
Best Coffee Can Makeover Ideas
1. Farmhouse Utensil Holder
Paint a metal coffee can in white, cream, sage green, or matte black. Wrap the center with jute twine and add a small label that says “Spoons,” “Napkins,” or “Kitchen Tools.” This works beautifully for wooden spoons, spatulas, barbecue utensils, or picnic cutlery. A larger coffee can is stable enough to hold taller items without tipping over easily.
2. DIY Desk Organizer
Turn a coffee can into a pencil cup or desktop catchall. Paint it a cheerful color, then add dividers using cardboard tubes or folded cardstock. Use it for pens, scissors, markers, glue sticks, rulers, and paintbrushes. For a coordinated look, make three cans in different heights and group them on a tray.
3. Coffee Can Planter
A coffee can planter is one of the most practical upcycled home decor projects. Use it for herbs, small flowers, succulents, or faux greenery. If planting directly in the can, drainage is important. You can also avoid drilling by placing a nursery pot inside the decorated can and removing it for watering. This keeps the outside container cleaner and helps protect furniture from moisture.
4. Bathroom Storage Container
Cover a plastic coffee can with peel-and-stick wallpaper or waterproof contact paper, then use it to hold cotton balls, hair ties, bath bombs, extra razors, or rolled washcloths. Choose soft colors like white, beige, gray, eucalyptus green, or pale blue for a spa-inspired look. Add a lid if you want to hide clutter. Bathrooms are already full of bottles shouting for attention; your coffee can does not need to join the choir.
5. Craft Room Supply Bin
Craft rooms collect tiny items at a speed science has not yet fully explained. Buttons, beads, pom-poms, pipe cleaners, ribbon scraps, glue sticks, and googly eyes all need homes. Coffee cans make sturdy, stackable containers for these supplies. Keep the lids, add large readable labels, and use matching paper or paint to create a clean, organized look.
6. Rustic Flower Vase
Wrap a coffee can in burlap, twine, or textured fabric and use it as a vase for faux flowers, dried stems, or fresh flowers placed in a jar of water inside the can. This method protects the decorated exterior from leaks. It is perfect for farmhouse tables, entryway consoles, porch decor, or seasonal arrangements.
7. Gift Container
A decorated coffee can becomes a clever reusable gift box. Fill it with cookies, cocoa packets, craft supplies, gardening gloves, seed packets, candy, small toys, or self-care items. Cover the lid with matching paper or fabric, tie ribbon around the can, and add a handmade tag. It looks thoughtful without requiring you to wrestle with wrapping paper, which is basically a festive octopus.
Design Styles That Work Well
Modern Minimalist
Use matte black, white, clay, olive, or charcoal paint. Add a simple label in clean lettering. This style works well in kitchens, offices, and bathrooms. Keep decorations minimal and let the shape do the work.
Farmhouse and Rustic
Choose chalk paint, burlap, twine, buffalo-check ribbon, or distressed edges. Sand lightly after painting to create a worn finish. This look pairs well with herbs, wooden utensils, and dried flowers.
Colorful and Playful
Use bright acrylic paint, patterned paper, stickers, or washi tape. This is ideal for kids’ rooms, craft areas, classrooms, and playrooms. Make several cans in different colors to sort crayons, markers, building blocks, and small toys.
Vintage Coffee Bar
Lean into the coffee theme by using warm browns, cream paint, faux vintage labels, or typography. A coffee can makeover can hold stir sticks, sugar packets, tea bags, coffee filters, or pods near a coffee station. It is practical, attractive, and perfectly on brand with your caffeine-based lifestyle.
Common Mistakes to Avoid
The first mistake is skipping surface prep. Paint may look fine at first, then scratch off later if the can was greasy, dusty, or too slick. Clean, dry, scuff, and prime when needed.
The second mistake is using the wrong adhesive. Hot glue works well for rope, trim, and heavier accents, but decoupage medium is better for paper and fabric. Spray adhesive can work for large wraps, but it should be used carefully in a well-ventilated space.
The third mistake is forgetting water protection. If the can will hold plants, flowers, bathroom items, or kitchen tools, seal it properly. Moisture has a way of finding the one unsealed spot and making itself at home.
The fourth mistake is overdecorating. A coffee can is already a small object, so too many embellishments can make it look busy. Choose one main finish, one accent, and one label. When in doubt, stop before the glitter stages a takeover.
Practical Uses Around the House
A finished coffee can organizer can work in almost every room. In the kitchen, use it for utensils, coffee filters, snack packets, or cookie cutters. In the office, use it for pens, charging cords, sticky notes, or receipts. In the laundry room, store clothespins, dryer balls, stain-removal sticks, or lost socks waiting for their dramatic reunion.
In the garage, a coffee can can hold nails, screws, zip ties, paintbrushes, or small hand tools. In the garden shed, it can store seed packets, plant labels, gloves, or twine. In a classroom or homeschool space, decorated cans are great for crayons, flash cards, scissors, and reward stickers.
The lid is a major advantage. Unlike open baskets, lidded coffee cans hide visual clutter and protect contents from dust. If you are organizing small supplies, consider adding a label on both the side and the lid so you can identify the contents whether the can is on a shelf or stacked in a cabinet.
Budget-Friendly Tips
A coffee can makeover should not cost more than buying a new container. The charm is in using what you already have. Before shopping, check your home for leftover paint, wrapping paper, fabric scraps, paper grocery bags, old maps, book pages from damaged books, ribbon from gifts, buttons, lace, or leftover wallpaper samples.
For a high-end look on a low budget, use neutral paint and one natural texture such as rope, leather cord, or wood beads. Repetition also makes inexpensive projects look more polished. Three matching coffee cans on a shelf look like a planned storage system. One lonely can with random stickers may look like it is still searching for its purpose.
Real-Life Experiences With Quick & Easy Coffee Can Makeovers
The first time I tried a coffee can makeover, I expected a cute container and got something closer to a personal lesson in patience. I had an empty metal coffee can, a half-used bottle of white craft paint, and the confidence of someone who had not yet learned that glossy surfaces do not automatically welcome paint like an old friend. I brushed on one thick coat, admired it for about five minutes, and then watched a tiny scratch peel back like a bad sunburn. Lesson one: primer is not optional when the surface is slick. It is the quiet hero of the project.
On the second attempt, I slowed down. I washed the can, dried it fully, lightly sanded it, added primer, and painted two thin coats. Suddenly, the project looked less like “school project due tomorrow” and more like something that belonged on a kitchen counter. I wrapped jute twine around the lower third, added a small kraft paper label, and used it to hold wooden spoons. The funny part was that guests noticed it. Not the expensive appliance nearby. Not the carefully arranged fruit bowl. The coffee can. Apparently, people love a good trash-to-treasure plot twist.
Another useful makeover was for a desk organizer. Instead of buying a new pencil cup, I covered a plastic coffee container with leftover peel-and-stick wallpaper. I kept the lid, cut a neat slit in the top, and turned it into a receipt holder. It became the place where small paper chaos went to behave itself. The lid made all the difference because it hid the mess while still keeping everything accessible. That is the dream: organization without having to look directly at your own disorganization.
A planter version taught me another important lesson: drainage matters. I once placed soil directly into a decorated can without thinking through watering. The plant survived, but the can did not age gracefully. After that, I started placing a small nursery pot inside the coffee can instead. It is cleaner, easier, and much better for indoor use. When the plant needs water, I remove the inner pot, water it at the sink, let it drain, and return it to the decorative can. Simple, tidy, and no surprise puddles on the windowsill.
The most successful coffee can makeovers usually share three qualities: they serve a real purpose, match the room where they live, and are not overcomplicated. A can wrapped in rope can look rustic. A can painted matte black can look modern. A can covered in bright paper can make a kids’ art table feel cheerful. The project does not need perfection. In fact, tiny imperfections often make handmade decor feel warmer. The goal is not to fool anyone into thinking you bought it at a boutique. The goal is to make something useful, attractive, and personal from an item most people overlook.
That is the best part of a quick and easy coffee can makeover. It changes how you see ordinary things. Once you turn one empty container into a planter, organizer, or gift box, you start looking at jars, boxes, tins, and baskets differently. Suddenly, the recycling bin looks less like an ending and more like a craft supply aisle with questionable lighting.
Conclusion
A quick and easy coffee can makeover is one of the simplest ways to add storage, personality, and creativity to your home without spending much money. With basic prep, the right finish, and a clear purpose, an empty coffee can can become a stylish planter, desk organizer, utensil holder, gift container, bathroom caddy, or craft supply bin. The project is beginner-friendly, budget-friendly, and flexible enough for almost any decor style.
The key is to keep it useful. Paint it well, decorate with intention, seal it when needed, and give it a job. When a coffee can has a purpose, it stops looking like packaging and starts looking like clever home decor. Not bad for something that used to hold breakfast motivation.
Note: For planters, protect surfaces by using an inner nursery pot or adding proper drainage. For containers used around children, cover or smooth any rough edges before decorating.