Plywood floors are the home-improvement world’s charming underdog. They are not as glamorous as walnut planks, not as polished as engineered oak, and certainly not the flooring option your realtor will whisper about in a reverent tone. Yet plywood flooring has something many homeowners love: it is affordable, flexible, surprisingly attractive, and very DIY-friendly when installed correctly.
If you have ever pulled up old carpet and stared at a subfloor while thinking, “Could I just make this work?” you are not alone. Many budget-conscious renovators have turned plywood into a finished floor in bedrooms, cabins, studios, laundry rooms, workshops, rental refreshes, and even stylish living spaces. With good material, careful prep, and a tough finish, plywood can look warm, modern, rustic, painted, stained, whitewashed, or intentionally minimalist.
But let’s be honest: plywood floors are not magic. They are wood, and wood has opinions. It swells when damp, dents under abuse, shows seams if you ignore layout, and punishes lazy sanding like a strict shop teacher. This guide explains what plywood flooring is, when it makes sense, what grade to buy, how to install it, how to finish it, and what real-life experiences can teach you before you start turning sheets of plywood into something your guests will compliment instead of politely stepping around.
What Are Plywood Floors?
Plywood is an engineered wood panel made from thin layers of wood veneer glued together with alternating grain direction. That cross-grain construction gives plywood strength and stability compared with a single slab of wood. In traditional flooring systems, plywood is usually hidden as a subfloor or underlayment beneath hardwood, tile, vinyl, laminate, or carpet. In a plywood floor project, the plywood becomes the visible walking surface.
There are two common approaches. The first is using full or partial plywood sheets as a finished floor. The second is cutting plywood into planks, strips, squares, or geometric shapes to mimic hardwood, parquet, or custom wood tile. Both methods can work beautifully, but they require different amounts of labor. Full sheets are faster. Planks look more like traditional wood flooring but demand more measuring, cutting, sanding, and patience. In other words, plywood planks are where your tape measure goes to test your character.
Why Choose Plywood Flooring?
The biggest reason homeowners choose plywood floors is cost. Hardwood flooring can be expensive, especially after adding labor, trim, underlayment, transitions, and finishing. Plywood gives DIYers a way to create a real wood surface for a fraction of the price. It also offers creative freedom. You can paint it a glossy black, stain it honey brown, whitewash it for a Scandinavian look, seal it clear for a raw modern vibe, or stencil it into something that looks like it escaped from a boutique hotel.
Plywood also works well in spaces where perfect luxury is not the goal. A guest room, attic office, craft room, basement studio, small cabin, mudroom, or workshop can look dramatically better with properly finished plywood than with tired carpet or bare subfloor. It is especially appealing when you want a warm, handmade look rather than a showroom-perfect surface.
Pros and Cons of Plywood Floors
Pros
Plywood floors are budget-friendly, widely available, and easy to customize. They can be cut with common woodworking tools and installed by experienced DIYers without specialized flooring machinery. Because plywood comes in large panels, it can cover a room quickly. If you cut it into planks, you can create wide-plank flooring at a much lower cost than solid hardwood.
Another advantage is design flexibility. Paint hides imperfections and lets you choose any color. Stain highlights grain and gives a more natural wood appearance. Polyurethane, floor enamel, or other durable coatings can protect the surface from daily wear. Plywood is also easier to patch than many people expect. A damaged plank can sometimes be sanded, filled, painted, or replaced without tearing out the whole room.
Cons
Plywood floors are not as durable or value-boosting as high-quality hardwood. The face veneer can be thin, which means aggressive sanding can cut through the attractive top layer. Cheaper plywood may have voids, patches, knots, rough grain, or football-shaped repairs that become very obvious after staining. Moisture is another concern. Plywood can swell, delaminate, cup, or warp if exposed to leaks, standing water, or damp conditions.
It is also important to manage expectations. Plywood floors may show seams, fastener heads, grain variation, and small irregularities. Some people call that character. Other people call it “why is my floor looking at me like that?” If you want a flawless luxury finish, plywood may not be your best match. If you like a practical, creative, budget-conscious floor with personality, plywood deserves a serious look.
Best Types of Plywood for Floors
Not all plywood is created equal. For a finished plywood floor, appearance matters as much as strength. Sanded plywood, cabinet-grade plywood, hardwood plywood, birch plywood, maple plywood, oak plywood, and AC-grade plywood are common choices for visible floors. These panels typically have a smoother face than rough sheathing plywood. If you plan to stain the floor, choose the best-looking face veneer you can afford because stain will highlight both beauty and flaws with equal enthusiasm.
For painted floors, you can get away with slightly less attractive plywood, but the surface still needs to be smooth, stable, and free from major defects. Avoid warped sheets, damaged edges, deep voids, and panels with loose veneer. Pressure-treated plywood is usually not ideal for interior finished floors because it can contain chemicals, may be damp when purchased, and often does not finish as cleanly as sanded interior panels.
Plywood Grades Explained Simply
Plywood grades describe the quality of the face and back veneers. An A-grade face is usually smooth and paintable or stainable with minimal defects. B-grade may have small repairs. C-grade and D-grade panels are rougher and more appropriate for structural uses where appearance is not the priority. For a finished plywood floor, A-C plywood is a popular budget option because one side is attractive enough to face up while the underside can be less refined.
If you are installing plywood as a subfloor under another floor covering, tongue-and-groove plywood rated for flooring is often recommended because it creates stronger panel edges and helps reduce squeaks. For a visible plywood floor, tongue-and-groove panels can still be useful, but many DIYers choose sanded panels or cut plywood planks instead.
Where Plywood Floors Work Best
Plywood flooring works best in dry interior spaces with moderate traffic. Bedrooms, offices, guest rooms, playrooms, closets, hobby rooms, finished attics, cabins, and creative studios are strong candidates. These areas usually do not face the same moisture risk as bathrooms, kitchens, laundry rooms, or entryways.
That does not mean plywood can never be used in a kitchen or mudroom, but the finish must be tough, seams should be sealed carefully, and rugs or mats should be placed where water commonly lands. Bathrooms are risky because humidity and splashes are part of the daily routine. If a room regularly behaves like a small indoor rainforest, plywood flooring may not be thrilled.
Planning the Layout
Good plywood floors start with layout. Before cutting anything, measure the room carefully and decide whether you want full panels, large squares, wide planks, narrow planks, diagonal strips, herringbone-style pieces, or a painted pattern. Dry-lay pieces when possible to preview seams and avoid awkward slivers at walls or doorways.
For plank-style plywood floors, stagger the seams so the floor looks intentional rather than like a spreadsheet made of wood. Randomized seams often look more natural than stair-step patterns. Leave expansion gaps at walls, usually hidden later by baseboards or shoe molding. Wood expands and contracts, and trapping it tightly against walls is a wonderful way to create future drama.
Preparing the Subfloor
The subfloor must be clean, dry, flat, and structurally sound before plywood flooring goes down. Remove old carpet staples, tack strips, adhesive lumps, loose nails, dust, and debris. Walk the floor and listen for squeaks. Drive screws into joists where needed to tighten loose areas. If the subfloor is uneven, sand high spots and fill low spots with appropriate floor patching compound.
Moisture matters. Plywood panels should be stored indoors and allowed to acclimate to the room before installation. Stand panels on edge with airflow around them for several days when possible. This helps the wood adjust to indoor temperature and humidity before it is fastened in place. Skipping acclimation is not always disastrous, but it increases the chance of movement after installation.
How to Install Plywood Floors
Step 1: Choose the Material
Select plywood based on your finish plan. For stained floors, buy attractive hardwood plywood with a consistent face. For painted floors, smooth sanded plywood can work well. Inspect every sheet before purchase. Look for flat panels, clean faces, solid edges, and minimal repairs. The best sheet is not always the one on top of the stack, because the top sheet has often lived a hard retail life full of cart dents and mystery footprints.
Step 2: Cut the Panels or Planks
If you want planks, rip plywood sheets into consistent widths using a table saw, circular saw with a guide, or track saw. Common widths range from 4 to 12 inches, but wider planks give a bolder rustic look. Sand cut edges lightly to remove splinters. Label or stack pieces by size if your room has a planned pattern.
Step 3: Dry-Fit the Floor
Lay out pieces before fastening. Check the look of seams, grain direction, and end joints. Adjust boards so highly visible areas receive the best-looking pieces. Save less attractive pieces for closets, corners, or under furniture. This is not cheating. This is design strategy wearing a tool belt.
Step 4: Fasten Securely
Use construction adhesive and finish nails, brad nails, or screws depending on the system, subfloor, and desired look. Screws offer strong holding power but leave visible heads unless countersunk and filled. Nails are easier to hide but may not hold as aggressively. Fastener spacing should be consistent, and panels should be secured tightly to reduce squeaks and movement.
Step 5: Fill Gaps and Holes
Use wood filler for nail holes, screw holes, and minor gaps. Choose stainable filler if staining, or paintable filler if painting. Be realistic: filler may absorb stain differently than plywood, so test first. For a rustic floor, tiny seams can look natural. For a sleek painted floor, careful filling and sanding are essential.
Step 6: Sand Thoroughly
Sanding turns plywood from “construction material” into “possible flooring.” Start with a grit appropriate to the surface condition and progress to finer grits. Do not oversand thin veneer. Vacuum thoroughly and wipe away dust before finishing. Dust left on the floor will become part of the finish, and not in a charming heirloom way.
Finishing Options for Plywood Floors
Painted Plywood Floors
Paint is one of the most forgiving and stylish options. Use a durable porch and floor paint, floor enamel, or coating designed for wood floors. Proper prep is critical: sand, clean, prime if required, and follow the manufacturer’s drying and recoating instructions. Painted plywood can be solid, striped, checkerboarded, stenciled, or patterned. It is a great choice when the plywood face is not pretty enough to stain.
Stained Plywood Floors
Stain can make plywood look warmer and more like traditional wood flooring, but it is less forgiving than paint. Plywood veneers may absorb stain unevenly, especially around patches, grain changes, and filled areas. Apply a wood conditioner if recommended, test stain on scrap pieces, and choose attractive plywood from the beginning. Clear polyurethane over stain adds protection and depth.
Clear Sealed Plywood Floors
A clear finish keeps the pale, modern look of plywood visible. This can be beautiful in minimalist interiors, studios, and Scandinavian-inspired rooms. Use multiple coats of water-based or oil-based polyurethane rated for floors. Water-based finishes dry clearer and usually keep the wood lighter. Oil-based finishes can add amber warmth but may take longer to dry and produce stronger odor.
Whitewashed or Pickled Plywood
Whitewashing softens the grain while keeping texture visible. It works well in beachy, cottage, farmhouse, and light modern spaces. As with stain, test first. Some plywood takes whitewash beautifully; some looks like it lost a fight with diluted paint. Samples are your friend.
Maintenance Tips
Maintain plywood floors like other wood floors. Sweep or vacuum regularly to remove grit that can scratch the finish. Use damp cleaning methods, not soaking-wet mops. Wipe spills quickly. Add felt pads under furniture legs. Use rugs in high-traffic zones, but avoid rug pads that may discolor the finish. Recoat the surface when wear becomes visible, especially in pathways, chair areas, and entry points.
Painted plywood floors may need touch-ups over time. Clear-coated floors may need a light sanding and fresh topcoat. The good news is that plywood is friendly to practical maintenance. It does not demand perfection. It simply asks that you do not flood it, gouge it, or drag a refrigerator across it while saying, “It’ll be fine.” It will not be fine.
Common Mistakes to Avoid
Using the Cheapest Plywood Available
Cheap plywood can be useful for hidden structural work, but finished floors need a decent face. Low-grade panels often have rough patches, voids, knots, and inconsistent grain. If you are staining, the wrong plywood will announce every flaw under the finish.
Ignoring Moisture
Moisture is the villain in many flooring stories. Do not install plywood over damp subfloors. Do not use it in leak-prone areas without a serious protection plan. Do not skip sealing edges if spills are likely. Water and plywood can coexist only when boundaries are respected.
Skipping Sanding
Sanding is dusty, boring, and completely necessary. Rough plywood catches socks, collects dirt, and makes finishes look amateur. Sanding between finish coats can also improve smoothness and durability.
Forgetting Expansion Gaps
Plywood moves with humidity changes. Leave space at the perimeter and cover it with trim. A floor installed too tightly can buckle or create ridges when humidity rises.
Choosing the Wrong Finish
Wall paint is not floor paint. It was not born for shoes, chairs, pet claws, dropped keys, or rolling office chairs. Use coatings designed for floor traffic. Your future self, standing in the room with a mop and fewer regrets, will appreciate it.
Is Plywood Flooring Right for Your Home?
Plywood flooring is right for homeowners who value creativity, affordability, and hands-on work. It is a strong choice when the budget is tight but the room still deserves personality. It is also great for people who enjoy a handmade finish and do not panic over small imperfections.
It may not be right if you want maximum resale value, luxury durability, or a flawless factory finish. In high-end spaces, traditional hardwood, engineered wood, tile, or luxury vinyl may make more sense. But for a smart DIY upgrade, plywood flooring can be a surprisingly stylish solution.
Real-World Experiences With Plywood Floors
One of the most helpful lessons from plywood floor projects is that the final result depends less on the idea and more on execution. Two homeowners can buy similar plywood and end up with totally different floors. One looks like a warm custom wood installation. The other looks like someone panicked during a renovation and nailed down a lumber aisle. The difference is usually preparation, layout, sanding, and finish.
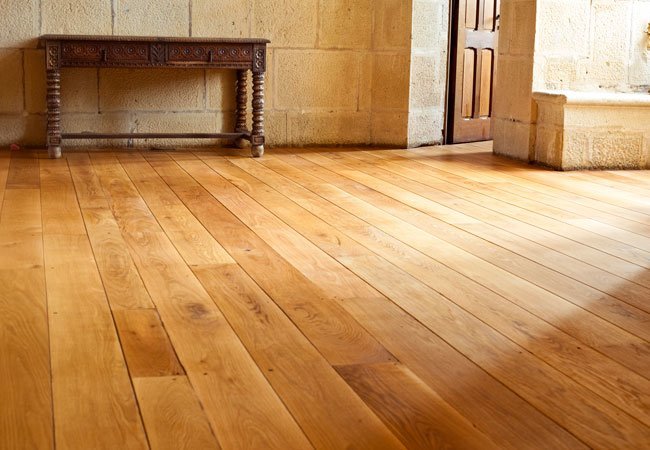
In a bedroom, plywood floors can be a fantastic budget upgrade. Bedrooms usually have lighter foot traffic, fewer spills, and more rugs, which makes them forgiving spaces for a first project. A homeowner might remove old carpet, clean the subfloor, install cut plywood planks, sand everything smooth, apply a medium brown stain, and seal with several coats of polyurethane. Add baseboards and a rug, and the room suddenly feels intentional rather than temporary.
In a workshop or studio, painted plywood floors can be even more practical. A durable gray, black, navy, or warm white floor paint can hide imperfections and create a clean backdrop for creative work. If the surface gets scratched, touch-ups are easy. This is one reason plywood floors appeal to makers, artists, and DIYers. The floor does not need to be precious. It needs to be useful, decent-looking, and repairable after someone drops a clamp, paintbrush, or emotional support coffee mug.
Cabins and small homes are another natural fit. Plywood floors can create a relaxed, rustic look that suits casual living. Wide plywood planks with visible grain can feel cozy and unfussy. In these spaces, the occasional dent or seam does not ruin the design; it becomes part of the story. A cabin floor should be able to survive muddy boots, dog naps, and someone saying, “Let’s just bring the firewood inside real quick.”
The experience changes in kitchens and bathrooms. Some homeowners successfully use plywood floors in kitchens, but they usually protect the surface carefully with multiple finish coats and rugs near the sink. Even then, dropped water, dishwasher leaks, and chair movement can create wear. Bathrooms are more difficult because humidity and splashes are constant. If you love plywood but need flooring for a wet area, consider using it somewhere else and choosing tile, vinyl, or another water-resistant surface for the bathroom.
Another real-world lesson is that stain testing is not optional. Plywood can surprise you. A stain that looks rich on a hardwood sample may look blotchy on plywood. Wood conditioner can help, but it will not turn low-grade plywood into premium oak. Testing stain, paint, and polyurethane on leftover scraps gives you a preview before the whole room becomes a very large experiment.
Finally, expect maintenance. Plywood floors can last, but they are not indestructible. Chair legs need pads. Entry areas need mats. Spills need quick cleanup. High-traffic areas may need fresh finish over time. That said, many homeowners appreciate the honesty of plywood flooring. It is not pretending to be marble. It is not pretending to be luxury hardwood. It is a smart, adaptable material that rewards careful work and forgives a little real life.
Conclusion
Plywood floors are proof that good design does not always require the most expensive material in the room. With the right plywood, a dry and stable subfloor, thoughtful layout, careful sanding, and a durable finish, plywood can become a handsome finished floor for a surprisingly modest budget. It can be rustic, modern, painted, stained, playful, practical, or quietly elegant.
The key is to treat plywood like a real flooring material, not a shortcut. Choose quality panels, acclimate them, plan seams, fasten securely, sand patiently, and protect the surface with a finish made for foot traffic. Do that, and plywood floors can deliver the kind of satisfying DIY transformation that makes you glance down and think, “Not bad for a sheet good.”
Editorial note: This article is written for general home-improvement education. Always follow local building codes, product manufacturer instructions, and professional guidance when structural issues, moisture problems, or major flooring repairs are involved.