A paver patio can turn an ordinary patch of grass into a proper outdoor room: a place for grilled burgers, sleepy Sunday coffee, and the occasional attempt to keep children away from the garden hose. But before you start picking colors with names like “Autumn Blend” and “Weathered Granite,” it helps to understand what a paver patio really costs.
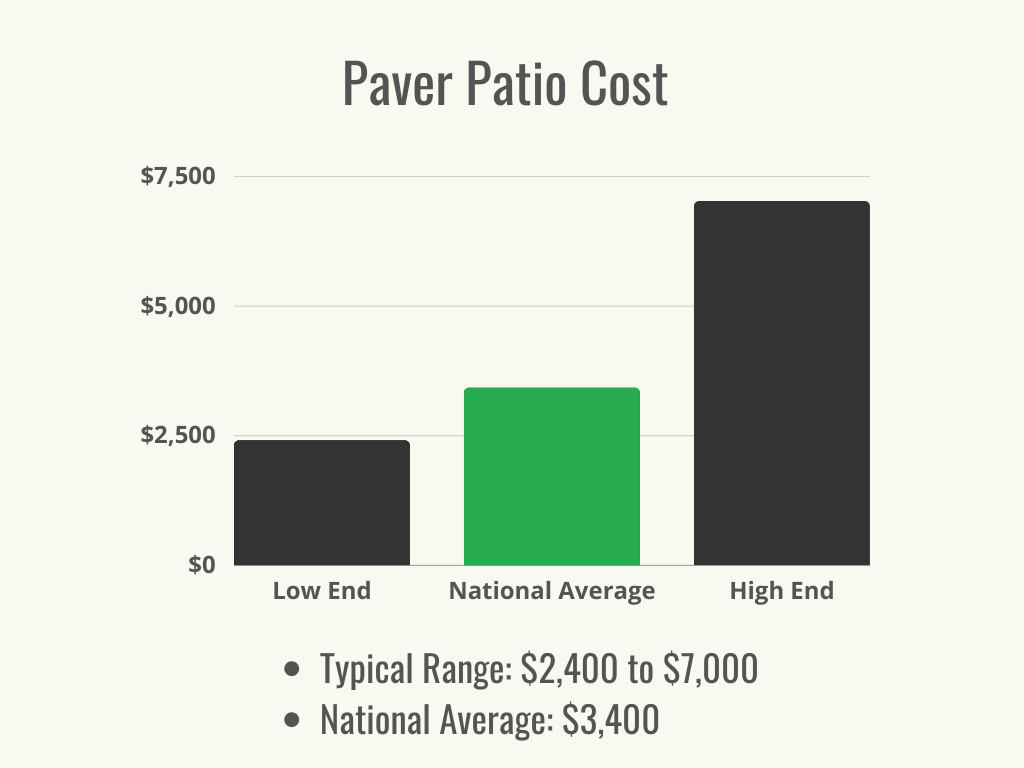
In the United States, a professionally installed paver patio commonly falls in the range of about $8 to $25 or more per square foot, depending on the material, patio size, site conditions, labor rates, drainage needs, and design complexity. A basic rectangular concrete paver patio may be fairly manageable, while a curved natural-stone patio with steps, lighting, and a fire pit can make your budget stretch like pizza dough.
This guide breaks down the real cost drivers, typical project budgets, money-saving strategies, and lessons that can help you plan a patio without being surprised by a quote that suddenly develops extra zeroes.
Paver Patio Cost at a Glance
For a simple planning number, many homeowners budget $12 to $30 per square foot for a standard professionally installed patio using concrete or brick pavers. Premium materials, difficult sites, custom borders, drainage work, and built-in features can push the total well above that range.
| Patio Size | Square Footage | Typical Budget Range | Best For |
|---|---|---|---|
| 10 x 12 feet | 120 sq. ft. | $1,500 to $3,600 | Small seating nook or grill area |
| 12 x 16 feet | 192 sq. ft. | $2,300 to $5,800 | Compact dining patio |
| 16 x 20 feet | 320 sq. ft. | $3,800 to $9,600 | Dining table, lounge furniture, and grill |
| 20 x 20 feet | 400 sq. ft. | $4,800 to $12,000 | Large entertaining area |
These are budgeting ranges, not guaranteed quotes. A flat backyard with easy access can cost much less than a sloped yard where installers must haul materials through a narrow side gate one wheelbarrow at a time. Wheelbarrows are useful, but they are not known for their speed or emotional resilience.
What Determines the Cost of a Paver Patio?
1. Patio Size
Size is the biggest cost factor because nearly every part of the project grows with square footage: pavers, gravel base, leveling sand, edge restraints, labor, cutting, delivery, and hauling. To calculate square footage, multiply the patio’s length by its width. A 16-by-20-foot patio equals 320 square feet.
Larger patios may have a slightly lower cost per square foot because crews can work more efficiently on a broad, straightforward layout. However, that discount disappears quickly when the design includes curves, multiple levels, circular patterns, or a maze of borders that requires frequent cutting.
2. Paver Material
The paver itself can be one of the most visible budget choices. Concrete pavers are usually the most affordable and widely available option. They come in many shapes, colors, and finishes, from modest rectangles to large-format slabs designed for a modern backyard look.
Brick pavers often cost more than standard concrete pavers but offer a timeless appearance that works especially well with traditional homes. Natural stone, such as bluestone, travertine, flagstone, or limestone, generally sits at the premium end because the material is heavier, often irregularly shaped, and more labor-intensive to install.
Porcelain pavers are another upscale choice. They can mimic stone, concrete, or wood while offering a sleek appearance and relatively low maintenance. Their higher product cost and installation requirements can make them a better fit for homeowners who value a polished, contemporary finish.
3. Base Preparation and Excavation
The glamorous part of a paver patio is the surface you see. The expensive, important part is usually the layer you do not see. A durable patio depends on proper excavation, compacted aggregate base, leveling sand, and edge restraints.
For many patios, installers excavate the area, remove soil, install a crushed-stone base, compact it in layers, add bedding sand, then place the pavers. A properly built base helps prevent shifting, low spots, puddles, and the sad “why does my patio feel like a miniature ski slope?” moment.
Soft clay soil, poor drainage, freeze-thaw conditions, tree roots, and previous fill dirt can all increase the cost of base preparation. In some yards, geotextile fabric, extra aggregate, drainage channels, or grading work may be needed before the patio can be installed correctly.
4. Shape, Pattern, and Cutting
A square or rectangular patio is usually the most cost-efficient shape because it creates less waste and requires fewer cuts. Curved edges, circles, arcs, fan patterns, herringbone layouts, and decorative borders look fantastic, but they also increase labor.
Every custom cut takes time. Every unusual angle creates waste. Every elegant circular fire-pit area eventually involves someone measuring, trimming, remeasuring, and quietly questioning their career choices. A complex pattern can be worth the added investment, but it should be a deliberate design choice rather than an accidental budget surprise.
5. Labor Rates and Site Access
Labor costs vary by region. Higher-cost metro areas and locations with strong demand for skilled hardscape installers often have higher quotes. Labor also rises when access is difficult. If a crew can bring a skid steer close to the patio area, excavation and material movement may be faster. If everything must travel through a narrow gate, around a pool, and past a prized rose garden, expect more labor hours.
Ask every contractor how they plan to access the site. The answer can reveal whether your quote includes realistic labor or a future change order waiting quietly in the bushes.
6. Drainage, Grading, and Permits
Water is the quiet villain of outdoor construction. A patio should slope away from the home so water does not collect near the foundation. If the existing yard slopes toward the house, installers may need to regrade the area, add drainage components, or redesign the patio elevation.
Permeable pavers can be worth considering in areas with heavy rainfall, runoff concerns, or local stormwater rules. They allow water to pass through wider joints and into a specially designed base below. They can cost more upfront, but they may solve drainage issues that would otherwise require separate work.
Most basic ground-level patios do not require a building permit, but local rules vary. Permits may be more likely when a project includes electrical work, gas lines, retaining walls, major grading, structural covers, or drainage changes. Check local requirements before work starts, not after the patio is already halfway built and your inspector is suddenly part of the family.
Typical Paver Patio Cost by Project Style
Budget Patio: $1,500 to $4,000
A budget-friendly paver patio is usually small, simple, and rectangular. Think concrete pavers, a basic running-bond or stacked pattern, limited cuts, and no major grading problems. A 10-by-12-foot patio can create a useful grilling or seating area without taking over the entire yard or your savings account.
Mid-Range Patio: $4,000 to $10,000
This range often includes a larger patio, upgraded concrete pavers or brick pavers, more detailed edging, a few curves, and professional installation. A 16-by-20-foot patio in this category can comfortably hold a dining table, chairs, grill, and lounge seating.
Premium Patio: $10,000 to $25,000 or More
Premium projects often include natural stone, porcelain pavers, multilevel designs, retaining walls, built-in seating, steps, lighting, fire features, outdoor kitchens, or major drainage work. These patios can feel like a true extension of the home, but they should be planned as a complete outdoor-living project rather than a simple paving job.
Common Add-Ons That Increase Paver Patio Costs
- Demolition and removal: Removing an old concrete slab, deck, asphalt pad, or overgrown landscaping can add meaningful labor and disposal costs.
- Retaining walls: Walls are often needed for sloped yards or raised patios and can become one of the largest line items.
- Steps: Even a few steps require careful layout, strong base preparation, and additional materials.
- Fire pits: A simple wood-burning fire pit may be affordable, while built-in gas fire features require more materials and professional utility work.
- Lighting: Low-voltage path lights, stair lights, and patio lighting improve usability but add electrical and installation costs.
- Seat walls: Built-in seating looks polished and saves space, but it adds masonry labor and materials.
- Pergolas and patio covers: These can dramatically improve comfort but should be budgeted separately from the patio surface.
- Outdoor kitchens: Cabinets, counters, gas lines, plumbing, and appliances can quickly turn a modest project into a major renovation.
How to Budget for a Paver Patio Without Cutting the Wrong Corners
Start With Function, Not Just Square Footage
Before choosing pavers, decide how you will use the patio. A small bistro table needs far less space than a dining table for eight, a grill station, and two lounge chairs. Map your furniture with painter’s tape, stakes, or even cardboard before finalizing the size.
Many homeowners discover that a patio designed around actual furniture dimensions works better than a patio designed around a number that simply sounded nice. “Let’s make it 300 square feet” is not a plan. “We need room for six chairs, a grill, and nobody falling into the hydrangeas” is a plan.
Keep the Main Shape Simple
A rectangular patio with one attractive border often delivers a cleaner look and a lower price than an elaborate shape. You can add visual interest through furniture, planters, lighting, and landscaping instead of turning every edge into a geometry exam.
Set Aside a Contingency Fund
Reserve roughly 10% to 20% of the project budget for surprises, especially if your yard has drainage problems, buried roots, unstable soil, or an old patio that needs removal. A contingency fund is not wasted money. It is the difference between handling a surprise calmly and attempting to negotiate with a tree stump at sunset.
Buy Enough Pavers
Order extra material for cuts, breakage, and future repairs. A common planning approach is to add about 5% to 10% more pavers than the measured square footage requires, especially for diagonal patterns, curves, or irregular natural stone. Keeping a few spare pavers is much easier than hunting for a discontinued color five years later.
Compare Quotes Carefully
Get at least three detailed written estimates. Do not compare only the final number. Compare the scope of work. One contractor may include excavation, gravel, compaction, edging, polymeric sand, cleanup, and drainage. Another may quote only the visible pavers and leave the expensive essentials lurking in the fine print.
What Should Be Included in a Paver Patio Quote?
A reliable estimate should clearly state:
- Patio dimensions and total square footage
- Paver brand, style, color, and pattern
- Excavation depth and soil removal
- Base material and compaction method
- Leveling sand or bedding layer
- Edge restraints
- Drainage and grading details
- Polymeric sand or jointing material
- Cutting, borders, steps, and decorative features
- Cleanup, disposal, and warranty details
If a quote does not mention the base, slope, edge restraint, or jointing material, ask questions. Those details are not glamorous, but neither is paying twice for the same patio.
Is a DIY Paver Patio Cheaper?
DIY installation can save on labor, especially for a small and simple patio. However, materials, tool rentals, delivery fees, disposal costs, compactor rental, saw blades, and the time required can add up quickly. Installing pavers is physically demanding work, and proper base preparation is not optional.
A confident DIY homeowner may do well with a small, flat, low-stakes patio or garden path. Larger patios, sloped yards, poor drainage, retaining walls, steps, and projects near the home’s foundation are usually safer investments when handled by an experienced hardscape contractor.
The best compromise for some homeowners is to handle the design, demolition, furniture planning, landscaping, or final planting themselves while hiring professionals for excavation, base preparation, and paver installation.
Long-Term Costs: Maintenance and Repairs
Paver patios require maintenance, but they offer one practical advantage over a solid concrete slab: individual pavers can often be lifted and reset if a small section settles. That can make localized repairs less dramatic than repairing a cracked or uneven slab.
Plan for occasional sweeping, joint-sand touch-ups, weed control, cleaning, and replacement of damaged pavers. Some pavers may benefit from sealing, but the best schedule depends on the paver material, finish, climate, and manufacturer recommendations. Avoid assuming that every patio needs the same maintenance routine.
Experiences and Lessons From Planning a Paver Patio
The most useful paver patio experiences tend to have one thing in common: homeowners usually remember the preparation more than the pavers. Nobody invites friends outside and says, “Please admire my excellent aggregate depth,” but a stable patio is exactly why guests can walk around without balancing like they are crossing a rope bridge.
One common experience is underestimating how much space outdoor furniture occupies. A homeowner may picture a six-seat dining set on a 12-by-12-foot patio and assume it will fit comfortably. Technically, it may fit. In the same way, a suitcase technically fits when you sit on it and pray. Once chairs are pulled out, people need room to walk, and a grill is added, the patio can feel cramped. Planning around real furniture dimensions often leads to a slightly larger but much more useful design.
Another frequent lesson involves drainage. A patio can look perfect on installation day and still cause trouble if water is directed toward the house, collects near the edge, or settles in low spots. Homeowners who invest in grading and proper slope often say it was not the most exciting line item in the quote, but it was one of the smartest. Good drainage is a little like a backup generator: nobody brags about it until it saves the day.
Material selection also creates strong opinions. Many homeowners start with the least expensive paver, then fall in love with a premium color blend, tumbled edge, or large-format slab at the showroom. The key lesson is not to avoid upgrades entirely. It is to choose one or two features that matter most. Perhaps the patio gets better pavers, but keeps a simple rectangular shape. Or perhaps the homeowner chooses standard concrete pavers and spends the savings on a fire pit, lighting, or landscaping. A project feels more satisfying when the money is spent intentionally rather than scattered across a dozen “just one more thing” decisions.
People also learn that contractor communication can be just as valuable as the pavers themselves. The best experiences usually involve a clear plan for excavation, base depth, slope, material delivery, property access, cleanup, and weather delays. Homeowners who ask detailed questions before work begins tend to have fewer surprises later. Asking how deep the excavation will be, where soil will go, and how the patio will drain is not being difficult. It is being the person who would prefer a patio over a backyard archaeology project.
Finally, many homeowners discover that a phased project can be a smart financial choice. Building the patio first, then adding a pergola, outdoor kitchen, planter walls, or lighting later can spread costs over time. The important part is planning for future additions early. Running conduit before pavers are installed, leaving room for a future seat wall, or selecting a layout that can expand later may cost little now and save significant money later. A well-planned patio does not have to be built all at once. It simply needs a clear destination.
Final Thoughts
A paver patio is more than a hardscape expense. It is an investment in how you use your yard. The smartest budget is not necessarily the cheapest one; it is the one that protects the base, handles drainage correctly, fits your real lifestyle, and leaves enough room for the details that make the space enjoyable.
Start with a realistic square-footage estimate, choose materials that match your priorities, compare detailed quotes, and protect your budget with a contingency fund. Do that, and your patio can become the kind of place where summer evenings last a little longer and nobody cares whether the burgers are slightly overcooked.