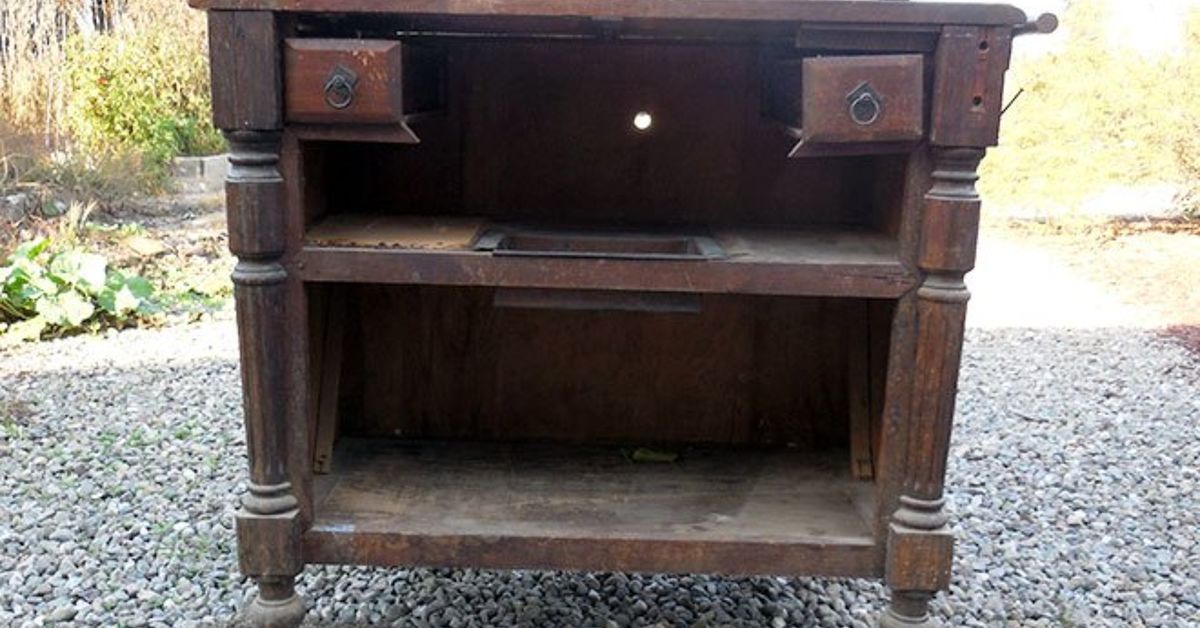
Somewhere in a garage, basement, thrift store, or forgotten corner of a dining room sits an old beat up cabinet wondering if its best days are over. The doors sag. The finish is scratched. One drawer sticks like it has a personal grudge. But before you send that tired piece of furniture to the curb, consider this: with a little cleaning, sanding, paint, hardware, and imagination, that cabinet can become a stylish wine bar that looks like it came from a boutique furniture showroom instead of Aunt Linda’s “please take this before I change my mind” pile.
Transforming an old cabinet into a wine bar is not just a clever DIY project. It is a practical way to reuse solid furniture, reduce waste, create storage, and add personality to your home. For adult households, a repurposed cabinet can become a compact entertaining station for glassware, serving tools, decor, and sealed beverage bottles. For families who prefer alcohol-free spaces, the same idea works beautifully as a mocktail cabinet, coffee bar, tea station, or sparkling-water nook. In other words, the cabinet gets a second life, and your home gets a conversation piece that does not arrive flat-packed with 47 mysterious screws.
Why Turn an Old Cabinet Into a Wine Bar?
A DIY wine bar cabinet is the sweet spot between function and character. New bar cabinets can be expensive, and many modern pieces are made to look vintage without actually having lived through anything more dramatic than warehouse lighting. An older cabinet already has texture, weight, and charm. Scratches, dents, and worn corners are not always flaws; sometimes they are the furniture equivalent of laugh lines.
Repurposing furniture also supports a more sustainable decorating mindset. Instead of buying something new every time a room needs a refresh, upcycling lets you work with what already exists. A beat up cabinet can become useful again with a few smart changes: stronger shelves, updated knobs, fresh paint, interior lighting, bottle storage, and a surface that can hold a tray, vase, or framed print.
The best part is that no two cabinet makeovers look exactly alike. A tall hutch can become a dramatic display bar. A short sideboard can become a dining room serving station. A small nightstand-style cabinet can become a mini beverage bar for a studio apartment. The goal is not perfection. The goal is transformation with a wink.
Choosing the Right Cabinet for the Makeover
Not every cabinet is ready for a glamorous second act, so inspect your piece before falling in love with it. Start with structure. Open the doors, pull out drawers, and gently rock the cabinet from side to side. A good candidate should feel stable, even if it looks rough. Cosmetic damage is easy to fix. A cabinet that wobbles like a nervous deer needs more serious repair.
Look for Solid Bones
Solid wood is usually the most forgiving material for a furniture makeover because it can be sanded, patched, stained, painted, and sealed. Plywood can also work well, especially in older cabinets with sturdy frames. Laminate and MDF are not deal-breakers, but they need the right primer and careful surface preparation so the paint does not peel off later like a bad sunburn.
Check the Shelves and Weight Capacity
A wine bar cabinet needs to hold glassware, bottles, trays, and accessories. Those items add weight quickly. If the original shelves are thin, bowed, or held up by flimsy plastic pegs, replace them with stronger boards and proper shelf supports. Heavier items should sit on lower shelves to keep the cabinet balanced.
Measure Before You Make Plans
Measure the cabinet height, width, depth, shelf spacing, drawer dimensions, and door clearance. This is the moment when dreams meet math, and math tends to bring a clipboard. If you want to add a rack for stemware, confirm there is enough room for glasses to hang without hitting the doors. If you want bottle cubbies, make sure the interior depth works. Planning now prevents the classic DIY moment of saying, “Interesting,” while holding a piece that absolutely does not fit.
Cleaning and Prepping the Cabinet
Preparation is the unglamorous hero of every furniture makeover. Paint may get the applause, but prep work does the heavy lifting. Old cabinets often carry dust, wax, grease, smoke residue, mystery smudges, and the emotional baggage of being stored next to holiday decorations for twelve years.
Remove Hardware and Doors
Take off knobs, pulls, hinges, doors, and removable shelves. Place screws in labeled bags so they do not disappear into the DIY Bermuda Triangle. If the hardware is attractive but dull, clean it and reuse it. If it looks dated, swap it for brass pulls, matte black knobs, glass handles, leather tabs, or antique-style cup pulls.
Clean Thoroughly
Use a mild degreasing cleaner and a soft cloth to remove surface grime. Pay attention to corners, door edges, and the areas around old handles where oils from hands collect over time. After cleaning, let the cabinet dry completely. Painting over dirt is like putting a tuxedo on a raccoon: technically possible, but not a long-term solution.
Sand for Better Adhesion
Light sanding helps primer and paint grip the surface. For wood cabinets, a medium grit can smooth rough patches, followed by a finer grit for a clean finish. For laminate, sanding should be gentle; the goal is to dull the glossy surface, not dig through it. Always wipe away sanding dust with a tack cloth or damp cloth before moving to primer.
Repairing Damage Without Erasing Character
An old beat up cabinet will usually have dents, scratches, chips, loose trim, or gaps. Repair what affects function, but do not feel pressured to erase every sign of age. A little imperfection makes the piece feel collected, not manufactured.
Fill Holes and Gouges
Use wood filler for old hardware holes, deep scratches, and small dents. Let it dry fully, then sand it flush. If you plan to stain instead of paint, choose a stainable filler and test it first. Some fillers accept stain differently than surrounding wood, creating a spotty look that says “oops” in three different shades.
Fix Loose Trim and Doors
Reattach loose molding with wood glue and clamps. Tighten hinges or replace them if doors sag. If drawers stick, clean the tracks, sand high spots, or apply a small amount of furniture wax to wooden runners. A wine bar cabinet should open smoothly, not make guests wonder if they need a crowbar.
Strengthen the Base
If the cabinet sits unevenly, check the legs or bottom frame. Add adjustable furniture feet, replace damaged legs, or attach a new base. A slightly elevated cabinet can look more custom and make cleaning underneath easier. That may not sound glamorous, but future you with a broom will be deeply grateful.
Designing the Wine Bar Layout
The inside layout determines whether your cabinet becomes a beautiful storage station or a chaotic cupboard where glassware goes to clink nervously. Think in zones: display, storage, serving, and hidden utility.
Top Surface: The Serving Zone
The top of the cabinet can hold a tray, small lamp, framed art, plant, ice bucket, or decorative bowl. For a polished look, keep the surface edited. One tray with a few useful pieces looks intentional. Twelve unrelated objects look like the cabinet is hosting a yard sale.
Upper Interior: Glassware and Display
If the cabinet has glass doors or open shelves, use the upper area for attractive glassware, decanters, small plates, or decorative accessories. Stemware racks can be mounted under a shelf, but they should be installed into sturdy material with proper screws. If the shelf feels weak, reinforce it first.
Lower Interior: Bottles and Heavier Items
The lower section is best for heavier storage. You can add X-shaped bottle dividers, simple horizontal cubbies, a removable rack, or adjustable shelves. If the cabinet will be used as a general beverage station, this space can also hold sparkling water, mixers for adult entertaining, napkins, coasters, or serving trays.
Drawers: Small Tools and Linens
Drawers are perfect for corkscrews, bottle openers, cocktail napkins, stirrers, coasters, labels, and small towels. Drawer dividers keep everything from becoming a junk drawer wearing a tiny bow tie.
Paint, Stain, or Natural Wood?
The finish you choose sets the personality of the cabinet. A black painted cabinet with brass hardware feels moody and elegant. Navy blue can look classic and fresh. Forest green brings old-library charm. White or cream creates a bright farmhouse look. A warm wood stain feels timeless, especially if the original grain is worth showing off.
When to Paint
Paint is ideal when the cabinet has mixed materials, heavy scratches, patched holes, or a dated finish that cannot be saved. Use a quality primer suited to the surface, then apply durable cabinet or furniture paint. Satin and semi-gloss finishes are popular because they are easier to wipe clean than flat paint.
When to Stain
Stain works best when the cabinet is real wood and the grain is attractive. You may need to strip or sand the old finish before applying stain. A protective clear coat helps the surface handle daily use. The result can be rich, warm, and sophisticated, especially with simple hardware.
When to Keep Some Original Character
Sometimes the best makeover is not a complete disguise. You might paint the outside and leave the interior wood natural. You might stain the top and paint the body. You might keep old brass hinges because they add charm. The trick is to make the contrast look intentional, not like you got tired halfway through and wandered off for snacks.
Adding Custom Wine Bar Features
Once the cabinet is clean, repaired, and finished, the fun details begin. These upgrades make the piece feel custom without requiring a professional workshop.
Install Stemware Storage
Under-shelf stemware racks are useful for adult bar cabinets because they free up shelf space and turn glasses into part of the display. Choose racks that fit the shelf depth and install them evenly. Before drilling, hold a glass in place to confirm door clearance.
Add Bottle Cubbies
Bottle cubbies can be made with wood strips, removable racks, or X-divider inserts. Keep the design simple and strong. If you are not comfortable cutting angled dividers, use a ready-made rack or stackable insert that fits the cabinet interior.
Use Peel-and-Stick Wallpaper or Tile
A patterned back panel can make the inside of the cabinet pop. Peel-and-stick wallpaper, beadboard panels, or thin decorative tile can add texture. A dark floral print creates drama, while grasscloth-style paper gives a warm, designer look. This is also a clever way to hide an interior back panel that has seen better decades.
Add Lighting
Battery-operated puck lights or rechargeable LED strips can brighten the interior without complicated wiring. Place lights where they highlight glassware and shelves, not where they shine directly into someone’s eyes like an interrogation lamp. Choose low-heat lighting and follow the product directions carefully.
Safety and Practical Details That Matter
A beautiful cabinet should also be safe and practical. If the cabinet is tall, narrow, heavy, or placed in a busy household, anchor it securely to the wall with an anti-tip device. Store heavier items low and avoid overloading shelves. If children live in or visit the home, keep adult-only items locked away and out of reach.
Ventilation also matters if you add lighting or store anything sensitive to heat. Avoid placing the cabinet in direct sunlight or beside heat sources. A bar cabinet is furniture, not a sauna with handles.
For older painted furniture, be cautious before sanding aggressively. Very old finishes may contain materials that require safer handling. If you are unsure, use a test kit or consult a professional before creating dust. Wear a mask when sanding, work in a ventilated area, and protect your floors. DIY confidence is wonderful; inhaling mystery dust is not part of the aesthetic.
Style Ideas for Different Home Looks
Modern Moody Wine Bar
Paint the cabinet matte black or deep charcoal, add brass pulls, line the interior with warm wood or wallpaper, and use soft lighting. This style works well in dining rooms, apartments, and living rooms where the cabinet needs to look polished without shouting for attention.
Farmhouse Cabinet Bar
Use warm white, sage green, or weathered gray paint. Add cup pulls, beadboard backing, woven baskets, and a wood-stained top. This look pairs well with rustic dining tables, open shelving, and casual entertaining spaces.
Mid-Century Inspired Bar Cabinet
Keep the lines clean. Choose walnut stain, tapered legs, simple round knobs, and minimal styling. If the original cabinet has flat doors and a low profile, it may already be halfway to mid-century charm. It just needs a little encouragement and possibly fewer scratches.
Vintage Glam Wine Bar
Try emerald green, deep burgundy, or glossy navy with gold hardware and a mirrored back panel. Add glass shelves if the structure allows, and style the top with a small lamp or framed art. This version says, “I know what I’m doing,” even if the drawer still contains one emergency screwdriver.
Common Mistakes to Avoid
The first mistake is skipping prep. Paint applied over grime, gloss, or dust will not last. The second mistake is choosing hardware before measuring. Handles that look perfect online may be the wrong size for existing holes. The third mistake is ignoring shelf strength. Glassware and bottles are heavier than they look, and a sagging shelf can ruin the mood quickly.
Another common issue is overdecorating. A cabinet wine bar should feel curated, not crowded. Leave breathing room between objects. Use trays to group small items. Keep the color palette consistent. When in doubt, remove one thing. Then remove one more thing. Then put back the tiny ceramic dog if it makes you happy. Style still needs a little personality.
Budget-Friendly Upgrade Ideas
You do not need a giant budget to make an old cabinet look expensive. New hardware can change the entire feel of the piece. A quart of quality paint may be enough for a small cabinet. Peel-and-stick wallpaper can add drama for less than custom paneling. Battery lights create ambiance without hiring an electrician. Even simple shelf liners can make the interior feel clean and finished.
If you want the cabinet to look more built-in, paint it a color that connects with the room. Repeat the metal finish from nearby light fixtures or drawer pulls. Add art above it. Place a runner, mirror, or wall sconce nearby. The cabinet should feel like it belongs, not like it just arrived carrying emotional luggage from the thrift store.
Final Thoughts: From Forgotten Furniture to Functional Focal Point
An old beat up cabinet transformed into a wine bar proves that good design is not always about buying new things. Sometimes it is about seeing potential in what already exists. With careful cleaning, smart repairs, durable paint or stain, upgraded hardware, and a thoughtful interior layout, a worn cabinet can become one of the most charming pieces in your home.
The beauty of this project is its flexibility. It can be elegant, rustic, modern, playful, compact, dramatic, or completely alcohol-free depending on your household and lifestyle. It can hold glassware, adult beverage accessories, coffee supplies, mocktail ingredients, linens, serving trays, or favorite decor. Most importantly, it tells a story. New furniture can be pretty, but a rescued cabinet has a little history, a little grit, and possibly one drawer that still needs encouragement. That is character.
Real-Life Experience Notes: What This Project Teaches You
The first experience most people have with a cabinet transformation is optimism. You look at the old piece and think, “This will be easy.” Then you remove the hardware and discover three paint colors, one suspicious stain, and a screw that appears to have been installed by a determined raccoon. That is the real beginning of the project. A DIY wine bar makeover teaches patience immediately. It reminds you that furniture has layers, and so do home improvement projects.
One of the biggest lessons is that cleaning takes longer than expected but saves the final result. Old cabinets often look dry and dusty from the outside, but once you start wiping down corners and drawer tracks, you realize they have collected years of kitchen grease, basement dust, and tiny crumbs from snacks nobody remembers eating. A thorough cleaning makes sanding easier, helps primer stick, and gives you a better sense of what repairs are actually needed.
Another valuable experience is learning when to repair and when to embrace imperfection. At first, every dent may look like a problem. After a while, you start noticing which marks add charm and which ones distract from the design. A small nick on the corner may feel vintage. A large gouge on the front door may need filler. The goal is not to make an old cabinet look factory-new. The goal is to make it look loved, intentional, and useful.
Painting also teaches humility. The first coat often looks terrible. It may appear streaky, uneven, or patchy, and you may briefly question every life choice that led to this moment. Then the second coat goes on, the color deepens, the surface evens out, and suddenly the cabinet begins to look like furniture again. By the time the hardware is installed, the transformation feels almost magical.
Layout planning is another practical lesson. It is easy to focus on the exterior color and forget how the cabinet will actually be used. A successful wine bar cabinet needs logical storage. Glassware should be easy to reach. Heavy items should sit low. Drawers should hold small accessories. Lighting should highlight the shelves without making the interior look like a stage production. The best design decisions are the ones that make the cabinet easier to use every day.
Finally, this project teaches that old furniture can completely change the feeling of a room. A neglected cabinet that once looked bulky and outdated can become a warm focal point in a dining room, hallway, kitchen corner, or living room. It gives the space storage, personality, and a handmade touch. And every time someone compliments it, you get the quiet satisfaction of knowing it was once one awkward trip to the curb away from disappearing forever.