In the world of 3D printing, few tiny boats have caused as much excitement, argument, calibration pain, and late-night filament snacking as the humble Benchy. Officially known as #3DBenchy, this little tugboat was created as a torture test for 3D printers. Unofficially, it has become the maker community’s plastic mascot, speed trophy, troubleshooting detective, and desk ornament that appears in every color known to humanity.
But “Maximum Throughput Benchie” is not just about printing one boat as fast as possible. That would be latency: how quickly a single print finishes. Throughput asks a different, slightly more industrial question: how many acceptable Benchies can a printer, farm, or wildly modified machine produce over time? In other words, if one Benchy is cute, how do we make a fleet before lunch?
This is where 3D printing gets interesting. Speed is only one part of the story. True maximum throughput depends on motion control, hotend flow, cooling, slicer strategy, bed management, reliability, and whether your machine can survive printing like it drank three espressos and joined a racing league.
What Is a Benchy, and Why Does Everyone Print It?
A Benchy is a small 3D-printable tugboat designed to expose weaknesses in a printer’s setup. It includes curves, overhangs, bridges, small holes, vertical walls, sloped surfaces, fine details, and dimensional features that are easy to inspect. That makes it more useful than a simple calibration cube, which mostly tells you whether your printer can make a cube. Congratulations, little robot. Aim higher.
The standard Benchy is typically printed at 1:1 scale, with a bow-to-stern length of about 60 mm. Common baseline settings include a 0.4 mm nozzle, 0.2 mm layer height, around 10% infill, no supports, and moderate extrusion speeds. These rules matter because Benchy comparisons become meaningless when one person prints a full-size boat and another prints something the size of a cornflake.
Why Benchy Works So Well as a Benchmark
Benchy is small enough to print quickly, but complicated enough to reveal problems. The front hull can show ringing and ghosting. The chimney can expose cooling and extrusion flaws. The roof tests bridging. The text on the stern checks fine detail. The cabin walls show layer consistency. The bottom surface may reveal first-layer problems, elephant’s foot, or bed adhesion issues.
That combination makes Benchy perfect for two very different goals: quality tuning and speed testing. A slow, clean Benchy tells you your printer is behaving. A fast Benchy tells you how much chaos your machine can handle before the tugboat starts looking like it survived a maritime incident.
Maximum Throughput vs. Maximum Speed
The phrase “Maximum Throughput Benchie” is important because it shifts the question from “How fast can I print one Benchy?” to “How efficiently can I produce many Benchies?” This difference matters in real-world 3D printing, especially for print farms, product prototyping, school labs, Etsy shops, maker spaces, and anyone who has promised 40 party favors by tomorrow morning.
Maximum speed focuses on a single print time. Maximum throughput focuses on total useful output per hour, per machine, or per operator. A printer that makes one rough Benchy in eight minutes may look exciting, but if every third print fails, the actual throughput collapses. A slower printer producing consistent 22-minute Benchies all day may beat the faster machine in real production.
The Simple Throughput Formula
Throughput can be estimated with a practical formula:
Useful Benchies per hour = successful prints ÷ total production time
Total production time includes printing, cooldown, part removal, bed preparation, filament swaps, restart time, failed prints, and the five minutes spent staring at a spaghetti blob while questioning your life choices.
The Hackaday-Style Idea: Parallel Printing
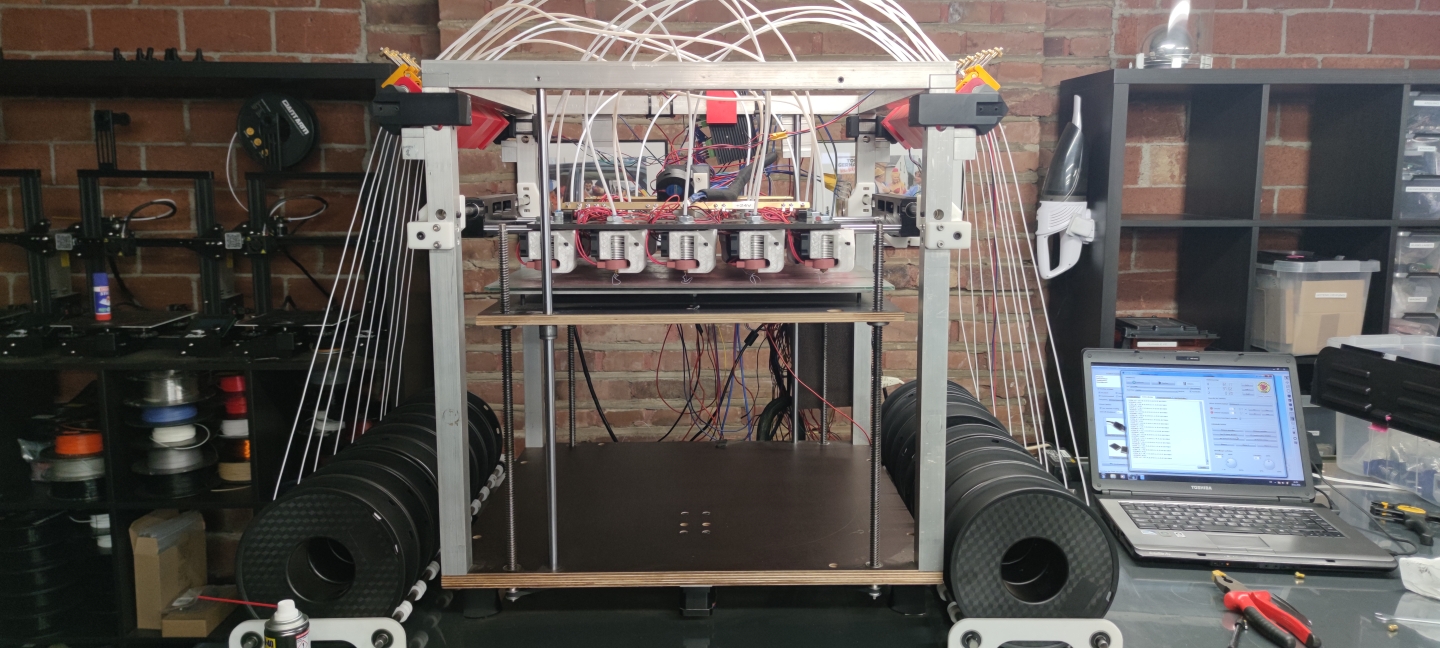
One of the most entertaining takes on maximum throughput came from a maker approach that borrowed an idea from computer architecture: if one process is limited by latency, increase throughput by parallelizing the workload. Instead of printing a single Benchy dramatically faster, the concept used multiple hotends to print many Benchies at once.
The logic is brilliant. A single hotend can only move so fast, melt so much plastic, and cool each layer so effectively. Add more hotends, and the machine starts behaving less like a solo printer and more like a tiny plastic factory. It may not reduce the time required for one individual Benchy, but it can multiply total Benchies produced per print cycle.
Think of it like baking cookies. You can obsess over making one cookie bake faster, or you can put 18 cookies on the tray. At some point, the oven’s total output matters more than the speed of a single snack.
The Main Bottlenecks in High-Throughput Benchy Printing
To understand maximum throughput, you need to know what slows 3D printers down. Spoiler: it is rarely just “print speed.” Slicer speed settings are only the flashy number on the dashboard. The real limits are mechanical, thermal, and procedural.
1. Motion System Limits
Benchy is acceleration-bound. That means the printer often cannot reach its advertised top speed because the model is full of short line segments, tight curves, corners, and small features. A printer may claim 500 mm/s travel speed, but on a tiny cabin wall, it may spend more time accelerating and decelerating than cruising.
CoreXY printers generally handle speed better than heavy bed-slinger designs because the moving mass can be lower. However, even a fast motion system must fight vibration. Push too hard and the print develops ringing, shifted corners, rough walls, or a hull that looks like it heard bad news.
2. Acceleration and Input Shaping
Modern high-speed printing relies heavily on acceleration tuning and input shaping. Input shaping reduces vibration artifacts by adjusting motion commands to counteract mechanical resonance. Firmware such as Klipper helped popularize advanced motion planning, while many newer printers now include their own vibration compensation systems.
For Benchy throughput, input shaping is a game changer because it allows printers to move faster without turning the surface into a washboard. Still, input shaping is not magic. If belts are loose, rails are dirty, the frame flexes, or the printer sits on a wobbly table, no firmware wizard can fully rescue the print.
3. Volumetric Flow Rate
Volumetric flow rate is one of the most important concepts in fast 3D printing. It measures how much melted filament a hotend can reliably push per second, usually in cubic millimeters per second. Print speed tells you how fast the nozzle moves. Flow rate tells you whether enough plastic can actually come out while it moves.
If you exceed the hotend’s flow capacity, the printer may under-extrude. You may see gaps, weak walls, dull surfaces, inconsistent lines, or top layers that look like they were printed during a filament famine. High-throughput Benchy printing requires matching speed, layer height, line width, nozzle temperature, and material flow capacity.
4. Cooling Capacity
A Benchy has small layers, especially around the chimney and cabin. When printing fast, each layer may not have enough time to cool before the next one arrives. Poor cooling can cause sagging bridges, melted-looking details, curled edges, and chimney deformation.
For maximum throughput, cooling becomes even more important. Multiple Benchies on the same plate can actually help because each layer has more time to cool while the printer moves between objects. That is one reason batch printing can improve quality at higher speeds, assuming your bed adhesion is strong and your travel moves are well planned.
5. Bed Adhesion and Part Removal
In production, the clock does not stop when the nozzle finishes. If a Benchy takes 15 minutes to print but 10 minutes to cool, remove, clean, and restart, your throughput is not as impressive as the slicer preview suggests.
Flexible build plates, textured PEI sheets, automated part ejection, conveyor-style printers, and print-farm workflows can all improve real throughput. The less time spent babysitting the bed, the more Benchies you produce per day.
SpeedBoatRace and the Rise of Fast Benchies
The SpeedBoatRace challenge pushed the community to test how fast a recognizable Benchy could be printed. The challenge inspired custom printers, aggressive slicer profiles, high-flow hotends, lightweight toolheads, optimized cooling ducts, and firmware tuning that would make a normal office printer quietly roll under a desk.
Some high-speed Benchy attempts focus on raw time. Others aim for “speed plus quality,” which is harder and more useful. Printing a Benchy quickly is fun. Printing a Benchy quickly that still has clean dimensions, readable details, solid walls, and a non-tragic chimney is engineering.
Why the Fastest Benchy Is Not Always the Best Benchmark
Ultra-fast Benchy records are exciting, but they may use custom machines, extreme acceleration, unusual profiles, specialized filament, or settings that are not ideal for everyday parts. A record print proves what is possible. It does not automatically prove what is practical for a print farm, school lab, or home workshop.
For most users, the better target is repeatable speed: the fastest profile that produces acceptable Benchies five, ten, or fifty times in a row. Repeatability is the grown-up cousin of speed, and it pays the bills.
How to Optimize for Maximum Benchy Throughput
If you want to improve Benchy throughput, do not simply set every slicer number to “ludicrous.” That is how you summon under-extrusion, layer shifts, and the smell of regret. Instead, tune systematically.
Start With a Reliable Baseline
Print a standard Benchy using conservative settings. Inspect the hull, cabin, chimney, roof, first layer, overhangs, and dimensions. This baseline shows what your printer can do when it is not being chased by a stopwatch.
Once the baseline is clean, increase speed gradually. Keep notes. Change one major variable at a time. If you increase acceleration, nozzle temperature, fan speed, line width, and pressure advance all in one test, you will learn only one thing: chaos has many hobbies.
Calibrate Pressure Advance or Linear Advance
Pressure advance helps control extrusion during acceleration and deceleration. Without it, corners may bulge, seams may get messy, and fast walls may look uneven. Proper calibration can make high-speed Benchies sharper and more consistent.
Different materials need different values. PLA, PETG, ABS, ASA, and high-speed PLA can behave differently because viscosity, elasticity, temperature, and flow characteristics vary. A setting that works beautifully for one spool may be wrong for another.
Find Your Hotend’s Real Flow Limit
Do not guess your maximum volumetric flow. Test it. Use an extrusion flow test or a slicer preview that displays flow rate. If your printer starts under-extruding at 18 mm³/s, setting a profile that demands 24 mm³/s will not make it faster. It will make it sadder.
A practical high-throughput setup may use a larger nozzle, higher nozzle temperature, high-flow hotend, or filament designed for faster melting. However, each change affects detail. A 0.6 mm nozzle can boost output, but small Benchy details may soften compared with a 0.4 mm nozzle.
Use Batch Printing Strategically
Printing several Benchies at once can increase throughput, especially when the bed has room and cooling benefits from longer layer times. However, batch printing also increases risk. One failed Benchy can knock into others or drag loose plastic across the plate like a tiny tugboat crime scene.
For safer batch printing, use strong bed adhesion, avoid excessive brim unless needed, arrange parts with enough spacing, reduce travel crossing, and consider sequential printing only if your printer’s clearance allows it. Always check gantry and nozzle clearance before sequential printing. A toolhead crash is not a productivity strategy.
Quality Metrics: What Counts as a Successful Throughput Benchy?
A maximum throughput Benchy should not be judged only by time. The better question is: would you accept this print as a real output? For benchmark purposes, define success before testing.
Useful Quality Checks
Look for consistent layers, readable stern text, a clean chimney, acceptable overhangs, controlled stringing, a flat bottom, and stable dimensions. The cabin should not lean. The roof should not sag excessively. The hull should not display severe ringing. The boat should look like a boat, not a melted duck wearing a captain’s hat.
Use calipers for dimensional checks if accuracy matters. Visual inspection is helpful, but measurement keeps the test honest. In production, “close enough” may be fine for decorations, but not for functional parts.
Single Printer, Multiple Printers, or Multi-Hotend?
There are three main ways to chase maximum Benchy throughput: make one printer faster, run more printers, or build a printer that prints multiple objects in parallel.
One Faster Printer
This is the most common path. Upgrade firmware, tune acceleration, improve cooling, test flow, use a better slicer profile, and refine the machine. It is affordable and educational, but eventually one nozzle becomes the bottleneck.
A Print Farm
Multiple printers improve throughput through redundancy. If one printer fails, others keep working. Print farms are easier to scale than complex multi-hotend machines, but they require more space, more maintenance, more power, and more organization.
A Multi-Hotend Machine
A multi-hotend setup can be spectacular for parallel output. It is also mechanically and thermally challenging. Each hotend needs consistent extrusion, cooling, alignment, and control. The reward is impressive throughput; the cost is complexity. This is the kind of project that makes engineers grin and spreadsheets sweat.
Practical Example: Comparing Three Throughput Scenarios
Imagine three setups. Printer A prints one Benchy in 20 minutes with a 95% success rate. Printer B prints one Benchy in 10 minutes with a 60% success rate. Printer C prints six Benchies in 35 minutes with a 90% success rate.
Printer A produces about 2.85 successful Benchies per hour. Printer B produces about 3.6 successful Benchies per hour, despite many failures. Printer C produces about 9.25 successful Benchies per hour. The lesson is clear: raw speed is nice, but batch capacity and reliability can dominate throughput.
This is why maximum throughput is such a useful concept. It forces you to evaluate the entire workflow, not just the fastest screenshot from a slicer preview.
Common Mistakes When Chasing Maximum Throughput
The biggest mistake is assuming that faster movement equals faster production. In reality, poor tuning can increase failures and reduce output. Another mistake is ignoring cooldown and reset time. A printer that finishes fast but needs constant attention may not be productive.
Many users also forget material limits. PLA is usually friendly for speed, but PETG can string, ABS and ASA need temperature stability, and flexible filaments are rarely throughput champions. High-speed PLA blends can help, but they still require proper temperature, cooling, and flow tuning.
Finally, do not ignore maintenance. High-speed printing stresses belts, pulleys, bearings, fans, nozzles, and extruders. A machine that prints fast for two days and then needs three days of repair is not a throughput hero. It is a drama queen with stepper motors.
500-Word Experience Section: Lessons From Chasing a Maximum Throughput Benchie
The first experience most people have with a fast Benchy is overconfidence. The slicer says 18 minutes, the printer looks sturdy, and the filament is sitting there like a fresh roll of optimism. You press start. For the first few layers, everything seems normal. Then the printer accelerates hard, the frame begins singing its mechanical opera, and suddenly you realize that “maximum throughput” is not a setting. It is a negotiation.
One of the most valuable lessons is that the Benchy tells the truth quickly. If acceleration is too high, the hull shows ringing. If cooling is weak, the chimney softens. If flow is too ambitious, the walls become thin or inconsistent. If pressure advance is wrong, corners look swollen or starved. A Benchy does not politely hide problems. It points at them with a tiny plastic smokestack.
In a real throughput test, the best improvement often comes from reducing wasted time rather than chasing another 5% speed boost. A flexible build plate can remove parts faster. A clean plate reduces failed first layers. A reliable filament profile saves troubleshooting. Preheating the printer before a batch can shave off idle minutes. Organizing files, naming profiles clearly, and keeping nozzles clean can matter as much as firmware tuning.
Batch printing also teaches humility. Printing one Benchy is simple. Printing nine at once feels efficient until one corner lifts and the nozzle starts dragging plastic across the fleet like a sea monster. Good spacing, correct bed temperature, first-layer consistency, and sensible travel moves become crucial. Sometimes the best batch size is not the maximum number that fits on the bed. It is the maximum number that finishes reliably.
Another experience is learning that “acceptable quality” depends on purpose. For a speed contest, a slightly rough Benchy may be fine if it meets the rules. For a customer sample, surface finish matters more. For printer tuning, the print must be honest enough to show defects. For a classroom demo, success may simply mean every student gets a recognizable boat without waiting until graduation.
The most satisfying moment comes when the system stabilizes. The printer starts confidently. The first layer sticks. The hotend keeps up. The cooling works. The Benchies finish consistently. You remove a full plate of tiny boats and realize that maximum throughput is less about violence and more about balance. The best setup is not the one that sounds fastest. It is the one that produces the most usable parts with the least babysitting.
That is the heart of the Maximum Throughput Benchie mindset. It combines maker creativity with production thinking. It asks you to tune like an engineer, measure like a scientist, and laugh like someone who has definitely printed at least one Benchy that looked haunted. When done well, it turns a novelty benchmark into a serious lesson about manufacturing efficiency, machine limits, and the beautiful absurdity of using a tiny tugboat to judge modern 3D printers.
Conclusion
Maximum Throughput Benchie is more than a clever phrase. It is a smarter way to think about 3D printing performance. Instead of worshiping the fastest single print, it evaluates the full production system: speed, flow, cooling, reliability, bed turnover, failure rate, and repeatability.
The Benchy remains popular because it compresses so many printing challenges into one charming model. When used for throughput testing, it becomes even more powerful. It helps makers understand whether their printer is merely fast on paper or genuinely productive in practice.
Whether you are tuning one desktop printer, managing a small print farm, experimenting with Klipper, testing high-flow hotends, or dreaming about a multi-nozzle Benchy armada, the goal is the same: produce more good parts in less time with fewer failures. That is not just speed. That is throughput. And in the end, the best Benchy is not always the fastest boat. It is the one that finishes cleanly, repeatedly, and without turning your workbench into a plastic shipwreck.
Note: This article is written in original standard American English for web publishing and is based on real 3D printing concepts, benchmark practices, firmware tuning principles, and high-speed Benchy discussions. No source links or citation placeholders are included inside the article body.