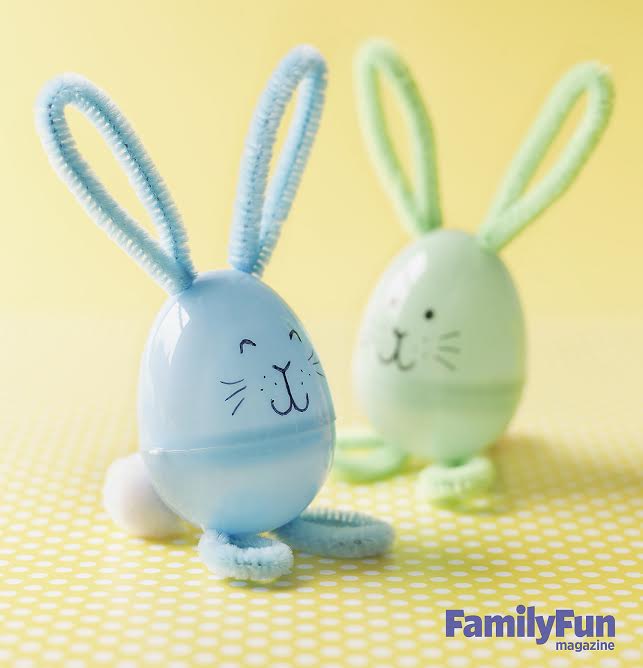
Easter crafts have a magical way of turning everyday objects into tiny seasonal celebrities. A paper plate becomes a bunny face. A pipe cleaner suddenly has career prospects as whiskers. And one humble plastic Easter egg, once emptied of jelly beans, can become the star of your spring craft table. That is exactly the charm behind the “All Ears” Easter craft: a sweet, simple, bunny-inspired project that gives leftover plastic eggs a second life as adorable little rabbits with oversized ears and plenty of personality.
This DIY Easter craft is perfect for kids, families, classrooms, Sunday school groups, spring parties, and anyone who has ever looked at a plastic egg and thought, “You know what this needs? Ears.” It uses affordable supplies, encourages creativity, and can be customized in dozens of ways. Best of all, it does not require advanced crafting skills, mysterious tools, or a glitter commitment you will still be finding under the couch in July.
In this guide, you will learn how to make your own “All Ears” Easter craft step by step, how to personalize each bunny, how to turn the project into a table decoration or party favor, and how to keep the activity fun, organized, and kid-friendly. Let’s hop in.
What Is the “All Ears” Easter Craft?
The “All Ears” Easter craft is a small bunny figure made from a plastic Easter egg. The egg becomes the bunny’s body, while pipe cleaners, felt, paper, pom-poms, googly eyes, and other craft materials bring the face, ears, feet, and tail to life. The result is a cheerful Easter bunny that can sit in a basket, decorate a table, hold a tiny treat, or join a full parade of handmade spring characters.
The name works because the bunny’s ears are the star of the show. You can make them tall and perky, floppy and dramatic, heart-shaped, glittery, pastel, patterned, or comically oversized. In other words, this is the rare craft where “too much ear” is not a problem. It is the assignment.
This project also fits beautifully into the broader world of easy Easter crafts for kids. It combines fine motor practice, color choices, simple construction, and imaginative play. Younger children can help choose colors and attach soft pieces, while older kids can bend pipe cleaners, draw expressions, and design their own bunny characters.
Why This Easter Bunny Craft Is Worth Making
It Reuses Plastic Easter Eggs
After an egg hunt, many households end up with a small mountain of plastic eggs. Some roll under the sofa. Some hide in the yard until summer. Some mysteriously appear in the laundry room. Turning them into Easter bunny crafts gives them a useful, creative second act.
It Is Budget-Friendly
You do not need expensive supplies. Most materials can be found in a basic craft drawer, dollar store, classroom bin, or leftover holiday box. Plastic eggs, pipe cleaners, construction paper, pom-poms, glue, and markers can go a long way.
It Works for Many Ages
This project is flexible. Preschoolers can make a simplified version with adult help. Elementary-age kids can complete most of the craft independently with supervision. Tweens can turn it into a more polished decoration with felt, ribbon, paint markers, and themed accessories.
It Is Great for Groups
If you need an Easter classroom craft, spring party activity, family gathering project, or rainy-day craft table, this one scales well. Set out a tray of supplies and let each child create a bunny with its own personality. By the end, you will have a full bunny village, and probably at least one bunny named Mr. Fluffernoodle.
Supplies You Will Need
Here is a practical supply list for making a classic “All Ears” Easter bunny craft:
- Plastic Easter eggs
- Pipe cleaners in white, pink, gray, brown, or pastel colors
- Googly eyes or markers for drawing eyes
- Small pom-poms for noses and tails
- Construction paper, craft foam, or felt
- Craft glue or glue dots
- Child-safe scissors
- Permanent markers or paint pens for older kids and adults
- Ribbon, stickers, sequins, or washi tape for decoration
- Cardstock or bottle caps for optional bunny feet or stands
If you are crafting with very young children, skip tiny pieces such as small beads, loose googly eyes, or mini pom-poms unless an adult is handling them. Small parts can be a choking risk for children under three, so choose larger, age-appropriate materials and supervise closely.
Step-by-Step Instructions: How to Make an “All Ears” Easter Bunny
Step 1: Choose Your Plastic Egg
Start with a clean, dry plastic Easter egg. Any color works. White eggs create a classic bunny look, pastel pink and blue feel playful, and bright colors make the craft look like the Easter Bunny hired a party planner.
If your egg has small holes at the top, those can be useful for attaching pipe cleaner ears. If not, you can glue the ears on the back or top of the egg. Make sure the egg closes firmly so it does not pop open while you are decorating it.
Step 2: Make the Bunny Ears
Take one pipe cleaner and bend it into a long ear shape. Twist the bottom ends together to secure it. Repeat with a second pipe cleaner for the other ear. For a two-tone effect, use a white pipe cleaner for the outer ear and a smaller pink pipe cleaner inside it.
For younger crafters, pre-bend the ears before the activity begins. For older kids, let them experiment with different ear shapes. Tall ears look alert and silly. Floppy ears look sweet and sleepy. One-up-one-down ears give the bunny a “just heard the snack bag open” expression.
Step 3: Attach the Ears to the Egg
If the egg has holes, thread the twisted ends of the pipe cleaners through the holes and bend them inside the egg to hold them in place. If the egg does not have holes, use glue dots, strong craft glue, or a small piece of tape inside the back seam to secure the ears.
Let the ears dry or settle before moving on. This is the part where patience helps. Unfortunately, patience is also the part of crafting that no one sells in a convenient twelve-pack.
Step 4: Add the Bunny Face
Glue on googly eyes, or draw eyes with a marker. Add a small pom-pom nose, then draw a mouth underneath. You can also cut whiskers from paper or use short pieces of pipe cleaner.
For a cleaner look, keep the face simple: two eyes, one nose, and a tiny smile. For a sillier version, add eyelashes, eyebrows, freckles, glasses, or a surprised open mouth. Every bunny deserves emotional range.
Step 5: Add Feet and a Tail
Glue a medium pom-pom to the back of the egg for a fluffy tail. To help the bunny stand, cut two oval feet from cardstock, felt, or craft foam and glue them to the bottom front of the egg. You can also glue the bunny onto a small cardstock base or a bottle cap if it keeps tipping over.
If your bunny still wobbles, do not panic. It is not a failure. It is a bunny with dramatic stage presence.
Step 6: Decorate and Personalize
Now comes the fun part. Add a ribbon bow, tiny paper bow tie, sticker flowers, washi tape stripes, or a miniature carrot cut from orange paper. You can create themed bunnies, such as:
- Garden Bunny: Add paper flowers and a green felt scarf.
- Party Bunny: Use glitter stickers, confetti dots, and a tiny party hat.
- Sleepy Bunny: Draw closed eyes and add floppy ears.
- Fancy Bunny: Add a ribbon bow, pearl stickers, or a paper vest.
- Super Bunny: Glue on a small felt cape and draw a heroic expression.
Creative Variations for Your DIY Easter Craft
Paper Ears Instead of Pipe Cleaner Ears
If you do not have pipe cleaners, cut bunny ears from construction paper, cardstock, craft foam, or felt. Fold a small tab at the bottom of each ear and glue the tabs to the egg. Paper ears are easier for very young children to decorate with crayons, markers, stickers, or fingerprints.
Use Wooden Beads or Foam Eggs
Plastic eggs are classic, but you can also use foam eggs, wooden eggs, or papier-mâché eggs. Foam is lightweight and easy to glue, while wooden eggs create a more durable decoration that adults may want to paint and reuse.
Make a Bunny Family
Use different egg sizes to create a bunny family. Large eggs become grown-up bunnies, medium eggs become kid bunnies, and tiny eggs become baby bunnies. Add names to the bottom of each one for a personalized Easter table setting.
Turn It Into an Easter Place Card
Glue a small folded cardstock name tag to the bunny’s feet or let the bunny hold a tiny paper sign. Place one at each seat for Easter brunch. Guests will know where to sit, and the table gets instant charm without anyone having to fold a napkin into a swan.
Create a Bunny Basket Filler
Because plastic eggs open, you can tuck a small note, sticker, wrapped candy, or clue for an Easter scavenger hunt inside. This turns the craft into both a decoration and a surprise container.
Tips for Crafting With Kids Without Losing the Table
Crafting with kids is joyful, creative, and occasionally sticky in ways science has yet to fully explain. A little preparation makes the process smoother.
Set Up a Craft Tray
Give each child a paper plate or tray to hold supplies. This keeps pom-poms from rolling away and helps contain glue. It also gives every crafter a clear workspace.
Pre-Cut Pieces for Younger Kids
If children are still developing scissor skills, pre-cut ears, feet, and small accessories. They can still choose colors, arrange pieces, and glue decorations.
Use Glue Dots for Fast Results
Craft glue works well, but it needs drying time. Glue dots are helpful when attaching eyes, noses, tails, and small bows. They also reduce the classic “I used half a bottle of glue and now the bunny is swimming” situation.
Offer Choices, Not Chaos
Instead of putting every craft supply you own on the table, offer a few categories: ears, eyes, noses, feet, and decorations. Too many options can overwhelm kids and create a craft table that looks like a unicorn sneezed.
Safety Notes for Easter Craft Activities
When making Easter crafts with children, adult supervision matters. Plastic eggs, googly eyes, beads, buttons, small pom-poms, and cut pipe cleaner pieces may be too small for toddlers. For children under three, avoid small parts and use larger paper shapes instead.
Use child-safe scissors for young crafters, and reserve hot glue guns, craft knives, and sharp tools for adults. If you use permanent markers or paint pens, protect the table and make sure the room is well ventilated. Wash hands after using glue, paint, or markers, especially before snack time. No one wants a jelly bean with a subtle note of washable glue.
How to Use Finished “All Ears” Easter Bunnies
Once your bunnies are dry, they can do more than sit around looking cute. Try these display and activity ideas:
- Place them in Easter baskets as handmade surprises.
- Use them as Easter brunch place cards.
- Line them along a mantel, windowsill, or bookshelf.
- Hide them as part of an indoor scavenger hunt.
- Fill them with clues, jokes, stickers, or wrapped treats.
- Attach a loop of ribbon and hang them from an Easter tree.
- Use them as classroom desk decorations.
You can also invite kids to write a short story about their bunny. Where does it live? What is its favorite snack? Why are its ears so large? This turns the craft into a literacy activity and gives children a chance to build a character around their creation.
Common Problems and Easy Fixes
The Ears Keep Falling Off
Use glue dots, stronger craft glue, or tape the twisted pipe cleaner ends inside the egg. If using paper ears, fold a wider tab at the bottom before gluing.
The Bunny Will Not Stand Up
Add larger cardstock feet or glue the egg to a small base. A bottle cap, cardboard circle, or folded cardstock stand can help stabilize it.
The Face Looks Crooked
Congratulations, you made a charming bunny with character. If you want to adjust it, gently peel off the eyes before the glue fully dries and reposition them. Otherwise, give the bunny a name like Wobbles and move forward with confidence.
The Glue Is Taking Too Long to Dry
Use a small amount of glue and let pieces dry in stages. For group crafting, make ears first, then faces, then tails and decorations. This prevents everything from sliding around at once.
Why Easter Bunny Crafts Are More Than Cute
Seasonal crafts may look simple, but they offer real benefits for kids. Cutting, bending, gluing, and placing small decorations help develop fine motor coordination. Choosing colors and expressions encourages decision-making. Following steps builds sequencing skills. Sharing supplies teaches patience, which is heroic work when there is only one pink pom-pom left.
Crafts also create memories. A handmade bunny may not look like something from a glossy magazine, but it carries the fingerprints, choices, and giggles of the person who made it. That matters. The slightly lopsided ears and overenthusiastic glue spots are part of the story.
Experience: What Making the “All Ears” Easter Craft Is Really Like
The first time you make an “All Ears” Easter craft, you may begin with a neat plan: one plastic egg, two symmetrical ears, a sweet little face, and a tidy pom-pom tail. Five minutes later, your bunny may have one ear pointing north, one ear pointing emotionally, and a face that says it has just discovered taxes. This is not a problem. This is the charm of the project.
One of the best parts of this craft is watching how different every bunny becomes. Give five children the same supplies and you will not get five identical rabbits. You will get a sleepy bunny, a superhero bunny, a bunny with six whiskers on one side and none on the other, a bunny wearing three bows, and a bunny that may technically be a cat but is still welcome at Easter brunch.
From a parent or teacher’s perspective, this craft is wonderfully manageable because it has structure without being rigid. The egg provides the body, so kids do not have to build everything from scratch. The ears are simple enough to understand, but flexible enough to personalize. The face gives the bunny instant personality. The decorations let children make creative choices without needing advanced skills.
It is also a good reminder that the best kids’ crafts are not always the most elaborate ones. Children often care less about perfection and more about ownership. They want to say, “I made this.” They want to choose the pink nose, the sparkly sticker, the wild ears, and the name. Adults may see a plastic egg with pipe cleaners. Kids see a character.
If you are doing this craft at home, the experience becomes even better when you slow down and let the activity breathe. Put on spring music. Set out a few bowls of supplies. Make one bunny yourself instead of only supervising. Children love seeing adults create beside them, especially when the adult’s bunny turns out slightly ridiculous. In fact, a goofy grown-up bunny often gives kids permission to experiment instead of worrying about making it “right.”
For classroom use, the project works well as a station activity. One station can be for choosing eggs, one for ears, one for faces, and one for decorations. This keeps the process organized and helps children move through the steps. It also reduces the great glue traffic jam, a well-known seasonal event in many classrooms.
For Easter brunch or a family gathering, the finished bunnies make delightful conversation starters. Place them at each setting, tuck a small note inside, or let guests vote on categories like “fluffiest tail,” “most dramatic ears,” and “bunny most likely to steal a carrot.” The craft becomes part of the celebration rather than just a pre-holiday activity.
There is also something satisfying about reusing plastic eggs after the candy is gone. Instead of tossing them into a storage bin and forgetting about them, you turn them into something cheerful. It is a small act of creativity, but small acts are often what make holidays feel personal.
The only real warning is that this craft can become addictive. Once you make one bunny, you may start seeing every plastic egg as a future rabbit. Then come the accessories. Then the bunny families. Then the bunny village. Before long, you are creating a full Easter neighborhood with a mayor, a bakery, and one suspiciously glittery rabbit who runs the local carrot bank. Honestly, there are worse ways to spend an afternoon.
Conclusion
Making your own “All Ears” Easter craft is simple, affordable, and full of personality. With a plastic Easter egg, pipe cleaner ears, a pom-pom tail, and a few creative details, you can create a bunny decoration that feels festive, handmade, and delightfully silly. It is a great project for kids, families, classrooms, and Easter parties because it encourages imagination while keeping the steps easy to follow.
Whether you make one bunny or an entire floppy-eared colony, this craft proves that Easter decorating does not need to be complicated to be memorable. Sometimes all you need is a leftover egg, a little glue, and the courage to give a bunny ears bigger than its body.