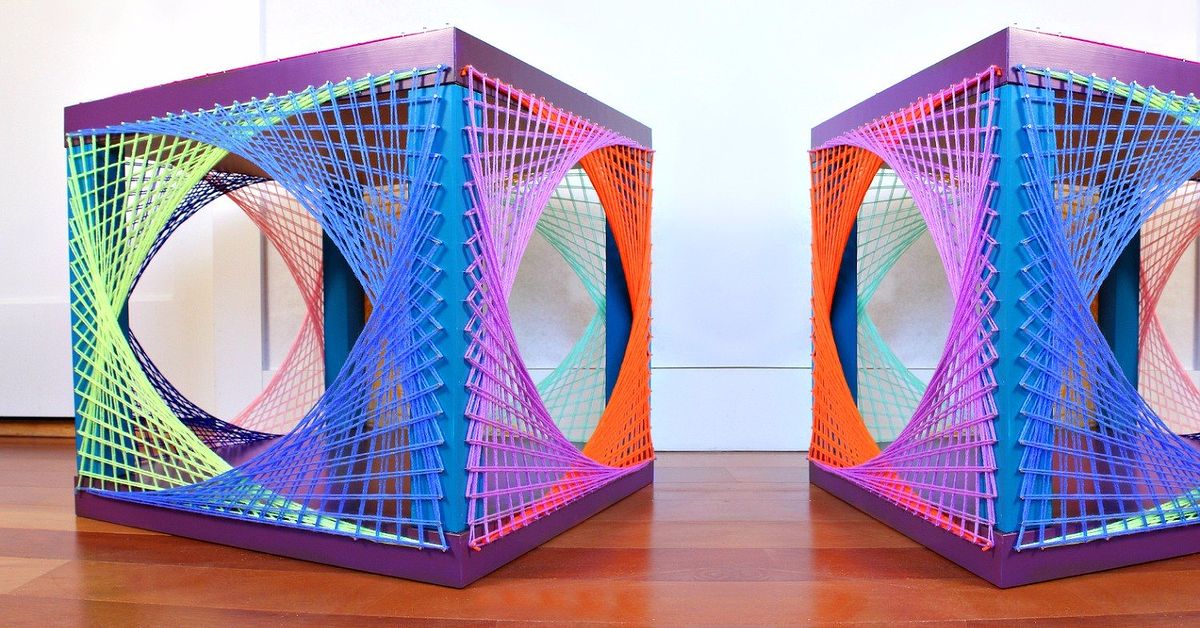
A basic side table has one important job: hold your coffee, remote control, reading glasses, and at least one mysterious object that seems to belong to nobody. But an IKEA side table can do much more than perform furniture babysitting duties. With a little paint, trim, new hardware, or a clever top treatment, it can become a polished accent piece that looks far more expensive than its flat-pack origins.
An IKEA hack side table makeover is one of the easiest ways to practice DIY design without taking on a project that requires a table saw, a construction permit, or a pep talk from a contractor. Small tables are affordable, portable, and forgiving. If your first paint coat looks slightly tragic, you can sand it down, try again, and pretend it was all part of the artistic process.
This guide walks through practical ways to transform an IKEA side table into something that feels custom, stylish, and genuinely useful. Whether you prefer a modern fluted look, a vintage-inspired nightstand, a colorful tile table, or a clean minimalist accent piece, the best makeover begins with a plan that matches your table’s material and your room’s personality.
Why an IKEA Side Table Is Perfect for a Makeover
IKEA furniture is often designed with simple lines, neutral finishes, and practical proportions. That simplicity is exactly what makes it such a good starting point for customization. A plain side table does not compete with your idea. It quietly waits for you to give it a better haircut.
Popular IKEA table styles often work well for hacks because they are lightweight, inexpensive, and easy to adapt. A LACK side table can become a colorful modern accent table. A metal tray table can be transformed with spray paint, mosaic tile, or a patterned removable surface. A small unfinished wood table can be stained, painted, or upgraded with trim and new legs.
The goal is not to hide the fact that the table began life at IKEA. The goal is to make the final piece look intentional. A successful DIY side table makeover should feel like it belongs in your room, not like it survived a craft-store stampede.
Choose the Right IKEA Table for Your Hack
Before buying paint, decorative trim, or six different samples of brass knobs, identify what your table is made of. The material determines how you should prepare it and which finishes will hold up best.
Laminate and Veneer Tables
Many IKEA side tables use engineered wood covered with laminate, foil, or veneer. These surfaces are smooth and durable, but they need proper preparation before paint will adhere well. A light scuff sanding, thorough cleaning, and a bonding primer are usually the difference between a sleek finish and paint that peels off after one enthusiastic coaster incident.
Laminate tables are best for painted makeovers, contact paper upgrades, decorative overlays, removable wallpaper, and lightweight trim details. Avoid soaking edges with water-based products, especially around seams, because moisture can cause swelling or lifting.
Solid Wood or Unfinished Pine Tables
Unfinished wood pieces offer more flexibility. You can stain them, paint them, whitewash them, distress the edges, or combine several finishes. Wood also accepts decorative details well, including fluting, dowels, furniture feet, and routed trim.
If you want a warmer, more natural result, unfinished wood is a great choice. A walnut-toned stain and tapered legs can create a mid-century look, while a soft whitewash can move the same table toward coastal or cottage style.
Metal Tray Tables
Metal side tables are ideal for bold color, matte black finishes, metallic accents, or tile surfaces. Clean the table carefully, lightly sand any glossy areas, and use a primer and paint designed for metal. Thin coats matter here. One heavy coat of spray paint can turn your chic little table into a drippy science experiment.
Plan Your IKEA Hack Side Table Makeover Before You Start
The fastest way to make a side table look expensive is to make it look deliberate. Before touching a brush, decide what style you are trying to create.
- Modern organic: warm wood tones, rounded edges, matte finishes, and simple sculptural details.
- Mid-century modern: tapered legs, walnut stain, olive green, warm brass, or geometric drawer pulls.
- French-inspired: ornate trim, curved feet, antique brass hardware, and soft muted paint.
- Coastal: pale blue, weathered white, woven cane, light wood, and natural textures.
- Colorful contemporary: bright paint, checkerboard patterns, contrast trim, or glossy lacquer-style finishes.
- Minimalist: one clean color, hidden hardware, and a single strong material detail such as stone-look film or a wood top.
Look at the room where the table will live. A side table next to a dark green sofa may need a warm wood top or a neutral painted base. A table in a small bedroom may benefit from a pale color that feels lighter. A table beside a reading chair may need a wipeable, durable surface because coffee has a long and complicated relationship with furniture.
Supplies for a Basic IKEA Side Table Makeover
You do not need a workshop full of tools to upgrade a small table. Most projects can be completed with a few affordable supplies.
- Drop cloth, cardboard, or old sheet to protect the work area
- Mild cleaner or degreaser
- Fine-grit sanding sponge or sandpaper
- Bonding primer for laminate, metal, or slick surfaces
- Furniture paint, cabinet paint, acrylic enamel, or spray paint
- Small foam roller and angled paintbrush
- Wood filler for dents, holes, or seams
- Painter’s tape
- Clear topcoat or polyurethane if the table will get heavy use
- Optional upgrades such as decorative trim, wood dowels, contact paper, tile, handles, legs, or overlays
For most indoor side tables, a satin or eggshell-like finish gives a practical balance between durability and softness. High gloss can look glamorous but shows every fingerprint. Matte paint looks sophisticated but may need a durable clear coat if the table will hold drinks, plants, or the occasional dramatic candle arrangement.
How to Prep an IKEA Side Table for Paint
Preparation is not glamorous. Nobody walks into a room and says, “Wow, that degreasing work is incredible.” But preparation is what keeps your makeover from becoming a flaky disaster six weeks later.
Step 1: Clean Every Surface
Remove dust, fingerprints, oils, and residue with a mild cleaner or degreaser. Pay attention to the tabletop, edges, and areas near handles or trays. Let the surface dry completely before sanding or priming.
Step 2: Sand Lightly
For laminate or veneer furniture, use fine-grit sandpaper or a sanding sponge to dull the shiny finish. You are not trying to sand through the surface. Think “gentle exfoliation,” not “demolition crew.”
For unfinished wood, sand more thoroughly to smooth rough areas and remove splinters. Wipe away all sanding dust with a damp cloth or tack cloth before moving on.
Step 3: Fill Gaps and Damage
Use wood filler for scratches, chipped corners, visible screw holes, or gaps between decorative trim pieces. Allow the filler to dry, then sand it smooth. This small step creates a much more polished result, especially when using a dark paint color or a glossy finish.
Step 4: Prime the Table
A quality primer helps paint stick to smooth surfaces and creates a more even final color. Use a bonding primer for laminate, melamine, veneer, or previously finished furniture. Apply thin, even coats with a small foam roller, then use a brush only where the roller cannot reach.
Let the primer dry fully according to its instructions. Rushing here is how many DIY projects become an accidental texture experiment.
Five IKEA Hack Side Table Makeover Ideas
1. Add Fluted Trim for a High-End Look
Fluting is one of the most effective ways to make a plain side table feel custom. You can create the look by attaching narrow half-round wood dowels, flexible fluted trim, or decorative panels to the table’s sides.
Measure carefully before cutting or attaching anything. Keep spacing consistent, especially near edges. Glue the trim in place with a product suitable for your table material, fill tiny gaps if needed, then prime and paint the entire piece in one color.
Deep green, navy, warm taupe, black, and muted clay tones work especially well for fluted tables. Pair the finished piece with a simple lamp and one ceramic vase so the texture gets the attention it deserves.
2. Create a Faux Marble Tabletop
A faux marble top can make a simple IKEA side table feel far more elegant. The easiest version uses marble-look contact paper or peel-and-stick vinyl. Choose a pattern with realistic variation rather than one that looks like a printer had a nervous breakdown.
Clean the tabletop, measure with extra material around the edges, and apply the film slowly. Use a credit card or smoothing tool to remove air bubbles. Wrap the edges neatly or trim them closely for a clean finish.
For a more durable version, use a thin stone remnant, a piece of tile, or a cut-to-size wood top painted in a marble pattern. Just make sure the new top is securely attached and does not make the table unstable.
3. Turn a Tray Table Into a Mosaic Accent Piece
A metal tray table can become a playful mosaic side table with tile, broken ceramic pieces, or small glass mosaic squares. This project works beautifully in sunrooms, reading corners, colorful bedrooms, or anywhere that could use a little personality.
Plan the pattern before gluing. You can create a simple checkerboard, a sunburst, a floral border, or an abstract arrangement. Use adhesive appropriate for the tile and surface, then grout if your materials require it. Seal the finished surface if needed and allow enough curing time before putting anything on top.
Keep the design simple if this is your first mosaic project. A limited color palette usually looks more intentional than a table that resembles a broken jewelry box.
4. Add New Legs and Decorative Hardware
Changing the legs can completely alter the visual weight of a side table. Tapered wood legs create a mid-century profile. Short bun feet add a traditional touch. Slim metal legs can make a chunky table feel lighter and more contemporary.
Before adding legs, check the bottom structure. Some lightweight tables may need a reinforcing wood base or mounting plate so the legs stay secure. Make sure all four legs are level before painting or styling the table.
If your table includes drawers or doors, replace plain hardware with knobs or pulls that match the room. Brass, black, wood, ceramic, acrylic, and leather pulls can each create a very different mood with almost no effort.
5. Use Paint and a Graphic Pattern
Paint is the fastest route to a dramatic IKEA furniture makeover. You can keep it simple with one rich color or add a pattern for a more decorative finish.
Try a checkerboard tabletop, painted scallops around the edge, a striped lower shelf, or a two-tone design with one color on the top and another on the legs. Painter’s tape is useful for crisp lines, but remove it carefully before the paint becomes completely hard to avoid pulling up the edge.
A simple black-and-cream checkerboard table works in modern, vintage, and eclectic rooms. Soft blue and white stripes create a coastal look. A tone-on-tone pattern in beige and taupe can add detail while staying calm.
How to Finish and Protect Your Side Table
A side table gets more wear than you may realize. It catches drinks, books, plants, charging cables, snack bowls, and whatever you empty from your pockets when you walk through the door. A durable finish helps your hard work survive normal life.
Apply paint in thin, even coats rather than trying to achieve full coverage immediately. Two or three light coats usually look smoother than one thick coat. Use a foam roller for broad surfaces and an angled brush for corners and trim.
Once the paint is fully dry, consider adding a clear protective topcoat. Choose a finish that matches your desired look: matte for a soft modern surface, satin for everyday durability, or gloss for a more dramatic effect. Let the table cure completely before using it. Dry paint is not always fully hardened paint, and a fresh mug can leave a surprisingly permanent souvenir.
Common IKEA Side Table Makeover Mistakes to Avoid
Skipping Primer on Laminate
Paint can struggle to bond to slick surfaces. A bonding primer gives the finish something to grip, especially on laminate, melamine, and veneer. Skipping it may save twenty minutes now and create a repair project later.
Using Too Much Paint at Once
Thick coats can create drips, brush marks, and uneven edges. Thin coats require patience, but they make the table look smoother and more professional.
Forgetting About the Edges
Edges are where a makeover often looks unfinished. Paint or wrap them carefully, seal exposed wood if necessary, and inspect the table from every angle before calling the project complete.
Adding Heavy Materials Without Checking Stability
Tile, stone, thick wood tops, and large decorative elements can make a lightweight table top-heavy. Test the table on a flat surface before using it. If it wobbles, correct it before placing a lamp, glass vase, or coffee near the edge.
Styling It Before It Has Fully Cured
It is tempting to place a lamp, stack of books, and perfect little bowl on the table immediately. Resist. Give the finish enough time to harden so your styling does not leave dents, rings, or sticky marks.
How to Style Your Finished IKEA Hack Side Table
Once your table is finished, styling should support the makeover rather than hide it. Start with one useful item, such as a lamp or small tray. Add one decorative item, such as a candle, vase, or framed photo. Then stop before the table becomes a tiny storage unit with an identity crisis.
For a living room side table, use a lamp, coaster set, and a small stack of books. For a bedroom table, add a compact lamp, a catchall dish, and a small plant. For an entryway table, use a tray for keys and a decorative object with a little height.
The best side table styling has breathing room. Your makeover should still be visible beneath the accessories.
Real-World Experiences With an IKEA Hack Side Table Makeover
The first thing many people learn during an IKEA side table makeover is that the table itself is usually not the difficult part. The difficult part is deciding when to stop adding ideas. A simple project can begin with, “I’ll just paint this little table,” and somehow end with three paint samples, decorative trim, a new lamp, a rug search, and a sudden belief that the entire room needs a personality refresh.
A common experience is underestimating how much preparation affects the final result. People often expect the exciting part to be the paint color, but the best transformations usually come from cleaning carefully, sanding lightly, filling dents, and using primer. These steps feel slow because they are slow. Still, they create the smooth foundation that makes a low-cost table look refined instead of rushed.
Another frequent lesson is that a small table is an excellent place to test a design trend before committing to it in a larger room. Fluted trim, bold green paint, faux marble, checkerboard patterns, and brass accents can feel intimidating on a large cabinet or wall. On a side table, they are manageable. If you love the result, you have a stylish accent piece. If you do not, you have learned something useful about your taste without repainting your entire kitchen.
Many DIYers also discover that the “perfect” finish is rarely necessary. Small brush marks, slight texture, and tiny imperfections often disappear once the table is placed beside a sofa or bed and styled with everyday objects. Furniture is meant to be used. A side table that looks good while holding a coffee cup and a novel is more successful than one that looks flawless but makes you afraid to set anything on it.
Color selection can be surprisingly emotional. A dark navy table may look sophisticated in a photo but feel too heavy in a small room. A pale blush may look charming in the store but feel overly sweet next to existing furniture. Testing paint on a hidden area or sample board helps, especially in rooms with changing light. Morning sunlight, evening lamp light, and rainy-day shadows can make the same color feel like three separate personalities.
People also learn that hardware and legs have more impact than expected. Replacing plain knobs with brass pulls or ceramic handles can instantly make a table feel more intentional. Adding tapered legs can make a low, boxy piece look lighter and more elegant. These changes are often easier than building an entirely new table from scratch, but they still create the satisfying feeling that you made something personal.
The best experience is usually the moment someone asks where the table came from. That is when the makeover has done its job. You get to say, “It started as an IKEA table,” while casually pretending you were not watching paint dry with the intensity of a detective solving a case.
An IKEA hack side table makeover is not really about fooling people into thinking you bought designer furniture. It is about creating something that fits your home better than the original version did. It can reflect your favorite colors, your budget, your style, and your willingness to spend a weekend turning a practical piece of furniture into a small victory.
Conclusion
An IKEA hack side table makeover proves that a small furniture project can have a big visual payoff. With thoughtful preparation, the right paint or finish, and one or two personal details, a plain table can become a custom-looking piece for your bedroom, living room, office, or entryway.
Start with a clear style direction, choose materials that suit the table’s surface, and prioritize durability where it matters most. Whether you add fluted trim, a faux marble top, colorful tile, new legs, or a bold paint pattern, the result should feel useful, personal, and just a little more exciting than the table you brought home in a flat box.