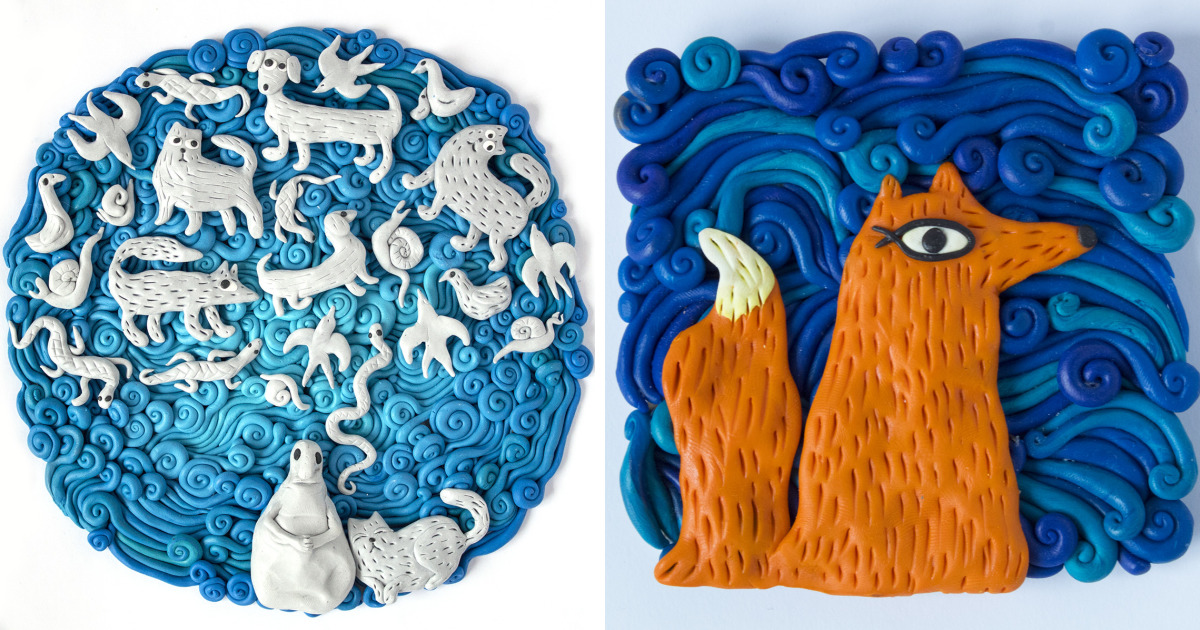
There is a special kind of happiness that happens when a small block of polymer clay becomes a tiny bird, a pink sunset, a cottage window, or a flower petal so cute it looks like it pays rent in a fairy garden. I had forgotten that feeling. For a while, art had become something I admired from a safe distance, like people who can parallel park on the first try. Then I rediscovered the joy of creating pictures from polymer clay, and suddenly my table was covered in color, texture, fingerprints, and one suspicious crumb that may or may not have been clay.
Polymer clay picture art sits somewhere between painting, sculpting, collage, and very patient snack-making. Instead of brushing color onto a flat canvas, you shape the color itself. You roll it, slice it, press it, blend it, layer it, bake it, and occasionally whisper encouraging things to it when a tiny leaf refuses to behave. The result is a picture with dimension: a raised landscape, a textured portrait, a floral panel, a whimsical animal scene, or an abstract design that looks far more expensive than the humble tools used to make it.
This article explores why polymer clay art is so satisfying, how to make polymer clay pictures, what tools and techniques help beginners, and why this hands-on craft can feel like a tiny vacation for the brain. Whether you are a returning maker, a curious beginner, or someone with a drawer full of abandoned craft supplies silently judging you, polymer clay offers a joyful way back into creativity.
What Makes Polymer Clay So Perfect For Picture Making?
Polymer clay is an oven-bake modeling material, usually based on PVC, that stays soft until cured with heat. Unlike natural pottery clay, it does not need a kiln, water bucket, or dramatic studio apron. You can work with it at a desk, kitchen table, or craft corner, then bake most projects in a home or craft oven according to the manufacturer’s directions.
For picture-making, this matters because polymer clay behaves like both pigment and sculpture. A blue block can become sky. A green sheet can become grass. A rope of brown clay can become tree bark. A translucent blend can become glowing petals. You are not merely drawing a sunflower; you are building it petal by petal until it practically demands a vase.
A Medium With Built-In Color
One of polymer clay’s biggest charms is that it comes in many colors and special effects, including translucent, metallic, pearl, granite-like, and glittery varieties. You can mix colors the way painters mix paint, but with the satisfying squish of dough. Need dusty rose? Mix a little red, white, and beige. Need moss green? Add a touch of brown to green and pretend you are a forest chemist.
Texture That Tells A Story
Polymer clay picture art becomes especially expressive when texture enters the scene. A toothbrush can stipple sand. A needle tool can carve hair, feathers, or grass. Lace can impress delicate patterns into clay. Aluminum foil can create stone texture. Even the back of a clean button can become a decorative stamp. This makes polymer clay pictures feel alive, because light catches the raised details differently throughout the day.
Why Rediscovering Polymer Clay Feels So Good
Returning to a creative hobby is not just about making pretty things. It is about remembering that your hands know how to think. Many of us spend our days tapping screens, answering messages, organizing deadlines, and becoming emotionally attached to browser tabs. Polymer clay interrupts that digital fog. It asks you to slow down, notice color, shape small pieces, and accept that a handmade moon may be slightly lopsided but still charming.
Creative activities, including drawing, sculpting, collage, and craft-based work, are often associated with relaxation, emotional expression, and stress relief. Polymer clay is especially grounding because it is tactile. You feel the material warm as you condition it. You notice resistance when it is too firm and softness when it is ready. That physical feedback pulls attention away from overthinking and back into the present moment.
In other words, polymer clay does what a good hobby should do: it gives the mind a job that is meaningful but not terrifying. Nobody is asking your tiny clay mushroom to file taxes. It simply needs to be adorable.
How To Start Creating Pictures From Polymer Clay
You do not need a professional art studio to begin. In fact, the best first setup is refreshingly simple. Start with a few colors of oven-bake polymer clay, a smooth work surface, a craft knife, an acrylic roller, parchment paper, a needle tool or toothpick, and an oven thermometer. Add baby wipes or rubbing alcohol for cleaning your hands and surface between colors, because white clay has a supernatural ability to attract every speck of dust within a five-mile radius.
Step 1: Choose A Simple Picture Idea
Beginners often make the mistake of starting with a masterpiece-level concept: a full dragon battle at sunset, perhaps, or a realistic portrait of their dog wearing sunglasses. Ambition is wonderful, but polymer clay rewards clear shapes. Start with a small floral scene, a moon and stars, a cozy cottage, a fruit bowl, a landscape, or a simple animal silhouette.
Sketch the idea lightly on paper first. You do not need to be a great drawer. A basic outline helps you plan where the background, main shapes, and raised details will go. Think of it like a map, except the destination is “less chaos.”
Step 2: Build A Strong Background
Many polymer clay pictures begin with a flat base layer. Roll out clay evenly, place it on parchment paper or a ceramic tile, and trim it into a rectangle, circle, oval, or freeform shape. You can also build directly onto a small wooden panel or canvas board, but check whether your chosen surface can safely handle the baking temperature required by your clay.
For a landscape, blend two or three colors into a gradient sky. For a floral piece, use a neutral background so the petals pop. For abstract art, layer thin shapes and textures like a tiny sculptural collage. Keep the background fairly thin and even, because thick areas take longer to cure properly.
Step 3: Layer Your Picture From Back To Front
Think like a stage designer. The sky goes first, then distant hills, then trees, then flowers, then final tiny details. Polymer clay pictures look cleaner when you build in layers from the background forward. Press pieces gently so they adhere without flattening every detail. Liquid polymer clay or oven-bake adhesive can help attach elements, especially when adding delicate pieces to a baked or partially baked surface.
Step 4: Add Texture And Personality
This is where the fun gets dangerous in the best way. Use a needle tool to draw veins into leaves. Roll tiny balls for flower centers. Twist two colors together for tree bark. Press dots into a night sky. Add little windows, roof tiles, whiskers, berry clusters, or waves. The smallest details often make the picture feel magical.
Try not to overwork the surface. Polymer clay keeps fingerprints, smudges, and tool marks. Sometimes that handmade texture is beautiful. Sometimes it looks like a raccoon helped. Smooth gently with your fingertip, a silicone tool, or a dab of clay softener when needed.
Essential Polymer Clay Techniques For Picture Art
Conditioning The Clay
Conditioning means warming and kneading polymer clay until it becomes flexible and workable. You can do this by hand, with an acrylic roller, or with a pasta machine dedicated to clay. Proper conditioning prevents cracking and makes it easier to create thin sheets, smooth blends, and clean shapes. If your clay crumbles at first, do not panic. It may simply need patience, warmth, or a compatible clay softener.
Color Blending
Color blending is one of the most useful skills for polymer clay picture making. A simple gradient can turn a plain background into a sunrise. A marbled mix can become stone, clouds, water, or petals. Blend slowly and test small amounts before committing, because colors can become muddy if mixed too enthusiastically. Polymer clay is forgiving, but it is not immune to “I accidentally invented swamp brown.”
Canes And Slices
Polymer clay canes are logs of layered clay with a design running through the center. When sliced, each piece reveals the same pattern. Canes are popular for flowers, leaves, fruit, stars, and geometric designs. For picture art, cane slices can become repeated petals, patterned borders, tiny lemons on a kitchen scene, or decorative tiles in a miniature wall.
Relief Sculpting
Relief sculpting is the heart of polymer clay picture art. Instead of making a fully three-dimensional object, you build raised forms on a flat surface. Low relief creates subtle dimension, while high relief makes elements stand out dramatically. A low-relief moon may sit softly in the sky; a high-relief flower may rise boldly from the panel like it is trying to escape into the room.
Baking Polymer Clay Pictures Safely And Successfully
Baking is where polymer clay changes from soft and flexible to firm and durable. Always follow the instructions on the clay package, because brands and product lines vary. Many common polymer clays cure around 275 degrees Fahrenheit, with baking time based on thickness, but the label should be your final authority.
An oven thermometer is one of the smartest tools you can buy. Home ovens often run hotter or cooler than their settings, and polymer clay can darken or scorch if overheated. Place your work on parchment paper, a ceramic tile, or another oven-safe surface. To protect delicate raised areas from browning, some makers use a loose foil tent or place another pan over the piece, leaving space so it does not touch the art.
Do not rush baking by raising the temperature. Polymer clay is not a frozen pizza, and even frozen pizza has trust issues. Underbaked clay may become weak or brittle, while overheated clay can discolor and smell unpleasant. Let the piece cool completely before handling, painting, sealing, or mounting it.
Painting, Sealing, And Finishing Touches
One beautiful thing about polymer clay is that you can make art using colored clay alone. However, painting can add shadows, highlights, fine lines, and expressive details. Acrylic paint and acrylic inks are commonly used, but not every paint or sealer behaves well on polymer clay. Some finishes can remain sticky, especially if they are not compatible with the clay surface.
Before painting an important piece, test your paint or varnish on a scrap of baked clay. This tiny experiment can save you from the heartbreak of watching a finished picture turn tacky, cloudy, or weirdly shiny in the wrong places. If you want a natural clay look, skip heavy varnish and polish raised areas gently. If you want shine, use a polymer-clay-safe gloss glaze.
Common Mistakes Beginners Make
Using Too Much Detail Too Soon
Details are delightful, but too many tiny elements can overwhelm a first project. Start with a clear focal point. A single bouquet, a small bird on a branch, or a moonlit hill can be more powerful than a crowded scene where every leaf is fighting for attention.
Forgetting About Thickness
Uneven thickness can affect curing. If one area is very thick and another is paper-thin, the piece may bake unevenly or become fragile. Build dimension gradually and keep structural areas strong enough to handle.
Ignoring Dust And Lint
Polymer clay is basically a lint detective. It finds fibers you did not know existed. Clean your hands, tools, and work surface often. Work with light colors first, then darker colors. Keep unused clay wrapped or stored away from heat, sunlight, and dust.
Expecting Perfection
The first few pieces may look charmingly chaotic. That is normal. Handmade art has a learning curve, and polymer clay has its own personality. Every project teaches something: how thin petals can be, how colors bake, how textures behave, and how many times you can drop a tiny clay eye before questioning your life choices.
Creative Polymer Clay Picture Ideas To Try
Botanical Panels
Create raised flowers, leaves, mushrooms, and vines on a neutral background. Botanical polymer clay pictures are beginner-friendly because organic shapes do not need perfect symmetry. A slightly uneven petal often looks natural, which is great news for humans with hands.
Miniature Landscapes
Build rolling hills, clouds, trees, rivers, and tiny houses. Use gradients for the sky and textured layers for grass or stone. A small landscape can feel like a window into another world.
Food Illustrations
Polymer clay is excellent for making miniature fruit, pastries, coffee cups, herbs, and kitchen scenes. A picture of lemons in a bowl or strawberries on a table can look cheerful, colorful, and slightly dangerous if you are hungry.
Pet Portraits
For a playful challenge, create a simplified pet portrait using layered shapes. Focus on the animal’s most recognizable features: ears, nose, markings, expression, and attitude. Especially attitude. Cats, for example, come with a lot of it.
Abstract Texture Art
If realistic scenes feel intimidating, go abstract. Combine shapes, lines, dots, metallic clay, marbling, and stamped textures. Abstract polymer clay pictures can be elegant, modern, and surprisingly calming to make.
Why Polymer Clay Pictures Make Wonderful Handmade Gifts
A polymer clay picture has a personal quality that mass-produced decor cannot copy. It shows time, touch, and intention. You can customize colors, names, flowers, pets, favorite places, or inside jokes. A tiny clay picture of a friend’s first apartment, wedding bouquet, garden, or beloved dog can become a keepsake with emotional weight far beyond its size.
Because polymer clay cures into a durable material, finished pieces can be framed, mounted, turned into ornaments, displayed on mini easels, or attached to shadow boxes. The key is to protect delicate raised elements and avoid placing finished art in extreme heat or direct sunlight for long periods.
The Quiet Joy Of Making With Your Hands Again
Rediscovering polymer clay reminded me that creativity does not always arrive with a grand announcement. Sometimes it returns as a small block of color. You sit down for twenty minutes, roll a petal, shape a cloud, press a texture, and suddenly the day feels less flat. The picture grows slowly, and so does your confidence.
There is also joy in the forgiving nature of the material. If a shape looks wrong, you can peel it up and try again before baking. If colors clash, blend them into something new. If a project fails completely, it becomes a lesson, a test tile, or a very fancy object for holding emotional growth.
Polymer clay picture art is not about proving you are an artist. It is about allowing yourself to make something visible from an invisible feeling. It is color therapy with a baking step. It is sculpture for people who like stories. It is painting for people who want the paint to have squish.
Experience Notes: Rediscovering The Joy Of Creating Pictures From Polymer Clay
The first experience that makes polymer clay picture-making so memorable is the moment the material softens in your hands. At first, the block may feel stiff, stubborn, and about as cooperative as a Monday morning. But after a few minutes of conditioning, it becomes warm and pliable. That change feels symbolic. The clay relaxes, and so do you. Suddenly, the idea that seemed too complicated becomes approachable. A flower is just a flattened oval. A tree is just a rolled rope with texture. A bird is just a teardrop shape with confidence.
Another enjoyable part is learning to see ordinary objects as tools. A toothpick becomes a drawing instrument. A toothbrush becomes a texture stamp. A bottle cap becomes a circle cutter. A piece of lace becomes a pattern-maker. This changes the way you look at your workspace. Instead of needing expensive supplies, you begin noticing possibilities everywhere. The craft becomes playful, almost like a scavenger hunt for texture.
There is also a wonderful rhythm to building a polymer clay picture. You do not finish everything at once. You create the background, then the main shapes, then smaller details, then highlights. Each step adds life. A plain green hill becomes a meadow after tiny yellow flowers appear. A simple blue sky becomes evening after a moon and a few stars are pressed into place. A flat brown branch becomes charming after leaves, berries, and a slightly confused bird join the scene.
The baking stage brings its own suspense. You place the piece in the oven, set the timer, and suddenly become the guardian of a tiny universe. When the picture comes out cured and cooled, it feels surprisingly official. What was soft and temporary is now solid. That transformation is deeply satisfying. It proves that small patient actions can become something lasting.
One of the best lessons from working with polymer clay is that mistakes are rarely final. A smudged color can become shadow. A crooked petal can become movement. A cracked piece can inspire a new design with vines, stones, or texture covering the flaw. Polymer clay teaches flexible thinking. Instead of asking, “How do I make this perfect?” you begin asking, “What can this become?” That question is useful far beyond the craft table.
Making pictures from polymer clay also offers a healthy break from perfection-driven creativity. The handmade look is part of the charm. Tiny fingerprints, soft edges, and uneven textures can make the art feel warm and human. In a world full of polished digital images, there is something refreshing about a picture that clearly came from real hands, real time, and real curiosity.
Most of all, rediscovering this craft brings back the joy of finishing something small. Not every creative project needs to become a business, a portfolio, or a viral post. Sometimes the reward is simply a small framed clay garden sitting on your shelf, reminding you that you made beauty out of little pieces. That is enough. More than enough, actually. It is the kind of enough that makes you want to open another block of clay and begin again.
Conclusion
Creating pictures from polymer clay is a joyful blend of sculpting, painting, collage, and storytelling. It is accessible enough for beginners, flexible enough for serious artists, and playful enough to make even a quiet afternoon feel adventurous. With a few colors, simple tools, safe baking habits, and a willingness to experiment, anyone can turn soft clay into flowers, landscapes, portraits, patterns, and tiny worlds full of personality.
Rediscovering polymer clay is really rediscovering creative patience. It reminds us that art can be slow, tactile, imperfect, and deeply satisfying. You do not need to wait for perfect inspiration. Start with one shape, one color, one small picture. The joy often arrives after your hands begin.