Most lamps begin with a practical question: “How much light does this room need?” This one apparently began with a much better question: “What would happen if the Knights of the Round Table hired a steampunk engineer?”
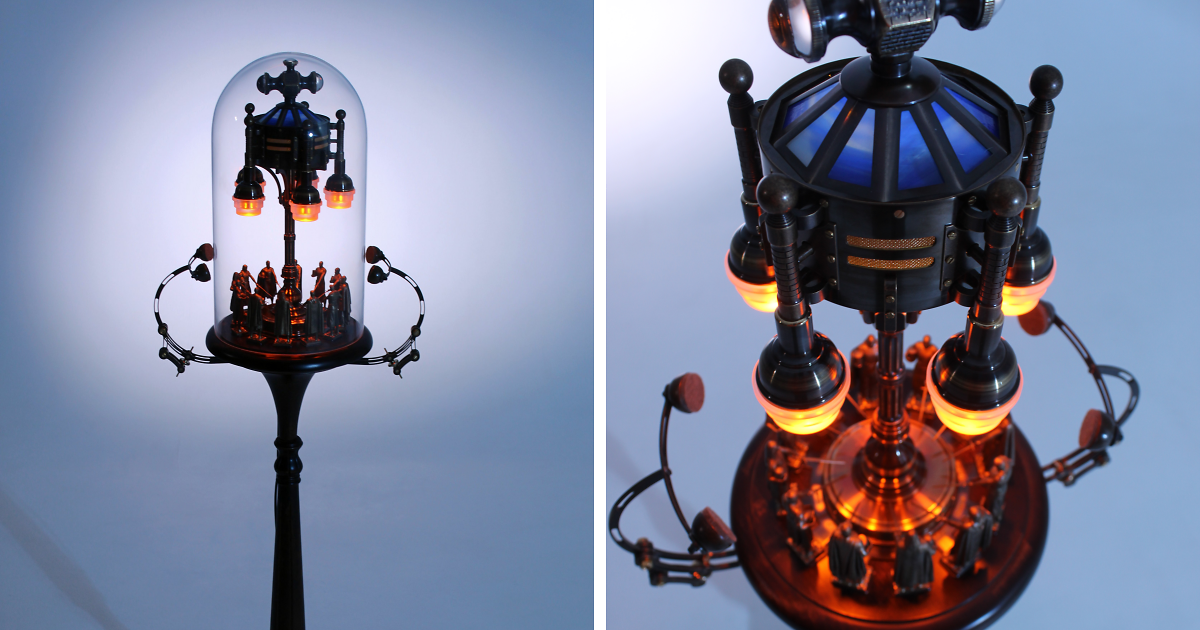
The result is a towering handmade lamp inspired by Arthurian legend, medieval architecture, stained glass, and the wonderfully overcomplicated machinery of steampunk design. Standing more than four feet tall, the piece contains individually designed knights, brass components, blue illumination, a symbolic cross, magnetic figure stands, custom electronics, and a protective glass dome. It is less a table lamp and more a tiny illuminated kingdom that happens to have a power switch.
Here is how a familiar medieval legend can be translated into a functional work of light, sculpture, and storytellingwithout simply gluing plastic gears to a lampshade and declaring victory.
Why the Knights of the Round Table Make a Brilliant Lamp Theme
Arthurian stories offer nearly everything a designer could want: heroic characters, mysterious symbols, monumental architecture, quests, magic, betrayal, sacred objects, and enough dramatic armor to keep a miniature painter busy until Camelot is rebuilt.
The Round Table is especially useful as a design idea because it creates a natural focal point. Every knight can face the same illuminated center, allowing the composition to feel organized rather than looking like several tiny warriors waiting for a delayed bus.
Medieval European art also provides a rich material vocabulary. Museum collections from the period contain metalwork, sculpture, stained glass, illuminated manuscripts, enamel, ivory, and ceremonial vessels. That variety gives a modern maker permission to combine brass, transparent panels, painted figures, architectural forms, and glowing details within one object.
Steampunk adds the second half of the visual equation. Its aesthetic mixes historical elegance with visible machinery, industrial materials, imagined mechanisms, and speculative technology. Brass pipes, switches, brackets, rivets, and wires therefore feel perfectly at home beside knights and Gothic windowseven though the historical periods are centuries apart. Steampunk has never been terribly bothered by calendars.
Picture 1: Beginning With the Legend

The project began with an image of the Knights of the Round Table. Rather than reproduce that scene literally, the maker used it as a narrative framework. This distinction matters. Strong themed design does not merely copy a costume, castle, or historical artifact. It asks which parts of the story can become shape, material, color, and light.
Here, the knights provide the characters. The circular gathering suggests composition. The Holy Grail quest introduces spiritual symbolism. Medieval churches inspire the stained-glass-style lighting, while steampunk supplies the brass skeleton and modern controls.
Turn the Story Into a Visual Map
Before building a similar lamp, write down four elements:
- The central legend: Arthur and the Knights of the Round Table.
- The emotional tone: Noble, mysterious, ceremonial, and slightly mechanical.
- The major symbols: Knights, a cross, a circular council, blue glass, and the Grail quest.
- The practical function: A stable lamp that produces layered ambient light.
This simple map keeps the project coherent. Without it, ambitious fantasy builds can become visual junk drawers containing a sword, a random dragon, seven gears, and something that may once have belonged to a kitchen faucet.
Picture 2: Building the Brass Framework

Brass is the bridge between the lamp’s two worlds. Its warm tone resembles historic metalwork, while pipes, fittings, fasteners, and brackets immediately suggest machinery. It also contrasts beautifully with cool blue illumination.
The secret is restraint. A convincing steampunk object should look engineered, not merely decorated. Each bracket should appear to support something. Each pipe should seem to carry power, light, or mysterious alchemical steam. Decorative fasteners should follow the geometry instead of being scattered across the surface like metallic sprinkles.
The original lamp was handmade down to its brass pieces and programmed switching system. That level of integration helps the mechanical elements feel essential rather than attached as an afterthought.
Design the Skeleton Before Adding Ornament
For a large sculptural lamp, begin with the load-bearing structure. Establish the base diameter, center of gravity, vertical supports, dome location, and access points for maintenance. Only then should ornamental tubes, shields, gears, and engraved panels enter the scene.
A useful rule is that the base should visually and physically balance the upper mass. A four-foot lamp with a narrow base may look elegant for several seconds, followed by a memorable crash and an awkward conversation with the glass supplier.
Picture 3: Creating a Lamp More Than Four Feet Tall

Scale transforms the project. At more than four feet in height, this is not a small novelty light for the corner of a desk. It occupies space like a sculpture, display cabinet, or piece of architectural furniture.
That size allows the viewer to discover the piece gradually. From across the room, the silhouette and blue glow dominate. At a closer distance, the brass framework becomes visible. Move closer again, and the individual knights, miniature bases, painted armor, symbols, and internal lighting reveal themselves.
Use Layers to Make Large Designs Interesting
A successful oversized lamp needs more than height. It needs visual layers:
- A strong outer silhouette
- A middle architectural layer of arches, windows, and supports
- An interior narrative scene
- Small details that reward close viewing
This layered approach is closely related to the way historical religious and ceremonial objects were designed. Materials, figures, color, and reflected light worked together to create an experience larger than any single detail.
Picture 4: Designing, Printing, and Painting the Knights

The knights are the emotional center of the lamp. According to the project description, they were invented, drawn, printed, and painted specifically for the piece. That sequence turns them from accessories into original cast members.
Custom modeling makes it possible to vary helmets, shields, poses, armor, and heraldic details. One figure can appear cautious, another proud, another battle-worn, and another suspiciously interested in becoming king before the current monarch has left the room.
Make Small Figures Read Clearly
Miniatures inside a lamp must be legible under unusual lighting. Fine details alone are not enough. Strong silhouettes, exaggerated poses, contrasting armor panels, and clearly defined shields matter more than tiny surface textures that disappear beneath the dome.
After printing, the figures should be cleaned, primed, and painted in thin layers. Common miniature techniques include washes for deep shadows, drybrushing for raised edges, and glazing for subtle color transitions. These methods emphasize sculpted detail without burying it beneath thick paint.
The palette should coordinate with the lighting. Silver, muted gold, iron, leather brown, dark red, and deep blue work especially well. Extremely bright colors can make a knight look less like a defender of Camelot and more like the mascot of a medieval breakfast cereal.
Picture 5: Mounting the Knights on Magnetic Stands

The figures sit on magnetic bases, an elegant solution that combines display flexibility with practical maintenance. The knights can be removed for cleaning, painting repairs, photography, or rearrangement. They can also be positioned without visible screws passing through the scenic platform.
Magnets are particularly useful beneath a protective dome because reaching into the composition may otherwise require dismantling several structural components. A removable figure is much easier to rescue if Sir Lancelot develops a chipped helmet or decides to fall face-first during transportation.
Plan the Magnets Before Printing
For a custom build, magnet recesses should be included in the digital models or drilled into sufficiently thick bases. Matching steel plates or concealed magnets can then be installed beneath the display surface. Polarity should be checked before adhesive is applied. Discovering that every knight is magnetically repelled from Camelot is amusing only once.
Picture 6: Adding the Blue Stained-Glass Illumination

A blue illuminated window creates one of the lamp’s most powerful effects. Historically, stained glass was not merely colored construction material. It served as a form of painting and visual storytelling, using transmitted light to animate religious figures, symbols, and narratives. During the Gothic era, large stained-glass cycles became major features of European sacred architecture.
Within a modern lamp, that tradition can be interpreted with real stained glass, painted glass, acrylic, resin, translucent film, or layered printed panels. The goal is not necessarily museum-level historical reconstruction. It is to produce rich, uneven color that feels deeper than an ordinary blue plastic sheet.
Diffuse the LEDs
Individual LED points can ruin the illusion by creating a row of bright electronic dots behind the window. A diffusion layersuch as frosted acrylic, translucent resin, or sufficient air spacehelps merge those points into a continuous glow.
Programmable RGB or RGBW LEDs allow the window to shift gently in intensity or color. However, addressable LEDs require correct voltage, adequate power capacity, and protective components appropriate to the selected system. Manufacturer documentation should always be followed rather than trusting a wiring diagram posted online by someone named “VoltageWizard420.”
Picture 7: Lighting the Cross and Referencing the Holy Grail

The cross at the top of the lamp is not simply an architectural finial. Its illumination refers to the spiritual dimension of the Grail tradition and the relationship between the knights, faith, worthiness, and the sacred quest.
This is an excellent example of meaningful ornament. The symbol completes the vertical story: the knights gather below, the glowing window occupies the middle, and the cross crowns the structure. The viewer’s eye naturally travels upward, turning the lamp into a miniature pilgrimage in brass and blue light.
Let Symbolic Lights Behave Differently
The cross does not need to match the window exactly. A warmer, softer, or slower pulse can visually separate it from the blue architectural illumination. Multiple lighting zones allow each symbolic element to perform a different role while remaining part of one composition.
Picture 8: Protecting the Finished Scene With a Glass Dome

The large glass dome provides a polished final enclosure, refracts the internal light, and protects the miniature environment from dust. Side brackets help guard the dome against accidental tipping or displacement.
The dome also changes the psychology of the object. Once enclosed, the knights no longer feel like loose models arranged on a platform. They appear preserved inside a self-contained world, somewhere between a museum display, a reliquary, and an extremely dramatic snow globe without the snow.
Keep Maintenance Possible
The enclosure should lift away or open without disturbing the wiring. The lamp will eventually need dusting, a loose figure may require attention, and an electronic component may need replacement. Permanent sealing looks wonderfully tidy until the first repair.
How to Build Your Own Medieval Legend Lamp Safely
Start With a Low-Voltage Lighting System
Low-voltage LED modules are generally more appropriate for complex handmade display pieces than improvised line-voltage wiring. Use a listed power supply with the correct output and keep mains-voltage components enclosed and inaccessible. Any work involving household wiring should be completed or reviewed by a qualified electrician.
Electrical safety is not the portion of the project where historical authenticity should be pursued. Medieval candles were atmospheric, but they were also excellent at turning expensive buildings into cautionary tales.
Use Certified Components and Proper Strain Relief
Power cords, plugs, switches, connectors, and supplies should be rated for the intended electrical load. The U.S. Consumer Product Safety Commission identifies inadequate wire size, poor strain relief, and missing overcurrent protection as serious risks in decorative lighting products.
Do not allow cords to rub against sharp metal edges. Add grommets where wires pass through brass or steel, secure cables so they cannot be pulled from terminals, and provide ventilation around power components.
Prototype Before Making the Final Parts
Build the project in inexpensive materials first. Cardboard, foam board, wooden dowels, and temporary LED strips can answer major questions about proportion and brightness. A full-scale mock-up may reveal that the dome is too narrow, the knights are hidden, or the cross appears to be floating several inches above the building for reasons no legend adequately explains.
Photograph the Lamp With the Room Lights Low
To capture all eight views effectively, photograph the lamp both illuminated and unlit. The unlit photographs reveal brasswork, painting, and construction details. The illuminated photographs show the blue window, glowing cross, reflections, and atmosphere.
Use a tripod and reduce surrounding light rather than forcing the lamp to compete with ceiling fixtures. Include one photograph with a person or recognizable piece of furniture nearby so readers can understand the four-foot scale.
Experiences From the Workbench: What a Project Like This Teaches You
The most memorable part of a complex themed lamp is rarely the moment it is finally switched on. The real experience is the long chain of decisions that slowly turns an idea into an object.
The Story Solves More Problems Than Expected
At the beginning, a medieval legend may seem like decoration placed on top of a lighting project. During development, it becomes a design tool. When choosing between two shapes, colors, or materials, the story provides an answer. Does the part belong in Camelot? Does it support the Grail theme? Does it look ceremonial, mechanical, or mysterious?
This prevents random additions. Makers often collect attractive components and then feel obligated to use every one of them. A clear narrative gives permission to reject pieces that are impressive but irrelevant. That restraint is surprisingly difficult, especially when the rejected component is a magnificent brass pressure gauge purchased at great emotional expense.
Scale Magnifies Every Tiny Mistake
A crooked bracket on a six-inch model might look charmingly handmade. The same error repeated across a four-foot lamp becomes an architectural policy. Large builds teach the value of templates, centerlines, measuring from fixed reference points, and checking symmetry before adhesive cures.
Scale also affects lighting. A small LED that looks bright during a desk test may disappear inside a tall enclosure. Reflections can create unexpected hotspots, while painted details may become invisible. Testing the complete lighting arrangement in darkness and normal room conditions is therefore essential.
Miniatures Need Personality, Not Just Detail
Painting several knights reveals how easily similar figures can blend into one metallic crowd. The enjoyable part is giving each character a readable identity. A shield can be cleaner or more battered. One knight can wear warmer metal tones, while another carries a dark blue cloak. A slightly turned head can suggest suspicion, loyalty, or the realization that the meeting should have been an email.
Those differences do not need to be historically precise to be effective. They simply need to make the viewer pause and look from one figure to the next. A successful scene encourages people to invent their own relationships among the characters.
The Final Assembly Is Both Exciting and Terrifying
Once the painted figures, lighting, brass structure, glass, magnets, and programmed controls come together, the project changes character. Separate craft exercises suddenly become one object. That moment is deeply satisfyingand also the moment when every maker becomes aware of fingerprints on the glass.
Careful assembly order helps. Test the electronics before installing the figures. Clean the inside of the dome before lowering it. Photograph difficult-to-reach details before they are enclosed. Keep spare LEDs, connectors, paint mixtures, and replacement magnets labeled for future repairs.
The Best Handmade Lamps Create a Ritual
A normal lamp is switched on because the room is dark. A narrative lamp is switched on because someone wants to experience it. The gradual appearance of the blue window, the illuminated cross, the knights, and the brass reflections creates a tiny performance.
That is the lasting lesson of turning a medieval legend into a lamp. Function does not have to eliminate fantasy. Technology does not have to look anonymous. A switch can begin a story, a light can reveal a world, and a group of miniature knights can make an ordinary corner of a room feel suspiciously close to Camelot.
Conclusion
This medieval steampunk lamp succeeds because every major feature supports the same idea. The handmade brass structure introduces the machinery. The original knight figures establish the Arthurian story. Magnetic stands make the scene adaptable. Blue window lighting evokes medieval stained glass, while the illuminated cross points toward the Holy Grail tradition. Finally, the large glass dome protects the work and turns it into a complete display.
The project is ambitious, but its core method is surprisingly accessible: choose a story, identify its strongest symbols, translate those symbols into materials, and use light to connect them. The result does not need to duplicate this four-foot creation. It could be a smaller Round Table night-light, a glowing castle bookend, or a single knight beneath a miniature dome.
Just remember that the most convincing fantasy objects are built with real planning. Camelot may be legendary, but stable bases, safe electronics, removable panels, and properly secured glass are very real indeed.