Got a PDF that needs to become a real-life bookletlike a program, a mini manual, a zine, or that “totally not last-minute”
school handout? Good news: Adobe Acrobat Reader (still commonly called “Adobe Reader”) can arrange pages automatically so
they print in the right order for folding and binding. The result is a clean, professional-looking booklet… assuming your printer
doesn’t decide it’s auditioning for a reality show.
This guide walks you through the exact booklet-print workflow in five steps, plus the settings that matter most:
Booklet Subset (Both sides vs. Front/Back only), Binding, paper size, duplex flipping, and quick fixes for the
most common “why is everything upside down?” moments.
What “Booklet Printing” Actually Does (and Why It’s Different)
When you print “normally,” page 1 prints first, then page 2, then page 3… simple. Booklet printing is sneaky-smart: it places
two PDF pages on each side of a sheet in a specific order so that when you fold the stack in half, the pages read
correctly like a little book. For example, the first sheet might contain the cover (page 1) paired with the last page on the same
sidebecause that’s how folded booklets work.
One important reality check: most folded booklets work best when your total page count is a multiple of 4
(4, 8, 12, 16, etc.). If you’re not at a multiple of 4, you may end up with a blank page or two at the end (which can be fine
some people call that “notes space” and pretend it was intentional).
Before You Start: Quick Checklist
- Adobe Acrobat Reader installed (desktop version for best control).
- A PDF that’s ready to print (preferably sized for Letter or A4).
- Paper (Letter or A4 is common; heavier paper looks nicer for covers).
- Duplex printing (automatic is easiest; manual duplex also works with care).
- One test sheet worth of patience (trust metest first).
The 5 Steps to Print a Booklet in Adobe Reader
-
Step 1: Open the PDF and launch the Print dialog
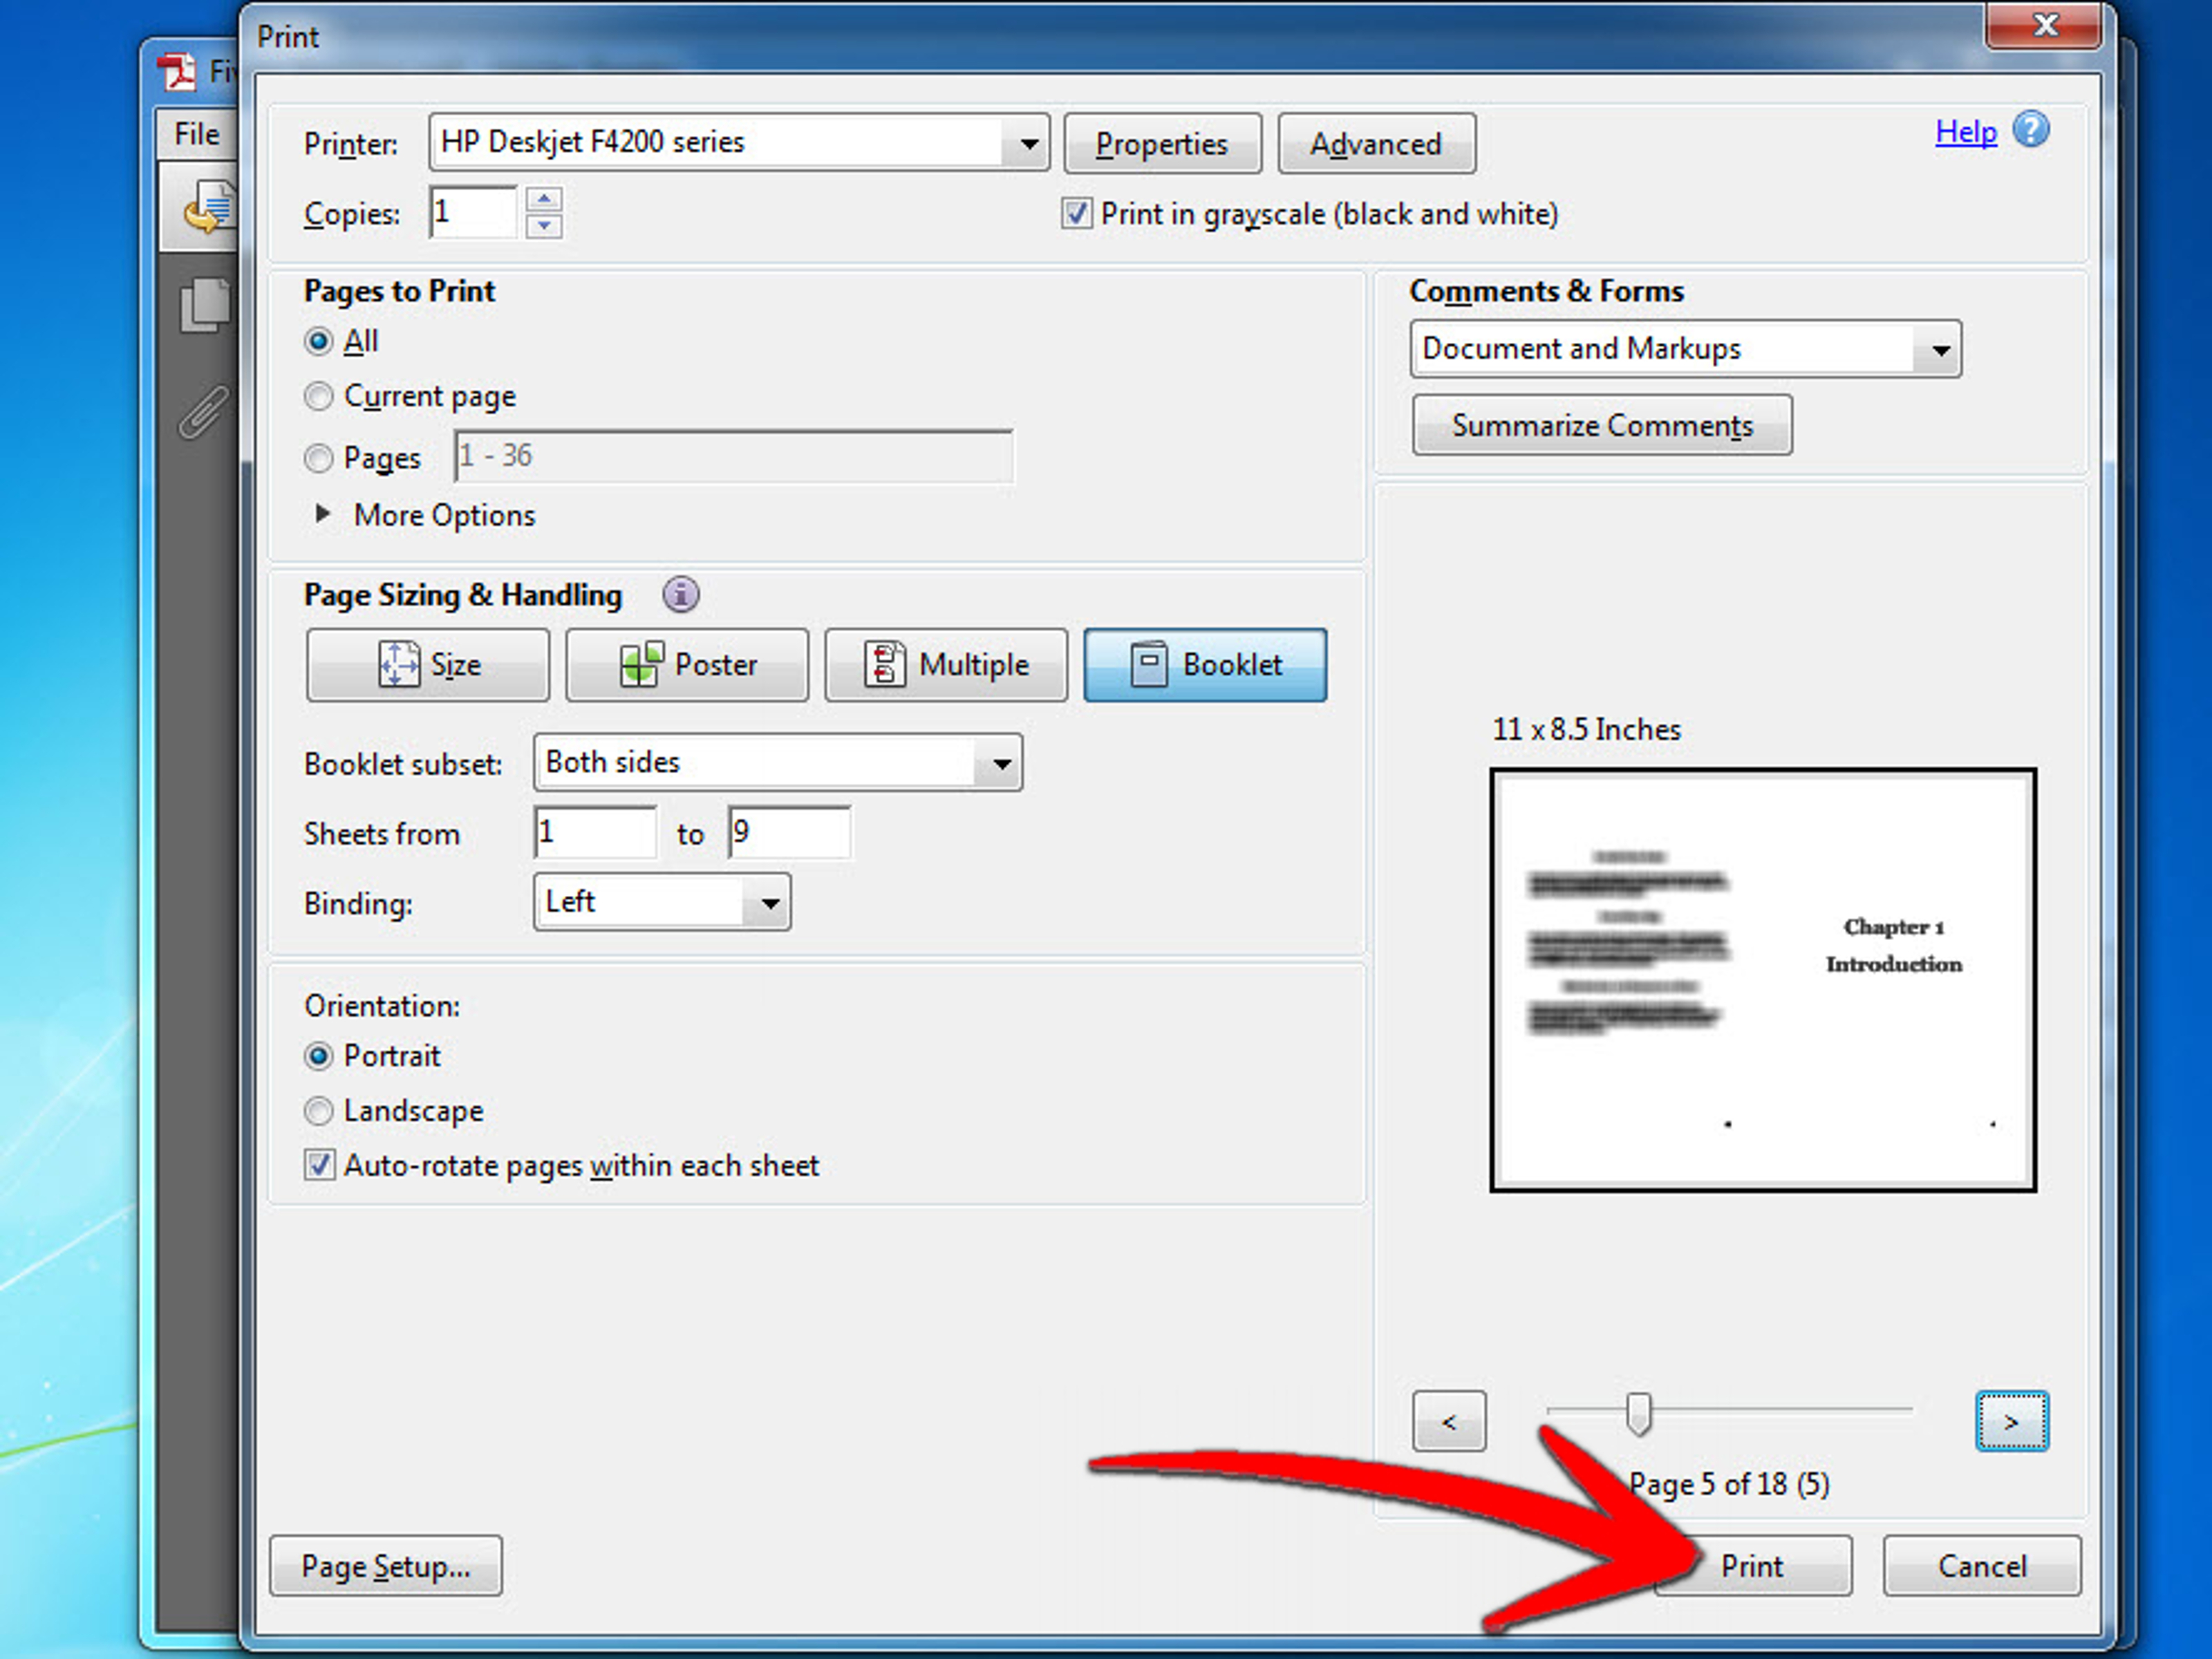
Open your PDF in Adobe Acrobat Reader, then go to File > Print (or press Ctrl+P on Windows,
Cmd+P on Mac). You’ll see a print dialog with a previewthis preview is your best friend and your last line of defense.Pro tip: If your print dialog looks “cut off” and you can’t see the Print button, try resizing the window,
scrolling inside the dialog, or adjusting display scaling. (Yes, it’s annoying. No, you’re not the first.) -
Step 2: Choose the correct printer and paper size
Select your printer from the Printer dropdown. Then confirm the paper size your printer will actually use
(usually Letter (8.5" x 11") in the U.S. or A4 elsewhere).If you need a different paper size, click Properties (Windows) or your printer’s settings button (Mac),
and set the paper size there. Adobe Reader can arrange the booklet pages beautifully, but it can’t override a printer driver that’s
stubbornly set to the wrong paper tray.Example: Printing a half-sheet booklet (final size 5.5" x 8.5")? You typically still print on
Letter paper, fold it in half, and staple along the fold. The booklet setting does the page ordering; the paper does the folding. -
Step 3: Select “Booklet” under Page Sizing & Handling
In the print dialog, find the section labeled something like Page Sizing & Handling (wording varies a bit by version).
Choose Booklet. This is the magic switch that turns “regular printing” into “foldable booklet printing.”Once Booklet is selected, look for booklet-specific settings such as:
- Booklet subset (Both sides / Front side only / Back side only)
- Binding (Left, Right, and sometimes Tall options)
- Sheets from (usually leave this alone unless you know you need only part of the booklet)
- Auto-rotate pages within each sheet (often helpful for mixed-orientation PDFs)
-
Step 4: Set Booklet Subset + Binding (duplex vs manual duplex)
This step decides whether you’ll have a smooth experience or a “why are pages 2 and 3 on different planets?” experience.
Choose your Booklet Subset
- Both sides: Pick this if your printer supports automatic duplex (prints front and back by itself).
- Front side only: Pick this for manual duplex (you print one side, then reinsert the stack).
- Back side only: Use this after printing Front side only, once you’ve flipped/reloaded the paper correctly.
Pick the Binding direction
For most English documents that read left-to-right, choose Left binding. If you’re printing something that opens the other way,
choose Right binding. “Tall” binding options typically help when your original pages are landscape-oriented but you still want a proper fold.If your duplex pages come out upside down
This usually isn’t Adobe Reader being chaoticit’s the duplex flip setting in your printer driver:
Flip on long edge vs flip on short edge. Portrait documents often want one; landscape often wants the other.
If your back side text is inverted, change the duplex flip option in printer properties and run a one-sheet test again.Mini test that saves your sanity: Print one sheet first (for example, a small page range like 1–4, if your PDF allows),
fold it, and confirm the page order and orientation before you print 40 sheets of regret. -
Step 5: Preview, print, fold, and finish (staple like a pro)
Use the print preview arrows to look at how sheets will be arranged. If everything looks correct, click Print.
After printing
- Collate the sheets (keep them in order).
- Fold the stack in half carefully (use a ruler edge or a bone folder if you want crisp folds).
- Staple along the fold (this is commonly called saddle-stitch). A long-reach stapler is ideal, but in a pinch,
you can staple near the fold edges or use a booklet stapler.
Example: Printing an 8-page event program? With booklet printing, you’ll usually end up with 2 sheets
printed double-sided. Fold both sheets together, staple along the fold, and you’re done.
Common Problems (and Fixes That Don’t Involve Screaming)
Problem: I don’t see the “Booklet” option
- Make sure you’re using the desktop Adobe Acrobat Reader print dialog (not a browser PDF viewer).
- Try updating Acrobat Reader to a newer version.
- Some simplified print dialogs hide advanced optionslook for “More settings” or expanders.
Problem: Pages are cut off or margins look wrong
- Confirm the printer paper size matches what you’re actually loading (Letter vs A4 mismatches cause chaos).
- Avoid double-scaling: don’t “Fit to page” in Adobe and also “Scale to fit” in the printer driver.
- Try enabling “Auto-rotate pages within each sheet” if pages are mixed orientation.
Problem: The back side prints upside down
- Change duplex flip setting in printer properties (long edge vs short edge) and re-test one sheet.
- For manual duplex, your paper reloading direction is likely reversedmark a corner with pencil and experiment with 1 sheet first.
Problem: Text looks fuzzy or “cheap”
- Increase print quality in printer properties (draft mode is the enemy of small booklet text).
- Make sure the PDF page size and printer settings match (odd scaling can blur type).
- If the PDF has tiny fonts, consider printing on slightly larger paper and trimming (cleaner results).
Pro Tips for Better-Looking Booklets
Use paper like you mean it
Regular copy paper works, but a slightly heavier weight feels instantly more “real.” If you want a nicer cover,
print the cover page on cardstock and the inside pages on regular paper.
Don’t fear page ranges for big booklets
If your booklet is large, printing everything at once can be risky (paper jams love ambitious plans). Printing in
smaller page ranges can help you manage the jobespecially on consumer printers with limited duplex reliability.
Always test with one sheet
Yes, it’s one extra minute. It’s also the difference between “Wow, that looks great” and “Why is page 7 next to the cover?”
Extra: Real-World Experiences Printing Booklets (What Usually Happens)
Booklet printing is one of those tasks that sounds simple until you do it oncethen you develop strong opinions about paper orientation.
In the real world, most “booklet disasters” aren’t caused by Adobe Reader at all. They’re caused by the tiny mismatch between what you
think your printer does and what it actually does when it meets a stack of paper and an opportunity for mischief.
One common experience: you select Both sides, hit Print, and feel prouduntil you realize your printer driver had duplex turned off.
So the printer happily prints only one side, and you’re left holding a stack of half-finished sheets like an unfinished novel. The fix is boring but
effective: open printer Properties and confirm duplex is enabled there. Many printers treat duplex as a “driver setting,” not an
“app setting,” so Adobe can’t force it on if the driver refuses to cooperate.
Another classic: manual duplex. You print Front side only, the pages look perfect, and you think you’ve won. Then you reinsert the paper,
print Back side only, and suddenly every other page is upside down. This is the moment you learn the difference between
flip on long edge and flip on short edgeand also that printers vary wildly in how they pull paper back in.
The smartest “experienced user” move is to do a one-sheet experiment with a pencil mark in the top-left corner. Print one front sheet, then reload it in
the way you think is correct, print the back, and check orientation. Once you discover the correct reload direction for your printer,
write it down. Future-you will thank present-you.
People also run into the “why does my booklet feel out of order?” surprise. That usually happens when you preview the PDF pages sequentially and expect the
paper to do the same. Booklets don’t work that way. The first printed sheet often pairs the first page with the last pagewhich looks
wrong until you fold it. The experience lesson here is simple: trust the booklet preview, not your gut reaction. Your gut is great at avoiding bad sushi,
not at imposition layout.
Then there’s print quality. A booklet shrinks pages onto half a sheet, which means text becomes smaller and any fuzziness becomes more obvious.
If you’ve ever printed a booklet and thought, “Why does this look like it was photocopied in 1997?” you’re not alone. The fix is usually to disable
“draft” printing, choose a better quality setting (like 600 dpi), and avoid double scaling. Another subtle experience-based tip: if the PDF includes fine
lines or light gray text, booklet printing can make it harder to read. Darkening text in the source PDF (when possible) or printing at higher contrast
can make the final booklet feel more polished.
Finally, finishing. Folding and stapling is where your booklet becomes a booklet. If your fold is sloppy, pages may not align and the booklet can look
“off” even if the printing was perfect. The easiest upgrade is to fold on a hard surface and crease with the edge of a ruler.
If you make booklets often, a long-reach stapler feels like a luxury until the first time you staple dead-center without gymnastics.
The overall “experienced user” mindset is: test small, confirm settings, then print the full run. Once you’ve dialed in your printer’s
duplex behavior and your preferred binding settings, booklet printing becomes repeatablealmost relaxinglike making a sandwich, except your sandwich
can’t print page 12 upside down out of spite.
Conclusion
Printing a booklet in Adobe Acrobat Reader comes down to a predictable recipe: open the PDF, select Booklet, choose the right
Booklet Subset (Both sides vs Front/Back only), confirm Binding, and make sure your printer’s duplex flip setting matches
your orientation. Do a one-sheet test, then print the full booklet, fold, and staple. In a world full of chaos, this is one place where five steps can
actually behave like five steps.