A plain concrete floor is dependable, practical, and about as visually exciting as a bowl of unseasoned oatmeal. Fortunately, you do not have to cover it with expensive tile or hire a crew carrying equipment that looks borrowed from an airport runway. With proper preparation, floor-rated paint, and a reusable stencil, ordinary concrete can imitate patterned tile, brick, encaustic cement, or a custom geometric design.
The decorative part is surprisingly approachable. The preparation is where the real work happens. Concrete may contain moisture, sealers, oil, dust, loose paint, and tiny surface defects that prevent a coating from bonding. Painting over those problems is like putting a tuxedo on a muddy dog: briefly impressive, but unlikely to end well.
This guide explains how to paint and stencil a concrete floor from the first moisture test to the final cure. The process works for many patios, porches, basements, laundry rooms, sunrooms, workshops, and other sound concrete surfaces, provided the selected products are approved for that location and expected traffic.
Can You Paint and Stencil Any Concrete Floor?
Most sound concrete floors can be painted, but not every slab is immediately ready. The floor should be stable, clean, dry, and free from active moisture problems. Major movement cracks, recurring water intrusion, crumbling concrete, or hydrostatic pressure require correction before a decorative coating is applied.
New concrete also needs time to cure. Many commonly available concrete-floor coatings require new slabs to cure for at least 30 days, although the exact waiting period must be confirmed on the product label. Painting too early can trap moisture and interfere with adhesion.
Previously sealed concrete presents another challenge. A simple water-drop test offers a useful preliminary clue: place several drops of water on the bare floor and watch them for about a minute. If the water soaks in and darkens the concrete, the surface is probably porous. If it remains in beads, a sealer or dense finish may be blocking absorption. That coating may need to be mechanically removed or treated with a compatible preparation system.
Tools and Materials You Will Need
Gathering everything before starting prevents the traditional DIY emergency in which a wet roller is abandoned while someone races to the store for painter’s tape.
- Concrete cleaner or degreaser
- Concrete etcher or surface-preparation product, if required
- Stiff nonmetal scrub brush or push broom
- Wet-dry vacuum, mop, or shop vacuum
- Concrete crack filler and a putty knife
- Scraper, sanding equipment, or coating remover as needed
- Concrete bonding primer when specified
- Floor-rated concrete or porch-and-patio paint
- A second compatible floor-paint color for the stencil
- Reusable floor stencil with registration marks
- Painter’s tape or repositionable stencil adhesive
- Paint tray, angled brush, roller frame, and extension pole
- Dense foam stencil roller or stencil brush
- Paper towels or clean cardboard for offloading paint
- Knee pads, gloves, eye protection, and suitable footwear
- Compatible clear protective coating, only when recommended
Plan the Pattern Before Opening the Paint
Choose a Floor-Rated Coating System
Regular wall paint is not designed for shoes, furniture legs, rolling carts, wet traffic, or the occasional dropped toolbox. Use a coating specifically labeled for concrete floors and for the intended indoor or outdoor setting. A basement, covered porch, open patio, and vehicle garage expose paint to different forms of wear.
It is also important to treat the primer, base color, stencil color, and optional topcoat as one compatible system. Combining unrelated products can create adhesion or curing problems even when each can looks impressive on its own. When uncertain, use products from the same recommended system or contact the manufacturer.
Select Practical Colors
A medium-tone base color is forgiving because it hides dust, minor wear, and small imperfections better than pure white or nearly black paint. A difference in lightness between the base and stencil colors helps the pattern remain visible from across the room.
Test the colors together on a scrap board or an inconspicuous part of the floor. Paint colors can appear dramatically different when spread across a large horizontal surface. That quiet cream sample may become a glowing vanilla skating rink under bright sunlight.
Dry-Lay the Stencil
Measure the room and determine where the pattern should begin. In a square room, starting near the visual center often creates balanced borders. In an irregular patio or narrow hallway, a long straight reference line may be more useful.
Place the dry stencil in several positions before painting. Check how the repeats meet walls, steps, drains, doorways, and fixed cabinets. A little planning can prevent a row of awkward half-patterns from becoming the first thing everyone notices.
Step 1: Test the Concrete for Moisture
Moisture moving through a slab can push a coating away from the surface, causing bubbles, discoloration, peeling, or complete loss of adhesion. Basements and slabs installed without an effective vapor barrier deserve particular attention.
For a basic screening test, tightly tape a square of clear plastic sheeting to several bare areas of the floor, sealing every edge. Leave it in place for the period recommended by the coating manufacturer. Condensation beneath the plastic or visible darkening of the concrete suggests excess moisture.
This simple test is not a substitute for professional moisture testing when a slab has a history of water problems. Persistent moisture should be diagnosed before painting. A decorative pattern cannot negotiate with groundwater, no matter how charming the pattern happens to be.
Step 2: Remove Dirt, Grease, Sealers, and Loose Paint
Sweep and vacuum the entire floor. Scrape away loose paint and remove any failing coating rather than attempting to glue it down with another layer. Sound existing paint may sometimes be recoated, but it must be cleaned, dulled, and prepared exactly as the new product requires.
Use a concrete degreaser on automotive stains, cooking grease, wax, or oily residue. Scrub stubborn areas thoroughly and repeat the treatment when necessary. Oil left in the concrete can create circular adhesion failures that look suspiciously like the floor developed crop circles overnight.
Rinse away cleaning residue completely. Soap, cleaner, dust, and old coating particles can all interfere with bonding. Avoid assuming that a pressure washer automatically solves every problem; it may spread contaminants or force water deeply into the slab. When one is used, allow ample drying time afterward.
Step 3: Repair Cracks and Damaged Areas
Vacuum loose material from cracks and fill appropriate nonmoving gaps with a compatible concrete repair product. Smooth the repair with a putty knife and allow it to cure according to its instructions. Sand or level raised edges if the filler permits it.
Do not casually fill an active structural crack and expect paint to restrain it. Cracks that continue widening, show vertical displacement, or repeatedly admit water may indicate a larger problem that should be professionally evaluated.
Small pits and irregularities do not always need to disappear. A painted concrete floor can retain some texture and character. The goal is a sound, clean surface, not a slab polished to resemble a piano.
Step 4: Create the Required Surface Profile
Bare concrete may require etching, grinding, or another profiling method so the coating can grip the surface. Some manufacturers describe the desired texture as similar to medium-grit sandpaper. Follow the instructions for the actual paint system rather than applying a generic treatment to every floor.
When using a concrete cleaner and etcher, wear the required protective equipment, provide ventilation, and obey every mixing, application, neutralizing, and rinsing instruction on the label. Never mix cleaning chemicals. Keep the surface wet during treatment if directed, scrub evenly, and rinse until all residue is removed.
Allow the slab to dry thoroughly. Concrete can appear dry on top while still retaining moisture in its pores. Cool weather, shade, and high humidity extend drying time, so the calendar should not overrule the condition of the floor.
Step 5: Mask the Room and Apply Primer
Protect walls, posts, doors, drains, and adjoining surfaces with painter’s tape and drop cloths. Plan an exit route before coating the floor. Otherwise, the final stage may involve standing inside a perfect rectangle of wet paint while reconsidering several life choices.
Apply a bonding primer if the coating manufacturer requires one. Cut in around the perimeter with an angled brush, then roll the open floor in manageable sections. Maintain a wet edge and avoid leaving thick puddles in depressions.
Some concrete-floor paints are self-priming on properly prepared bare concrete, while others require a dedicated primer. Previously coated or sealed floors may need a specialized recoat primer. The product instructions should settle the question.
Step 6: Roll On the Base Color
Stir the paint thoroughly without whipping excessive air into it. Cut in the edges, then use a quality roller recommended for the surface texture. Work in sections, distributing the paint evenly with overlapping passes.
Two thin coats usually produce a more uniform and durable result than one heroic, pudding-thick coat. If a second coat is needed, wait for the full recoat interval. Rolling too soon can lift the first coat or trap softness beneath the surface.
Apply the second coat in a direction perpendicular to the first when recommended. Allow the base to dry long enough that painter’s tape, stencil adhesive, and foot pressure will not mark or lift it. “Dry to the touch” does not necessarily mean “ready for a person kneeling on it for six hours.”
Step 7: Position the Floor Stencil
Snap a straight reference line or mark the center point with low-tack tape. Place the stencil and secure it lightly. Tape should hold the stencil flat without bonding so aggressively that it removes the base coat.
Use the stencil’s registration marks to keep each repeat aligned. For large tile-style patterns, consider completing alternating spaces first, similar to a checkerboard. Return to the skipped spaces after the first set has dried. This reduces the risk of laying the stencil on fresh paint.
Check alignment frequently rather than trusting a single starting line for the entire room. A tiny error repeated 20 times can produce a pattern that appears to be quietly leaving through the nearest doorway.
Step 8: Apply the Stencil Color With Minimal Paint
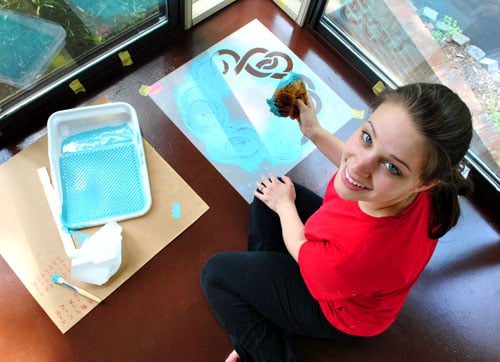
The most important stenciling rule is simple: use less paint than feels reasonable. Load a dense foam roller or stencil brush, then remove most of the paint on folded paper towels or clean cardboard. The applicator should feel nearly dry.
Roll or stipple with light to medium pressure. Several thin passes create cleaner edges than one heavy application. Excess paint is the main cause of bleeding beneath the stencil. Pressing harder does not improve coverage; it merely gives the paint a better opportunity to escape under the plastic.
Lift the stencil straight upward while the paint is still manageable. Inspect the back and wipe away buildup before it transfers to the next repeat. Allow each section to become stable enough for repositioning.
Near walls and corners, bend the stencil carefully when possible or use a partial stencil with a small brush. Do not worry if every edge repeat is not identical. Furniture and normal viewing angles hide minor variations remarkably well.
Step 9: Make Small Touch-Ups
After the design has dried, inspect the floor from standing height before correcting anything. A tiny fuzzy edge that looks disastrous from three inches away may be completely invisible during normal use.
Use a small artist’s brush and the base color to sharpen noticeable bleeds. Restore missing stencil details with the pattern color. Keep repairs restrained. Excessive correction can make one small area look more artificial than the original imperfection.
Step 10: Decide Whether the Floor Needs a Topcoat
Some floor paints are designed to serve as the final finish and should not be covered with an unrelated clear sealer. Other decorative systems recommend one or more compatible protective coats. Confirm the requirement with the paint manufacturer.
Where a topcoat is approved, apply thin, even layers and observe the stated recoat time. Outdoor surfaces must use an exterior-rated, UV-resistant product. Wet walkways, steps, patios, and pool-adjacent areas may also require an approved slip-resistant coating or additive.
Do not assume that a glossy finish is automatically stronger. Gloss can highlight surface flaws and may become slippery when wet. The best finish is the one designed for the surface, exposure, and expected traffic.
How Long Should a Painted Concrete Floor Cure?
Curing is longer than drying. Depending on the product and conditions, a coating may feel dry within hours but require several days before normal traffic, furniture, washing, or vehicle tires are allowed. Cooler temperatures and high humidity can extend those times considerably.
Follow the longest applicable cure time among the base coat, stencil color, and clear finish. Avoid rugs, rubber-backed mats, heavy furniture, and aggressive cleaning until the system has cured. When replacing furniture, use protective pads and lift pieces rather than dragging them.
Common Concrete Floor Painting Mistakes
Skipping the Moisture Test
A beautifully painted floor can still peel when vapor moves through the slab. Investigate recurring dampness before purchasing decorative supplies.
Painting Over Grease or Sealer
Concrete may look clean while retaining invisible contamination. Clean, rinse, and verify porosity instead of trusting appearances.
Using Too Much Stencil Paint
A heavily loaded roller creates blurred edges. Offload the applicator every time it is loaded and build color through thin passes.
Ignoring Product Compatibility
A random primer, floor paint, craft paint, and clear coat do not automatically form a durable system. Confirm that every layer can bond to the one below it.
Returning the Room to Service Too Soon
Premature foot traffic, furniture, water, or tires can permanently mark a coating that appears dry but has not fully cured.
Cleaning and Maintaining a Stenciled Concrete Floor
Remove grit regularly with a soft broom or vacuum because abrasive dirt can slowly dull the finish. Clean with a mild, nonabrasive product approved for the coating. Avoid harsh solvents, stiff metal brushes, and aggressive pressure washing unless the manufacturer specifically permits them.
Place protective pads under furniture and repair isolated wear before exposed spots expand. Save a small, tightly sealed quantity of each paint color for future touch-ups. Label the containers clearly; six months later, “grayish one” will not feel like a sufficiently scientific description.
Practical Project Experience: Lessons That Make the Job Easier
Across successful DIY concrete-floor projects, one lesson appears repeatedly: the job feels slowest before any decorative paint reaches the floor. Cleaning, scraping, rinsing, waiting, testing, and repairing can occupy more time than painting and stenciling combined. That imbalance tempts people to hurry through preparation. It is also why preparation determines whether the finished pattern lasts for years or begins peeling during the next season.
A useful approach is to treat the project as several smaller jobs rather than one long decorating marathon. The first session is for inspection and moisture testing. The second is for cleaning and repairs. Another is reserved for profiling and drying. Painting begins only after the slab passes those earlier checkpoints. This schedule may feel less exciting, but it prevents fatigue from turning “good enough” into a permanent feature beneath the paint.
Pattern planning also improves when the stencil is tested at full scale. A design that looks elegant on a computer screen can feel extremely busy across a 200-square-foot patio. Taping several paper copies together or stenciling a large scrap board provides a more realistic preview. It also reveals whether the contrast is strong enough and whether the stencil contains delicate bridges that may be difficult to handle repeatedly.
During application, a small paint tray and a nearly dry foam roller are easier to control than a full-size roller dripping with paint. Many first attempts bleed because the stencil color seems too faint after one pass, encouraging the painter to add more paint. The better solution is another light pass. The color becomes solid gradually while the edges remain sharp.
It is equally helpful to clean or rotate between two identical stencils. As paint dries on one stencil, the openings can become smaller and the underside less flat. One stencil can soak or dry while the other remains in use. This is especially useful on large floors where hundreds of repeats would otherwise turn a flexible stencil into something resembling decorative armor.
Knee comfort deserves more attention than it usually receives. Stenciling a floor involves repeated crouching, measuring, and repositioning. Thick knee pads, an extension handle for the stencil roller, and planned breaks improve both comfort and accuracy. A tired painter presses harder, stops checking registration marks, and becomes increasingly willing to declare crooked patterns “rustic.”
Edges are another source of unnecessary anxiety. Full repeats should be completed first, leaving the perimeter until the central field is dry. At that point, the stencil can be bent or partially masked without risking damage to the main pattern. Small inconsistencies near a wall generally disappear once baseboards, furniture, planters, or storage items return.
Experienced DIYers also learn not to judge the floor while kneeling directly over it. Every tiny bleed and imperfect corner appears enormous at that distance. Standing up and looking across the entire space provides a fairer assessment. Most hand-painted variation contributes character rather than looking like failure.
Finally, patience during curing protects all the work that came before it. Moving furniture back one day early can leave dents, scratches, or dull patches that no amount of positive thinking will remove. Keeping the room lightly used for the full manufacturer-specified period is not lost time; it is the final construction step.
The most satisfying moment arrives when the tape is removed and the room is viewed as a whole. Concrete that once looked cold and unfinished now carries color, rhythm, and personality. The pattern may not be machine-perfect, but that is part of its appeal. A carefully prepared and hand-stenciled floor looks intentional, distinctive, and considerably more expensive than the collection of rollers, tape, and patience used to create it.
Conclusion
Learning how to paint and stencil a concrete floor is less about artistic talent than disciplined preparation. Test for moisture, remove contamination, repair damage, create the surface profile required by the coating, and allow every layer to dry and cure properly. Once the base is stable, keep the stencil aligned and the applicator nearly dry.
The result can resemble patterned tile at a fraction of the disruption associated with installing a new floor. Better still, the colors and design are completely customizable. Respect the concrete, follow the coating instructions, and resist the urge to rush. Your formerly gray slab may become the most talked-about surface in the roomand not because it is peeling.