Note: This article synthesizes measurement guidance from reputable U.S.-focused apparel, outdoor, denim, tailoring, and retail sources, including Nordstrom, Lands’ End, REI, L.L.Bean, Levi’s, Gap, Target, Macy’s, Brooks Brothers, Proper Cloth, INDOCHINO, Stitch Fix, and American Eagle.
Finding the perfect fit should not feel like solving a secret fashion riddle while trapped in a dressing room under fluorescent lights. Yet many people buy clothing online, guess their size, cross their fingers, and then wonder why the “relaxed fit” pants look like they are auditioning for a circus tent. The good news? Accurate body measurements can save you time, money, returns, and those dramatic mirror debates we have all had with ourselves.
Whether you are shopping for jeans, dresses, suits, shirts, uniforms, activewear, or a once-in-a-lifetime outfit, knowing how to measure yourself accurately gives you a major advantage. Size labels vary by brand, country, fabric, fit, and style. A medium in one store may fit like a small somewhere else, while one pair of jeans may fit beautifully at the waist and another may act like it has a personal grudge against your hips. Measurements are the reliable middle ground.
This guide explains how to take body measurements the right way, how to avoid common mistakes, and how to use those numbers to choose clothing that actually fits. No fashion degree required. Just a soft measuring tape, a mirror, good posture, and a few minutes of patience.
Why Accurate Body Measurements Matter
Body measurements are the bridge between your real shape and a brand’s size chart. Clothing sizes are not universal, and even within the same brand, fit can shift between slim, classic, relaxed, petite, tall, curvy, athletic, maternity, plus, or big-and-tall lines. That is why relying only on “I usually wear a size 8” or “I’m always a large” can lead to disappointing results.
Accurate measurements help you compare your body to the garment’s intended fit. For example, a fitted button-down shirt needs different ease than a cozy hoodie. Jeans with stretch behave differently from rigid denim. A suit jacket requires attention to the chest, shoulder, sleeve, and length, while a dress may depend more on bust, waist, hips, and torso length.
When you measure yourself correctly, you can shop smarter, tailor more confidently, and understand why some clothes work while others do not. It is not about chasing a specific size. It is about finding the size and cut that serves your body, your movement, and your style.
What You Need Before You Start
Before measuring, gather a few simple tools. A flexible cloth or soft plastic measuring tape is best because it curves around the body smoothly. If you do not have one, use a string or ribbon, mark the length, and compare it to a ruler or yardstick. A full-length mirror helps you check that the tape stays level. A notebook or phone note keeps your numbers organized.
Wear close-fitting clothing or lightweight undergarments so bulky fabric does not add extra inches. Stand naturally, breathe normally, and avoid pulling the tape too tight. The tape should rest flat against your body without squeezing. If the tape digs in, the number may be smaller than your true wearing measurement. If it droops, the number may be too large.
For best results, measure twice. If the numbers differ, take a third measurement and use the most consistent result. Measuring is not a speed contest. Your future well-fitting jeans will thank you.
Golden Rules for Measuring Yourself Accurately
Keep the Tape Level
For chest, bust, waist, and hip measurements, the tape should stay parallel to the floor. If it slopes up or down, the measurement changes. This is one of the most common reasons people get inaccurate numbers, especially when measuring alone.
Do Not Hold Your Breath
It is tempting to stand extra tall, tighten your stomach, or hold your breath while measuring. Resist the urge. Clothes are worn while sitting, walking, eating, laughing, reaching, and living. Measure your body in a relaxed, normal position so your clothing has enough room for actual life.
Use the Right Measurement for the Right Garment
A pants waist measurement is not always the same as a natural waist measurement. A dress shirt waist may be taken around the fuller part of the midsection, while pants may sit lower or higher depending on the rise. Always read the brand’s measuring instructions before choosing a size.
Measure Your Body, Then Check the Size Chart
Do not assume your size based on habit. Compare your measurements to the specific size chart for the item. If you are between sizes, look at the fabric, fit notes, reviews, and garment style. Stretchy leggings, structured blazers, and non-stretch denim all follow different rules.
How to Measure Your Bust or Chest
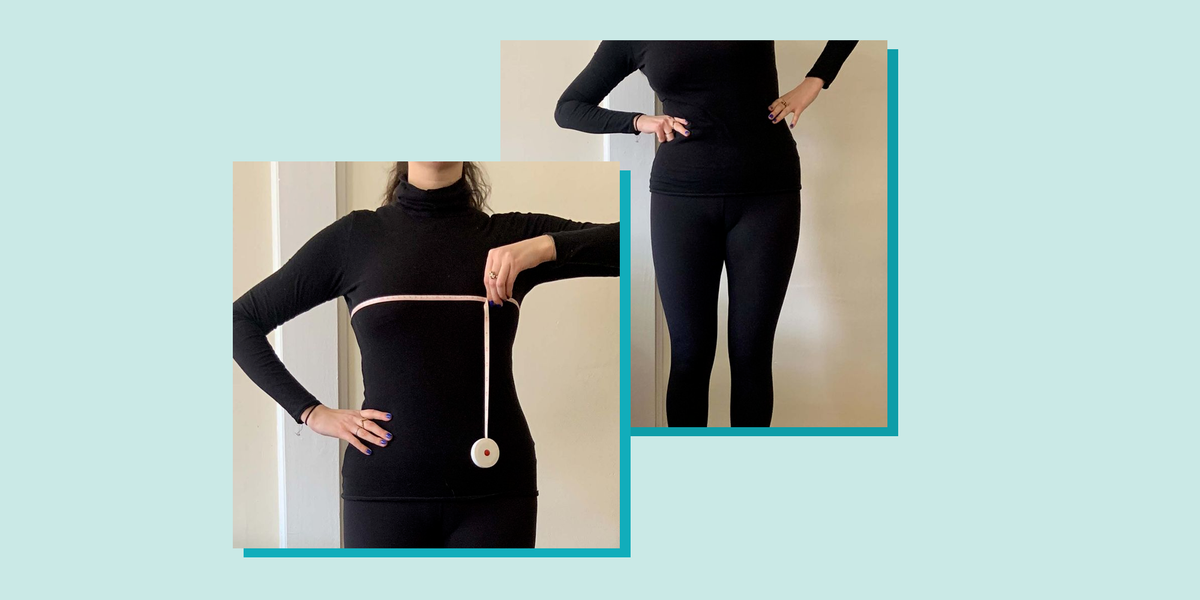
To measure your bust or chest, wrap the tape around the fullest part of your chest, usually across the shoulder blades and under the arms. Keep your arms relaxed at your sides and make sure the tape is level across your back. The tape should be snug but not tight.
For tops, dresses, jackets, and outerwear, this number helps determine whether the garment will button, zip, or sit comfortably across the front. If your chest measurement places you in a larger size than your waist, choose the size that fits the chest first, especially for structured garments. A tailor can often adjust the waist, but a too-tight chest can pull, gape, or restrict movement.
Example: If your chest measures 40 inches and your waist matches a smaller size, a fitted blazer may fit better in the chest size and then be tailored slightly at the waist. For a stretchy knit top, you may have more flexibility.
How to Measure Your Natural Waist
Your natural waist is usually the narrowest part of your torso, often located above the belly button and below the rib cage. A simple trick is to bend slightly to one side. The crease that forms is your natural waistline. Wrap the tape around that point, keeping it level and comfortably close to the body.
This measurement is especially useful for dresses, skirts, high-rise pants, tailored clothing, and size charts that specifically mention the natural waist. Do not measure where you wish the waistband would sit unless the brand tells you to measure there. Natural waist and pants waist are cousins, not twins.
When measuring, keep one finger lightly under the tape if you prefer a little breathing room, especially for non-stretch fabrics. Do not pull the tape so tightly that it changes your posture. The goal is accuracy, not negotiation.
How to Measure Your Hips and Seat
Stand with your feet together or close together, depending on the brand’s instructions, and wrap the tape around the fullest part of your hips and seat. Keep the tape horizontal and check in the mirror that it is not riding up in the back.
Hip measurements are essential for jeans, trousers, skirts, dresses, jumpsuits, and fitted coats. If pants fit at the waist but pull across the hips, your hip measurement may be the deciding number. Some denim brands also offer curvy fits, which are designed for a larger difference between waist and hip measurements.
Example: If your waist is 28 inches and your hips are 41 inches, you may find that curvy jeans fit better than standard straight-size jeans because they allow more room through the hip and thigh while reducing waist gapping.
How to Measure Your Inseam
Your inseam is the length from the top of your inner thigh down to the ankle or desired pant hem. You can measure your body, but many people get the most reliable result by measuring a pair of pants that already fits well. Lay the pants flat, smooth the fabric, and measure along the inside seam from the crotch to the bottom hem.
For jeans and trousers, inseam affects where the pant leg lands: ankle, full length, cropped, stacked, or puddled. A 28-inch inseam may be ankle length for one person and cropped for another. Height matters, but leg length matters more.
If you plan to wear pants with specific shoes, consider that too. A hem that works with sneakers may look too short with boots or too long with flats. For formal pants, measure while wearing the type of shoe you expect to pair with them.
How to Measure Your Neck
For dress shirts, collars, and some formalwear, measure around the base of your neck where a collar naturally sits. Keep the tape lightly against the skin and allow a small amount of comfort space. Many measuring guides suggest avoiding a squeezed measurement because a too-tight collar can feel uncomfortable quickly.
If your neck measures 15.5 inches, you may choose a shirt size that reflects that exact measurement or the next available half-inch size depending on the brand. Always check whether the shirt uses neck-and-sleeve sizing, alpha sizing, or a custom measurement system.
How to Measure Sleeve Length
Sleeve length is commonly measured from the center back of the neck, across the shoulder, down the arm, and to the wrist. Keep your arm relaxed and slightly bent. This matters because arms are not mannequins. They move, reach, wave, carry coffee, and occasionally rescue phones from falling off tables.
For dress shirts, jackets, and coats, sleeve length can make a major difference in polish. Sleeves that are too short can look awkward, while sleeves that are too long can swallow your hands. A proper sleeve should allow comfortable movement and land at the intended point for that garment type.
How to Measure Shoulder Width
Shoulder width is usually measured across the back from one shoulder point to the other. This measurement is important for blazers, structured coats, suits, and button-down shirts. Unlike hems or sleeve cuffs, shoulders are harder and more expensive to alter.
If a jacket’s shoulder seam falls far beyond your natural shoulder, the garment may look oversized in an unintended way. If it sits too far inward, the jacket may feel tight and limit arm movement. When buying tailored clothing, shoulder fit should be one of your first checkpoints.
How to Measure Torso Length
Torso length is useful for one-piece swimsuits, bodysuits, jumpsuits, dresses, backpacks, and some athletic gear. For clothing, torso measurement may run from the top of the shoulder, down through the legs, and back up to the starting point, depending on the brand’s guide. For backpacks, torso length is measured differently, usually from the base of the neck to the top of the hips.
Always follow the specific measuring instructions for the item. A jumpsuit and a hiking backpack may both care about torso length, but they are not asking the same question.
How to Measure Thigh, Calf, Wrist, and Bicep
Some garments require extra measurements. For fitted pants, measure around the fullest part of your thigh. For tall boots, measure calf circumference at the widest part of the calf. For tailored shirts, measure around the bicep and wrist. For gloves, measure around the hand as the size chart instructs.
These smaller measurements can prevent specific fit problems. A shirt may fit your chest but feel tight in the biceps. Boots may fit your foot but not zip over the calf. Pants may fit the waist but feel restrictive through the thigh. Extra measurements give you the full story.
Body Measurements vs. Garment Measurements
Body measurements are taken directly from your body. Garment measurements are taken from the clothing itself. Both are useful, but they are not the same.
For example, if your chest measures 40 inches, a shirt that measures exactly 40 inches around the chest would likely feel too tight. Clothing needs ease, which is the extra room added for comfort, movement, and style. A slim shirt may have less ease, while a relaxed shirt may have more.
When shopping online, check whether the size chart lists body measurements or garment measurements. If the chart says “body measurements,” compare it to your body. If it says “garment measurements,” compare it to a similar item you already own and like.
How to Use a Size Chart Like a Pro
Start by identifying the measurements that matter most for the garment. For a dress, compare bust, waist, and hips. For jeans, compare waist, hip, rise, inseam, and fabric stretch. For a suit jacket, focus on chest, shoulders, sleeve length, and jacket length. For a dress shirt, check neck, chest, waist, sleeve, and fit type.
If your measurements span multiple sizes, choose based on the hardest area to alter and the garment’s structure. For tailored jackets, shoulders and chest are key. For pants, hips and thighs may matter more than the waistband because waistbands can often be adjusted. For dresses, choose the size that fits the largest relevant measurement, then tailor where needed.
Also read the fit description. Words like “slim,” “classic,” “relaxed,” “oversized,” “curvy,” “petite,” “tall,” and “athletic” are clues. A slim-fit shirt and a relaxed-fit shirt in the same size can feel completely different.
Common Measuring Mistakes to Avoid
Measuring Over Bulky Clothing
Thick sweaters, jeans, and layered outfits add extra inches. Measure over close-fitting clothing or undergarments for a more accurate result.
Pulling the Tape Too Tight
A tight tape may give a smaller number, but it will not give a better fit. Clothing based on squeezed measurements can feel uncomfortable.
Ignoring Fabric and Stretch
Rigid denim, wool suiting, cotton poplin, ribbed knits, and spandex blends all behave differently. Measurements matter, but fabric determines how those measurements feel.
Using Old Measurements Forever
Bodies change. Recheck your measurements every few months, before major purchases, or whenever clothing starts fitting differently.
Forgetting Posture
Stand naturally. Do not puff up, shrink down, twist, or pose like you are being sculpted for a museum. Measure the body that will actually wear the clothes.
Fit Tips for Different Clothing Categories
Jeans and Pants
Measure waist, hips, inseam, and sometimes thigh. Pay attention to rise because high-rise, mid-rise, and low-rise pants sit at different places on the body. If the waistband gaps but the hips fit, try a curvy fit or consider tailoring.
Dresses
Measure bust, waist, hips, and sometimes torso length. If the dress is fitted, choose the size that fits your largest key measurement. If it is loose or stretchy, you may have more flexibility.
Shirts and Blouses
Measure chest or bust, shoulders, sleeve length, and sometimes waist. For button-down shirts, check for pulling at the buttons, tightness across the shoulders, and sleeve length.
Suits and Blazers
Measure chest, shoulders, waist, sleeve length, and jacket length. Prioritize the shoulders and chest because those areas are the most difficult to alter cleanly.
Activewear
Measure based on the garment type: bust and underbust for sports bras, waist and hips for leggings, and inseam for performance pants. Stretch is helpful, but too much compression can reduce comfort.
Outerwear
Measure chest, shoulder, sleeve, and sometimes hip. Consider what you will wear underneath. A winter coat needs room for layers; a light jacket may be closer fitting.
Real-Life Measuring Experiences and Lessons Learned
One of the most useful lessons about measuring yourself is that the number is not the enemy. The number is simply information. Many people avoid measuring because they feel attached to a certain size, but clothing sizes are wildly inconsistent. A tape measure is not judging you. It is just reporting data, like a tiny fabric scientist.
A common experience is discovering that different parts of your body match different sizes. Maybe your shoulders match a medium, your chest fits a large, and your waist fits a medium again. That does not mean anything is wrong. It means your body has proportions, and clothing brands use standard patterns that may or may not match them. This is exactly why measurements are more useful than labels.
Another lesson comes from online shopping. Many shoppers order their “usual size” and ignore the size chart, only to find that the item fits strangely. Once you start checking measurements, you notice patterns. Perhaps one brand runs narrow in the hips. Another may cut sleeves long. Another may make jeans with generous stretch, while another uses rigid denim that requires a more precise fit. Over time, you become less dependent on luck and more confident in your choices.
Measuring a favorite garment can also be a game changer. If you own a pair of pants that fits perfectly, lay it flat and record the waist, hip, rise, inseam, thigh, and leg opening. If you have a shirt that always feels right, measure the chest, shoulder, length, and sleeve. These garment measurements become your personal shopping cheat sheet. When a product page lists garment dimensions, you can compare them to something you already trust.
It is also helpful to measure at the right time. If you measure when you are rushed, tired, or standing in poor lighting, mistakes happen. Give yourself a calm five minutes. Use a mirror. Write everything down clearly. Label the date. You may even want separate notes for body measurements and favorite garment measurements.
For special occasions, measure early. Do not wait until the week before a wedding, interview, graduation, performance, or big event to figure out your size. Tailoring takes time, shipping takes time, and returns take even more time. Measuring early gives you options. Options are peaceful. Last-minute panic hemming is not.
Finally, remember that the perfect fit is personal. Some people love a crisp, close fit. Others prefer relaxed silhouettes. Some want jeans to hit the ankle; others like extra length. Measurements help you find clothing that supports your preference, not someone else’s idea of what your size should be. The goal is not to fit into clothes. The goal is to find clothes that fit you.
Conclusion: Measure Once, Shop Smarter Again and Again
Learning how to measure yourself accurately for the perfect fit is one of the simplest style skills you can build. It helps you understand your body’s proportions, compare size charts with confidence, choose better clothing online, and reduce frustrating returns. With a soft measuring tape, relaxed posture, and a few careful notes, you can turn shopping from a guessing game into a much more reliable process.
Remember the basics: keep the tape level, measure over light clothing, breathe normally, write down your numbers, and check the specific size chart for every brand. Focus on the measurements that matter most for each garment, and do not be afraid of tailoring when a small adjustment can turn a good piece into a great one.
Perfect fit is not about the size printed on a tag. It is about comfort, movement, proportion, and confidence. Once you know your measurements, you can shop with less stress and a lot more “yes, this actually fits” energy.