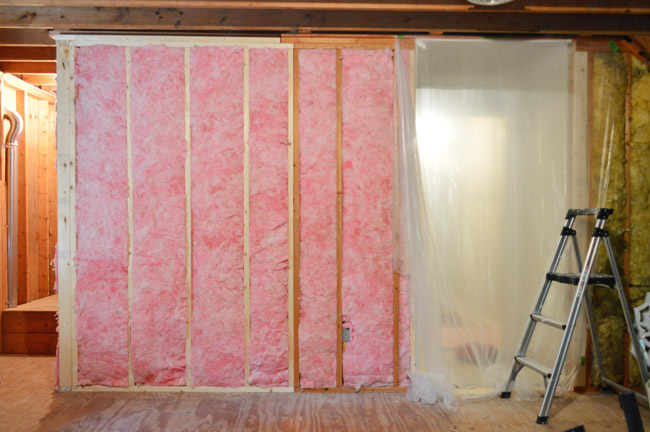
Learning how to insulate walls is one of those home improvement projects that sounds boring until your living room stops feeling like a walk-in freezer. Then suddenly insulation becomes very exciting. Maybe not “front-row concert tickets” exciting, but definitely “my utility bill is no longer trying to ruin my week” exciting.
Wall insulation helps slow heat transfer, reduce drafts, improve indoor comfort, and make heating and cooling systems work less like exhausted marathon runners. Whether you are building new walls, renovating an older house, finishing a basement, or wondering why one bedroom feels like it belongs in another climate zone, the right insulation strategy can make a noticeable difference.
This guide explains how to insulate walls the smart way: what materials to consider, how to prepare, which methods work for open and existing walls, what mistakes to avoid, and when to call a professional before your weekend project becomes a Tuesday emergency.
Why Wall Insulation Matters
Walls are a major part of your home’s thermal envelope, which is the barrier between comfortable indoor air and the outdoor world doing whatever dramatic weather performance it has scheduled. Poorly insulated walls allow heat to escape in winter and enter in summer. That means your furnace, heat pump, or air conditioner has to work harder to keep rooms comfortable.
Good wall insulation can help with:
- Lower heating and cooling costs
- More even room temperatures
- Reduced drafts and cold wall surfaces
- Better sound control between rooms and from outside noise
- Improved comfort in bedrooms, basements, garages, and additions
- Better long-term building performance when installed with proper air sealing and moisture control
The key phrase is “properly installed.” Insulation is not magic cotton candy for houses. If it is compressed, gapped, wet, poorly sealed, or installed in the wrong assembly, it can underperform or even create moisture problems.
Understand R-Value Before You Buy Anything
R-value measures how well insulation resists heat flow. The higher the R-value, the better the material resists heat transfer. However, bigger is not always automatically better. The best wall insulation depends on climate zone, wall depth, framing type, local code, moisture conditions, and whether you are insulating open walls or finished walls.
In many U.S. homes with standard 2×4 wood framing, wall cavities are often insulated with R-13 or R-15 batts. In 2×6 walls, R-19 or R-21 products are common. Some modern energy codes and high-performance designs also use continuous exterior insulation to reduce thermal bridging, which happens when wood or metal framing conducts heat through the wall assembly.
Think of wall studs as tiny thermal bridges wearing hard hats. Even if the cavity insulation is excellent, the studs can still transfer heat. Continuous insulation, such as rigid foam board or mineral wool board installed outside the sheathing, helps cover those bridges and improve whole-wall performance.
Common Types of Wall Insulation
Fiberglass Batts and Rolls
Fiberglass batts are one of the most common choices for open wall cavities. They are widely available, relatively affordable, and DIY-friendly when installed carefully. The catch is that fiberglass performs best when it fully fills the cavity without being compressed. Gaps around wires, pipes, outlets, and corners can reduce performance.
Use unfaced or faced batts depending on your wall design and local code. Kraft-faced batts include a vapor retarder, but vapor control rules vary by climate. In cold climates, vapor retarders are often placed toward the warm-in-winter side. In hot-humid climates, the wrong vapor barrier can trap moisture where nobody wants it: inside the wall, quietly plotting.
Mineral Wool Batts
Mineral wool, often called rock wool or stone wool, is denser than fiberglass and fits snugly between studs. It offers good thermal performance, sound control, fire resistance, and moisture resistance. It is also easier to cut cleanly around obstacles. The trade-off is usually cost; mineral wool often costs more than standard fiberglass.
Blown-In Cellulose or Fiberglass
Blown-in insulation is a strong option for existing walls because it can be installed through small holes drilled from the interior or exterior. Dense-pack cellulose and dense-pack fiberglass can fill wall cavities without removing all the drywall. This method is especially useful for older homes with empty wall cavities.
The installer drills holes, blows insulation into each cavity at the correct density, verifies the cavity is full, then patches the holes. It sounds simple, but dense packing requires skill. Too loose and insulation can settle. Too aggressive and walls may bulge. This is why many homeowners hire trained insulation contractors for existing walls.
Spray Foam Insulation
Spray foam expands to seal gaps and insulate at the same time. Open-cell spray foam is lighter and vapor-permeable, while closed-cell spray foam has a higher R-value per inch and adds moisture resistance. Spray foam can be useful in difficult areas, rim joists, irregular framing, and certain retrofit projects.
However, spray foam is usually more expensive and should be installed by professionals. It also requires careful attention to ventilation, curing, fire protection, and code requirements. Spray foam is powerful, but it is not the place to learn by saying, “How hard could it be?” Famous last words, right after “I don’t need to label these wires.”
Rigid Foam Board
Rigid foam board can be used on exterior walls, basement walls, and certain interior applications. Common types include polyisocyanurate, expanded polystyrene, and extruded polystyrene. Rigid foam can provide continuous insulation and reduce thermal bridging when installed outside framed walls.
Seams usually need to be taped or sealed, and the foam must be protected from sunlight and fire exposure according to code. In wall assemblies, rigid foam thickness must be chosen carefully to control condensation risk.
Insulated Sheathing and Exterior Mineral Wool
For major renovations or new siding projects, exterior continuous insulation can be one of the best upgrades. It keeps the wall cavity warmer in winter, reduces thermal bridging, and can improve comfort significantly. Exterior mineral wool boards are vapor-permeable, while foam boards vary in vapor permeability depending on type and thickness.
This method usually requires details around windows, doors, flashing, siding attachment, and drainage planes. In other words, it is excellentbut not a “just slap it on and hope” project.
How To Insulate Open Walls
Open walls are the easiest walls to insulate because the framing is exposed. This happens during new construction, additions, basement finishing, or major remodeling.
Step 1: Inspect the Wall Cavities
Before installing insulation, check for water damage, mold, pest issues, missing sheathing, electrical problems, plumbing leaks, or gaps to the exterior. Insulation should never be used to hide a problem. It will not fix leaks; it will simply give them a cozy place to become worse.
Step 2: Air Seal Before Insulating
Air sealing is just as important as insulation. Seal gaps around plumbing penetrations, electrical boxes, bottom plates, top plates, window framing, and exterior sheathing seams. Use appropriate caulk, canned foam, gaskets, or sealant depending on the gap size and location.
If air can move through insulation, performance drops. Imagine wearing a warm sweater in a wind tunnel. Technically you are dressed warmly, but emotionally you are questioning your choices.
Step 3: Measure and Cut Carefully
Measure each cavity rather than assuming every stud bay is identical. Older homes especially enjoy surprising homeowners with framing that seems to have been measured with optimism. Cut batts slightly oversized so they friction-fit without bunching.
Step 4: Fit Insulation Around Obstacles
Split batts around wires instead of stuffing insulation behind them. Cut around electrical boxes, pipes, and blocking. The goal is full contact with the wall cavity on all sides. Avoid voids, folds, and compression.
Step 5: Install Vapor Control Correctly
Vapor retarders are climate-specific. Some walls need them; some walls should avoid them. Always follow local building code and manufacturer instructions. In mixed or humid climates, vapor-open assemblies may be safer than trapping moisture between impermeable layers.
Step 6: Cover With Drywall or Approved Thermal Barrier
Many insulation products, especially foam plastic insulation, require an approved thermal barrier such as drywall. Do not leave exposed foam in living areas unless the product and local code allow it.
How To Insulate Existing Walls Without Removing Drywall
Existing finished walls are trickier, but you still have options. The most common method is drill-and-fill insulation.
Drill-and-Fill Method
With drill-and-fill, small holes are drilled into each stud cavity. The installer uses a hose to blow dense-pack cellulose or fiberglass into the cavity. The holes are then patched and finished. This can be done from the exterior if siding allows, or from the interior if exterior access is difficult.
This method works best when cavities are open enough to fill. Fire blocking, diagonal bracing, old knob-and-tube wiring, moisture damage, or unusual framing can complicate the job. A good contractor may use thermal imaging, inspection holes, or other diagnostic tools to understand the wall before filling it.
Interior Wall Insulation Panels
Another option is adding insulation to the interior side of exterior walls. This may involve rigid foam board, insulated drywall panels, or a new framed service wall with batts. Interior insulation can work well, but it reduces room size and may require moving outlets, trim, radiators, cabinets, or plumbing.
Moisture control is critical. Adding interior insulation makes the original wall colder in winter, which can increase condensation risk if indoor moisture reaches the wrong surface.
Exterior Insulation During Re-Siding
If you are replacing siding, it is an ideal time to add exterior continuous insulation. The siding is already coming off, which means the wall can be improved from the outside with less disruption indoors. This approach can also improve air sealing and water management when done with proper flashing and drainage details.
Best Wall Insulation for Different Situations
Best for DIY Open Walls
Fiberglass or mineral wool batts are usually the easiest for capable DIYers. Mineral wool is often more forgiving because it cuts cleanly and holds its shape well.
Best for Existing Finished Walls
Dense-pack cellulose or fiberglass is commonly used because it can fill cavities through small holes. Professional installation is strongly recommended.
Best for Sound Control
Mineral wool batts are excellent for reducing sound transfer in interior partitions, bedrooms, bathrooms, and media rooms. Just remember: insulation helps with sound, but sealing gaps and using proper drywall assemblies matter too.
Best for Basements
Rigid foam board, closed-cell spray foam, or mineral wool systems are often used for basement walls. Basement insulation must account for moisture, concrete, vapor movement, and local code requirements. Avoid placing moisture-sensitive materials directly against damp foundation walls.
Best for Major Energy Upgrades
Exterior continuous insulation paired with air sealing is one of the most effective approaches. It improves whole-wall performance and reduces thermal bridging, especially in cold and mixed climates.
Wall Insulation Mistakes To Avoid
Skipping Air Sealing
Insulation slows heat transfer, but air leaks move heat, moisture, dust, and outdoor air through the building. Seal first, insulate second. It is the home improvement version of brushing before whitening.
Compressing Batts
Stuffing thick insulation into shallow cavities reduces its effectiveness. Insulation works because it traps air. Compress it too much and you lose performance.
Leaving Gaps Around Electrical Boxes
Small gaps add up. Cut insulation neatly around boxes and seal penetrations safely. Use electrical box gaskets where appropriate.
Ignoring Moisture Problems
Never insulate over damp, moldy, or leaking walls. Fix water issues first. Otherwise, insulation becomes a sponge with a mortgage.
Using the Wrong Vapor Barrier
Vapor control depends on climate and wall design. A plastic vapor barrier may be appropriate in some cold climates but risky in hot-humid regions or certain retrofit assemblies. When in doubt, ask a building science professional or local code official.
Blocking Ventilation Where It Is Needed
Some assemblies need drying potential. Do not block weep holes, drainage planes, or required ventilation paths. Walls need to manage water, not pretend rain is a rumor.
How Much Does Wall Insulation Cost?
Costs vary widely based on wall access, insulation type, house size, region, labor rates, and whether repair work is needed. Fiberglass batts are usually the most affordable for open walls. Mineral wool costs more but provides strong fire resistance and sound control. Dense-pack wall insulation costs more than DIY batts because it requires equipment and labor. Spray foam and exterior continuous insulation are typically higher-cost options, but they can offer strong performance in the right assembly.
For a realistic estimate, get quotes from at least two or three insulation contractors. Ask what material they recommend, how they verify cavity fill, whether air sealing is included, how holes will be patched, what R-value you can expect, and how they handle moisture concerns.
DIY or Hire a Professional?
You can DIY wall insulation when the walls are open, dry, safe, and straightforward. If you can measure carefully, cut neatly, wear protective gear, and follow manufacturer instructions, batt insulation is manageable.
Hire a professional when:
- You are insulating existing finished exterior walls
- You suspect moisture, mold, or hidden damage
- Your home has old wiring or unusual framing
- You want spray foam insulation
- You are adding exterior continuous insulation
- You need code compliance documentation
- You are insulating basement or foundation walls
Professionals can also perform blower door testing or thermal imaging to find leaks and weak spots. That beats guessing, which is a bold strategy but not always a cheap one.
Practical Checklist Before You Insulate Walls
- Identify your climate zone and local insulation requirements.
- Check wall depth and framing type.
- Inspect for leaks, mold, pests, and damaged materials.
- Choose insulation based on wall access and moisture conditions.
- Air seal gaps and penetrations before insulating.
- Install insulation without compression, voids, or gaps.
- Use vapor control only where appropriate.
- Protect foam insulation with approved thermal barriers.
- Verify finished walls are fully filled if using blown-in insulation.
- Keep records for permits, rebates, tax credits, or resale.
Experience Notes: What Wall Insulation Teaches You in Real Life
The first thing you learn when insulating walls is that houses are not as square, simple, or polite as they look on real estate listings. A wall may appear flat and innocent, but once you open it, you may find crooked studs, mystery holes, abandoned cable, a suspicious draft, and at least one spider who clearly believes he is the project manager.
One of the most useful experiences is realizing how much comfort depends on air sealing. Many homeowners start by thinking insulation alone will solve everything. Then they seal gaps around outlet boxes, top plates, baseboards, and plumbing penetrations, and suddenly the room feels calmer. Not just warmercalmer. Drafts create a subtle discomfort that makes people raise the thermostat without understanding why. Air sealing removes that invisible annoyance.
Another lesson is that neatness matters. A batt of insulation shoved into a cavity like laundry into a suitcase will not perform like one carefully cut and fitted. Around electrical wires, it is better to split the batt and wrap it around the wire than to jam everything behind it. Around pipes and boxes, small cuts make a big difference. Insulation rewards patience. It does not reward the “good enough, drywall will hide it” philosophy, which is how future homeowners end up muttering your name in a tone usually reserved for villains.
Older homes teach even more humility. Existing walls may have no insulation at all, or they may have settled, damaged, or poorly installed material. Dense-pack insulation can be a game changer, but it needs verification. If a contractor simply drills holes and blows material without checking blocking, cavity depth, or fill density, some areas may remain empty. Thermal imaging after installation can reveal missed spots. It is like an X-ray for your house, except the diagnosis is usually “cold knees in the north bedroom.”
Basements are another place where experience matters. Many people want to frame a wall, stuff it with fiberglass, and call it a day. But concrete walls can hold moisture, and moisture plus the wrong insulation assembly can lead to mold. Rigid foam, spray foam, or mineral wool systems are often better choices, but the details matter: drying potential, fire protection, drainage, and local code all need attention.
Finally, wall insulation teaches budget discipline. It is tempting to spend money where you can see the upgrade: countertops, paint, light fixtures, dramatic faucets that look like they belong in a boutique hotel. Insulation disappears behind the wall. It gets no compliments at dinner parties. But every winter morning, every summer afternoon, and every utility bill quietly reminds you that hidden improvements can be the most valuable ones. A well-insulated wall is not glamorous, but neither is being cold in your own kitchen while paying extra for the privilege.
Conclusion
Knowing how to insulate walls helps you make smarter decisions about comfort, energy efficiency, and long-term home performance. The best approach depends on whether your walls are open or finished, your climate, your budget, and the condition of the building. Fiberglass and mineral wool batts work well for open walls. Dense-pack cellulose or fiberglass is practical for existing walls. Spray foam and exterior continuous insulation can deliver excellent results when installed correctly.
The golden rule is simple: do not treat insulation as a standalone fix. Pair it with air sealing, moisture control, and careful installation. Do that, and your home can feel more comfortable, quieter, and easier to heat and cool. Your walls will not send you a thank-you card, but your thermostat might finally stop acting dramatic.
Note: This article is for general educational use. Always follow local building codes, product instructions, and professional guidance for moisture control, fire safety, electrical work, and permit requirements.