Growing ginger at home feels a little like discovering a gardening cheat code. You bury a knobby piece of something that looks as though it has been forgotten in the back of the refrigerator, wait patiently, and eventually uncover a cluster of fragrant, spicy rhizomes.
Edible ginger, botanically known as Zingiber officinale, is a tropical perennial grown for its underground rhizomes. Although commonly called ginger root, the edible portion is technically an underground stem. In warm climates, ginger can remain outdoors year-round. In colder regions, it can be grown as a seasonal crop, started indoors, or raised in a container that moves inside before cold weather arrives.
You do not need a tropical estate, greenhouse, or professional horticulture degree to succeed. A wide container, warm temperatures, good soil, and a little restraint with the watering can are usually enough. These nine beginner-friendly tips explain how to grow ginger from a store-bought or nursery rhizome, care for it through the growing season, and harvest it without accidentally turning the pot into a swamp.
What You Need Before Planting Ginger
- A firm, healthy ginger rhizome with visible buds or “eyes”
- A wide container with drainage holes or a prepared garden bed
- Rich, loose, well-draining potting mix
- Compost or another source of organic matter
- A warm location with bright, indirect light or partial shade
- Patience, because ginger is not interested in speed gardening
Ginger usually requires a long, warm growing season. Fully mature rhizomes may need approximately eight to ten months, while tender baby ginger can often be harvested earlier. Gardeners in short-season climates can gain valuable time by sprouting ginger indoors before outdoor temperatures become reliably warm.
1. Choose a Fresh, Healthy Ginger Rhizome
Look for plump pieces with visible growing points
Your ginger harvest begins with the piece you plant, so do not start with a shriveled rhizome that looks ready to apply for retirement. Choose ginger that feels firm and plump, with smooth skin and several small bumps, points, or pale green buds. These growing points are the eyes from which new shoots emerge.
Seed ginger from a nursery or specialty supplier is the most dependable option because it is intended for planting. Organic ginger from a grocery store can also work well. Conventional supermarket ginger may occasionally be treated or stored under conditions that delay sprouting, although many pieces will still grow.
A large rhizome can be planted whole or divided into smaller sections. Each section should be roughly 1 to 2 inches long and contain at least one healthy eye; two or more eyes provide extra insurance. After cutting, leave the sections in a dry, shaded location for a day or two so the cut surfaces can callus. This helps reduce the chance of rot after planting.
2. Give Ginger Plenty of Warmth
Start indoors when your growing season is short
Ginger is a tropical plant, and it behaves like one. It prefers warm soil, warm air, humidity, and absolutely no surprise visits from frost. Growth is generally strongest when soil temperatures are around the mid-70s Fahrenheit or warmer. Cool, wet soil can delay sprouting and encourage decay.
In warm regions, plant ginger outdoors in spring after the soil has warmed. In colder areas, start it indoors six to ten weeks before the weather becomes suitable. Place the container in a warm room, on a seed-starting heat mat set to a moderate temperature, or near a bright window that does not become chilly at night.
Do not rush a ginger plant outdoors because one sunny afternoon feels like summer. Wait until nighttime temperatures are consistently above approximately 50 degrees Fahrenheit. Before moving an indoor plant outside permanently, acclimate it gradually over a week by giving it increasing amounts of outdoor exposure.
3. Use a Wide Container with Excellent Drainage
Ginger grows sideways more than downward
Ginger rhizomes expand horizontally near the soil surface. That means a broad container is more useful than a narrow, extra-deep pot. For one or two starter pieces, choose a pot at least 12 inches wide. A larger tub, fabric grow bag, or planter box provides more room for the rhizomes to branch and produce a better harvest.
Drainage holes are nonnegotiable. Ginger appreciates moisture, but it does not enjoy sitting in stagnant water. A decorative pot without holes may look impressive, but to a ginger rhizome it can become a stylish little bathtub of doom.
For container growing, use a quality potting mix rather than dense garden soil. A suitable mixture should hold some moisture while allowing excess water to escape. Combining potting mix with finished compost and a drainage-improving ingredient such as perlite or fine pine bark can create a loose, fertile growing medium.
Ginger can also grow in raised beds or directly in the ground when the soil is rich and well drained. Raised beds are particularly useful where native soil is heavy because they make moisture and soil structure easier to control.
4. Plant Ginger Shallowly with the Eyes Facing Up
Do not bury it as though you are hiding treasure
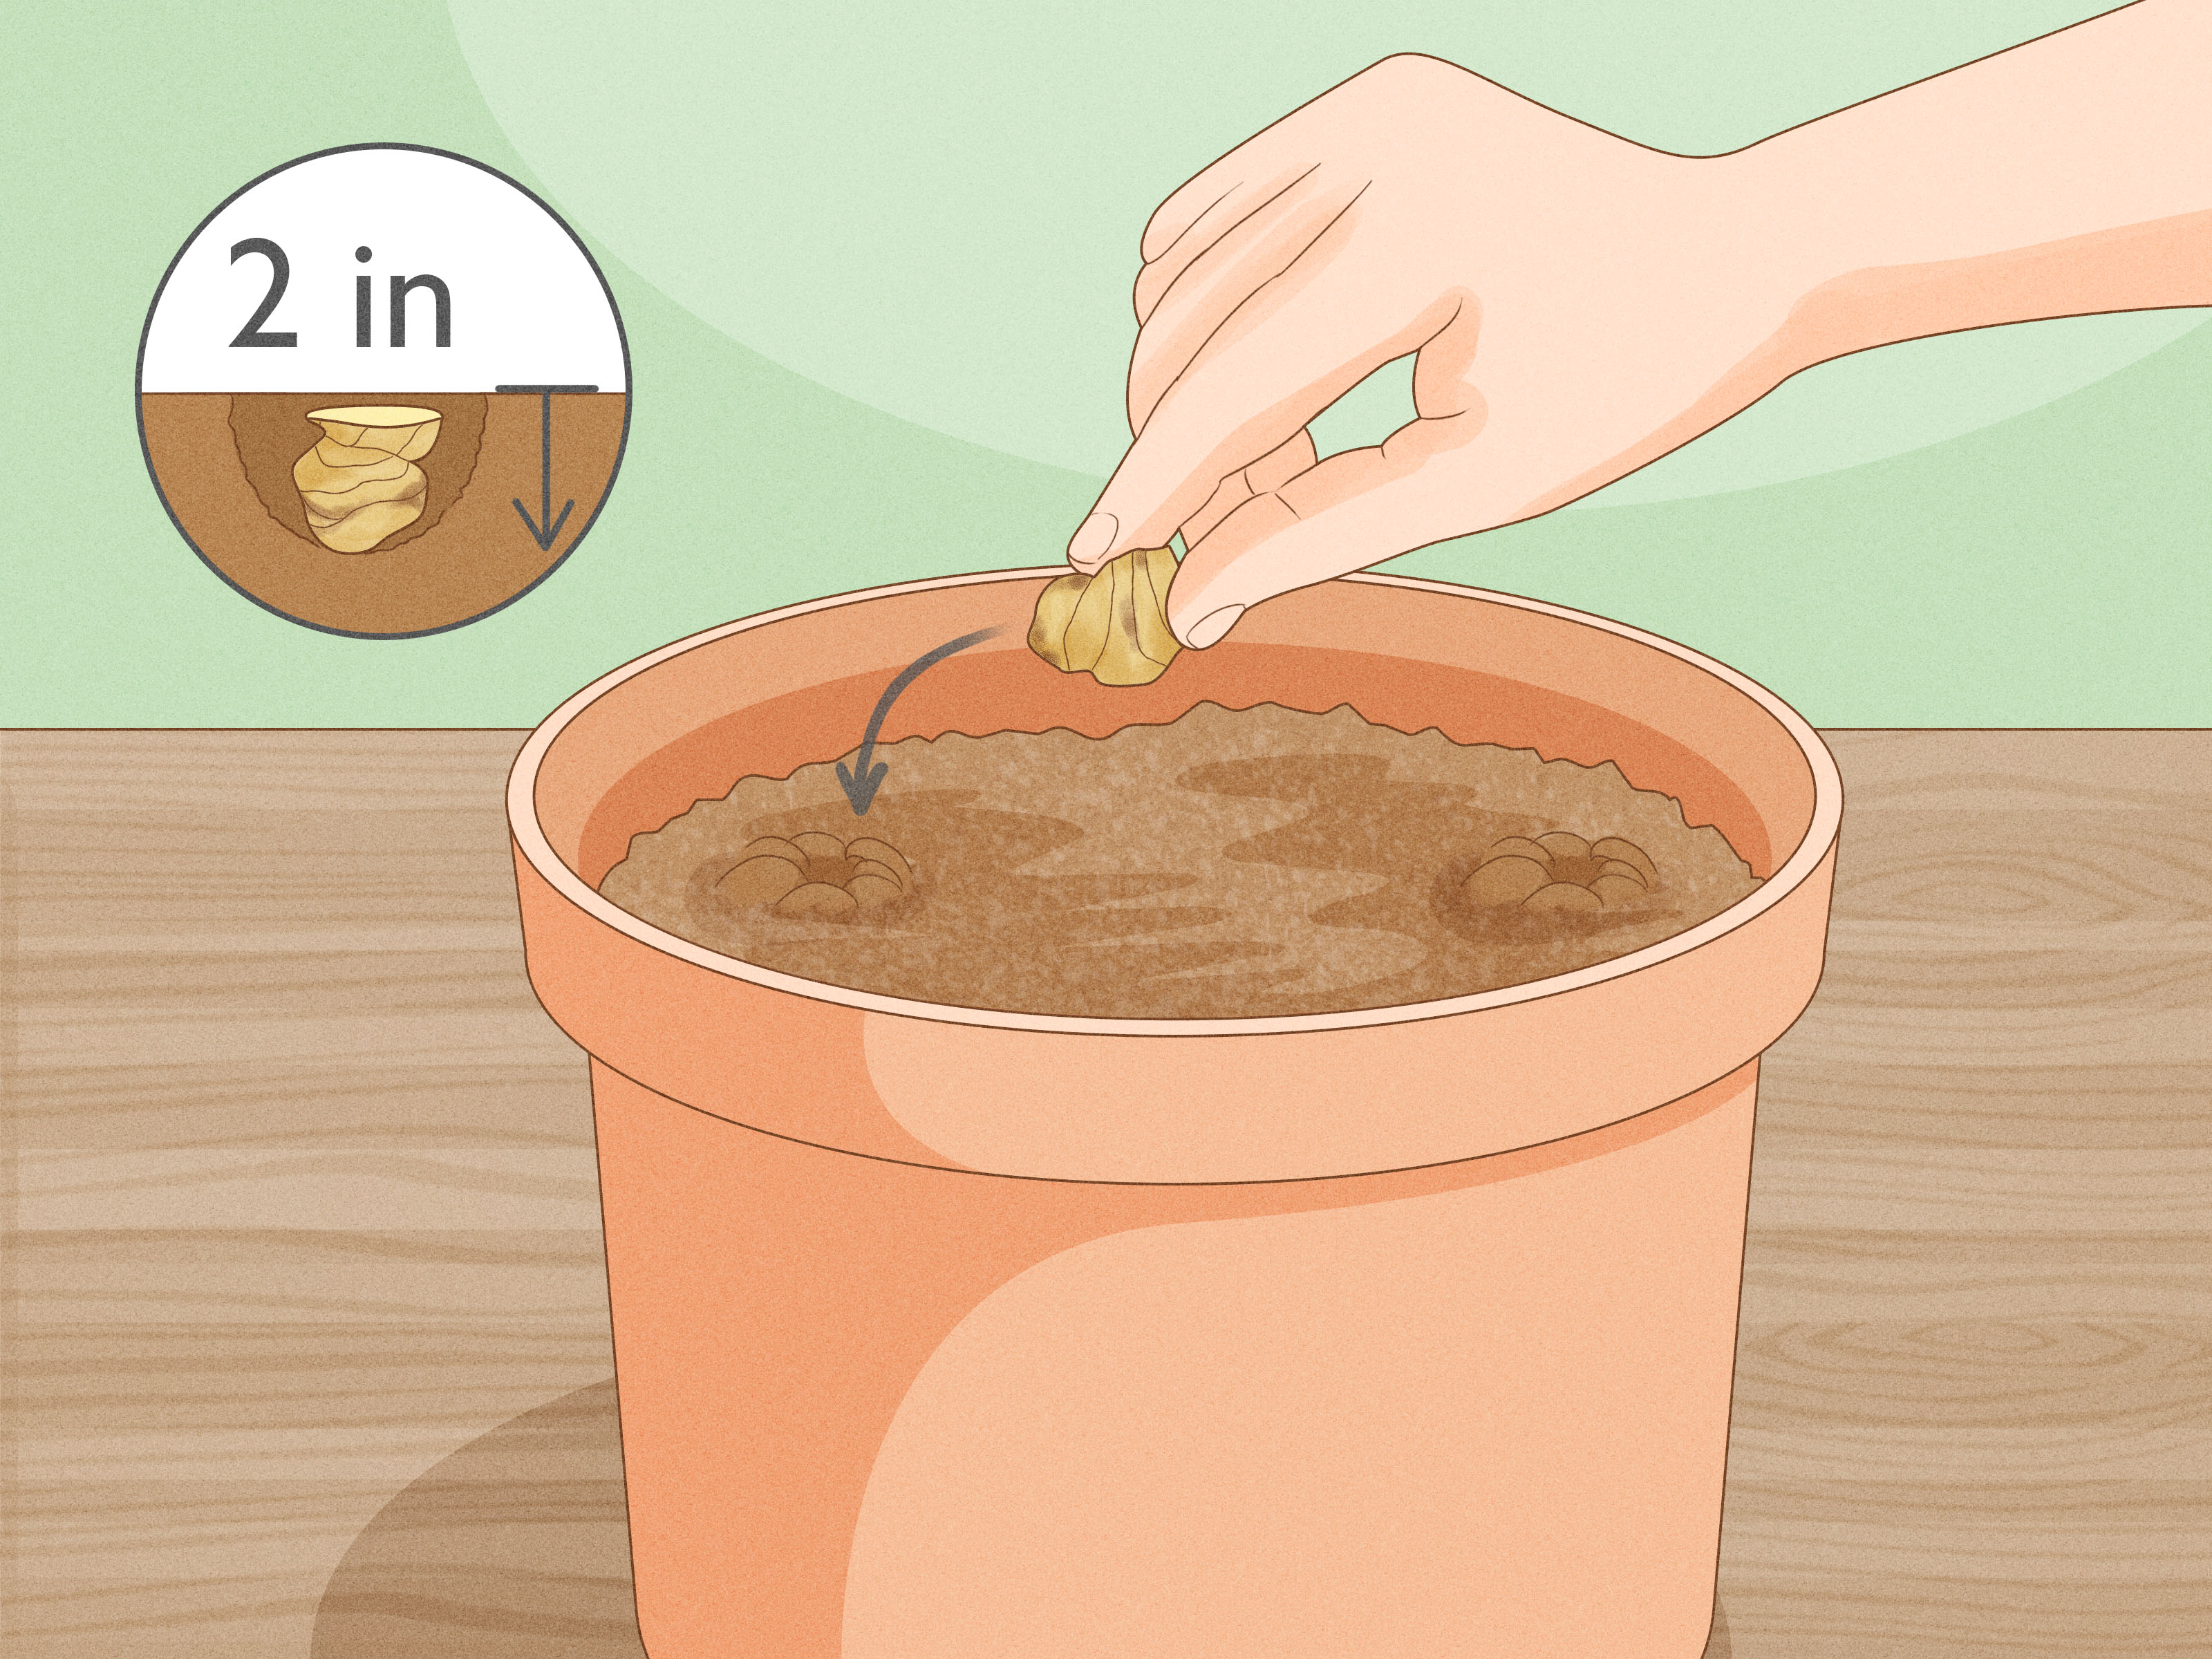
Place each ginger section horizontally with the eyes facing upward. Cover it with approximately 1 to 2 inches of soil. Ginger is naturally a shallow-growing plant, so planting it excessively deep can slow emergence and increase the risk of rot.
Spacing recommendations vary according to the growing system and desired harvest size. In a garden bed, leave roughly 6 to 15 inches between pieces. Closer spacing can work for an early baby-ginger harvest, while wider spacing gives plants more room to develop mature rhizomes.
After planting, water lightly to settle the soil. The goal is an evenly damp growing medium, not a mud pie. Shoots may appear within several weeks, although ginger sometimes takes longer when temperatures are cool. Resist the urge to dig it up every Tuesday to see whether it is “doing anything.” Underground plants generally dislike performance reviews.
5. Provide Partial Shade or Gentle Morning Sun
Protect the leaves from harsh afternoon exposure
Ginger naturally grows in warm environments with filtered light. For many home gardeners, the ideal location provides bright shade, dappled sunlight, or a few hours of gentle morning sun followed by afternoon protection.
In cool or humid regions, ginger may tolerate more direct sunlight if the soil remains moist. In hot climates, intense afternoon sun can scorch the foliage, dry the container rapidly, and cause brown leaf tips. A porch, lightly shaded patio, greenhouse bench, or garden bed beneath taller plants can provide suitable conditions.
Indoor ginger needs a bright location but may suffer beside a window that magnifies intense midday sun. A sheer curtain can soften the light. Rotate containers occasionally so the shoots grow evenly rather than leaning dramatically toward the window like houseplants auditioning for a soap opera.
If the leaf tips become brown and crispy, check both sunlight exposure and soil moisture. Brown tips can indicate excessive sun, dry soil, low humidity, or an inconsistent watering routine.
6. Keep the Soil Moist but Never Waterlogged
Water lightly before shoots appear
Water management is one of the most important parts of learning how to grow ginger. Before the rhizome sprouts, it uses relatively little water. Keep the soil lightly moist, allowing the surface to begin drying before watering again. Constantly saturated soil at this stage can cause the planted piece to rot before it produces a shoot.
Once active growth begins, ginger requires more consistent moisture. Check container-grown plants frequently during hot weather because pots can dry much faster than garden beds. Water thoroughly until excess moisture drains from the bottom, then wait until the top inch of soil feels slightly dry before watering again.
A thin layer of organic mulch can help outdoor plants retain moisture, moderate soil temperature, and reduce weeds. Keep thick mulch away from emerging shoots so the crown remains ventilated.
Wilting during the hottest part of an afternoon does not always mean the plant needs immediate flooding. Check the soil first. If it is already wet, more water is not the answer. Ginger may temporarily droop from heat and recover as temperatures fall.
7. Feed Ginger During Active Growth
Build healthy foliage before expecting large rhizomes
Ginger grows best in fertile soil containing plenty of organic matter. Mix finished compost into the soil before planting, then provide light supplemental feeding during the growing season if the potting mix does not already contain a slow-release fertilizer.
A balanced liquid fertilizer can be applied at reduced strength every few weeks once shoots are actively growing. Another option is to top-dress the container with compost or worm castings. Avoid repeatedly applying strong, high-nitrogen fertilizer. It may produce impressive leaves while doing less for the rhizomes you actually want to harvest.
Yellowing lower leaves late in the season may be a normal sign of approaching dormancy. Yellow foliage during vigorous summer growth, however, can indicate a nutrient shortage, poor drainage, damaged roots, or overwatering. Evaluate the entire plant and growing environment before adding fertilizer. Feeding a plant with rotting roots is rather like offering a sandwich to someone whose canoe is sinking.
Healthy ginger foliage is typically upright and green, while new shoots should continue appearing as the underground rhizome expands.
8. Watch for Pests, Rot, and Stress Signals
Most problems begin with poor growing conditions
Homegrown ginger is not usually overwhelmed by pests, but indoor or greenhouse plants can occasionally attract spider mites, aphids, scale insects, or mealybugs. Inspect the undersides of leaves and the points where leaves meet the stems. Fine webbing, sticky residue, pale speckling, or clusters of tiny insects deserve attention.
Small pest populations can often be removed with a strong stream of water or by wiping the leaves carefully. Improve air circulation and avoid placing new plants beside established ones until they have been inspected.
Rhizome rot is usually a greater danger than insect damage. Warning signs include collapsing shoots, persistently yellow leaves, a sour smell, or soft, discolored rhizomes. Rot becomes more likely when ginger is planted in cold, compacted, or constantly wet soil.
If rot is discovered early, remove the plant, cut away damaged tissue with a clean tool, and allow healthy pieces to dry before replanting them in fresh, well-draining soil. Discard pieces that are soft throughout. Be honest with yourself: a rhizome that has achieved the texture of pudding is not “probably still fine.”
9. Harvest at the Right Stage
Choose between baby ginger and mature ginger
You do not have to wait for full maturity before harvesting. Baby ginger is typically harvested several months after planting, often around five months in suitable conditions. It has thin, tender skin, a juicy texture, and a milder flavor. Because the skin is delicate, baby ginger often needs little or no peeling.
Mature ginger generally needs approximately eight to ten months of warm growth. As the plant approaches dormancy, the leaves begin yellowing and dying back. At this point, reduce watering and allow the soil to become somewhat drier before harvesting.
To harvest a container, tip it gently onto a tarp or work surface and separate the rhizomes from the soil by hand. In a garden bed, loosen the soil around the plant with a digging fork, starting far enough from the stems to avoid spearing the crop.
You can also perform a partial harvest. Carefully uncover an outer section, cut away the amount needed, and cover the remaining rhizome again. Save several firm pieces with healthy eyes for replanting.
Wash harvested ginger gently and allow the surface to dry. Fresh ginger can be refrigerated for shorter storage or frozen for longer use. Mature rhizomes generally store better than tender baby ginger because their skin is thicker and less easily damaged.
Common Ginger-Growing Problems
Why has my ginger not sprouted?
The soil may be too cold, the rhizome may lack a viable eye, or the planting mix may be excessively wet. Move the container to a warmer location and keep the soil only lightly moist. Sprouting can take several weeks, so do not declare a botanical emergency after four days.
Why are the leaves turning brown?
Brown tips commonly point to intense sunlight, dry soil, low humidity, fertilizer buildup, or irregular watering. Move the plant away from harsh afternoon sun, check moisture more consistently, and flush container soil with plain water if excessive fertilizer salts may be present.
Why are the leaves yellow?
Yellowing can result from overwatering, poor drainage, inadequate nutrition, cold temperatures, or natural dormancy. If the plant is late in its growing season, gradual yellowing is expected. If the soil smells unpleasant or remains soggy, inspect the rhizome for rot.
Can ginger survive winter?
Edible ginger is hardy outdoors primarily in very warm climates. Elsewhere, harvest it before frost or bring container plants indoors before temperatures fall below approximately 50 degrees Fahrenheit. Growth may slow during winter, especially when indoor light levels are low.
A Beginner’s First-Season Ginger-Growing Experience
A typical first attempt at growing ginger often begins with too much optimism and a pot that is too small. The gardener finds a promising rhizome in the kitchen, places it in whatever container happens to be available, waters it generously, and checks for sprouts the following morning. Ginger responds to this enthusiasm by doing absolutely nothing visible.
The first useful lesson is that ginger works on tropical time. A planted rhizome may remain quiet for weeks while it develops roots and prepares a shoot. During this period, repeatedly watering the pot is more dangerous than leaving it slightly dry. Beginners frequently assume that no visible growth means the plant needs more water. In reality, cool, soggy soil is one of the fastest ways to turn a healthy rhizome into compost before schedule.
The second lesson usually arrives when the first shoot finally appears. It may look thin and unimpressive, but growth accelerates once warmth, humidity, and longer days arrive. Additional shoots then emerge from different points along the rhizome. This is the moment when a wide container begins to make sense. Ginger does not simply form one enlarged lump beneath the original stem; it creeps outward, creating branches and new growing points near the soil surface.
Light exposure can also require experimentation. A plant placed in strong afternoon sun may develop brown, papery tips even though the soil seems adequately moist. Moving it to bright shade or morning-only sun often produces healthier leaves. Conversely, ginger kept in a dark indoor corner may survive but grow slowly, with weak stems leaning toward the nearest window. The best location tends to be bright and warm without feeling like the surface of a frying pan.
Watering becomes easier when the gardener stops following a rigid calendar and starts checking the soil. A container may need water every few days during hot, windy weather but far less often during a cool, cloudy week. Lifting the pot, touching the soil, and observing the foliage provide more useful information than a rule such as “water every Tuesday.” Plants, inconveniently, do not read calendars.
The first harvest is often smaller than expected, particularly when the plant was started late or grown in a cramped pot. Even a modest harvest, however, reveals why homegrown ginger is worth the effort. Young rhizomes can be pale yellow with pinkish tips, thin skin, and a fragrance much brighter than ginger that has spent weeks in storage. The flavor is lively but often less fibrous and less aggressively hot than fully mature ginger.
The final lesson is to save planting material. Instead of using every harvested piece in the kitchen, set aside several firm sections with visible eyes. Stored or replanted correctly, these pieces become the beginning of the next crop. The second season is usually easier because the gardener starts earlier, chooses a wider container, manages water more carefully, and no longer panics when the soil remains quiet for a while.
That is the real charm of growing ginger: the plant teaches patience without demanding complicated equipment. It rewards observation more than constant intervention. Give it warmth, room, moisture without flooding, and enough time, and a grocery-store rhizome can become both an attractive tropical plant and a surprisingly useful kitchen harvest. These practical observations align with extension guidance on pre-sprouting, temperature management, shallow planting, and harvesting ginger in temperate climates.
Conclusion
Learning how to grow ginger is mostly an exercise in creating tropical conditions without creating tropical rainfall inside the pot. Begin with a healthy rhizome, plant it shallowly in loose soil, keep it warm, and provide steady but controlled moisture. Partial shade protects the leaves, occasional feeding supports vigorous growth, and a wide container gives the rhizomes space to expand.
Gardeners in cooler climates can still grow a worthwhile crop by starting ginger indoors and harvesting tender baby ginger before frost. Those with a longer warm season can wait for mature rhizomes after the foliage begins to decline. Either way, the result is a fragrant homegrown ingredient that traveled only a few steps from soil to kitchen.
Note: Planting dates, watering frequency, and harvest time vary with climate, container size, temperature, and the condition of the original rhizome. The recommendations above synthesize guidance from U.S. university extension programs and established horticultural references; adjust them to your local growing conditions.