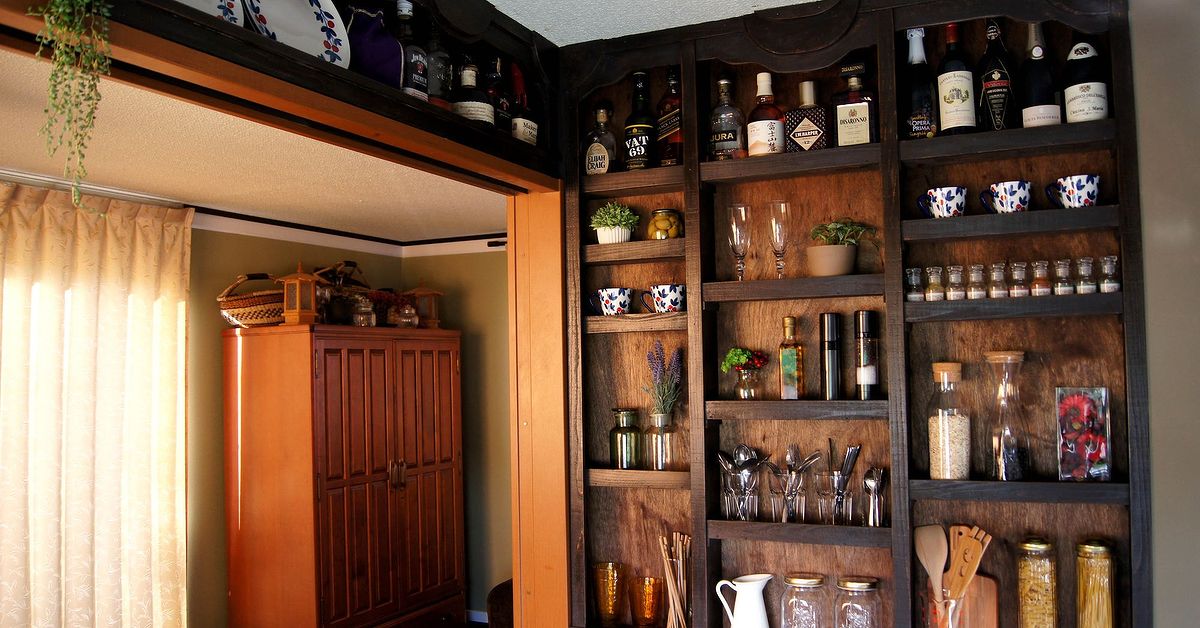
Built-in kitchen wall shelves can turn an awkward blank wall into hardworking storage while making the entire room look more intentional. Done well, they appear to have arrived with the house. Done poorly, they lean forward like they are trying to escape with your coffee mugs.
The good news is that you do not need a professional cabinet shop to create sturdy, attractive built-in shelving. With careful measurements, properly anchored supports, quality plywood, simple trim, and a patient approach to finishing, a moderately experienced DIYer can build custom shelves that hold dishes, cookbooks, pantry jars, serving bowls, and decorative pieces without sagging or wobbling.
What Makes Kitchen Wall Shelves Look Built In?
A basic floating shelf is attached to a wall. A built-in shelf looks integrated with the kitchen’s architecture. It may fill an entire nook, fit tightly between two cabinets, extend from a countertop to the ceiling, or use side panels and trim to create a cabinet-like appearance.
The built-in effect usually comes from four details:
- The shelving fits the available wall space closely.
- Visible gaps are covered with trim or neatly caulked.
- The shelves match or complement the existing cabinets.
- Supports and fasteners are concealed as much as possible.
This guide uses wall-mounted wood cleats, plywood shelves, and solid-wood front edging. It is one of the most approachable ways to achieve a custom built-in appearance without constructing full cabinet boxes.
Plan the Shelves Before Buying Lumber
Choose the Right Location
Look for a blank wall, shallow alcove, unused corner, or open area between cabinets. A wall near a coffee station might hold mugs and beans, while shelves beside a dining nook can store serving dishes and cookbooks.
Avoid placing combustible wood shelving where it could interfere with a range hood, microwave, or required cooktop clearance. Appliance requirements vary by model. For example, some manufacturers call for substantial open space between a cooktop and an unprotected wood cabinet, while range-hood mounting heights depend on the appliance and fuel type. Always follow the installation manuals for your range and ventilation equipment rather than treating a social-media photo as a building code.
Decide What the Shelves Will Hold
A shelf for a few framed recipes has very different structural needs from a shelf loaded with stoneware dinner plates. Make a rough inventory before deciding on shelf depth, thickness, and support.
Common kitchen shelf depths include:
- 6 to 8 inches: Spices, mugs, glasses, and small decorations
- 9 to 11 inches: Cookbooks, bowls, canisters, and everyday dishes
- 12 inches or more: Small appliances, pantry baskets, and large serving pieces
Deeper shelves hold more, but they also project farther into the room. In a narrow kitchen, a deep shelf at forehead height can become a surprisingly effective alarm clock.
Calculate Shelf Spacing
Measure the tallest objects you expect to store and add approximately 2 inches of breathing room. Everyday dishes may fit within a 12- to 14-inch opening, while large cookbooks, pitchers, or appliances may need 15 to 18 inches.
Use painter’s tape to outline the proposed shelves directly on the wall. Step back and view the layout from several angles. Check that the lowest shelf will not interfere with countertop appliances and that the highest shelf remains useful rather than becoming a retirement home for dusty vases.
A Practical Example and Cut Plan
Suppose you have a wall opening that is 36 inches wide and want three shelves measuring approximately 10 inches deep. A simple plan could include:
- Three shelves cut from 3/4-inch cabinet-grade plywood
- Three back cleats made from 1-by-2 lumber
- Six short side cleats, with two supporting each shelf
- Three 1-by-2 poplar boards for the shelf fronts
- Optional vertical side panels for a more enclosed built-in appearance
- Decorative trim or scribe molding around the outer edges
For shelves carrying heavy dishes, limiting unsupported spans and reinforcing the front edge can substantially improve stiffness. Woodworking tests have shown that shelf material, thickness, span, and edging all influence sag. Three-quarter-inch plywood with a solid-wood front edge is a practical combination, while long spans may need a center support, thicker construction, or a torsion-box design.
Tools and Materials
Recommended Tools
- Tape measure
- Stud finder with electrical-detection capability
- Four-foot level or laser level
- Pencil and painter’s tape
- Circular saw with a straightedge guide or a table saw
- Miter saw or handsaw for trim
- Drill and impact driver
- Countersink bit
- Brad nailer or hammer and finish nails
- Clamps
- Orbital sander
- Caulk gun
- Eye, hearing, and respiratory protection
Recommended Materials
- 3/4-inch cabinet-grade plywood
- 1-by-2 or 1-by-3 lumber for cleats and front edging
- Cabinet screws or structural wood screws
- Heavy-duty wall anchors when studs are unavailable
- Wood glue
- Wood filler
- Paintable caulk
- Primer
- Cabinet, trim, or furniture-grade paint
- Optional veneer edge banding, crown molding, or scribe trim
How to Build DIY Built-in Kitchen Wall Shelves
Step 1: Inspect and Measure the Wall
Measure the opening at the top, middle, and bottom. Walls are frequently out of square, especially in older houses, so do not assume one measurement tells the entire story.
Check both side walls with a level. If one side leans, record the difference. A small gap can later be hidden with caulk or scribe molding, but a large variation may require a tapered filler strip.
Also locate outlets, plumbing fixtures, ductwork, and nearby appliances. Turn off power to the relevant circuit before drilling where electrical wiring may be present. Never continue drilling blindly when a bit encounters unexpected resistance.
Step 2: Find and Mark the Wall Studs
Run a stud finder across the back wall and mark both edges of each stud. Confirm the center by testing with a small finish nail in an inconspicuous area when appropriate. Continue the stud marks vertically through every planned shelf position.
Fastening shelf supports directly to studs provides the strongest connection. Studs in typical framed walls are often spaced 16 or 24 inches on center, although actual conditions vary. When a stud is unavailable at a necessary fastening point, choose an anchor specifically rated for the wall type and expected load.
Step 3: Draw Level Layout Lines
Mark the top or bottom position of each shelf. Use a long level or laser level to extend the mark across the back wall and onto both side walls.
Do not measure every shelf independently from the floor. Floors and countertops can slope, causing small errors to multiply. Instead, establish one reliable level reference and measure subsequent shelves from that line.
Step 4: Cut the Shelf Cleats
Cut one back cleat and two side cleats for each shelf. The back cleat should fit between the side walls or vertical panels. Side cleats should be slightly shorter than the shelf depth so the front edging can hide them.
Sand the visible lower edges before installation. Once the cleats are attached near a wall, sanding them becomes an awkward activity involving bent wrists and newly invented vocabulary.
Step 5: Install the Back Cleats
Position the first back cleat against its layout line. Check it with a level and drill pilot holes through the cleat at stud locations. Secure it with screws long enough to pass through the cleat and wall covering and penetrate solid framing adequately.
Start with one screw near the center, adjust the cleat until perfectly level, and then install the remaining screws. Repeat for every shelf.
Cleats are widely used for wall-mounted and pantry shelving because they create continuous support and can be fastened across multiple studs. Side-wall cleats add further support and help distribute the load.
Step 6: Add the Side Cleats
Align each side cleat with the back cleat, checking both pieces with a level. Fasten the side cleats into studs when possible. Where framing is unavailable, use appropriate anchors or secure the cleats to installed vertical side panels.
Check the front ends of the two side cleats with a level. A shelf can be level from left to right yet still tilt forward, which is an excellent way to teach jars about gravity.
Step 7: Cut and Test-Fit the Shelves
Cut each plywood shelf separately according to the actual opening at that height. Leave a very small installation allowance rather than forcing a shelf between uneven walls.
Slide the shelf onto its cleats and test the fit. Check for rocking, front-to-back slope, and wall gaps. Use thin shims behind a cleat when the wall surface is uneven. Once satisfied, label the shelf so it returns to the same position after finishing.
Step 8: Reinforce the Front Edges
Cut solid-wood front edging to match each shelf. A 1-by-2 board installed vertically creates a thicker, more substantial appearance and helps resist sagging.
Apply wood glue along the plywood edge, clamp the trim in place, and secure it with brad nails. Keep the top of the edging flush with the shelf surface. Fill nail holes after the glue dries.
For a thinner appearance, use iron-on veneer edge banding. It hides the plywood layers but provides less structural reinforcement than a solid-wood strip.
Step 9: Secure the Shelves
Apply a modest bead of wood glue to the cleats, set each shelf in place, and fasten it from above with countersunk screws or finish nails. Place fasteners near the back and side edges where stored items will conceal them.
For shelves that may eventually need removal, skip the glue and use screws alone. Removable shelves are helpful when repainting or accessing hidden utilities.
Step 10: Add Side Panels and Trim
To strengthen the built-in appearance, install plywood side panels from the countertop or floor to the top shelf. Fasten them to the cleats and wall framing, checking that they remain plumb.
Add narrow face-frame strips, scribe molding, base trim, or crown molding where the shelving meets surrounding cabinetry. These pieces conceal uneven joints and visually connect the new structure to the kitchen.
Use wood filler on nail holes and paintable caulk at narrow wall joints. Wood filler belongs in wood defects; flexible caulk belongs in joints that may move slightly. Swapping those jobs usually creates cracks, frustration, or both.
How to Achieve a Durable Kitchen Finish
Kitchen shelving faces grease, steam, fingerprints, sliding dishes, and the occasional pasta-sauce incident. Ordinary flat wall paint is rarely the best finish for the shelf surfaces.
- Fill holes and visible plywood defects.
- Sand the surfaces smooth, progressing from medium to fine sandpaper.
- Vacuum thoroughly and wipe away remaining dust.
- Apply a compatible primer, especially over raw wood, MDF, laminate, or patched areas.
- Lightly sand the dry primer.
- Apply two thin coats of cabinet, furniture, or durable trim paint.
- Allow the finish to cure before loading the shelves.
Premium cabinet coatings are formulated to create a harder, more washable surface than basic wall paint. Proper cleaning, sanding, priming, thin coats, and adequate curing time help prevent peeling and “blocking,” the annoying condition in which objects stick to incompletely cured paint.
Smart Design Ideas for Custom Kitchen Shelving
Match the Cabinets
Paint the shelves the same color as the cabinets for a seamless look. Matching the face-frame width and molding profile makes the addition appear original to the kitchen.
Create a Contrasting Accent
Natural white oak, walnut-toned stain, or a contrasting paint color can turn the shelves into a focal point. Repeat the finish elsewhere through stools, cutting boards, or cabinet hardware to keep the choice intentional.
Add a Finished Back
Install beadboard, painted plywood, tile, or a washable wallpaper behind the shelving. A finished back protects the drywall and adds depth without taking away much storage space.
Include Lighting
Low-voltage LED strips can illuminate work surfaces and display items. Plan wiring routes before closing gaps with trim. Electrical work inside walls should comply with local requirements and may require a licensed electrician.
Use Adjustable Sections
Fixed shelves offer strength and a clean appearance, but one adjustable section makes the built-in more adaptable. Shelf-pin holes can accommodate changing appliances, cookbooks, or storage baskets.
Common DIY Shelf-Building Mistakes
- Skipping the stud search: Drywall alone is not a structural plan.
- Ignoring total weight: Plates, canned goods, and appliances become heavy quickly.
- Using long unsupported spans: Even attractive shelves can sag under sustained loads.
- Copying one measurement: Walls are rarely perfectly parallel.
- Installing cleats without checking front-to-back level: This creates shelves that tip outward.
- Painting immediately after assembly: Glue, filler, and caulk need proper drying time.
- Loading paint too soon: Dry-to-touch paint may not be fully cured.
- Forgetting appliance clearance: Decorative shelving should never compromise ventilation or heat safety.
- Using MDF in a splash-prone location without sealing it: Unprotected edges can absorb moisture and swell.
- Caulking giant gaps: Large gaps should be covered with fitted trim, not filled with a heroic rope of caulk.
Real-World Experience: Lessons That Make the Project Easier
The biggest lesson from building custom shelves is that the wall controls the project. You may draw a flawless rectangle on paper, but the actual opening will often be narrower at one end, bowed in the middle, or slightly out of plumb. Cutting every shelf from one initial measurement is therefore risky. The safer approach is to measure and test-fit each shelf individually. Number the pieces on their hidden edges so they do not get mixed up during painting.
Painter’s tape is another surprisingly valuable tool. Before buying lumber, outline every shelf on the wall and leave the tape in place for a day. Walk through the kitchen, open nearby doors, use the countertop, and pretend to reach for objects. A shelf that looks elegant in a sketch may feel too deep when you are carrying a hot pan. Adjusting tape costs nothing. Adjusting a finished plywood shelf is considerably less charming.
When cutting plywood with a circular saw, support the entire sheet on rigid foam insulation placed on the floor. Set the blade only slightly deeper than the plywood and use a straightedge guide. This method keeps the panel stable and reduces the wrestling match that can occur when cutting a large sheet across two sawhorses. A fine-tooth blade and painter’s tape over the cut line can also reduce splintering.
Another practical improvement is to finish as many pieces as possible before final installation. Sanding and painting a loose shelf on a workbench is faster and cleaner than working against a kitchen wall. Leave final nail filling, caulking, and the last paint coat until after assembly so the built-in still receives a continuous finish.
Do not underestimate the value of a temporary ledger board. When installing a large side panel or upper section, a level scrap board screwed into studs can support the piece while you adjust it. This turns a stressful two-person balancing act into a controlled installation. Remove the ledger afterward and patch its holes.
For painted shelving, poplar is a friendly material for front edges and face frames. It machines cleanly, accepts paint well, and is generally straighter than inexpensive construction lumber. Inspect every board at the store by looking down its length. A twisted trim board will fight you through cutting, gluing, nailing, filling, and painting. Life provides enough conflict without purchasing additional conflict by the linear foot.
Plan the final arrangement before deciding where every shelf belongs. Put frequently used dishes between waist and eye level. Store heavy appliances on lower shelves, where lifting is safer. Reserve upper shelves for occasional serving pieces and lightweight decorations. Open kitchen shelves look best when they have a little empty space, so do not design them to hold every object you have ever owned.
Finally, allow the finish to cure. This is the least exciting step and one of the most important. Fresh paint may feel dry but remain soft underneath. Loading it with dishes too early can leave rings, dents, or stuck objects. Give the coating the manufacturer-recommended curing time, then add shelf contents gradually. Once the shelves are loaded, check the fasteners and level again after several days. A stable, properly supported installation should remain unchanged.
Conclusion
DIY built-in kitchen wall shelves combine practical storage with the polished appearance of custom cabinetry. The project succeeds when you plan around real storage needs, measure the wall carefully, attach supports to framing, control unsupported shelf spans, reinforce plywood edges, and use a finish capable of handling kitchen life.
Take your time during layout and test fitting. Trim can conceal small irregularities, but it cannot rescue a shelf that is dramatically crooked or poorly supported. Build the structure carefully, finish it patiently, and your new shelves should look less like a weekend experiment and more like they have always belonged in the room.