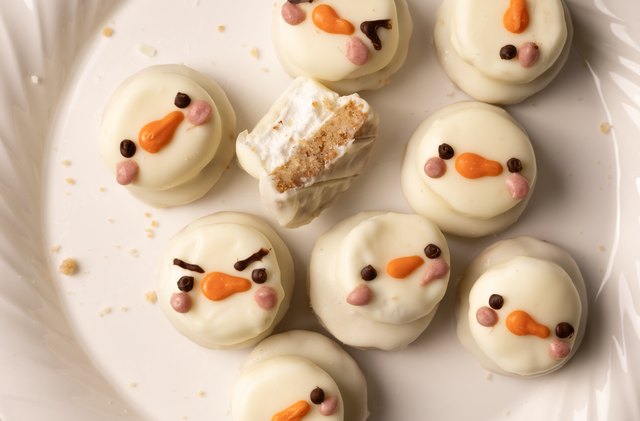
Some holiday cookies quietly sit on the dessert tray. Others wear tiny chocolate hats, balance fluffy marshmallow bellies, and look like they might start singing carols if you leave the kitchen for five minutes. Homemade Mallomars cookies shaped like snowmen belong proudly in the second category.
Inspired by the classic Mallomars formulagraham-style cookie, pillowy marshmallow, and dark chocolate shellthis festive version turns the nostalgic treat into a winter baking project that is part cookie, part candy, and part edible snow day. Instead of making simple round cookies, you build adorable snowman shapes with crisp cookie bases, homemade marshmallow bodies, glossy chocolate coats, and playful decorations.
The result is a batch of chocolate-covered marshmallow snowman cookies that taste like a s’more put on a scarf and decided to attend a holiday party. They are rich but not heavy, sweet but balanced, and impressive enough for cookie swaps, Christmas dessert boards, classroom parties, and cozy weekends when the oven becomes the warmest member of the family.
What Are Snowman Mallomars?
Traditional Mallomars are built around a simple but brilliant idea: a round graham cracker-style base topped with marshmallow and covered in dark chocolate. Homemade versions usually follow the same structure but give bakers more freedom with flavor, texture, and decoration.
Snowman Mallomars take that structure and make it festive. The base becomes a small cookie foundation. The marshmallow is piped or shaped into stacked snowman forms. The chocolate coating can be white, dark, or a mix of both. The finishing touchesmini chocolate chips, sprinkles, candy buttons, pretzel arms, and tiny orange nosesturn each cookie into a frosty little character.
Think of them as homemade Mallomars with a holiday makeover. They are cute enough for kids, delicious enough for adults, and dramatic enough to make someone say, “You made these?” which is basically the baker’s version of winning a trophy.
Why This Recipe Works
The magic of homemade Mallomars comes from contrast. A slightly crisp cookie base supports a soft marshmallow center, while the chocolate shell adds snap and richness. For snowman shapes, structure matters even more. The cookie has to be sturdy, the marshmallow needs to hold its shape, and the coating must set without turning the snowmen into mysterious holiday puddles.
This recipe uses a graham-inspired cookie dough with butter, brown sugar, honey, and a touch of cinnamon. It tastes warm and lightly toasted, similar to a graham cracker but softer and more homemade. The marshmallow is made with gelatin and hot sugar syrup, giving it enough body to pipe or spoon into snowman shapes. Finally, the chocolate coating locks everything together and adds the classic Mallomars flavor.
Ingredients for Homemade Mallomars Snowmen
For the Cookie Base
- 1 1/2 cups all-purpose flour
- 1/2 cup whole wheat flour
- 1/2 teaspoon baking soda
- 1/2 teaspoon fine salt
- 1/2 teaspoon ground cinnamon
- 1/2 cup unsalted butter, softened
- 1/3 cup light brown sugar
- 2 tablespoons honey
- 1 teaspoon vanilla extract
- 2 tablespoons milk, as needed
For the Marshmallow Snowmen
- 2 1/2 teaspoons unflavored gelatin
- 1/2 cup cold water, divided
- 3/4 cup granulated sugar
- 1/2 cup light corn syrup
- 1/8 teaspoon salt
- 1 teaspoon vanilla extract
- Powdered sugar, for dusting hands and tools
For the Chocolate Coating and Decorations
- 12 ounces dark chocolate, chopped
- 1 tablespoon coconut oil or vegetable shortening, optional for easier dipping
- White chocolate or candy melts, optional for snowy coating
- Mini chocolate chips for eyes and buttons
- Orange sprinkles or tiny candy pieces for noses
- Pretzel sticks for arms
- Red or green icing for scarves
How to Make Homemade Mallomars Cookies Shaped Like Snowmen
Step 1: Make the Cookie Dough
In a medium bowl, whisk together the all-purpose flour, whole wheat flour, baking soda, salt, and cinnamon. In a separate bowl, beat the softened butter and brown sugar until creamy. Add the honey and vanilla, then mix until smooth.
Add the dry ingredients to the butter mixture and stir until a soft dough forms. If the dough feels crumbly, add milk one tablespoon at a time. The dough should hold together without sticking aggressively to your fingers. Wrap it and chill for at least 30 minutes. Chilling helps the cookies keep their shape and makes the dough easier to roll.
Step 2: Cut and Bake the Cookie Bases
Preheat the oven to 350°F. Line a baking sheet with parchment paper. Roll the chilled dough to about 1/4 inch thick. For classic snowman Mallomars, cut small circles for the base, about 2 inches wide. For a full snowman silhouette, cut connected circles using a snowman cookie cutter.
Place the cookies on the prepared baking sheet and bake for 9 to 11 minutes, or until the edges look set and lightly golden. Let them cool completely. Do not rush this step. Warm cookies and marshmallow are not enemies, exactly, but they are definitely not good roommates.
Step 3: Prepare the Homemade Marshmallow
Pour 1/4 cup cold water into the bowl of a stand mixer and sprinkle the gelatin over it. Let it bloom for 5 to 10 minutes. Blooming gives the gelatin time to absorb water, which helps the marshmallow whip properly.
In a saucepan, combine the remaining 1/4 cup water, sugar, corn syrup, and salt. Cook over medium heat, stirring only until the sugar dissolves. Attach a candy thermometer and continue cooking until the syrup reaches 240°F. This is the soft-ball stage, the sweet spot for marshmallow that is fluffy but stable.
With the mixer on low speed, carefully pour the hot syrup into the bloomed gelatin. Increase the speed gradually to high and whip for 8 to 10 minutes, until the mixture becomes thick, glossy, and white. Add vanilla near the end. The marshmallow should form soft peaks and hold a shape when spooned.
Safety note: Hot sugar syrup can burn quickly. Use a deep saucepan, pour slowly, and keep younger helpers away from the mixer during this step. They can join the decorating committee, which is clearly the most glamorous department anyway.
Step 4: Shape the Snowmen
Transfer the marshmallow to a piping bag fitted with a large round tip, or use a zip-top bag with the corner snipped off. Pipe one large mound onto each cookie base, then pipe a smaller mound on top for the head. For taller snowmen, add a third small mound, but remember that gravity has opinions.
If the marshmallow becomes too firm to pipe, work quickly or warm the piping bag slightly with your hands. Lightly dust your fingers with powdered sugar and smooth any peaks. Let the marshmallow-topped cookies sit at room temperature for 30 to 45 minutes, until the surface is less sticky.
Step 5: Coat with Chocolate
Melt the dark chocolate gently in a heatproof bowl set over barely simmering water, or microwave it in short bursts, stirring often. For a shinier finish and better snap, temper the chocolate if you feel comfortable doing so. If you want a simpler route, add a small amount of coconut oil or shortening to help the chocolate coat smoothly.
Dip each marshmallow snowman into the melted chocolate, allowing excess chocolate to drip back into the bowl. Place the cookies on parchment paper. If you prefer a classic snowman look, dip them in white chocolate or white candy coating, then drizzle dark chocolate for hats, scarves, or buttons.
Step 6: Decorate Before the Coating Sets
While the coating is still soft, add mini chocolate chips for eyes, orange sprinkles for noses, and pretzel sticks for arms. Use colored icing to pipe scarves once the chocolate has set. Give each snowman a slightly different expression. One can look cheerful, one can look surprised, and one can look like it just saw the December grocery bill.
Tips for Perfect Chocolate-Covered Marshmallow Snowman Cookies
Use a Sturdy Cookie Base
Soft cookies taste wonderful, but snowman Mallomars need a base with enough strength to support marshmallow and chocolate. A graham-style cookie works well because it brings flavor and structure. Avoid underbaking, or the cookies may bend when dipped.
Let the Marshmallow Set Before Dipping
Fresh marshmallow is sticky and delicate. Giving it time to dry slightly on the outside makes dipping much easier. The inside stays fluffy, but the surface becomes easier to coat.
Choose the Right Chocolate
Dark chocolate gives these cookies the most traditional Mallomars flavor, balancing the sweet marshmallow with a slightly bitter edge. Milk chocolate makes them sweeter and more kid-friendly. White chocolate creates the strongest snowman appearance, especially with dark chocolate accents.
Keep the Shapes Small
Large snowmen are cute, but they are harder to dip and more likely to lean. Smaller cookies are easier to handle, faster to set, and better for party trays. Plus, eating two small cookies feels more festive than eating one giant one. That is not science, but it is emotionally accurate.
Flavor Variations
Peppermint Snowman Mallomars
Add 1/4 teaspoon peppermint extract to the marshmallow and sprinkle crushed candy canes over the chocolate coating. This version tastes like hot cocoa in cookie form.
S’mores Snowmen
Use dark chocolate coating, graham-style cookies, and a lightly toasted marshmallow flavor by adding a tiny pinch of smoked salt or using toasted sugar. Finish with graham cracker crumbs.
Cookies and Cream Snowmen
Stir finely crushed chocolate sandwich cookies into the cookie dough or sprinkle them over white chocolate coating. This creates a playful black-and-white snowman look.
Salted Dark Chocolate Snowmen
After dipping in dark chocolate, add a few flakes of sea salt. The salt sharpens the chocolate flavor and keeps the cookie from tasting too sweet.
How to Store Homemade Mallomars Snowmen
Store the finished cookies in an airtight container at cool room temperature for up to 3 days. If your kitchen is warm, refrigerate them, but let them sit at room temperature for 10 to 15 minutes before serving so the marshmallow softens slightly.
For the best texture, avoid stacking the cookies unless the chocolate is completely set. Place parchment paper between layers if needed. These cookies can also be frozen, although decorations may become less crisp after thawing. Freeze in a single layer first, then transfer to a container. Thaw in the refrigerator before serving.
Serving Ideas for Holiday Parties
Homemade Mallomars cookies shaped like snowmen look charming on a white platter dusted with powdered sugar “snow.” Add rosemary sprigs for a wintery look, or arrange them around mugs of hot chocolate. They also make delightful edible gifts. Place two or three in a clear treat bag, tie with ribbon, and add a small tag that says, “Some assembly required by snow clouds.”
For cookie swaps, pack them in cupcake liners so the decorations stay neat. For dessert boards, pair them with peppermint bark, gingerbread cookies, chocolate truffles, and fresh strawberries. The mix of textures makes the board feel abundant without requiring a thousand separate baking projects.
Common Mistakes to Avoid
Overheating the Chocolate
Chocolate can become thick, dull, or grainy if overheated. Melt it slowly and stir often. Keep water away from the bowl because even a small splash can cause chocolate to seize.
Whipping Marshmallow Too Little
Under-whipped marshmallow may slide off the cookie or collapse. It should look thick, glossy, and stretchy. When in doubt, whip a little longer rather than stopping too early.
Decorating Too Late
If the chocolate sets before you add eyes, noses, and buttons, the decorations will not stick. Keep toppings ready before dipping. Snowmen wait for no one.
Making the Marshmallow Too Tall
A towering snowman looks fun until it tips over like a holiday drama queen. Keep the marshmallow mounds balanced and centered on the cookie base.
Experience Notes: What It Is Like to Make Snowman Mallomars at Home
Making homemade Mallomars cookies shaped like snowmen is not the fastest holiday baking project, but that is part of the fun. This is the kind of recipe that turns the kitchen into a tiny workshop. There is dough chilling in the refrigerator, marshmallow whipping into glossy clouds, chocolate melting in a bowl, and decorations scattered across the counter like a cheerful sprinkle explosion.
The first thing you notice is the smell of the cookie base. The honey, brown sugar, cinnamon, and butter create a warm aroma that feels halfway between graham crackers and Christmas morning. The cookies should cool completely before the marshmallow goes on, which is a good time to organize decorations. Put the mini chips, orange sprinkles, pretzels, and icing into small bowls. It makes the decorating process smoother and keeps the counter from looking like a candy store sneezed.
The marshmallow stage is the most dramatic. At first, the mixture looks thin and syrupy, and then suddenly it transforms into a thick white fluff. Watching it climb the whisk is oddly satisfying. It feels like kitchen magic, except the wand is a stand mixer and the spell is mostly sugar science. The texture changes quickly, so piping the snowmen soon after whipping is important. If you wait too long, the marshmallow becomes harder to shape.
Dipping the snowmen in chocolate can be messy, especially the first few. That is normal. The trick is to use a fork or dipping tool, tap off the extra chocolate gently, and slide the cookie onto parchment paper. The first snowman may look like it got caught in a blizzard. By the fourth or fifth, you will find your rhythm. Homemade cookies do not need factory-level perfection. In fact, the slightly crooked ones often have the most personality.
Decorating is where the recipe becomes memorable. Children can help add eyes, buttons, and noses once the hot sugar and melted chocolate steps are finished. Adults usually enjoy it too, though they may pretend they are “just helping.” Every snowman turns out different. Some look jolly. Some look confused. Some look like they have strong opinions about holiday music. That variety makes the finished tray more charming.
When you finally bite into one, the payoff is huge. The chocolate shell cracks, the marshmallow pulls softly, and the cookie base adds just enough crunch. It tastes nostalgic but fresher than a packaged cookie. The homemade marshmallow has a vanilla flavor that feels clean and fluffy, while the dark chocolate keeps everything balanced. With a mug of cocoa or coffee, these cookies become a full winter mood.
The best advice is to make them when you have time to enjoy the process. This is not a rushed Tuesday-night cookie. It is a weekend project, a holiday activity, or a special dessert for people who appreciate a little edible theater. The recipe rewards patience, but it also forgives imperfection. A lopsided snowman is still delicious. A cracked chocolate shell still tastes wonderful. And if one cookie falls apart, the baker is legally allowed to eat the evidence.
Conclusion
Homemade Mallomars cookies shaped like snowmen are everything a holiday dessert should be: playful, nostalgic, chocolatey, fluffy, and just fancy enough to make people impressed without requiring professional pastry school. With a graham-style cookie base, homemade marshmallow, and a glossy chocolate coating, these snowman cookies deliver the beloved Mallomars experience in a festive handmade form.
They are perfect for Christmas cookie boxes, winter birthdays, holiday parties, or cozy baking days when you want something more exciting than another plain sugar cookie. Make them small, let the marshmallow set, keep the chocolate gentle, and have fun with the decorations. The snowmen may not survive long on the dessert table, but honestly, that is the sweetest kind of snowstorm.