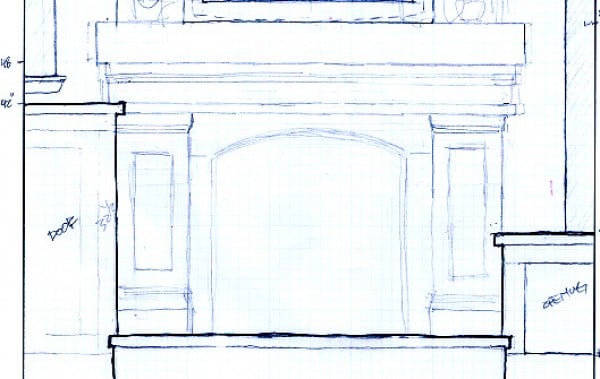
A blank wall is not a crime, but it can feel like one when the rest of the room is trying its best. That is where a smart faux mantel plan comes in. A faux mantel gives your living room, bedroom, dining room, entryway, or apartment corner the charm of a fireplace without the chimney, masonry work, demolition dust, or mysterious contractor quote that somehow includes “miscellaneous” three times.
In simple terms, a faux mantel is a decorative fireplace-style surround or shelf that creates a focal point. It may frame candles, stacked birch logs, books, battery-operated lanterns, peel-and-stick tile, an electric insert, or nothing at all except pure architectural confidence. The best part? A DIY faux fireplace mantel can be built with common lumber, MDF, trim, paint, wood glue, screws, and a weekend of patience. Maybe two weekends if your measuring tape vanishes into the same dimension as missing socks.
This guide walks through a practical, beginner-friendly faux mantel plan with materials, measurements, construction steps, styling ideas, safety notes, and real-world lessons from DIY experience. The goal is not to build a working fireplace. The goal is to create the look of a fireplace mantel: cozy, polished, proportional, and strong enough to hold decor without wobbling like a nervous folding table.
What Is a Faux Mantel?
A faux mantel is a decorative mantel or fireplace surround that imitates the appearance of a traditional fireplace. It can be freestanding, wall-mounted, built around an electric fireplace insert, or attached as a shallow architectural feature. Unlike a working wood-burning fireplace, a faux mantel does not need a chimney, flue, firebox, or masonry hearth unless you are adding a rated electric or gas component, which changes the rules and requires manufacturer instructions.
For most homeowners and renters, the faux mantel is about design. It gives a room a natural center, a shelf for seasonal decor, and a cozy “gather here” feeling. You can paint it crisp white for a cottage look, stain it warm brown for rustic charm, go black for dramatic modern style, or build it with fluted trim for a trendier custom finish.
Why Build a Faux Mantel Instead of Buying One?
Buying a ready-made mantel is convenient, but building your own offers three big advantages: fit, style, and budget control. A store-bought mantel may be too narrow, too deep, too ornate, or just slightly wrong in the way that makes your eye twitch every time you enter the room. A custom faux mantel plan lets you size the piece to your wall, ceiling height, furniture layout, and design taste.
A DIY approach also allows you to choose materials. MDF is smooth, affordable, and great for painted projects. Pine is easy to work with and takes paint or stain well. Poplar is a favorite for trim because it paints beautifully. Reclaimed wood adds instant history, though it may also add splinters, nail holes, and a personality best described as “barn with opinions.”
Before You Build: Decide on the Style
The first step in any successful faux mantel plan is choosing the look. Do not start cutting boards until you know whether you want clean modern lines or a traditional surround with layered molding. The design should match the room, not fight it like two cats in a cardboard box.
Modern Floating Mantel
A modern floating mantel is basically a sturdy wall shelf with a fireplace attitude. It works well above an existing non-working fireplace, over an electric insert, or on a feature wall. Keep the lines simple, use a box-style shelf, and avoid heavy trim.
Classic Faux Fireplace Surround
This style includes two vertical legs, a horizontal header, and a mantel shelf on top. It gives the strongest fireplace illusion and works beautifully in living rooms, bedrooms, and dining rooms.
Farmhouse Faux Mantel
For farmhouse style, use chunky proportions, a slightly deeper shelf, simple trim, and a painted or stained finish. White paint with a stained top is a reliable combination.
Vintage or Cottage Mantel
Add decorative molding, rosettes, corbels, or beadboard inside the opening. A distressed finish can work well, but use restraint. “Lightly aged” is charming. “Dragged behind a truck” is a different design category.
Recommended Faux Mantel Dimensions
For a decorative faux mantel, dimensions can be flexible. However, proportion matters. A mantel that is too small looks like a picture frame that lost its photo. A mantel that is too large can swallow the room and make the sofa look like doll furniture.
For a standard living room wall, a good starting size is:
| Part | Recommended Size | Notes |
|---|---|---|
| Overall width | 48 to 60 inches | Use wider sizes for large rooms or long walls. |
| Overall height | 42 to 54 inches | Keep it proportional to ceiling height. |
| Mantel shelf depth | 6 to 8 inches | Deep enough for decor, not so deep it feels bulky. |
| Opening width | 26 to 36 inches | Adjust for candles, logs, baskets, or an electric insert. |
| Opening height | 28 to 36 inches | Taller openings feel more traditional. |
If your faux mantel will sit near a real working fireplace, do not rely on decorative measurements alone. Follow local building code, fireplace manufacturer instructions, and required combustible clearances. Wood trim and mantel shelves near active fireboxes need proper spacing from heat and flame. Decorative-only mantels are simpler, but anything involving real heat deserves serious attention.
Tools and Materials for a Simple Faux Mantel Plan
This plan assumes a painted faux fireplace surround with a mantel shelf. It can be attached to the wall or built as a freestanding decorative piece that is still anchored for safety.
Tools
- Tape measure
- Pencil
- Level
- Stud finder
- Miter saw or circular saw
- Drill and drill bits
- Nail gun or hammer and finish nails
- Clamps
- Sanding block or orbital sander
- Caulk gun
- Paintbrush and foam roller
- Safety glasses and dust mask
Materials
- 1 x 8 board for the mantel shelf
- 1 x 6 boards for the vertical legs
- 1 x 8 or 1 x 10 board for the header
- 1 x 2 or 1 x 3 boards for trim
- 2 x 2 or 2 x 4 lumber for wall cleats or internal support
- Wood glue
- Finish nails
- 2-inch and 3-inch screws
- Wood filler
- Paintable caulk
- Primer
- Interior paint, satin or semi-gloss
- Optional molding, corbels, peel-and-stick tile, faux brick panel, or beadboard
Step-by-Step Faux Mantel Plan
Step 1: Measure the Wall
Start by choosing the wall. Measure the width, ceiling height, nearby furniture, outlets, baseboards, and any artwork or TV that will sit above the mantel. Mark the center point of the wall with painter’s tape. This small step prevents the classic DIY tragedy of building something beautiful and then realizing it is three inches off-center forever.
Step 2: Sketch the Mantel
Draw a basic front view. For a beginner-friendly design, use an overall width of 54 inches and height of 48 inches. Make each leg about 8 inches wide. Leave a center opening around 32 inches wide and 32 inches high. Add a shelf that overhangs the legs by 1 to 2 inches on each side.
Step 3: Build the Side Legs
Cut two vertical leg boards to the same height. If you want a chunkier look, build each leg as a shallow box using a front board and side returns. The returns create depth, making the mantel look built-in rather than pasted to the wall. Use wood glue and finish nails, then check that each leg is square.
Step 4: Build the Header
The header is the horizontal board that spans between the legs. Cut it to fit across the top of the opening. Attach it with glue and screws or nails. Use a level before fastening. If the header is crooked, every candle, frame, and holiday garland you place on top will silently judge you.
Step 5: Add the Mantel Shelf
Cut the shelf board so it overhangs the surround slightly. A 1-inch to 2-inch overhang on each side usually looks balanced. If you want a more finished edge, add small trim beneath the shelf or use crown molding. The shelf is what turns a simple frame into a convincing DIY faux fireplace mantel.
Step 6: Install Cleats or Wall Support
If the mantel is wall-mounted, attach cleats to wall studs. A cleat is a support board fastened to the wall that gives the mantel something solid to grab. Use a stud finder, mark the studs, level the cleat, and secure it with long screws. Then fasten the mantel to the cleat from the top, sides, or hidden interior points.
Step 7: Add Trim and Molding
Trim is where the magic happens. A plain box can become a custom-looking mantel with simple 1 x 2 boards, cove molding, crown molding, or small decorative blocks. Layer trim around the legs, across the header, and under the shelf. Keep the trim consistent so the finished piece looks intentional, not like the clearance bin exploded.
Step 8: Fill, Sand, and Caulk
Fill nail holes with wood filler. Sand rough edges and seams smooth. Caulk the joints where boards meet, especially if you are painting the mantel. Caulk is the friendly little secret that makes beginner carpentry look calmer, cleaner, and far more expensive than it actually was.
Step 9: Prime and Paint
Use primer before paint, especially on MDF, raw pine, or patched areas. For the final coat, satin and semi-gloss finishes work well because they are durable and easy to clean. White is timeless, black is bold, soft greige is warm, and deep green or navy can make the mantel feel like built-in furniture.
Step 10: Style the Firebox Opening
The opening is where your faux mantel becomes fun. Fill it with stacked birch logs, flameless candles, a basket of blankets, books, lanterns, or a peel-and-stick tile back panel. If you use candles, choose battery-operated flameless candles for the safest low-maintenance glow.
Faux Mantel Safety Notes
A decorative faux mantel is not a working fireplace. Do not burn wood, paper, gel fuel, or anything else inside a faux firebox unless the insert or appliance is specifically designed, rated, installed, and ventilated for that purpose. A pile of logs inside a wooden decorative surround should be treated as decor, not as an invitation to recreate a pioneer winter.
If you are building around an electric fireplace insert, follow the manufacturer’s installation manual. Electric inserts have their own clearance, ventilation, and power requirements. Avoid blocking vents, trapping cords, or using extension cords in unsafe ways.
If your mantel is near a real fireplace, treat clearance rules seriously. Combustible wood trim must be kept safely away from the firebox opening, and deeper projections often require more clearance. Local codes and the fireplace manufacturer’s instructions should always win over internet inspiration.
Design Ideas to Make a Faux Mantel Look Built-In
Use the Same Baseboard Profile
Matching the mantel base trim to your room’s existing baseboards helps the piece feel original to the house. This is a small detail with a big payoff.
Add a Tile or Faux Brick Insert
Peel-and-stick tile, faux brick panels, beadboard, or painted hardboard can create the illusion of a firebox. Herringbone patterns look especially polished, even when they are secretly wallpaper or thin panels. Your guests do not need to know. Let the wall have its little mystery.
Paint the Wall Behind It
Painting the inside opening a darker shade adds depth. Black, charcoal, deep brown, or dark green can make the opening recede visually, which helps the mantel look more realistic.
Layer Decor Above the Shelf
A mirror, framed art, leaning prints, vases, candlesticks, and greenery can turn the mantel into a proper focal point. For a casual look, use asymmetry. For a formal look, balance matching objects on both sides.
Common Faux Mantel Mistakes to Avoid
Making the Shelf Too Shallow
A 3-inch shelf may look sleek, but it limits decor. A 6-inch to 8-inch depth is more practical for frames, candles, small plants, and seasonal styling.
Skipping Wall Anchoring
Even a decorative mantel should be anchored. Children, pets, enthusiastic decorators, and gravity all exist. Use studs, cleats, or proper wall anchors depending on your wall type.
Forgetting About Scale
A tiny mantel on a huge wall looks lonely. A massive mantel in a small room looks like it is preparing to host a medieval banquet. Tape the outline on the wall before building so you can preview the size.
Painting Too Soon
Let glue, filler, and caulk dry fully before painting. Rushing this step can leave cracks, smears, and regret. DIY rewards patience, usually right after testing it.
Budget-Friendly Upgrades
You can make a simple faux mantel look custom without spending a fortune. Add corbels under the shelf for a traditional look. Use fluted trim on the legs for a modern designer effect. Install battery-powered puck lights inside the opening for a soft evening glow. Apply removable wallpaper behind the firebox for renters. Add a stone-look tile hearth panel at the base if you want a more grounded fireplace effect.
For a rustic finish, stain the top shelf and paint the surround. For a cleaner built-in look, paint everything the same color as the wall or trim. For dramatic contrast, paint the mantel black against a white wall, then style it with brass, wood, and greenery.
Real-World Experiences: What You Learn While Building a Faux Mantel
The first thing most DIYers learn while building a faux mantel is that walls are rarely straight. They may look flat from across the room, but once a long board touches them, suddenly the wall reveals its secret career as a potato chip. This is normal. Keep shims, caulk, and patience nearby. A tiny gap can usually be hidden with trim or paintable caulk. A large gap may require a scribe strip, which is simply a custom-cut filler piece that follows the uneven wall line.
The second lesson is that the mantel shelf determines the whole mood. A thin shelf makes the piece feel delicate and modern. A thick shelf feels rustic and substantial. If the room already has heavy furniture, a chunkier shelf can look balanced. If the space is small, a lighter shelf prevents the mantel from visually crowding the wall. Before fastening the shelf, place it on top and step back. Look from the doorway, the sofa, and the side angle. Good DIY decisions are rarely made with your nose six inches from a board.
Another experience worth mentioning is the importance of sanding. Nobody gets excited about sanding. Sanding is not glamorous. Sanding does not get applause. But sanding is the difference between “custom built-in” and “camp craft with ambition.” Focus on cut edges, filled nail holes, and any ripped boards. If you run your hand across the surface and it feels rough, paint will not magically fix it. Paint is not a fairy godmother; it is more like a spotlight.
Painting also teaches humility. A foam roller gives smooth results on flat surfaces, while a brush is better for corners and trim. Two thin coats almost always look better than one thick coat. Thick paint runs, pools, and leaves brush marks that look like tiny highways. Let each coat dry properly before adding another. If you are painting a dark color, use a tinted primer to reduce the number of coats.
Styling the faux mantel is the reward phase. Start with one large anchor piece above the shelf, such as a mirror or framed print. Then add medium-height items like vases or candlesticks. Finish with small objects, greenery, books, or seasonal accents. Avoid lining up tiny objects like soldiers. Layering looks more natural. The best mantel styling usually has variation in height, texture, and shape.
Finally, the biggest experience is emotional: a faux mantel changes how a room feels. It gives furniture a place to face, gives decor a home, and gives the wall a reason to exist beyond holding paint. Even when it is completely fake, the cozy effect is real. That is the funny little genius of a faux mantel plan: it does not need fire to warm up a room.
Conclusion
A good faux mantel plan is part carpentry, part decorating, and part clever illusion. With basic boards, trim, paint, and careful measuring, you can build a DIY faux fireplace mantel that gives any room a stronger focal point. Keep the proportions balanced, anchor the structure securely, use trim to create depth, and finish with smooth paint or stain. Whether your style is farmhouse, modern, cottage, vintage, or quietly dramatic, a faux mantel offers the cozy charm of a fireplace without the cost and complexity of installing a real one.
The most successful faux mantels look intentional. They relate to the size of the room, repeat existing trim details, and provide a natural place for decor. Build it safely, finish it carefully, and style it with personality. The fire may be pretend, but the upgrade is absolutely real.