A stripped screw can turn a five-minute repair into a tiny metal hostage negotiation. The screwdriver spins, the screw refuses to move, and every additional attempt seems to polish the damaged head into a perfectly useless circle.
Fortunately, you usually do not need to destroy the surrounding materialor your afternoonto remove it. The best approach is to begin with gentle methods that restore grip, then gradually move toward pliers, penetrating oil, extractor bits, slot cutting, or careful drilling.
This guide combines practical recommendations from major home-improvement retailers, tool manufacturers, repair specialists, woodworking publications, and DIY authorities, including Lowe’s, The Home Depot, This Old House, Family Handyman, Popular Mechanics, Bob Vila, Better Homes & Gardens, The Spruce, iFixit, Fine Homebuilding, Rockler, IRWIN, CRAFTSMAN, Ace Hardware, and Pro Tool Reviews.
What Is a Stripped Screw?
A screw is stripped when the recesses in its head have become too worn, rounded, or damaged for the correct driver bit to grip. A Phillips cross may look more like a shallow crater, an Allen socket may become nearly circular, or a Torx recess may lose the edges that allow the bit to transfer torque.
Stripping commonly happens when the wrong bit size is used, the driver is held at an angle, excessive speed is applied, or the screw is forced into hard material without a pilot hole. Soft, inexpensive fasteners are especially vulnerable. Once a bit begins slipping, continuing to pull the trigger normally makes the damage worse rather than persuading the screw to cooperate.
Stripped Head Versus Stripped Hole
These are two different problems. A stripped screw head cannot accept the driver properly. A stripped screw hole has damaged threads or torn wood fibers, so the screw spins without tightening. This article focuses on extracting a screw with a damaged head, although the empty hole may also need repair afterward.
Inspect the Screw Before Choosing a Method
Pause before attacking the fastener with the largest tool in the garage. A quick inspection will help you select the easiest removal technique.
- Is the head above the surface? Locking pliers may be the fastest solution.
- Is part of the original recess still visible? A different driver, rubber band, or abrasive material may restore enough grip.
- Is the screw rusted? Penetrating oil and light impact may be necessary before turning it.
- Is it installed in wood, metal, plastic, or an electronic device? The surrounding material determines how aggressive you can safely be.
- Is the head completely rounded or broken off? A left-hand drill bit or screw extractor is probably the better choice.
Tools and Materials That May Help
You will not need every item below. Think of this as a rescue menu rather than a shopping list assembled by an overly enthusiastic hardware store employee.
- Manual screwdrivers in several sizes
- Phillips, flathead, Torx, square, and hex bits
- Wide rubber band
- Steel wool or abrasive cleaning powder
- Locking pliers or screw-extracting pliers
- Penetrating oil
- Hammer
- Variable-speed drill
- Left-hand drill bits
- Screw extractor kit
- Rotary tool with a thin cutting wheel
- Safety glasses and work gloves
Easy Ways to Extract a Stripped Screw
1. Switch to a Manual Screwdriver
If the screw was damaged by a power drill, put the drill down. A manual screwdriver provides more control, clearer feedback, and better alignment. Select the largest driver that fully enters the remaining recess, push straight down, and turn counterclockwise slowly.
Keep the shaft aligned with the screw. Tilting the screwdriver reduces contact and encourages cam-outthe cheerful technical term for the bit escaping while ruining your day.
2. Try a Different Bit Size or Shape
The original bit may no longer match the damaged recess. Try a slightly larger Phillips bit, a flathead screwdriver that spans the remaining edges, or a Torx bit that can bite into a rounded Phillips head. A square-drive bit can also grip certain damaged recesses.
Do not hammer an oversized bit into delicate plastic or electronics. On sturdy metal or wood assemblies, however, a snug alternative bit may remove the screw before specialized tools become necessary. Several repair guides recommend changing bit types or sizes as an early, low-risk method.
3. Add Grip With a Rubber Band
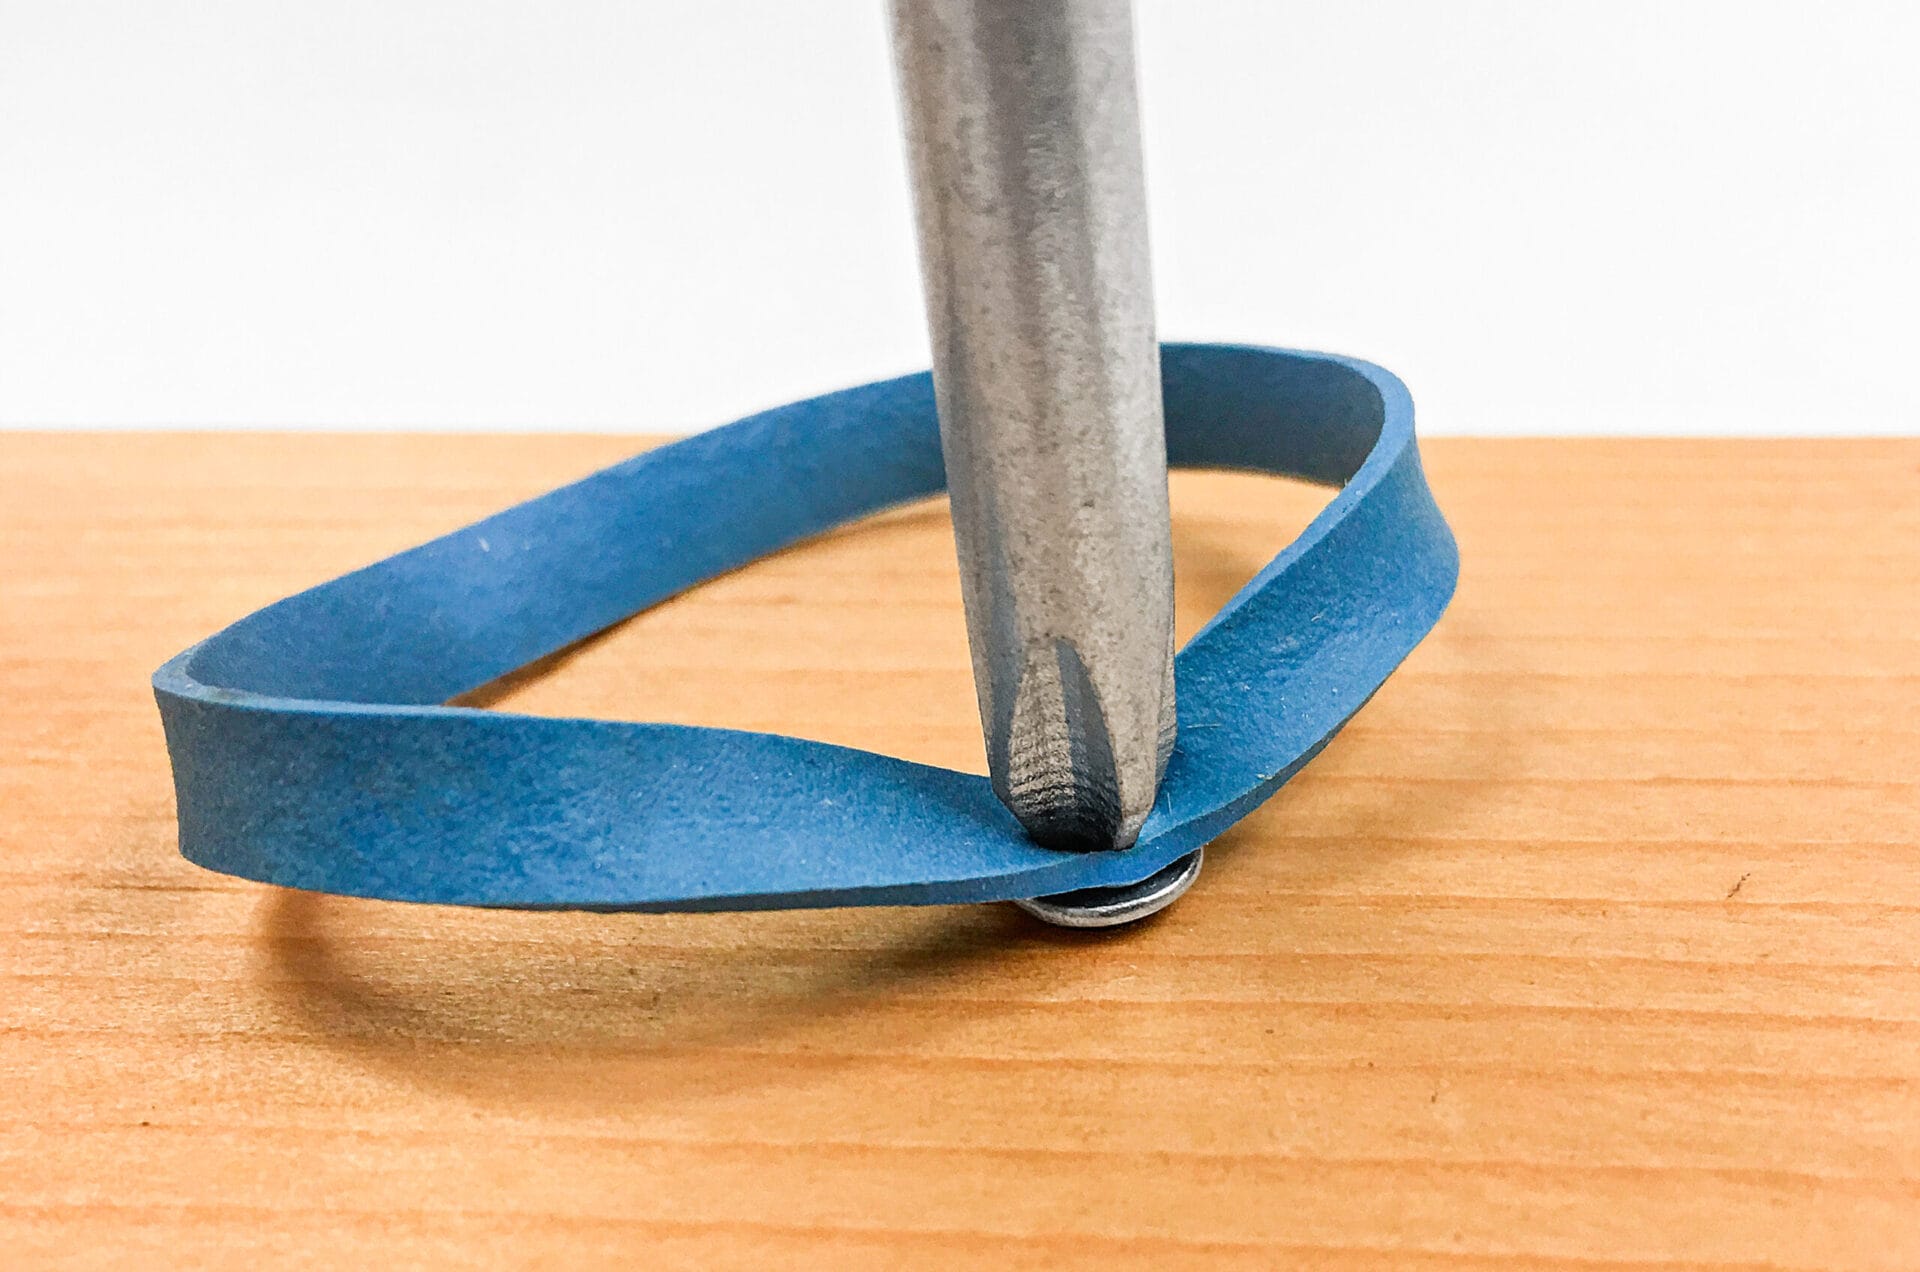
Place a wide, flat rubber band over the screw head. Press the screwdriver firmly through the rubber and turn slowly. The rubber fills shallow gaps and increases friction between the tool and the damaged metal.
This technique works best when part of the recess remains. It is less effective on a completely circular head or a screw frozen by corrosion. Use steady downward pressure rather than high speed. Family Handyman, Lowe’s, The Home Depot, and other DIY sources commonly recommend this inexpensive first-line trick.
4. Use Steel Wool or Abrasive Powder
A small piece of fine steel wool can serve the same purpose as a rubber band. Place it over the screw head, seat the driver through it, and turn carefully. The metal fibers add friction and may help the bit catch uneven edges.
A pinch of abrasive cleaning powder can also improve traction. Keep powders away from electronics, bearings, finished furniture, and other places where loose grit could create a second repair project.
5. Tap the Driver Into the Screw
Seat the best-fitting bit in the damaged recess and tap the handle lightly with a hammer. The goal is to create a tighter fit and break the bond around the threadsnot to reenact a railroad-spike competition.
After tapping, maintain downward pressure and turn the screwdriver counterclockwise. This method is useful on larger screws in sturdy materials. Avoid it near glass, brittle plastic, thin sheet metal, circuit boards, and delicate finishes.
6. Use an Impact Screwdriver
A manual impact screwdriver converts a hammer strike into rotational force while keeping the bit pressed into the screw. It can be very effective on rusted screws in machinery, outdoor equipment, motorcycles, appliances, and metal assemblies.
Choose the proper bit, set the tool to loosen, hold it square to the fastener, and strike it according to the manufacturer’s directions. The combination of downward impact and controlled rotation reduces the tendency of the bit to climb out.
7. Grab the Head With Locking Pliers
If the head protrudes above the surface, bypass the damaged recess entirely. Clamp locking pliers tightly around the sides of the screw head, keeping the jaws perpendicular to the fastener when possible. Rock the screw slightly to break it loose, then rotate counterclockwise.
If the head is nearly flush with wood, carefully remove a tiny amount of surrounding material to give the jaws access. Protect finished surfaces with thin cardboard, painter’s tape, or a metal putty knife. Locking pliers are among the most consistently recommended external-removal methods.
8. Clamp the Drill Chuck Around the Head
For a protruding screw with enough exposed head, open the chuck of a drill and position its jaws directly around the fastener. Tighten the chuck firmly, set the drill to reverse, and run it at low speed.
This trick can succeed when locking pliers slide off a beveled head. It requires adequate clearance and a drill chuck capable of gripping the screw evenly. Fine Homebuilding has documented this method for stubborn deck screws, but it should be used slowly to avoid scratching the surrounding surface.
9. Apply Penetrating Oil to Rusted Screws
When corrosion is the real problem, better grip alone may not be enough. Apply a small amount of penetrating oil around the screw head and allow it time to work into the threads. Depending on the product and corrosion level, waiting 10 to 30 minutes may help.
Tap the area lightly to encourage penetration, then retry the manual screwdriver, impact driver, or pliers. Wipe away excess oil before using tools that require friction. Do not use penetrating fluids carelessly around energized electronics, porous stone, unfinished wood, or materials that may stain.
10. Use a Left-Hand Drill Bit
A left-hand drill bit cuts while the drill rotates in reverse. As it forms a pilot hole in the damaged screw, the reverse rotation may catch the fastener and back it out automatically.
- Mark the center of the screw with a center punch when appropriate.
- Install a left-hand bit smaller than the screw shaft.
- Set the drill to reverse.
- Hold the drill square to the screw.
- Run it slowly with light, controlled pressure.
If the screw begins turning, stop drilling and continue backing it out. Centering matters: an off-center hole can damage the surrounding threads or cause the bit to wander.
11. Use a Screw Extractor Kit
A screw extractor is designed for fasteners that ordinary drivers can no longer grip. Many modern kits use double-ended bits: one end cuts or burnishes a recess, and the reverse-threaded end bites into that recess and removes the screw.
- Select the extractor size recommended for the screw.
- Place the drill in reverse if required by the kit.
- Use the cutting end at low speed to create a clean recess.
- Flip the bit to the extractor end.
- Apply firm, straight pressure while turning slowly in reverse.
Follow the specific instructions supplied with the extractor. Excessive speed can overheat the tool, enlarge the hole, or snap the hardened extractor inside the screwa development best described as the final boss of fastener problems. Toolmakers and woodworking specialists commonly describe extractor systems as a drill, flip, and extract process.
12. Cut a New Slot in the Head
If the screw head is accessible, use a rotary tool with a thin cutting wheel to create one straight slot across it. Make the cut deep enough for a flathead screwdriver but not so deep that the head becomes weak or splits.
Wear eye protection because cutting wheels and metal particles can fly. Protect nearby surfaces with a thin steel shield. Once the slot is formed, insert a correctly sized flathead screwdriver, press down firmly, and turn slowly. Both iFixit and Family Handyman describe slot cutting as an option when the original recess is beyond use.
13. Drill Off the Screw Head
This is a last-resort method when the head must be removed so the attached part can come free. Select a conventional drill bit slightly wider than the screw shaft but smaller than the outer diameter of the head. Drill straight through the center until the head separates from the shaft.
Remove the attached panel, hinge, or bracket. A portion of the screw shaft should then remain exposed, allowing it to be turned with locking pliers.
Use this method cautiously. Drilling too deeply can damage threads, enlarge mounting holes, mar the workpiece, or send the bit into hidden wiring. Disconnect power and verify what is behind the surface before drilling.
How to Remove Stripped Screws From Different Materials
Wood
Begin with a rubber band, different driver, or locking pliers. Wood allows limited excavation around a recessed head, but remove as little material as possible. After extraction, repair a damaged hole with a glued wood dowel, wooden plug, or another method appropriate to the load. Structural connections may require a longer or larger properly rated fastener rather than a cosmetic filler.
Metal
Rust and thread binding are common, so penetrating oil, impact, left-hand drill bits, and screw extractors are particularly useful. Use a center punch to keep drill bits from wandering. Slow cutting speed and suitable lubricant may reduce heat when drilling harder metals.
Plastic
Use the gentlest techniques first. Plastic can crack, melt, deform, or lose its molded threads. Start with a manual driver and extra friction. Avoid aggressive hammering and high drill speeds. If heat develops, stop and let the area cool.
Electronics
Shut down the device, disconnect external power, and remove the battery when safely possible. Use the exact precision bit and strong magnification. Keep metal dust out of the equipment, and cover nearby components before cutting or drilling.
For tiny laptop, phone, or game-console screws, ordinary workshop extractors may be too large. Precision extracting pliers, specialty micro-extractors, or professional repair may be safer than turning a small inconvenience into a damaged circuit board.
Common Mistakes That Make a Stripped Screw Worse
- Continuing at full drill speed: High speed rapidly removes the remaining edges.
- Using the wrong bit: A bit that is almost correct is frequently worse than one that is obviously wrong.
- Holding the tool at an angle: Misalignment concentrates force on a small portion of the recess.
- Applying torque without downward pressure: The bit climbs out instead of turning the screw.
- Starting with destructive methods: Cutting and drilling should follow simpler attempts, not lead the parade.
- Ignoring rust: A corroded screw may need lubrication and impact before it can rotate.
- Using worn driver bits: Rounded bits behave like tiny metal spoons and provide poor contact.
How to Prevent Stripped Screws
The easiest stripped screw to remove is the one you never strip. A few habits can prevent most problems.
Match the Bit Exactly
Test the fit before driving. The bit should fill the recess with minimal movement. Remember that Phillips and Pozidriv fasteners may look similar but are not interchangeable.
Keep the Driver Straight
Align the tool with the screw’s axis. Support long workpieces and position yourself so you can apply force directly behind the driver.
Use Low Speed and Appropriate Torque
Start slowly and reduce the drill’s clutch setting for small screws or soft metals. Stop as soon as the head is seated. More trigger does not mean more craftsmanship.
Drill Pilot Holes
Hardwood, dense composite materials, and long screws create high resistance. A correctly sized pilot hole lowers driving torque and reduces the chance of stripping or snapping the fastener.
Replace Damaged Screws and Bits
Do not reinstall a badly worn screw simply because you defeated it once. Replace it with the correct type, length, material, and drive style. Retire driver bits when their edges become visibly rounded.
Stop When the Bit Slips
The first slip is a warning. Release the trigger, check alignment, clean the recess, and reconsider the bit size. Prevention guidance from repair and home-improvement specialists repeatedly emphasizes correct bit selection, slow speed, straight alignment, and stopping when slippage begins.
Practical Experiences and Lessons From Stripped-Screw Repairs
Real repair situations demonstrate why the order of operations matters. The fastest solution is often not the most powerful tool but the method that matches the screw’s position, condition, and surrounding material.
The Cabinet Hinge That Needed Only a Better Bit
Consider a cabinet hinge secured with a worn Phillips screw. A drill bit spins in the recess, and the immediate temptation is to reach for an extractor. Yet close inspection reveals that the cross still has two usable edges. Switching to a larger manual Phillips screwdriver, pressing firmly, and turning slowly may remove it in seconds.
The lesson is simple: power tools can hide useful feedback. With a manual screwdriver, you can feel whether the bit is seated, whether the screw is beginning to move, and whether the head is deteriorating. Starting manually also reduces the risk of scratching a hinge or damaging a cabinet face.
The Deck Screw With an Exposed Head
Outdoor screws often combine two problems: a stripped recess and corrosion. If the head is standing above the board, a rubber band may be unnecessary. Locking pliers can grip the exterior of the head and avoid the recess completely.
The most effective technique is usually to clamp tightly, rock the screw a few degrees in both directions, and then begin a controlled counterclockwise turn. If it does not move, penetrating oil and patience can be more useful than squeezing the pliers harder. Once the threads break free, the screw often backs out without drama.
This scenario reinforces an important rule: use external grip whenever the head provides enough surface. There is little reason to drill into a screw that can already be grabbed from the outside.
The Rusted Appliance Screw
A screw in an outdoor appliance or metal bracket may appear stripped when corrosion is actually preventing movement. Repeatedly turning the driver can destroy the head while the threads remain locked.
A better sequence is to clean loose rust, apply penetrating oil, wait, tap the screw lightly, and use a manual impact screwdriver. Impact helps break corrosion while maintaining downward engagement. The repair takes longer than the rubber-band trick, but it is far less likely to leave a broken shaft buried in the metal.
The Tiny Laptop Screw
Small electronics require a completely different temperament. A large extractor, heavy hammer, or enthusiastic rotary tool can damage a case, battery, display cable, or circuit board.
The practical approach is to improve visibility, stabilize the device, clean debris from the recess, and try an exact precision bit with steady pressure. A thin rubber layer may help when the head is only mildly damaged. If the screw remains stuck, precision extracting pliers or a repair professional may be the sensible next step.
The lesson here is not that every screw must surrender at home. Good repair judgment includes recognizing when the value of the device exceeds the value of proving a point to a two-millimeter fastener.
The Fully Rounded Screw That Needed an Extractor
When a screw head is flush, completely rounded, and too hard to cut safely, an extractor kit becomes the logical solution. Success depends more on preparation than force. The workpiece should be stable, the selected extractor should match the fastener, and the drill should remain centered at low speed.
Many failed extractor attempts come from rushing. A crooked recess gives the extractor poor contact, while excessive speed can polish the hole instead of allowing the reverse threads to bite. A careful drill-flip-extract sequence usually produces better results than leaning into the drill as though the screw owes money.
The Most Useful Overall Lesson
Across furniture, decks, appliances, vehicles, and electronics, the same progression works well: stop the damage, inspect the fastener, improve grip, relieve corrosion, grab the exterior if possible, and drill only when simpler methods fail.
A stripped screw is rarely a reason to abandon a project. It is simply a reminder that repairs reward patience, alignment, and the occasional strategically deployed rubber band.
Conclusion
The easiest way to extract a stripped screw depends on how much of the head remains and whether it sits above or below the surrounding surface. Begin with a manual screwdriver, a better-fitting bit, or a rubber band. Move to locking pliers when the head is exposed, and use penetrating oil when rust is involved.
For severe damage, a left-hand drill bit, screw extractor, newly cut slot, or carefully drilled-off head can finish the job. Work slowly, protect the surrounding material, and stop whenever a method begins causing more damage than progress. Once the screw is removed, replace it rather than giving the battered veteran another tour of duty.