For years, desktop 3D printers have been excellent at one magic trick: adding plastic exactly where we ask them to. Layer by layer, bead by bead, they turn digital models into brackets, cosplay armor, printer mods, robot fingers, coffee accessories, and occasionally a very ambitious benchy that looks like it survived a maritime incident. But E3D’s ASMBL concept asked a wonderfully disruptive question: what if a 3D printer could also remove material while it prints?
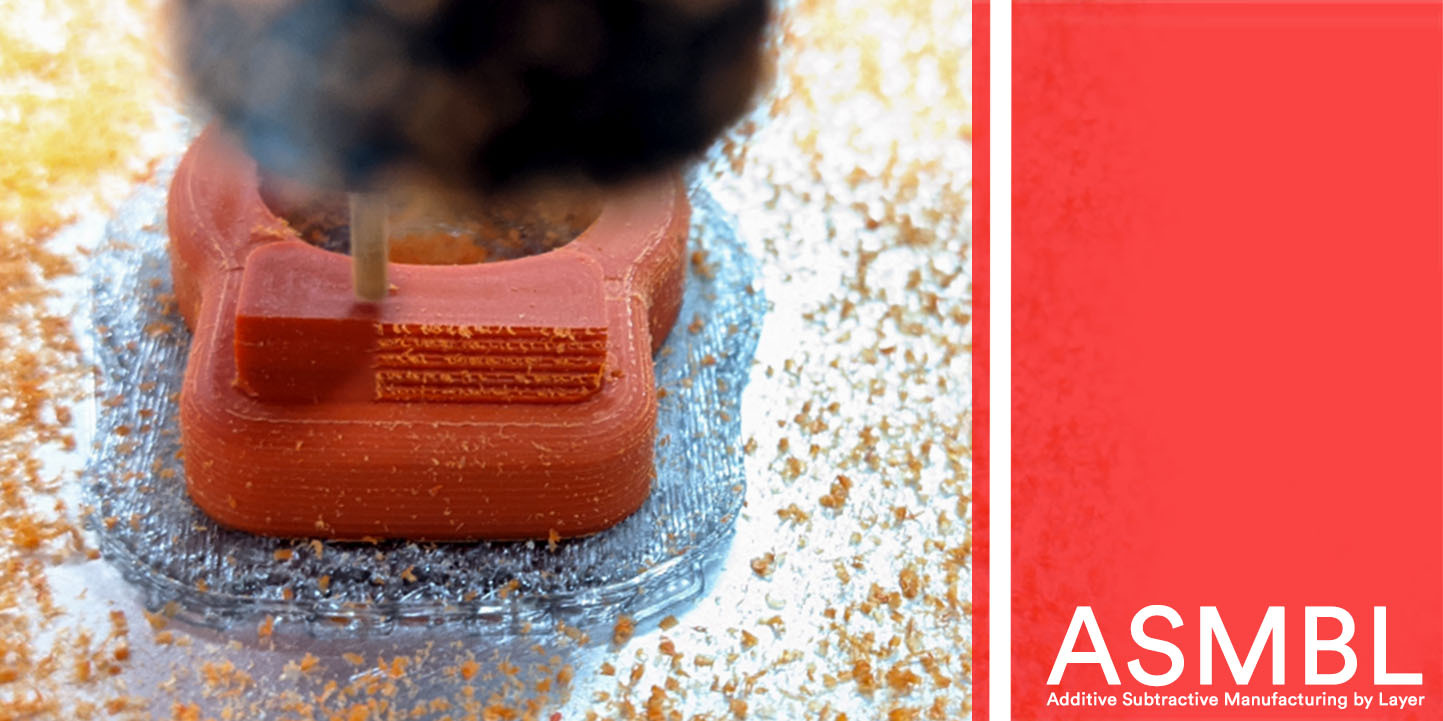
That is the clever idea behind E3D Teaches Additive 3D-Printers How To Subtract. E3D, best known for hot ends, nozzles, extrusion systems, and serious tinkering energy, explored a hybrid manufacturing approach called ASMBL, short for Additive/Subtractive Machining By Layer. Instead of waiting until a print is finished and then attacking it with sandpaper, files, knives, prayers, and questionable optimism, ASMBL combines FDM 3D printing with miniature milling in the same automated workflow.
In plain English: the printer adds plastic, then a cutting tool trims selected areas. Add, cut, add, cut. It is like teaching a pastry chef to use a lathe. Strange? Absolutely. Brilliant? Also yes.
What Is ASMBL?
ASMBL is E3D’s experiment in hybrid additive and subtractive manufacturing for desktop-style 3D printers. Traditional FDM printing builds parts by extruding molten thermoplastic through a nozzle. Subtractive manufacturing, such as CNC milling, starts with material and removes what is not needed. ASMBL combines both ideas in one coordinated process.
The system was developed around the E3D ToolChanger and Motion System, a platform designed to automatically pick up and park different tools during a job. In normal multi-tool printing, those tools might be different hot ends, materials, nozzle sizes, or support-material extruders. ASMBL takes the concept further by adding a subtractive tool: a small spindle with an end mill.
Instead of printing a full object first and machining it afterward, ASMBL can machine surfaces at intermediate stages. That matters because once a part is fully printed, some internal edges, holes, channels, or stepped surfaces may be impossible to reach. By milling as the part grows, the machine can finish features before they get buried under later layers. It is less “post-processing” and more “process-processing,” which sounds like a phrase invented by an engineer after three coffees but is genuinely important.
Why 3D Printers Need a Little Subtraction
FDM printing is wonderfully accessible, but it has a few stubborn limitations. Layer lines are the most visible. Even a well-tuned printer leaves tiny ridges where layers stack. For prototypes, that may be fine. For functional parts, mating surfaces, snap fits, bushings, and precision holes, those ridges can become annoying little gremlins.
Dimensional accuracy is another challenge. A printed hole may come out slightly undersized. A vertical wall may show ripple, ringing, or elephant’s foot near the bed. Sharp outside corners may soften because a round nozzle cannot create a mathematically sharp edge. The printer is doing its best, but it is still squeezing hot spaghetti through a tiny metal tip. Respect the spaghetti.
CNC machining excels where FDM struggles. A sharp end mill can clean up a perimeter, true a surface, open a hole to a precise diameter, and create crisper edges. Combining FDM with milling gives makers the design freedom of 3D printing and the finishing precision of subtractive manufacturing.
How E3D’s Additive/Subtractive Workflow Works
The core idea is simple, even if the execution is not. A part is sliced for FDM printing. A milling toolpath is also generated using CAM software. Then software merges the additive and subtractive G-code so the machine knows when to print and when to mill.
On the ToolChanger platform, the printer can set down the extrusion tool, pick up the subtractive tool, machine the selected surface, clear chips with local suction, park the milling tool, and resume printing. This may happen many times during a single job. The result is a part that is not merely printed, but printed and refined as it grows.
E3D’s subtractive tool used practical, maker-accessible components such as a BLDC motor, an ESC, an ER8 collet, and a small end mill. The project also leaned on Autodesk Fusion 360 for CAM toolpath generation and a plugin workflow developed to merge the subtractive paths into the FDM process. In other words, ASMBL was not just a cute hardware stunt. It also confronted the less glamorous but absolutely critical software problem: how do you choreograph two manufacturing methods without making the machine lose its tiny mechanical mind?
The Role of the E3D ToolChanger
The ToolChanger was the perfect playground for this idea because it was built for automatic tool swapping. A normal desktop printer usually carries one print head. Some carry two. The ToolChanger was designed to use several independent tools and park the ones not currently needed. That reduces problems such as inactive nozzles oozing into the print, dragging across surfaces, or adding unnecessary weight to the moving carriage.
For ASMBL, this architecture matters because the milling spindle is not something you want hanging around all the time. When printing, it should be safely parked. When milling, the hot end should not be hovering nearby like a nervous intern holding a glue gun. Tool changing lets each process use the tool it needs at the moment it needs it.
The idea also hints at a much broader future for desktop machines. A multi-tool platform can theoretically use extrusion tools, paste dispensers, inspection probes, cameras, lasers, pick-and-place heads, or subtractive spindles. The 3D printer becomes less like a single-purpose appliance and more like a small robotic manufacturing cell.
Why Milling During the Print Is Different From Sanding Afterward
Anyone who has finished an FDM part knows the usual routine. Print the object. Remove supports. Sand the surface. Sand again. Discover a corner you missed. Sand more. Prime it. Notice layer lines laughing through the primer. Sand again. At some point, you wonder whether the real product is the part or the pile of plastic dust on your desk.
ASMBL changes the timing. Instead of trying to fix every surface after the print is complete, it can machine surfaces before they become inaccessible. This is especially useful for vertical walls, holes, chamfers, and features that need cleaner geometry. The milling tool can skim the perimeter and remove small imperfections while the machine still has access.
That does not mean ASMBL makes every finishing method obsolete. Chemical smoothing, sanding, media blasting, painting, annealing, and coating all still have their place. But for parts that need mechanical accuracy rather than just cosmetic polish, cutting material with a controlled tool can be far more predictable than hand-finishing.
Benefits of Hybrid Additive and Subtractive 3D Printing
1. Cleaner Surface Finish
The most obvious benefit is improved surface quality. FDM layer lines can be reduced or removed on machined faces. Instead of relying solely on smaller layer heights, slower printing, or endless sanding, the printer can physically cut the surface to a cleaner finish.
2. Better Dimensional Accuracy
Printed holes, slots, and mating features often need extra tolerance compensation. A milling pass can bring critical dimensions closer to the intended design. For engineering parts, that can be the difference between “snaps together beautifully” and “requires a hammer and emotional support.”
3. Sharper Corners and Edges
A round nozzle naturally creates rounded features. A cutting tool can refine edges and produce sharper geometry in selected areas. This is valuable for parts that interface with other components or require crisp external profiles.
4. Access to Otherwise Hidden Features
Because machining can happen layer by layer, ASMBL can reach features that would be blocked after the print finishes. This is one of the concept’s most exciting advantages. It is not simply post-processing bolted onto a printer; it is a new way to plan the build.
5. Less Manual Labor
Manual finishing is slow, inconsistent, and occasionally turns a carefully printed part into modern art. Automated finishing inside the print workflow could reduce labor and make results more repeatable.
Limitations: Because Physics Still Has a Vote
ASMBL is clever, but it is not a magic wand. Milling plastic on a 3D printer introduces real challenges. The machine must be rigid enough to resist cutting forces. The spindle must be controlled safely. Chips must be removed so they do not contaminate the print. Tool offsets must be calibrated accurately. The CAM workflow must be reliable. The part must be supported well enough that cutting does not cause flexing, tearing, chatter, heat buildup, or delamination.
FDM parts are not solid blocks of injection-molded plastic. They contain layer bonds, infill, air gaps, shells, and anisotropic strength. Machining too aggressively can rip material instead of cutting it cleanly. The best strategy is usually light finishing passes, careful feeds and speeds, sharp tools, and a healthy respect for the fact that plastic melts when annoyed.
Material choice also matters. E3D reported promising results with engineering materials such as ASA and PEEK, including fiber-filled variants. But different plastics behave very differently under a cutter. PLA can soften with heat. PETG can be stringy. Nylon can flex. Carbon-fiber-filled materials are abrasive. Flexible filaments are basically cooked noodles with ambition. Every material needs testing.
ASMBL and the Bigger Hybrid Manufacturing Trend
Hybrid manufacturing is not new in industry. Large machines have combined additive deposition and CNC machining for metal parts, repair work, aerospace components, tooling, and high-value manufacturing. The usual industrial logic is straightforward: add material where needed, then machine the surfaces that require precision.
What makes E3D’s ASMBL fascinating is that it brought this logic down toward the desktop and maker level. It suggested that hybrid manufacturing does not have to live only inside expensive industrial equipment the size of a garage and priced like a small yacht. With clever tool changing, careful software, and open experimentation, the same principle can be explored on smaller machines.
That is a big cultural shift. Desktop 3D printing has often focused on print speed, nozzle temperature, bed adhesion, and material compatibility. ASMBL adds a more manufacturing-oriented mindset: What surfaces actually need precision? Which features should be printed near-net-shape? When should the machine cut? How should designers plan parts for both extrusion and machining?
What Designers Can Learn From E3D’s Experiment
The biggest lesson is that additive and subtractive methods are not enemies. They are teammates with different personalities. Additive manufacturing is generous and imaginative. It builds complex shapes, internal channels, lightweight structures, and custom forms. Subtractive manufacturing is picky and disciplined. It cares about tolerances, surface finish, and repeatable geometry.
When designing for a hybrid workflow, the goal is not to machine everything. That would defeat the purpose of printing. Instead, designers should identify critical faces and features. A bearing pocket, a gasket surface, a sliding rail, a bolt hole, or a snap-fit interface may deserve a milling pass. A decorative inner curve hidden inside the part probably does not.
This selective approach is powerful. Print the geometry cheaply and flexibly. Machine only what matters. That is near-net-shape thinking: create the part close to its final form, then remove a small amount of material to achieve the final specification.
Practical Examples of Where ASMBL Makes Sense
Imagine printing a small gearbox housing. FDM can create the overall shape, mounting bosses, cable channels, and lightweight internal structure. But the bearing seats need accuracy. A hybrid workflow could print the housing and then mill the bearing pockets to final size. The result is a part that benefits from both design freedom and precision finishing.
Another example is a jig or fixture. 3D printing is excellent for custom workholding because it is fast and inexpensive. But a fixture may need flat reference surfaces or precisely located holes. Milling those areas during the print could improve repeatability without machining the entire object from a solid block.
A third example is cosmetic prototyping. If a product designer wants a smooth vertical wall or crisp outer edge, ASMBL-style finishing could reduce manual sanding. Nobody became a product designer because they dreamed of sanding PLA until their fingerprints filed a resignation letter.
What Happened to the ToolChanger?
E3D later discontinued the ToolChanger and Motion System as a commercial product while continuing to focus on extrusion systems, hot ends, nozzles, and related FDM technologies. That does not make ASMBL irrelevant. In some ways, it makes the concept more interesting as a milestone. The ToolChanger showed what a modular desktop manufacturing platform could do, and ASMBL showed that tool changing could move beyond multi-color prints into genuinely hybrid manufacturing.
The project also left behind ideas, files, discussion, and inspiration for makers and machine builders. Desktop 3D printing advances through exactly this kind of experiment: someone asks a slightly unreasonable question, builds the answer, publishes enough evidence to make everyone else curious, and suddenly the community has a new direction to explore.
Is This the Future of Desktop 3D Printing?
Hybrid additive/subtractive printing will probably not replace normal FDM printing for everyday users. Most people printing drawer organizers, cosplay props, plant labels, or replacement knobs do not need a spindle toolhead. They need good bed adhesion and a printer that does not make spaghetti art at 2 a.m.
But for advanced users, engineering shops, schools, research labs, and makers building functional parts, the idea is compelling. A future desktop machine might print, mill, probe, inspect, and correct its own work. It might use toolpaths that understand both extrusion width and cutter diameter. It might automatically finish critical surfaces without requiring the user to become a part-time machinist.
That future will require better software, safer enclosures, stronger motion platforms, smarter calibration, and well-documented material settings. But the direction is clear: desktop fabrication is moving from simple printing toward integrated manufacturing.
Experience Notes: What Working Around Hybrid 3D Printing Teaches You
Anyone who has spent time around 3D printers quickly learns that the machine is only half the story. The other half is judgment. You can have the best nozzle, the fanciest slicer profile, and a filament dryer humming in the corner like a tiny appliance from a science-fiction kitchen, but if the part is poorly designed, the result will still be disappointing. Hybrid additive/subtractive thinking sharpens that judgment.
The first experience lesson is to stop treating every surface equally. On a normal FDM print, users often chase perfect quality everywhere. They lower layer height, slow the print, tune retraction, adjust temperature, and sacrifice hours to the print gods. But many surfaces do not need perfection. A hidden internal wall does not care if it has layer lines. A decorative back face may not need tight tolerance. A bearing pocket, however, absolutely does. ASMBL-style thinking encourages makers to spend precision only where precision pays rent.
The second lesson is that “printable” and “manufacturable” are not the same word wearing different hats. A model may be printable but still awkward to finish, assemble, or use. Adding subtractive capability forces the designer to think about tool access. Can the end mill reach that face? Is there enough clearance around the feature? Will the cutter collide with a wall? Is the part stiff enough when that layer is machined? These questions make you a better designer even if you never build an ASMBL machine.
The third lesson is that post-processing should be planned, not punished. Many makers treat finishing as the price paid after printing. Hybrid manufacturing turns finishing into an intentional design step. Instead of saying, “I’ll sand it later,” you ask, “Which features should be cut, when should they be cut, and how much material should I leave for cleanup?” That is a more professional mindset and a less dusty one.
The fourth lesson is humility. A 3D printer with a milling spindle sounds like a superhero machine, but it also multiplies calibration challenges. Tool offsets must be accurate. Workholding must be stable. Chip control matters. Feeds and speeds matter. Heat matters. The machine frame matters. Suddenly, the user who once worried only about nozzle clogs is learning about cutter geometry and chip evacuation. Congratulations, your printer has become a tiny machine shop, and it brought homework.
The fifth lesson is that open experimentation matters. E3D’s ASMBL project was exciting not because it instantly solved every problem, but because it made a serious concept approachable. It showed a path: use a tool-changing platform, create a subtractive tool, generate CAM operations, merge G-code, and test real materials. That roadmap gives curious builders something concrete to learn from.
Finally, hybrid printing reminds us that the future of fabrication may not be about choosing one process forever. The best workflow might be additive here, subtractive there, inspection in between, and automation tying it all together. E3D’s subtractive experiment is a reminder that progress often begins when someone looks at a machine built to add material and says, “Nice. Now teach it to remove some.”
Conclusion
E3D Teaches Additive 3D-Printers How To Subtract is more than a catchy headline. It captures a real shift in how makers and engineers think about desktop fabrication. E3D’s ASMBL concept showed that a 3D printer does not have to be limited to extrusion alone. With tool changing, CAM software, and a carefully designed milling tool, a printer can build a part and refine it during the same job.
The concept is not simple, and it is not for every user. It demands rigidity, calibration, chip control, software coordination, and material testing. But it also points toward a smarter kind of desktop manufacturing: one where 3D printing provides geometric freedom and subtractive machining delivers precision where it counts.
For hobbyists, ASMBL is an inspiring experiment. For engineers, it is a reminder to design around the strengths of multiple processes. For the future of desktop fabrication, it is a signpost. The next generation of machines may not just print faster or hotter. They may print, cut, inspect, correct, and finish. And if that sounds like a robot intern with excellent hand-eye coordination, well, the future has always been a little weird.