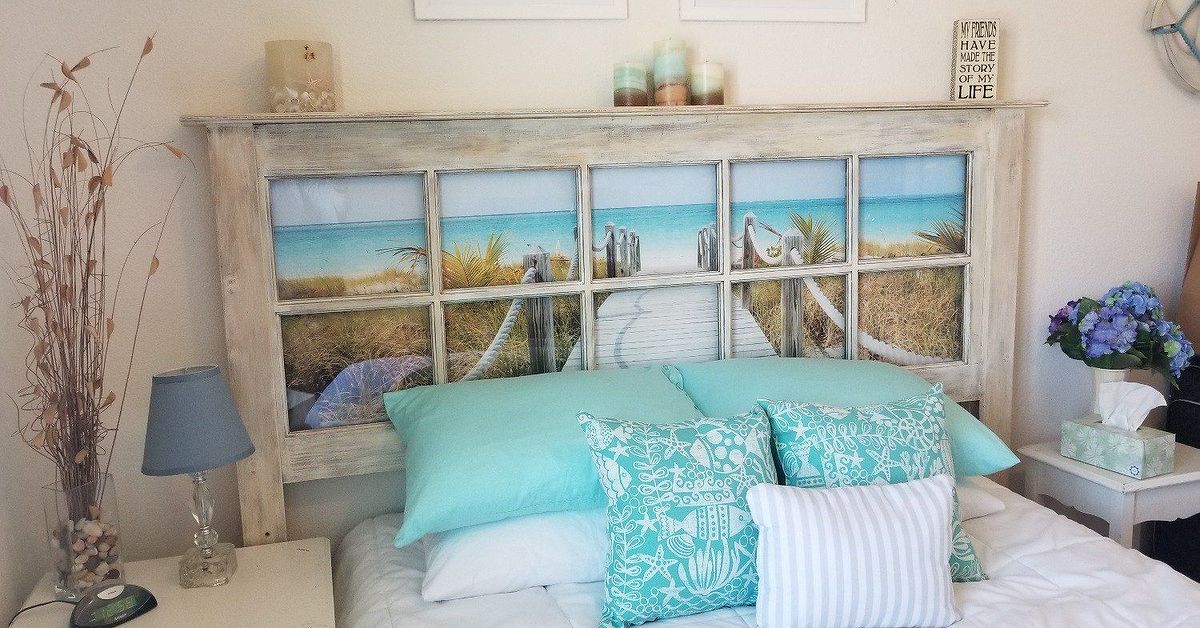
A vintage glass-pane door already has everything a memorable headboard needs: architectural detail, interesting proportions, old hardware, and enough personality to make a plain bedroom wall look dramatically underdressed. With careful restoration and secure mounting, a salvaged door can become a one-of-a-kind focal point instead of spending another decade leaning in the back corner of an architectural salvage shop.
This DIY vintage glass pane door headboard project is less about complicated woodworking and more about smart preparation. You will inspect the door, decide whether the original glass is safe to retain, preserve or refresh the finish, reinforce weak areas, and mount the finished piece securely. The result can suit farmhouse, cottage, industrial, traditional, or eclectic interiors without looking like it arrived in a cardboard box with an Allen wrench and an apology.
Why an Old Glass Door Makes Such a Striking Headboard
Standard headboards are designed to frame a mattress. A vintage door does something more interesting: it introduces architecture. Divided panes create rhythm, muntins add texture, and aged wood brings a sense of history that new lumber often struggles to imitate convincingly.
Glass also keeps a large headboard from appearing visually heavy. Instead of becoming a solid block above the mattress, the door reflects light and allows the wall color, wallpaper, fabric, or artwork behind it to remain visible. You can treat each pane as a tiny display area or leave the entire piece simple and transparent.
“`
Styles That Work Especially Well
- Farmhouse: Soft white paint, visible wear, black iron hardware, and linen bedding.
- Cottage: Muted blue, sage, cream, or pale gray with floral fabric behind the panes.
- Industrial: Dark-stained wood, clear glass, steel brackets, and exposed original hardware.
- Traditional: Restored natural wood paired with symmetrical lamps and tailored bedding.
- Eclectic: Colored panes, botanical prints, wallpaper remnants, or collected photographs.
“`
Safety Comes Before Patina
A glass-pane headboard will be positioned close to sleeping occupants, so safety should guide every decision. Do not assume that an old door is ready to hang simply because it has survived this long. Vintage objects are charming, but they are not famous for arriving with inspection stickers and installation manuals.
“`
Inspect the Wood
Set the door flat on padded sawhorses and examine both sides. Look for rot, active insect damage, separated joints, deep cracks, loose muntins, warped rails, and areas where fasteners may have split the wood. Minor cosmetic damage can add character. Structural weakness cannot.
Press gently around the glass openings and corners. The frame should feel rigid without flexing or making suspicious creaking sounds. A door with badly deteriorated joints may need professional restoration or may be better used as non-glass wall decor elsewhere.
Inspect Every Pane
Check the glass under bright light. Reject panes with cracks, star-shaped impact marks, loose edges, deep scratches, or chips extending into the pane. Old glazing putty that is powdery, separated, or missing should also be repaired.
Traditional antique glass may be ordinary annealed glass rather than modern safety glazing. Because ordinary glass can break into sharp pieces, consult a professional glazier when the glass type is unknown. A glazier can determine whether replacing the panes with tempered glass, laminated safety glass, or a clear impact-resistant alternative is appropriate.
Clear safety film may help hold fragments together in certain situations, but it should not be treated as a universal replacement for properly specified safety glazing. Follow the film manufacturer’s instructions and ask a glass professional whether it is suitable for the specific pane thickness and condition.
Check for Lead-Based Paint
Painted architectural salvage may contain old coatings, including lead-based paint. Before sanding, scraping, drilling, or applying heat, test the finish using an appropriate method or hire a qualified professional. When the age or coating history is unknown, treat the surface cautiously.
Avoid aggressive dry sanding that can spread fine dust. Isolate the workspace, wear suitable protective equipment, keep children and pets away, collect debris carefully, and clean using lead-safe practices. If the finish is stable and visually appealing, sealing it may be safer and easier than stripping it completely.
“`
Plan the Headboard Before Buying Supplies
Measure the actual width of the mattress and bed frame rather than relying only on the size printed on a label. Decide whether the door should match the mattress width, extend slightly beyond it, or span the nightstands for a dramatic wall-to-wall effect.
Most full-size interior doors work best when mounted horizontally. A single narrow door may also be mounted vertically behind a twin bed, while two matching doors can be joined or aligned behind a larger mattress.
“`
Choose the Finished Height
Mock up the door’s outline on the wall with painter’s tape. Sit against the pillows and check where your head and shoulders will rest. Glass and projecting hardware should remain above the area likely to receive direct pressure.
A practical arrangement places the lower edge behind or slightly below the top of the mattress while leaving enough visible door to create a strong focal point. Account for baseboards, electrical outlets, picture molding, lamps, and the thickness of the mounting cleat.
Decide Which Side Faces the Room
Lay the door on the floor and view both faces from several feet away. One side may have better paint, cleaner glazing, more attractive hinge marks, or an appealing old lockset. There is no rule requiring the former “front” of the door to remain the front of the headboard.
“`
Tools and Materials
Your exact supply list will depend on the condition of the door and the finish you choose.
“`
Basic Tools
- Tape measure, pencil, and level
- Stud finder
- Drill-driver and suitable bits
- Screwdrivers and small pry tools
- Putty knife or glazing tool
- Clamps and padded sawhorses
- Vacuum with an appropriate fine-dust filter
- Soft brushes, lint-free cloths, and nonabrasive pads
- Safety glasses, gloves, and suitable respiratory protection
Possible Materials
- Wood glue and clamps for loose joints
- Paintable wood filler or color-matched repair compound
- Primer, paint, stain, wax, or clear protective finish
- Replacement glazing points, clips, or compatible glazing compound
- Tempered, laminated, acrylic, or polycarbonate replacement panels
- French cleat or another properly rated mounting system
- Structural screws appropriate for the wall framing
- Lower spacers, felt pads, or rubber bumpers
- Thin plywood or fabric-covered backing, if desired
“`
How to Make a DIY Vintage Glass Pane Door Headboard
“`
Step 1: Remove Loose Hardware
Photograph the door before disassembly so you can remember where everything belongs. Remove hardware that rattles, protrudes toward the pillow area, or interferes with mounting. Bag and label screws, hinges, plates, and knobs.
Decorative hardware can be reinstalled after finishing, but avoid leaving sharp latch bolts or projecting screws where they could contact a person. A beautiful brass knob is less romantic when it introduces itself to your forehead at 2 a.m.
Step 2: Clean Without Erasing the Character
Begin with a dry, soft-bristle brush and a vacuum to remove loose dirt from corners. Follow with a lightly damp cloth and a mild cleaner suitable for the existing finish. Test any cleaning solution in an inconspicuous location.
Do not saturate old wood or flood glazing channels. Excess moisture can swell joints, loosen fragile putty, and create cloudy residue around the glass. Clean each pane carefully while supporting it from the opposite side.
Step 3: Stabilize the Frame
Repair loose but sound joints with appropriate wood glue and clamps. Fill only damage that affects safety, mounting, or the final appearance. Old hinge recesses, nail holes, and worn edges can remain visible if they suit the design.
Reinforce the back only when necessary, using wood strips or a shallow plywood panel positioned so it cannot be seen from the front. Avoid driving fasteners close to the edge of glass openings.
Step 4: Secure or Replace the Glass
If the original panes are confirmed suitable and remain stable, replace failed glazing points or clips and repair the bedding compound with materials compatible with the door. Do not force fasteners tightly against the glass; panes need secure support without concentrated pressure.
When replacing glass, have each opening measured accurately. Vintage openings are not always perfectly square, so ordering every pane from a single assumed dimension can produce an expensive stack of almost-correct rectangles.
Acrylic or polycarbonate panels can reduce weight and eliminate sharp glass fragments, although they scratch more easily and may look different from historic wavy glass. Frosted panels, mirrored inserts, cane webbing, decorative metal mesh, or thin wood panels can also replace damaged glass while preserving the divided-light pattern.
Step 5: Preserve, Paint, or Refinish the Door
Choose one of three basic approaches:
- Preserve the patina: Clean the surface, stabilize flaking areas safely, and apply a compatible clear sealer.
- Refresh the paint: Prepare the surface, spot-prime repairs, and apply a durable interior finish.
- Expose the wood: Remove the existing finish safely, sand with the grain, stain if desired, and protect with a clear topcoat.
Do not over-sand every dent and edge unless you want the door to look new. Genuine wear is difficult to recreate and easy to destroy. The goal is a clean, stable surface, not a door that appears to have undergone digital airbrushing.
Allow coatings to cure fully before bringing the headboard into the bedroom. A finish that feels dry may still release odor or remain soft enough to stick to bedding.
Step 6: Add a Decorative Backing
A removable backing panel can transform the glass sections without permanently altering the door. Cut thin plywood or rigid board slightly smaller than the door and cover it with wallpaper, linen, botanical fabric, book pages, maps, or painted artwork.
Attach the backing to the rear frame rather than directly to the panes. Leave a small air gap so the backing does not place pressure on the glass. For easy seasonal changes, secure it with turn buttons or small removable brackets.
Another option is to place individual prints behind selected panes. Use acid-free materials for valuable photographs and avoid adhesives that could damage old glass or wood.
Step 7: Install a French Cleat
A French cleat is a practical choice because it distributes weight across a wide horizontal area and allows the headboard to sit close to the wall. Use a commercial metal cleat or make a wooden version from straight, sound lumber cut at a matching angle.
Fasten the door-side cleat into substantial rails or reinforced framing, not into thin molding. Locate the wall studs and secure the wall-side cleat with structural screws suitable for the framing and total weight. Keep the cleat perfectly level.
Do not depend on small picture hooks, adhesive strips, or drywall alone for a heavy door. When studs do not align conveniently, install a properly anchored support board or consult an experienced carpenter.
Step 8: Add Lower Spacers and Anti-Lift Protection
Install matching spacers near the lower corners so the door hangs parallel to the wall. Felt or rubber pads can reduce vibration and protect painted surfaces.
Add discreet anti-lift screws, brackets, or locking clips so the door cannot be bumped upward and disengaged from the cleat. This small detail matters because beds move, pillows migrate, and humans sometimes rearrange furniture with the elegance of a forklift.
Step 9: Mount the Headboard With Help
Glass-pane doors are awkward even when they are not extremely heavy. Use at least two capable adults to lift and position the finished piece. Keep hands away from individual panes and support the wooden frame.
After hanging, verify that the cleat is fully engaged. Test for movement by applying gentle pressure to the frame in several directions. Recheck all fasteners after the bed has been used for several days.
“`
Finishing Ideas for the Glass Panes
“`
Frosted Privacy Film
Frosted film softens reflections and hides an imperfect wall while preserving the divided-pane effect. Apply it only to clean, compatible glass and keep trimming tools away from fragile glazing putty.
Fabric Behind Clear Glass
Botanical linen, ticking stripes, faded florals, and solid velvet can create a soft upholstered appearance without covering the wooden frame. Mount the fabric to a removable board so it stays smooth.
Mirror Inserts
Mirror can make a small room feel brighter, but it also increases weight and requires careful professional cutting and installation. Use safety-backed mirror products and a mounting system designed for the added load.
Pressed Botanicals and Artwork
Treat the panes like a grid of frames. Display reproductions of botanical specimens, postcards, family photographs, sheet music, or abstract color blocks. Keep the arrangement restrained so the door remains the star rather than becoming a crowded scrapbook.
Leave the Panes Clear
Clear glass may be the most effective option when the door has beautiful proportions. Paint the wall behind it a contrasting color or install subtle wallpaper so the pattern appears through the openings.
“`
Estimated Cost and Project Time
The cost varies widely because the door itself may be free, inexpensive, or an architectural antique priced as though it once belonged to a minor European monarch. The largest expenses are usually professional glass work, finishing products, and heavy-duty mounting hardware.
A sound door requiring only cleaning, sealing, and mounting may be completed over a weekend. Glass replacement, joint repairs, paint removal, or multi-coat finishing can extend the project over several days because adhesives and coatings need proper curing time.
Do not rush the mounting stage to meet a decorating deadline. A secure installation is more important than revealing the room before brunch guests arrive.
Common Mistakes to Avoid
- Keeping cracked glass for authenticity: Damage is not patina when it can cut someone.
- Dry-sanding unknown old paint: Test first and use lead-safe methods.
- Mounting into drywall alone: Attach the primary support to framing or a properly engineered anchor system.
- Ignoring the door’s weight: Weigh or conservatively estimate the complete piece, including replacement panels and backing.
- Attaching hardware near glass edges: Concentrated pressure can crack a pane.
- Leaving sharp projections: Remove or reposition latches, bolts, hooks, and knob spindles near the bed.
- Skipping anti-lift hardware: A cleat-mounted headboard should not be able to bounce free.
- Over-restoring the surface: Preserve attractive wear instead of sanding away the door’s history.
Conclusion
A DIY vintage glass pane door headboard can give a bedroom the character of custom architectural millwork without requiring you to build every detail from scratch. The door already supplies the proportions, divided pattern, texture, and history. Your job is to make those features clean, stable, safe, and securely mounted.
Inspect the wood and glass honestly, handle old paint cautiously, use professional glazing help when necessary, and attach the finished piece to structural framing. Once those essentials are covered, the decorative possibilities are wide open. Preserve the original finish, introduce color, add fabric behind the panes, or simply let the wall show through. The best version will look collected rather than manufacturedand sturdy enough that you can sleep beneath it without composing a last will and testament.
Project Experience: Lessons Commonly Learned During the Build
The most surprising part of converting a vintage glass-pane door into a headboard is how little time is spent doing glamorous decorating. Most of the project consists of inspecting, cleaning, measuring, waiting, and changing a plan that seemed flawless before the door was placed on two sawhorses. That is not a failure. It is how successful salvage projects usually unfold.
A common first lesson is that photographs hide weight. A door that looks graceful in an online listing may feel like a drawbridge when two people try to lift it. Before choosing hardware, it helps to weigh the complete door or obtain a conservative estimate. The hardware should support more than the calculated load, and the wall connection should be treated as part of the furniture rather than as a method of hanging artwork.
The second lesson is that old objects are rarely square. A builder may measure one glass opening, assume the remaining openings match, and discover that each pane varies slightly. Numbering every opening and making a cardboard template prevents expensive replacement mistakes. The same principle applies to rails, hardware recesses, and mounting locations: measure the actual object, not the object you believe ought to exist.
Cleaning also produces an important judgment call. The first pass often reveals attractive wood beneath grime, but it can also expose faded paint, patched holes, and mismatched repairs. The temptation is to continue scrubbing and sanding until everything looks consistent. In practice, stopping earlier usually preserves more character. A headboard can be clean and sealed without appearing freshly manufactured.
Another familiar experience is changing the design after testing it on the wall. A floral fabric that looked subtle on a sample may become overwhelmingly cheerful across twelve panes. A dark stain may disappear against a charcoal wall. Painter’s-tape outlines, temporary fabric panels, and phone photographs taken from the bedroom doorway make these problems obvious before anything becomes permanent.
The mounting day tends to be the least photogenic and most important part of the project. Finding the studs may reveal plumbing, outlets, or inconvenient framing. The mattress may need to move, bedside tables may need to be cleared, and the wall may collect more pencil marks than expected. Taking time to level the cleat, drill pilot holes, and verify every fastener produces a result that feels solid instead of merely appearing straight.
Once the door is mounted, small refinements become noticeable. Rubber bumpers can stop a faint rattle. A lower spacer can correct a slight tilt. One projecting screw may need trimming. The bed may need to sit an inch farther from the wall so pillows do not press against the frame. These adjustments are normal commissioning work, not evidence that the project went wrong.
The final lesson is that restraint usually wins. The old door already contains glass, grid lines, hardware marks, color variation, and texture. Adding lights, photographs, lettering, fabric, wreaths, hooks, and three shades of distressing can turn a graceful architectural feature into a craft-store traffic jam. Choosing one supporting detailsuch as linen behind the panes or a contrasting wall colorallows the vintage structure to remain the focal point.
When the project is finished properly, the greatest satisfaction comes from the balance between age and reliability. The headboard still looks as though it carries a story, but it no longer behaves like an unpredictable salvage-yard discovery. It becomes a secure, useful part of the room, which is ultimately the best outcome for any creative upcycling project.