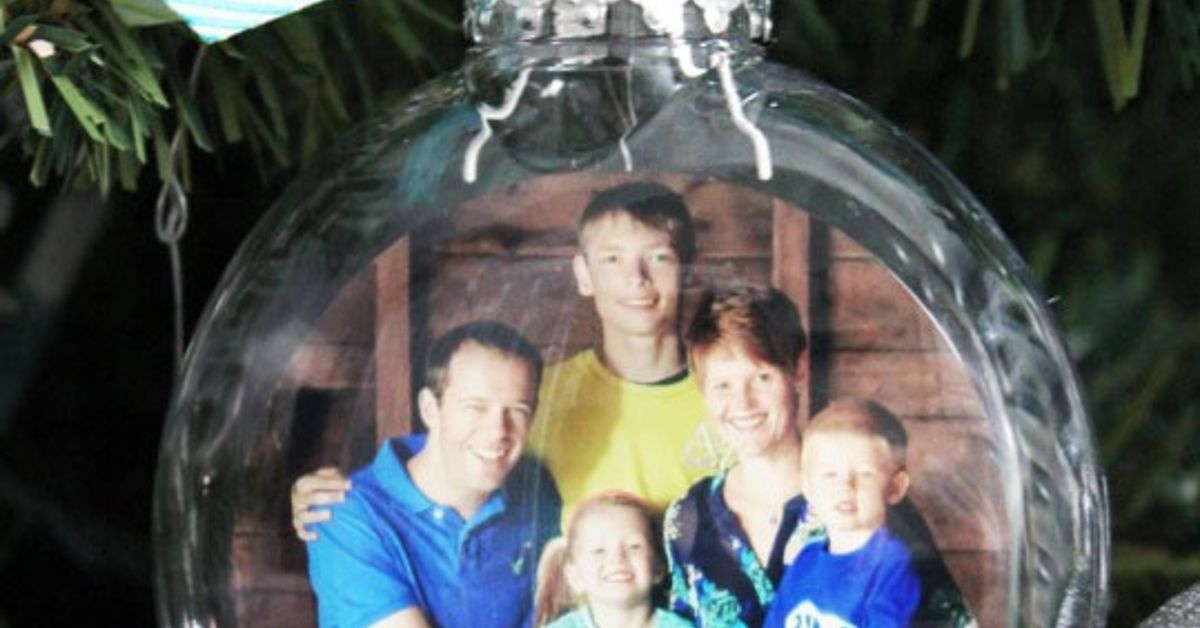
A DIY glass photo ornament turns an ordinary snapshot into the kind of holiday decoration people pause to examine. Instead of another anonymous red ball hanging between the lights, your tree can display a wedding portrait, a new baby, a beloved pet, a family vacation, or that one group photo in which almost everyone managed to keep their eyes open.
This personalized Christmas ornament is inexpensive, beginner-friendly, and meaningful enough to become a treasured family keepsake. It also makes a thoughtful handmade gift for grandparents, newlyweds, parents, teachers, and friends. Best of all, you do not need an elaborate workshop or an advanced degree in glitter management. With a clear glass ornament, a properly sized photo, and a little patience, you can create a polished decoration in one afternoon.
This guide explains how to make a glass photo ornament step by step, choose the right materials, avoid common mistakes, and customize the finished piece without making it look as though a craft store exploded inside it.
Why Make a Glass Photo Ornament?
Holiday decorations become more meaningful when they tell a story. A photo ornament can mark a milestone, preserve a memory, or honor someone important. Unlike a framed photograph that stays in the same location year-round, an ornament returns each holiday season and becomes part of a family tradition.
Clear glass also gives the project a refined appearance. Light passes through and reflects around the ornament, helping the photograph stand out among greenery and string lights. A flat glass disc offers a frame-like presentation, while a round glass ball creates a dimensional, snow-globe-inspired effect.
These ornaments can commemorate almost any occasion:
- A baby’s first Christmas
- A wedding, anniversary, or engagement
- A graduation or new home
- A favorite family vacation
- A child’s school picture
- A beloved pet
- A memorial tribute
- An annual family portrait
They are also practical gifts. A handmade photo ornament is personal without being bulky, expensive, or difficult to mail. It says, “I remembered this moment,” rather than, “I panicked in the checkout line and bought you a peppermint candle.”
Choose the Best Glass Ornament for Your Project
Flat Glass Disc Ornament
A clear flat disc is the easiest option for beginners. Its broad, relatively flat surface reduces distortion and makes it simpler to position the photograph. Disc ornaments are especially useful for portraits, wedding pictures, and images containing several people.
Choose a disc with a removable metal cap and an opening wide enough to accept a gently rolled photograph. A diameter of approximately three to four inches generally provides enough space for a recognizable image without making the ornament too heavy for a tree branch.
Round Glass Ball Ornament
A traditional glass ball creates a charming dimensional effect, but its curved surface can visually distort faces near the edges. Select a photograph with the main subject centered and surrounded by extra background space. Tight group photos are less forgiving because Uncle David may enter the ornament looking perfectly normal and emerge with a forehead shaped like a holiday ham.
Shatterproof Clear Ornament
Real glass produces a beautiful finish, but a clear plastic ornament is a sensible alternative for homes with young children, energetic pets, or hard flooring. Many shatterproof ornaments open into two halves, making photo placement significantly easier. The same decorating principles apply, although adhesive compatibility should be tested on an inconspicuous area first.
Materials and Tools
Gather everything before removing the ornament cap. This prevents the classic crafting ritual of searching the house for scissors while holding a fragile glass ball in one hand.
- One clear glass disc or ball ornament
- A high-resolution digital photograph
- Photo paper, presentation paper, or quality matte paper
- Printer or professionally printed photograph
- Paper trimmer or sharp scissors
- Flexible measuring tape or ruler
- Pencil and scrap paper
- Long tweezers or blunt craft tongs
- Wooden skewer, clean paintbrush handle, or cotton swab
- Clear-drying craft glue or decoupage medium
- Soft lint-free cloth
- Rubbing alcohol
- Ribbon, twine, or decorative cord
- Optional faux snow, glitter, confetti, vinyl lettering, or small embellishments
Place a folded towel beneath the work area. It cushions the glass, keeps the ornament from rolling, and may save the project if the ornament slips. A shallow bowl lined with a towel also makes a useful temporary holder.
How to Make a DIY Glass Photo Ornament
Step 1: Select the Right Photograph
Choose a bright, sharp image with a clear focal point. Photos with strong contrast usually remain more readable at ornament size than dark or crowded images. A portrait with one to three people is easier to crop than a large group standing across a wide landscape.
Keep important faces near the center and leave room around heads, hair, and shoulders. The ornament opening, curved glass, or decorative border may hide more of the picture than expected. Avoid placing essential details directly against the image edges.
For a vintage look, convert the picture to black and white or sepia. For a contemporary ornament, keep the original color and increase brightness slightly before printing. Small prints can appear darker than they look on a backlit phone or computer screen.
Step 2: Measure the Ornament
Measure the visible width and height of the ornament rather than relying only on the package dimensions. A three-inch ornament may have less than three inches of usable display space because of its curved sides and metal cap.
Create a paper template before printing the final image. Cut scrap paper into the approximate shape, insert it into the ornament, and adjust until it sits correctly. Mark the position of the cap, edges, and any area that becomes distorted.
This test costs almost nothing and can prevent repeated photo printing. It is the crafting equivalent of measuring twice and cutting once, except nobody has to stand in a garage looking disappointed at a piece of lumber.
Step 3: Crop and Print the Photo
Use basic photo-editing software to crop the image to the template dimensions. Print several sizes on one sheet, including one slightly smaller and one slightly larger than your measurement. Paper is cheaper than frustration.
For crisp results, use a high-resolution file and print at the final intended size. Select a printer setting that matches the paper being used. A photo-paper setting on photo paper typically produces better detail and color than a plain-paper setting.
Matte or lightweight presentation paper is often easier to roll and insert than thick glossy photo paper. Heavy paper may resist flattening inside the ornament. If using glossy paper, allow the ink to dry completely before handling it to avoid fingerprints and smearing.
Step 4: Trim and Test the Image
Cut the picture carefully with sharp scissors or a paper trimmer. Rounded corners slide through a narrow ornament opening more easily than sharp corners and are less likely to scratch the photograph.
Before applying adhesive, test the fit. Roll the picture loosely with the printed side facing inward so the image is protected during insertion. Slide it gently through the opening, allow it to unfurl, and use a wooden skewer or blunt tool to guide it into position.
Do not force the photograph. Remove it and trim a small amount if it buckles or overlaps. The image should lie comfortably against the inner surface without being crushed.
Step 5: Clean the Glass
Remove the photograph and clean the ornament before final assembly. Wipe the outside with a lint-free cloth lightly dampened with rubbing alcohol. This removes dust, oils, and fingerprints that could interfere with paint, vinyl, or exterior adhesive.
Let the ornament dry completely. Inspect it under bright light because one overlooked fingerprint can become surprisingly dramatic once surrounded by twinkle lights.
Step 6: Secure the Photograph
There are two reliable approaches. For a removable design, simply place the photograph inside and use a small amount of lightweight filler to keep it upright. For a permanent keepsake, apply tiny dots of clear-drying adhesive to the back edges of the photograph before inserting it.
Use adhesive sparingly. Thick glue can seep beyond the photograph, create cloudy marks, or trap air bubbles. A thin layer is sufficient. After inserting the image, position it with long tweezers or a clean wooden skewer and press gently against the inside of the glass.
If access to the interior is limited, place adhesive only near the top or along two side edges. The goal is to prevent movement, not to laminate the entire photograph to the ornament with enough glue to survive reentry from space.
Step 7: Add Decorative Fillers
Once the photograph is positioned, add a small amount of faux snow, fine paper confetti, metallic stars, or iridescent flakes. A folded piece of paper can serve as a miniature funnel.
Keep filler below the important part of the image. A shallow layer suggests snow; half an ornament filled with glitter suggests your family has been swallowed by a festive avalanche.
Avoid coarse sand, gravel, beads, or heavy objects inside real glass. They can scratch the photo, increase the ornament’s weight, and strike the glass when the ornament moves.
Step 8: Replace the Cap and Add a Hanger
Replace the metal cap carefully without squeezing the glass neck. Thread ribbon, velvet cord, baker’s twine, or metallic string through the loop. Tie a secure knot and trim the ends evenly.
Before hanging the ornament, hold it over a padded surface and gently test the loop. Use a sturdy tree branch rather than a thin outer tip, especially when working with genuine glass.
Creative Design Ideas
Add a Name or Date
Apply permanent adhesive vinyl to the outside of the ornament to add a surname, wedding date, birth year, or short phrase. Keep lettering simple and large enough to read. A curved ornament is not the ideal location for a twelve-line family biography.
Create a Two-Sided Ornament
Print two photographs and place them back to back. One side might feature a wedding portrait and the other the wedding date. For a baby ornament, use a photograph on one side and birth details on the other.
Use a Photo and Decorative Background
Place patterned scrapbook paper behind the photograph to hide its plain white back. Plaid, snowflakes, music notes, kraft paper, or metallic cardstock can coordinate the ornament with the rest of your holiday décor.
Make a Memorial Ornament
Choose a favorite portrait and add a restrained accent such as a white ribbon, a small paper star, or a meaningful date. Simple designs often feel more respectful and timeless than heavily decorated ones.
Turn It Into a Vacation Keepsake
Use a travel photo and add lightweight memorabilia, such as a tiny printed map, a miniature destination name, or a pinch of clean decorative sand sealed inside a small paper packet. Avoid placing damp, organic, or untreated materials inside the ornament.
Common Problems and Easy Fixes
The Photograph Will Not Flatten
The paper may be too thick or rolled too tightly. Reprint the picture on lighter matte paper and roll it loosely around a wide marker rather than a pencil. Allow the paper to relax for a minute before insertion.
The Image Looks Distorted
Curved glass magnifies the center and compresses the edges. Crop the subject more centrally, reduce the image size slightly, or switch to a flatter disc ornament.
The Glue Looks Cloudy
Some clear-drying adhesives appear milky while wet. Allow the ornament to dry according to the product directions. If cloudiness remains, too much glue may have been applied. Use tiny dots rather than a complete coating on the next attempt.
The Photo Keeps Sliding
Add a small adhesive point behind the upper edge or place a shallow layer of faux snow at the bottom for support. Two-sided photos can also be cut slightly wider so they rest gently against both sides of a flat disc.
There Are Fingerprints Inside the Glass
Wrap a lint-free cloth around a wooden skewer and carefully wipe the interior before reinserting the photograph. Avoid loose cotton that may leave fibers behind.
Glass Ornament Safety and Storage
Real glass ornaments should be handled by adults or closely supervised older children. Work over a padded surface, inspect the ornament for cracks, and discard damaged pieces. Do not use an ornament with a chipped neck because replacing the cap can cause the glass to break.
Keep breakable decorations and ornaments with small removable components out of reach of young children. Hang glass ornaments on sturdy inner branches where they are less likely to be brushed, pulled, or launched across the room by a curious cat.
After the holidays, wrap each ornament in acid-free tissue paper or a soft cloth and store it in a divided ornament box. Choose a dry, temperature-stable location. Attics, garages, and damp basements can expose photographs and adhesives to extreme conditions that encourage fading, warping, or separation.
Experiences From Making DIY Glass Photo Ornaments
The first lesson many people learn when making a glass photo ornament is that the photograph seen on a phone screen is not necessarily the photograph that works inside a three-inch glass ball. A wide family photo may look wonderful at full size, yet become a row of tiny heads once reduced. Selecting a closer portrait usually creates a more satisfying result.
Printing multiple test sizes on one page is one of the most useful habits for this project. A difference of one-quarter inch can determine whether the image sits neatly or folds against the side. During one batch of ornaments, a photograph measured perfectly according to the package label but still looked cramped inside the glass. The stated ornament size described its outside diameter, not the usable interior display area. A quick paper template solved the problem and made every later ornament easier.
Paper choice also changes the experience dramatically. Thick glossy photo paper produces rich color, but it can behave like a tiny spring after being rolled. It may open suddenly before it reaches the correct position, leaving the crafter trying to negotiate with it through an opening barely wider than a fingertip. Lightweight matte presentation paper is more cooperative. It rolls smoothly, opens gradually, and can still produce a sharp, attractive image when the printer settings are correct.
Another useful discovery is that less decoration usually looks better. It is tempting to add snow, glitter, sequins, ribbon, bells, vinyl snowflakes, and perhaps a miniature reindeer who appears to have wandered into the wrong craft. However, the photograph should remain the main feature. A small amount of faux snow at the bottom and one ribbon at the top often create a more elegant ornament than a crowded collection of embellishments.
Clear adhesive requires restraint as well. On an early ornament, applying glue across the entire back of the photo seemed like a sensible way to prevent movement. Instead, the paper became difficult to position, glue spread beyond the edges, and the glass developed cloudy patches. Later versions used only two or three tiny adhesive points. They were cleaner, easier to adjust, and just as secure once dry.
The most enjoyable part of the process is making a coordinated set. One ornament can represent each year of a child’s life, each family vacation, or every pet that has ruled the household. Using the same ornament shape and ribbon color creates visual consistency even when the photographs are completely different.
Photo ornaments also tend to inspire stories when they are unpacked. A picture that seemed ordinary when taken may become surprisingly meaningful years later. Children laugh at old hairstyles, grandparents remember forgotten details, and someone inevitably asks why the dog was wearing a sweater. This is where the project becomes more than a seasonal craft. It turns a box of holiday decorations into a small family archive.
Making ornaments as gifts offers another practical lesson: label the year. Memories are confident but not always accurate. A small date on the back prevents future debates about whether the beach trip happened in 2022 or 2023. Adding a name is especially helpful when creating ornaments for several grandchildren, classmates, or pets with suspiciously similar fur.
Finally, expect the first ornament to be the experimental one. It may require extra trimming, repositioning, or a second print. By the third ornament, the process becomes much faster. Templates are ready, the ideal paper is known, and the correct amount of filler no longer resembles a meteorological event. Save the successful template with the remaining supplies so next year’s ornament can be made without beginning the measuring process again.
Conclusion
A DIY glass photo ornament combines simple materials with a meaningful personal memory. The most successful version begins with a clear, well-cropped photograph, a carefully measured template, lightweight paper, and restrained decoration. Work slowly, use only a small amount of adhesive, and let each element dry before handling the ornament.
Whether it celebrates a wedding, a new baby, a family trip, or a pet who considers the Christmas tree a seasonal climbing gym, the finished ornament will be more memorable than a mass-produced decoration. Make one each year, and your holiday tree will gradually become a sparkling timeline of the people, places, and moments that matter most.
Note: For projects involving children or pets, use a clear shatterproof ornament instead of real glass. Always inspect glass ornaments for cracks or chipped edges before decorating or hanging them.