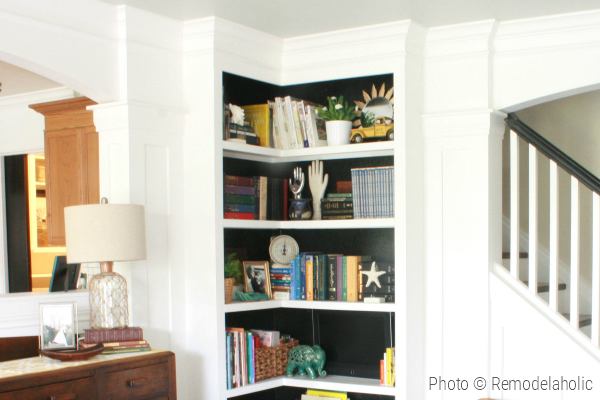
Every home has at least one awkward corner: the one where dust gathers, a lonely plant slowly questions its life choices, or a pile of “I’ll deal with that later” items becomes a permanent resident. The good news? That neglected corner can become one of the most useful, attractive, and personality-packed spaces in your home. The solution is simple, stylish, and wonderfully satisfying: build your own corner bookshelves.
DIY corner bookshelves are a smart way to add storage without stealing valuable floor space. They can turn a dead zone into a reading nook, create a home for your favorite novels, display plants and family photos, or finally give your board games a place that is not “balanced dangerously on top of the closet.” Whether you want floating corner shelves, a built-in corner bookcase, or a freestanding triangular unit, this guide walks you through the planning, materials, tools, construction steps, finishing tips, safety notes, and real-world lessons that make the project successful.
Why Build Corner Bookshelves Instead of Buying Them?
Store-bought bookshelves are convenient, but they rarely fit corners perfectly. Rooms are not always square, baseboards get in the way, and that “standard size” shelf you found online somehow manages to be both too tall and too shallow. Building your own corner bookshelves gives you control over height, width, depth, shelf spacing, finish, and style.
Custom corner shelving also makes excellent use of vertical space. Instead of crowding the room with another bulky furniture piece, you can build upward and tuck storage neatly into the angle where two walls meet. This is especially helpful in apartments, small bedrooms, home offices, nurseries, and living rooms where every square foot has a job to do.
Choose the Right Corner Bookshelf Style
Before buying lumber, decide what kind of corner bookshelf fits your room and skill level. Each option has a different look, budget, and difficulty level.
Floating Corner Shelves
Floating corner shelves are clean, modern, and ideal for lighter displays. They work well for paperbacks, plants, candles, framed photos, and small decor pieces. The key is proper support. Shelves that appear to “float” still need secure brackets, cleats, or hidden hardware fastened into studs or rated anchors.
Freestanding Corner Bookcase
A freestanding unit is a great choice if you rent or want the option to move the bookshelf later. It can be triangular, ladder-style, or L-shaped. For safety, tall freestanding bookcases should still be anchored to the wall, especially in homes with children, pets, or enthusiastic adults who think “just one more book” is a structural engineering strategy.
Built-In Corner Bookshelves
Built-ins look polished and intentional. They can run from floor to ceiling, wrap around a window, or frame a reading chair. They require more measuring, cutting, trim work, and patience, but the result can look like it came with the house. Built-in corner bookshelves also add architectural character and can increase the sense of permanence in a room.
Plan the Design Before You Cut Anything
Good shelves start with good measurements. Measure the height of the corner, the available wall width on both sides, the depth you want, and the location of outlets, vents, switches, windows, and baseboards. Corners are often not perfectly 90 degrees, so use an angle finder or make a cardboard template before cutting shelves that must fit tightly.
Think about what the shelves will hold. Books are heavier than most people expect. A shelf filled with hardcovers carries much more weight than one holding framed art and a tiny fern named Gary. If the shelves will hold heavy books, keep spans shorter, use thicker material, add a front edge, or include vertical supports.
Best Materials for DIY Corner Bookshelves
The best material depends on your budget, tools, and desired finish. Plywood, solid wood, and MDF are the most common choices.
Plywood
Cabinet-grade plywood is strong, stable, and widely used for built-ins. Three-quarter-inch plywood is a practical choice for shelves, sides, and cabinet boxes. It takes paint well and can look beautiful with hardwood edge banding if stained.
Solid Wood
Solid wood offers natural beauty and strength, especially for visible shelves. Pine is affordable and easy to work with, while oak, maple, and poplar provide more durability. Solid wood can move with humidity, so allow for seasonal expansion in certain designs.
MDF
MDF is smooth, affordable, and excellent for painted built-ins. It is heavy, creates fine dust when cut, and does not handle moisture well. It also needs proper support because long spans can sag under heavy books.
Tools and Supplies You Will Need
You do not need a professional cabinet shop to build corner bookshelves, but you do need basic tools and careful setup. A typical project may require a tape measure, level, stud finder, pencil, drill, driver bits, circular saw or miter saw, jigsaw, clamps, sander, wood glue, screws, wall anchors, shelf brackets or cleats, safety glasses, hearing protection, dust mask, primer, paint or stain, and wood filler.
For a cleaner finish, consider adding trim, edge banding, caulk, and a high-quality brush or foam roller. If you are building a built-in unit, a nailer can speed up trim installation, but screws and patience can also do the job.
Step-by-Step: How to Build Your Own Corner Bookshelves
Step 1: Sketch the Layout
Start with a simple drawing. Mark the height, shelf spacing, shelf depth, and whether the shelves will be equal on both walls or longer on one side. For books, shelf spacing of 10 to 12 inches works for most paperbacks and standard hardcovers. For art books, baskets, or decorative objects, plan a few taller openings.
Step 2: Locate the Studs
Use a stud finder to locate studs on both walls. Mark them with painter’s tape so you can see the layout clearly. Whenever possible, fasten shelf supports directly into studs. If a stud is not available exactly where you need one, use wall anchors rated for the expected weight and follow the anchor manufacturer’s instructions.
Step 3: Cut the Shelf Pieces
Cut your shelves according to your plan. For triangular corner shelves, you can cut square panels diagonally. For L-shaped shelves, cut two rectangular boards and join them at the corner with pocket screws, biscuits, dowels, or a supportive cleat underneath. Sand edges smooth with 120-grit sandpaper, then finish with 180-grit for a clean feel.
Step 4: Add Support Cleats or Brackets
Cleats are simple strips of wood screwed into the wall that support the shelves from below. Install one cleat on each wall, making sure both are level and aligned. For heavier shelves, add a front support, vertical divider, or side panel. If using metal brackets or shelving standards, make sure they are rated for the load and installed straight.
Step 5: Install the Shelves
Set each shelf onto its cleats or brackets. Check for level from front to back and side to side. Secure the shelf with screws driven from the top or underside, depending on your design. If you are building floating shelves, slide the shelf onto the hidden support and tighten any set screws according to the hardware instructions.
Step 6: Build the Face Frame or Trim
Trim transforms a basic shelf into something that looks finished. Add a front edge strip to hide plywood layers and increase stiffness. A 1×2 face frame can make shelves look thicker while helping reduce sag. For built-ins, add side trim, base trim, and crown molding so the unit blends into the wall.
Step 7: Fill, Sand, and Finish
Fill nail holes and gaps with wood filler or caulk where appropriate. Sand the surfaces lightly. If painting, apply primer first, especially on raw wood or MDF edges. Then add two coats of durable interior paint. If staining, use a pre-stain conditioner on softwoods like pine, then stain and protect with polyurethane or another clear finish.
Step 8: Anchor for Safety
Safety is not the glamorous part of bookshelf building, but it is the part that keeps your project from becoming a dramatic home video. Tall bookcases, built-ins, and freestanding units should be secured to the wall. Use anti-tip hardware, brackets, or structural screws into studs. Place heavier books on lower shelves, and avoid putting tempting toys or climb-worthy items on high shelves in homes with children.
How to Prevent Shelf Sag
Sagging shelves are the enemy of good bookshelf design. A little dip may not seem serious at first, but once the books move in, gravity begins writing its own renovation plan. To prevent sag, keep shelf spans reasonable, use thicker material, add hardwood edging, include center supports, or build torsion-box style shelves for extra stiffness.
For heavy books, avoid long unsupported shelves. If your shelf needs to run wider than about 36 to 42 inches, consider adding a vertical divider or a front edge. Plywood with a solid wood lip can be much stronger than a plain board of the same thickness. The lip acts like a beam, giving the shelf more resistance against bending.
Design Ideas for Corner Bookshelves
The Reading Nook Corner
Install shelves from waist height upward, then place a comfortable chair below. Add a small lamp, a throw blanket, and a side table. Congratulations, you have created a reading nook. Warning: productivity may decline.
The Floor-to-Ceiling Library
For a dramatic look, build shelves from the baseboard to the ceiling. Paint the unit the same color as the wall for a seamless built-in effect, or choose a contrasting color for a statement feature.
The Kids’ Book Corner
Use lower shelves for picture books, baskets, puzzles, and toys. Round over sharp edges, anchor everything securely, and keep the design sturdy. A small corner library can make reading feel special and accessible.
The Home Office Corner
Corner bookshelves are perfect for office supplies, reference books, printer paper, and decor. Add a mix of open shelves and closed baskets to reduce visual clutter. Nobody needs to see your emergency cable collection unless they have earned that level of trust.
Styling Your Corner Bookshelves
Once the shelves are built, resist the urge to pack every inch with books and objects. A beautiful bookshelf balances storage and breathing room. Mix vertical books with horizontal stacks. Add plants, framed photos, bowls, pottery, small sculptures, and boxes. Use baskets for less attractive items like chargers, remotes, notebooks, and mysterious cords that belong to devices you no longer own.
For a designer look, repeat a few colors throughout the shelves. Vary height and texture. Place heavier visual items lower and lighter pieces higher. Leave some open space so the shelves look curated instead of panicked. The goal is “personal library,” not “yard sale during a windstorm.”
Common Mistakes to Avoid
The first mistake is skipping the stud-finding step. Drywall alone is not enough for heavy shelves full of books. The second mistake is making shelves too deep. For most books, 10 to 12 inches is enough. Very deep shelves can look bulky and invite clutter.
Another mistake is forgetting baseboards. If your shelf unit sits on the floor, baseboards may prevent it from fitting flush against the wall. You can notch the back of the unit, remove a section of baseboard, or design the shelf with legs or a recessed base.
Finally, do not rush the finish. Paint and caulk are where DIY projects either become “custom built-in” or “weekend experiment with visible regrets.” Sand between coats, let finishes dry properly, and use painter’s tape carefully.
Budget-Friendly Tips
You can build attractive corner bookshelves without emptying your wallet. Use plywood for the main structure and reserve solid wood for visible trim. Buy primed boards if painting. Repurpose leftover lumber for cleats and small dividers. Consider adjustable shelf standards for flexibility, especially in a growing kids’ room or a home office where storage needs change.
If your budget is tight, start with three or four floating corner shelves rather than a full built-in. You can always expand later. DIY projects are allowed to grow in phases. In fact, most homes are held together by phased projects and optimism.
Real-Life Experience: What Building Corner Bookshelves Teaches You
Building your own corner bookshelves is one of those projects that looks simple on paper and teaches you a surprising number of lessons in real life. The first lesson is that corners lie. You may assume two walls meet at a perfect 90-degree angle, but many corners are slightly open, tight, bowed, or uneven. This does not mean your house is broken; it means your tape measure is about to develop trust issues. A cardboard template can save you from wasting lumber and saying words your neighbors should not hear.
The second lesson is that planning shelf spacing matters more than you think. At first, equal spacing seems neat and logical. Then you realize your tallest cookbooks, photo albums, or storage baskets do not fit anywhere. A smarter approach is to vary the shelf heights. Use smaller openings for novels and paperbacks, medium openings for decor, and one or two taller spaces for oversized books or display pieces. This makes the shelf more useful and more interesting to look at.
The third lesson is that sanding is not optional. It is tempting to say, “Good enough, paint will hide it.” Paint is many things, but it is not a magician. Rough edges, glue blobs, and uneven filler often become more visible after the first coat. Sanding before finishing and lightly sanding between coats can make the difference between homemade and handmade. Homemade says, “I tried.” Handmade says, “I measured twice and only panicked once.”
Another experience most DIYers share is discovering that wall studs are rarely where you want them to be. You may design a perfect layout, only to find that the strongest attachment points are a few inches away from your ideal bracket placement. This is where flexibility helps. Adjusting the shelf layout slightly, adding a longer cleat, or using a combination of studs and rated anchors can solve the problem without compromising safety.
Finishing also takes longer than expected. Cutting and assembling might happen in a day, but primer, paint, stain, and clear coat need drying time. If you install shelves too soon, the finish can scratch or feel tacky. Patience creates a tougher, smoother surface. It also gives you time to reconsider whether you really need to organize books by color, genre, height, emotional damage, or how likely you are to reread them.
The most satisfying part comes at the end, when the corner finally has a purpose. A previously empty spot becomes storage, display, and personality in one. You notice how the room feels more finished. You may even find yourself standing there with a cup of coffee, admiring the shelves like they are a national monument. That is normal. DIY pride is part of the reward.
The biggest takeaway is this: corner bookshelves do not need to be perfect to be valuable. They need to be strong, safe, level, and suited to your space. A tiny gap can be caulked. A small paint flaw can be touched up. A slightly imperfect shelf that holds your favorite books is still far better than an empty corner collecting dust and bad vibes.
Conclusion
Building your own corner bookshelves is a practical, creative, and rewarding way to make better use of your home. With careful planning, sturdy materials, proper wall support, and a little patience, you can create shelves that look custom, hold real weight, and fit your exact space. Whether you choose floating corner shelves, a freestanding bookcase, or a built-in library wall, the project adds storage and character without overwhelming the room.
Start by measuring carefully, choosing the right material, anchoring supports securely, and designing shelves around what you actually own. Finish with paint, stain, trim, and styling that matches your home. The result is more than a place for books. It is a corner with purpose, charm, and maybe even enough room for that plant that has been waiting patiently for better real estate.