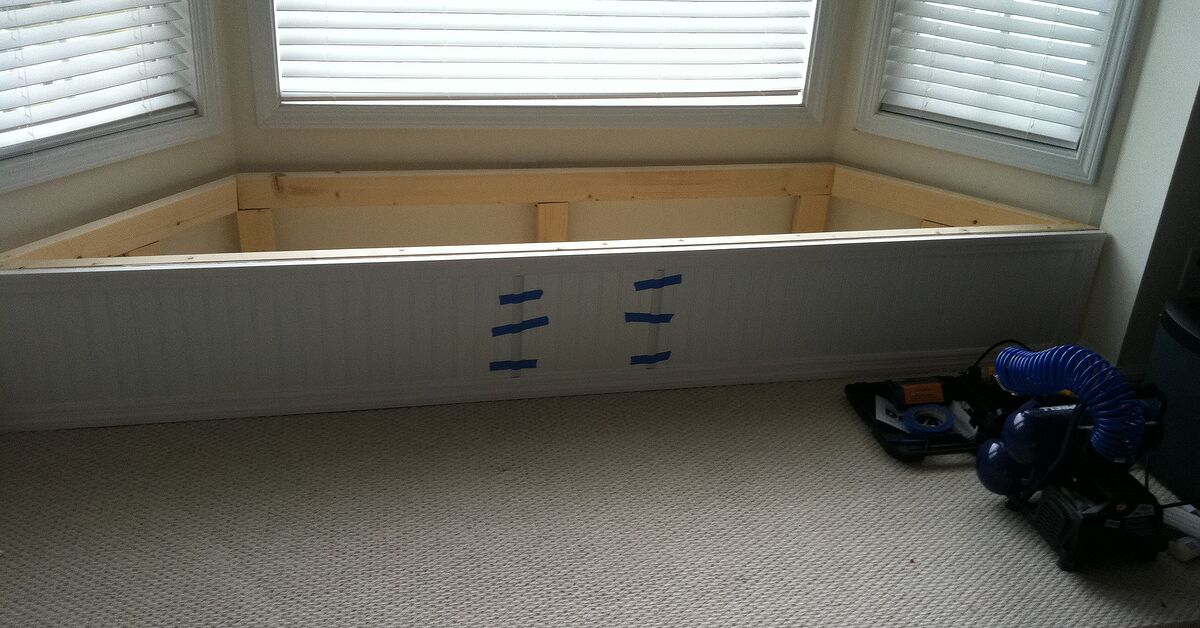
A bay window is architectural real estate with excellent lighting and, surprisingly often, no assigned job. It looks charming, collects a few plants, and eventually becomes the unofficial parking lot for laundry baskets. A bay window flip top storage bench gives that awkward space a promotion: comfortable seating above, hidden storage below, and a custom built-in appearance that makes the whole room feel more intentional.
The project is more than a wooden box with a cushion tossed on top. Bay windows rarely have perfectly square corners, floors are not always level, and a large hinged lid can become heavy enough to behave like a medieval drawbridge. A successful design balances accurate measuring, sturdy construction, comfortable proportions, safe lid hardware, and trim that hides the small irregularities every house proudly contributes.
Whether the bench will hold blankets, toys, board games, shoes, seasonal decorations, or the mysterious collection of charging cables nobody is brave enough to throw away, careful planning will turn the bay into one of the hardest-working areas in the room.
Why a Flip Top Storage Bench Works So Well in a Bay Window
Bay windows naturally create a shallow alcove, making them ideal locations for built-in seating. Designers regularly use these spaces for reading nooks, breakfast seating, bedroom lounges, and compact storage because the bench takes advantage of floor area that might otherwise be difficult to furnish.
A flip top design is especially useful when you want one large, uninterrupted storage compartment. Drawers need clearance in front of the bench, while cabinet doors can collide with nearby furniture. A hinged seat opens upward, allowing access even when a rug, ottoman, or coffee table sits nearby.
The storage cavity can also accommodate bulky items that do not cooperate with tidy little cubbies. Extra pillows, winter blankets, oversized toys, exercise equipment, and guest bedding can disappear beneath the seat without first passing an organizational audition.
Built-In Style Without Wasting Space
A well-trimmed bench can appear original to the house. Baseboard, face-frame details, wall trim, and paint help connect the new construction to the existing room. Stock cabinets can sometimes be adapted as a base, but a custom plywood box usually follows unusual bay-window angles more closely and provides a larger open compartment. This Old House and Lowe’s both present bay-window seating as a practical way to combine architectural character with storage.
Plan the Bench Before Buying Lumber
The smartest part of the build happens before the first board is cut. Bay windows may look symmetrical from across the room, but a tape measure often reveals a slightly different story. One side wall may be longer, the center window may not be perfectly centered, and the floor may rise or fall from one end to the other.
Measure the Entire Bay
Record the width along the back wall, the width across the front, the depth at the center, the length of both angled sides, and the height from the floor to the window trim. Measure at several heights because walls can lean slightly. Also locate wall studs, electrical outlets, heating registers, window cranks, curtain hardware, and any trim that could interfere with the lid.
Do not assume the left side mirrors the right side. Houses enjoy individuality, particularly when a homeowner needs two matching cuts.
Create a Full-Size Template
Cardboard, rosin paper, or several pieces of kraft paper taped together can save an impressive amount of plywood. Fit the template to the bay, trimming it gradually until the front and side edges look balanced. Leave a small installation gap near the walls; trim or a narrow bead of paintable caulk can conceal it later.
The template should represent the bench top rather than the wall itself. Decide whether the front edge will run straight across the bay or follow a more complex shape. A straight front is easier to frame, upholster, and trim, while an angled front may preserve more floor space in a small room.
Choose a Comfortable Finished Height
Many window-seat plans use a bench base around 15 inches high before adding a cushion. A two- or three-inch cushion then creates a comfortable finished seating height for many adults. Existing dining chairs or sofas can provide a useful comparison before you commit to a dimension.
Remember that an overly deep seat may feel luxurious for lounging but awkward for upright sitting. A deep bay can still work well if you add firm back pillows. Check that the cushion will not block window locks, handles, or the lower portion of operable windows.
Decide How the Lid Will Open
A single lid creates the simplest appearance, but it can become heavy on a wide bench. Dividing the top into two or three independently opening sections makes each lid easier to lift and allows someone to remain seated on one side while another compartment is opened.
Before choosing the design, check the path of the lid. It must clear window trim, blinds, shades, and the wall behind it. A narrow fixed strip along the rear of the bench can provide room for hinges and prevent the moving lid from rubbing against the wall.
Recommended Materials and Hardware
A durable bench usually combines a structural frame or cleats with a plywood cabinet. The exact materials depend on the width of the bay, the desired trim style, and whether the bench will be permanently attached.
Cabinet-Grade Plywood
Three-quarter-inch plywood is a practical choice for the sides, dividers, front panel, and lid. Cabinet-grade plywood has a smoother face than basic sheathing and requires less repair before painting or staining. Lowe’s describes higher plywood grades as smoother and better suited to furniture and cabinet work, while lower grades may contain larger knots, patches, and surface defects.
MDF can produce exceptionally smooth painted surfaces, but it is heavy and less forgiving around moisture. It can work for applied trim or a face panel, while plywood is often the more practical material for the main box and moving lid.
Framing and Fasteners
A base made from straight 2-by lumber provides a level platform and transfers the bench load to the floor. Wall cleats can be fastened into studs to stabilize the rear of the unit. Use construction screws or appropriately sized wood screws rather than relying on trim nails for structural connections.
Pocket screws, glue, dados, rabbets, or simple screwed butt joints can all work when used correctly. The goal is a rigid cabinet that does not rack when someone sits near an outer corner. Fine Homebuilding notes that window-seat construction should be strong enough to handle real-world use, including the predictable moment when someone stands on it to adjust the curtains.
Safe Hinges and Lid Supports
A standard piano hinge distributes force along the rear edge, but it does not automatically control a heavy lid. Add properly sized soft-close lid supports, torsion hinges, or lift-assist hardware that can hold the lid open and lower it gently.
Lid hardware must be selected according to the completed lid’s weight and front-to-back depth, including the cushion or upholstery attached to it. Rockler’s hardware guidance explains that deeper and heavier lids require greater inch-pound support and provides calculators for selecting suitable torsion hinges.
This is not a decorative upgrade to postpone until someday. The U.S. Consumer Product Safety Commission has warned that uncontrolled storage-chest lids can create impact, entrapment, and suffocation hazards, particularly around children. A lid support should keep the top from falling unexpectedly, and the compartment should never use an automatic locking latch.
How to Build a Bay Window Flip Top Storage Bench
Step 1: Remove or Preserve Existing Baseboard
For the most integrated result, carefully remove the baseboard from the walls inside the bay. Save reusable pieces if they match the room. After installation, the trim can be cut and returned across the front of the bench, helping the unit look like part of the architecture.
Another option is to notch the rear of the bench around existing baseboard. This saves demolition but complicates fitting and may leave wider wall gaps.
Step 2: Build and Level the Base
Construct a rectangular or trapezoidal platform from straight framing lumber. Position it slightly behind the future face of the bench so the finished trim can create a recessed toe kick or furniture-style base.
Set the platform in place and check it from front to back and side to side. Shim beneath low areas using durable composite or wood shims. Fasten the platform securely, but avoid driving screws into flooring systems, wiring, plumbing, or radiant-heating components unless their locations are known.
Step 3: Assemble the Storage Box
Cut the plywood sides, front, back supports, and internal dividers according to the template and measured opening. Assemble the cabinet in manageable sections if the bay is narrow or difficult to access.
Include at least one internal divider on a long bench. Dividers strengthen the front panel, reduce lid span, and prevent the box from flexing. They can also create separate storage zones so holiday decorations do not form an alliance with the children’s building blocks.
Dry-fit the cabinet before applying glue. Check that it sits flat, clears the window trim, and leaves room for the finished lid.
Step 4: Secure the Cabinet
Place the cabinet on the leveled base and fasten it to the platform. Attach rear cleats or cabinet supports to wall studs where appropriate. Recheck the face for straightness before adding trim because a slightly bowed front becomes much more noticeable after molding is installed.
Step 5: Add the Face Frame and Decorative Trim
A simple shaker-style face can be made with vertical stiles and horizontal rails. For a more traditional room, add panel molding or match nearby cabinet-door profiles. In a modern interior, a flat front with a small shadow-line reveal may look cleaner.
Fill nail holes, sand joints, and ease sharp edges. The front of the bench receives shoes, vacuum cleaners, toy trucks, and other forms of domestic affection, so durable trim and washable paint are worthwhile.
Step 6: Build the Flip Top
Transfer the cardboard template to the plywood lid. A small overhang at the front can provide a finger grip, but a deep overhang may put extra leverage on the hinges. Round or soften exposed corners, particularly in a narrow walkway.
For an upholstered top, attach firm foam and batting before installing the final hardware, or temporarily assemble the cushion so the lid can be weighed accurately. Cushions around three inches thick are commonly marketed for bench seating because they provide noticeable padding without making the seat excessively tall.
Step 7: Install and Test the Hinges
Follow the hardware manufacturer’s positioning instructions exactly. Soft-close supports depend on specific mounting distances and orientations. Reinforce mounting points if screws would otherwise enter only thin plywood edges.
Test the bare lid, then test it again after the cushion, fabric, pull, or trim has been installed. The lid should lift without excessive force, remain safely open, and close slowly. Open and close it repeatedly while checking for rubbing, loose screws, twisting, and pinch points.
Step 8: Prime, Paint, and Finish
Sand the bench, remove dust, prime exposed wood and filled areas, and apply a durable interior enamel or cabinet-grade paint. Painting removable lid sections separately can produce cleaner edges and prevent them from sticking to the cabinet.
For a stained bench, use matching veneer plywood and solid-wood trim so the grain looks intentional. Test stain on scraps because plywood veneer and solid lumber may absorb color differently.
Storage Organization Inside the Bench
A giant empty compartment offers flexibility but can become a dark cave where useful objects go to reconsider their life choices. Removable bins, fabric baskets, or lightweight dividers make the interior easier to manage.
- Living room: Store throws, board games, extra pillow covers, and seasonal décor.
- Bedroom: Use the compartment for spare bedding, shoes, handbags, or luggage accessories.
- Playroom: Create sections for stuffed animals, blocks, puzzles, and art supplies.
- Dining nook: Store table linens, seldom-used serving pieces, and holiday placemats.
- Home office: Hide printer paper, files, camera equipment, and technology accessories.
HGTV and Bob Vila both highlight window seating as a way to combine a comfortable nook with storage for toys or household clutter. Removable containers are especially convenient because they can be lifted out rather than requiring someone to lean deep into the compartment.
Common Mistakes to Avoid
Building Directly on an Uneven Floor
If the base is not level, the cabinet may twist, the lid gaps may vary, and the top may rub against the frame. Level the platform first rather than trying to correct every problem with finish trim.
Making One Enormous Lid
A full-width lid looks simple on paper but can be awkward in practice. It requires stronger hardware, more overhead clearance, and more effort to open. Divided lids are usually easier to control on wide benches.
Ignoring the Cushion During Planning
The cushion changes the finished seat height, lid weight, window clearance, and hinge requirements. Treat it as a structural part of the plan, not a decorative accessory selected after construction.
Blocking Airflow or Window Operation
Do not cover heating registers, return-air grilles, window locks, or required escape openings. If the bay contains an HVAC register, the bench may need a properly designed duct extension or grille in the front. Consult a qualified professional when the project affects mechanical systems, electrical outlets, or code-required window access.
Using Uncontrolled Hinges
A heavy lid with ordinary hinges can slam shut. Use appropriately rated supports and test them after all upholstery is installed. A front finger gap, rounded edge, or recessed pull can make operation easier, but these details do not replace safe lid-control hardware.
Style Ideas for the Finished Bench
Classic Painted Built-In
Match the wall trim or nearby cabinetry with white, cream, soft gray, or another established room color. Add shaker-style panels to the front and a tailored cushion in a subtle stripe or small-scale pattern.
Warm Wood Reading Nook
Use oak, maple, birch, or walnut veneer plywood with matching solid-wood edging. Add a washable cushion, two back pillows, and a wall-mounted reading light. The result feels closer to custom furniture than a conventional storage box.
Modern Minimalist Bench
Choose a flat slab front, concealed hardware, neutral upholstery, and minimal trim. A slightly recessed base can make the cabinet appear to float while still providing full support.
Family-Friendly Playroom Seat
Divide the top into smaller lids, choose performance fabric with a removable cover, and organize the storage with lightweight bins. Soft-close hardware and rounded corners are essential where young children regularly use the room.
Experience-Based Lessons From a Typical Weekend Build
The following composite project experience reflects the practical lessons that commonly emerge when building a custom bay window flip top storage bench.
The first surprise usually arrives during measuring. From the doorway, the bay appears balanced enough to satisfy a geometry teacher. Up close, the left wall may be half an inch deeper than the right, the center section may taper slightly, and the floor may rise near one corner. This is the moment when cardboard becomes the most valuable material in the workshop.
A full-size template makes the project feel less intimidating. Small pieces can be taped onto short areas and trimmed away where the paper touches the wall. After several rounds of fitting, the template begins to slide into position without buckling. That simple paper shape becomes the reference for the base, cabinet, and top, preventing three separate interpretations of the same irregular space.
The second lesson is that building the base carefully makes everything afterward easier. It is tempting to hurry because the base will eventually disappear, but a level platform determines whether the cabinet sits square and whether the lids align. Shimming one low corner may feel fussy during construction; repairing crooked lid gaps after painting feels considerably fussier.
Assembly also reveals the advantage of working in sections. A long cabinet may fit perfectly inside the bay but refuse to turn through the hallway or around the room’s furniture. Building two smaller boxes, positioning them on the base, and fastening them together can prevent a spontaneous lesson in removing door casings.
Once the cabinet is secured, the project begins to look impressive very quickly. The face frame covers plywood edges, trim hides modest wall gaps, and the bench changes from “large wooden container” to “possibly designed by someone who owns a laser level.” This stage offers the biggest visual reward for relatively little material.
The lid, however, deserves patience. On a wide bench, a single sheet of plywood can feel surprisingly heavy. Add foam, batting, fabric, and trim, and the hardware must control even more weight. Weighing the completed or temporarily assembled lid before buying supports prevents guesswork. Hardware that is too weak allows the top to fall, while hardware that is too strong can make the lid difficult to close.
Upholstery introduces another practical decision: permanent attachment versus a separate cushion. Upholstering the lid creates a clean, fitted appearance and keeps the cushion from sliding. A loose cushion is easier to remove for cleaning and allows the wooden lid to be refinished later. In homes with pets, children, snacks, or all three operating at once, a removable zippered cover often proves its worth.
Painting takes longer than expected because the bench contains many corners, edges, and surfaces that become visible when the lid opens. Finishing the interior in a light color helps stored items remain visible. Painting the lid separately also reduces the chance that fresh paint will glue the top to the cabinet with the determination of industrial adhesive.
The final installation tends to expose small details that were invisible on paper. A blind cord may need a new cleat. A pillow may interfere with a window crank. The lid may need a slightly larger rear gap after upholstery. These adjustments are normal in custom work and are easier to handle before caulking and final touch-up paint.
The best moment comes when the bench is loaded for the first time. Blankets, games, and spare pillows vanish into the storage cavity, yet the room somehow gains a comfortable seat instead of another bulky cabinet. The bay window finally has a purpose, the room feels larger, and the bench looks as though it has always belonged there.
That is the real appeal of the project. It solves several problems without advertising itself as a storage solution. It is seating, cabinetry, organization, and architecture bundled into one hardworking piece of furnitureplus a convenient place to sit while wondering why there are still three screws left over.
Conclusion
A bay window flip top storage bench can transform an underused architectural feature into a comfortable, organized, and visually polished part of the home. The strongest designs begin with a full-size template, a carefully leveled base, sturdy cabinet-grade materials, and realistic planning for the cushion and moving lid.
Most importantly, the hinge and lid-support system should be treated as essential safety equipment. Select hardware for the actual lid weight and depth, test it after upholstery is installed, and eliminate uncontrolled closing or automatic locking. With those details handled properly, the finished bench can offer years of seating and storage while looking far more expensive than the pile of plywood from which it began.